


Title Page
-
undefined
Asset ID
-
Work Order Number
-
Crew
-
Shift
-
SMU Hours
-
Start time
-
End time
General Warning
-
Tasks completed must either be PASS (no issues) or FAIL (issues found) and must include coding A/B/C/D to verify actions taken, and relevant comments to
support.
Tasks marked 'Non-Tech:' are approved to be completed by a Serviceperson
Notify Supervisor / Leading Hand of any faults / defects which are safety critical or will require
attention prior to returning the truck to production. -
Critical Defect Identified, Equipment Requires Immediate Repair - A
-
Defect Identified – RTS Completed - B
-
Minor Defect Identified and Repaired - C
-
No Defects Identified - D
Specific Hazards to be aware of:
-
undefined
Sign On:
-
Add signature
-
Authorised to Isolate
-
Competent to Maintain
-
Competent to Operate
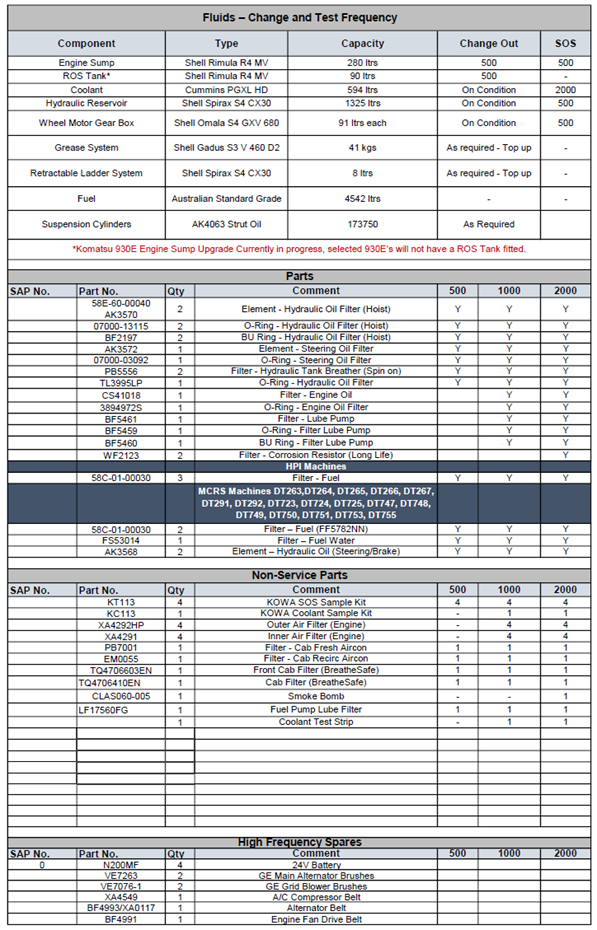
Fluids - Change and Test Frequency
Washbay to Workshop
-
Non-Tech:
Carry out brake testing as per procedure (Komatsu 930E-
4 Pre-shift Brake Test as per the Operation &
Maintenance Manual). -
Service brake
- Pass
- Fail
- A
- B
- C
- D
-
Fault details
-
Add signature
-
Add signature
-
Park Brake
- Pass
- Fail
- A
- B
- C
- D
-
Fault Details
-
Add signature
-
Add signature
-
Retarder
- Pass
- Fail
- A
- B
- C
- D
-
Retarder (DID panel displays Test System test failed)
-
Fault details
-
Add signature
-
Add signature
-
Non-Tech: Verify ladder raises when park brake released.
- Pass
- Fail
- A
- B
- C
- D
-
Details
-
Add signature
-
Add signature
-
Ladder raises and latches when park brake released.
- Pass
- Fail
- A
- B
- C
- D
-
Fault details
-
Add signature
-
Add signature
-
Check Engine for unusual noises and vibrations (include
fan drives and turbochargers). -
Belts squealing
- Pass
- Fail
- A
- B
- C
- D
-
Detail
-
Add signature
-
Add signature
-
Bearing Noise
- Pass
- Fail
- A
- B
- C
- D
-
Detail
-
Add signature
-
Add signature
-
Knocking
- Pass
- Fail
- A
- B
- C
- D
-
Add signature
-
Details
-
Add signature
-
Non-Tech: Clean air filter dust bowls (cups), ensure bowls are permitted to dry before re-installing
-
Non-Tech: Wash the fuel cooler (RH side of radiator) with a low pressure hose. Check for obstructions and clean as required.
-
Non-Tech: Clean Battery box
-
Check operation of Slow Mode system including illuminated switch and external blue cab light (Only on ID 263 - 267, 291 - 292)
- Pass
- Fail
- A
- B
- C
- D
-
Details
-
Add signature
-
Add signature
Running Checks
-
Non-Tech: SAFEmine – Hold in button for 8 second. Release and watch start up. Ensure lights flash and alarm beeps. Place finger over light sensor on face, lights must dim.
- Pass
- Fail
- A
- B
- C
- D
-
Details
-
Add signature
-
Add signature
-
Non-Tech: 2Way – Check buttons and dial on face are intact and functioning. Check speaker and face mounting. Conduct 2 way radio check. Face is clear to read. Communication through the speaker is clear
- Pass
- Fail
- A
- B
- C
- D
-
Details
-
Add signature
-
Add signature
-
Non-Tech: Check operation of all vehicle lights and horns (head / tail / clearance / brake lights / indicators / PLM / windrow / reverse). Note: Do not operate air horn in workshop
- Pass
- Fail
- A
- B
- C
- D
-
Add signature
-
Details
-
Add signature
-
Non-Tech: Check operation: - All instrument gauges and illumination. - All warning systems, alarms & reverse camera. - All vehicle controls and switches
- Pass
- Fail
- A
- B
- C
- D
-
Details
-
Add signature
-
Add signature
-
Non-Tech: Check operation of windscreen wipers and washers. Wiper blades: no visible cracks, tears or missing rubber in squeegee edge. (no smear on the windscreen) - Washer nozzles: Spray is even on the windscreen, no blockage
- Pass
- Fail
- A
- B
- C
- D
-
Details
-
Add signature
-
Add signature
-
Conduct visual inspection of tray rope Fail - external cuts/wear on rubber (>D5mm x L20mm)
- Pass
- Fail
- A
- B
- C
- D
-
Details
-
Add signature
-
Add signature
-
Non-Tech: Check all aerials for damage / security.
- Pass
- Fail
- A
- B
- C
- D
-
Details
-
Non-Tech: Check cabin for general wear or damage: · Door and Window operation.
- Pass
- Fail
- A
- B
- C
- D
-
Details
-
Add signature
-
Add signature
-
Non-Tech:
Check the operation of the A/C vents temperature and
record temp: -
Cold Temp
-
Hot Temp
-
Add signature
-
Non-Tech: Check condition of seat and operation and seat belts.
- Pass
- Fail
- A
- B
- C
- D
-
Details
-
Add signature
-
Add signature
-
Check operation of • Body up switch = light will illuminate on the dash • Hoist limit switch = cylinder travel stops x52mm before full extension. • Clean the sensing areas of any dirt accumulation and inspect the wiring for any signs of damage. • Check operation of hoist actuator linkage.
- Pass
- Fail
- A
- B
- C
- D
-
Details
-
Add signature
-
Add signature
-
Visual Inspection for movement in hoist cylinder bearings and body pivots. Check pivot pin retainer bolts. Check for adequate lubrication. Report to Supervisor if movement is >1mm
- Pass
- Fail
- A
- B
- C
- D
-
Report to Supervisor if
movement is >1mm -
LH Top measurement
-
Notify Supervisor
-
Add signature
-
Add signature
-
LH Lower measurement
-
Notify Supervisor
-
-
Add signature
-
RH Top measurement
-
Notify Supervisor
-
Add signature
-
Add signature
-
RH Lower measurement
-
Notify Supervisor
-
Add signature
-
Add signature
-
Inspect condition of tray, Inspect for cracking, damage, and missing or damaged wear package - Photos are required
- Pass
- Fail
- A
- B
- C
- D
-
Add signature
-
Turn steering wheel in both directions to check correct operation, wear, damage and security - check for nose cone, and 'dog bone' movement. Check for adequate lubrication. Nosecone Bearing Wear limits Maximum Wear Limit for Operation - 2.54 mm (0.099" inch) Raise Notification for Schedule Replacement of Bearing - 2.55 - 2.64 mm (0.x00" in - 0.x03") Stop Truck to Replace Bearing - 2.65 mm (0.x04") or greater
- Pass
- Fail
- A
- B
- C
- D
-
Measurement mm
-
Complete an RTS for change at next service
-
Add signature
-
Report to Supervisor - Bearing needs to be replaced before truck can be returned to work
-
Who Reported
-
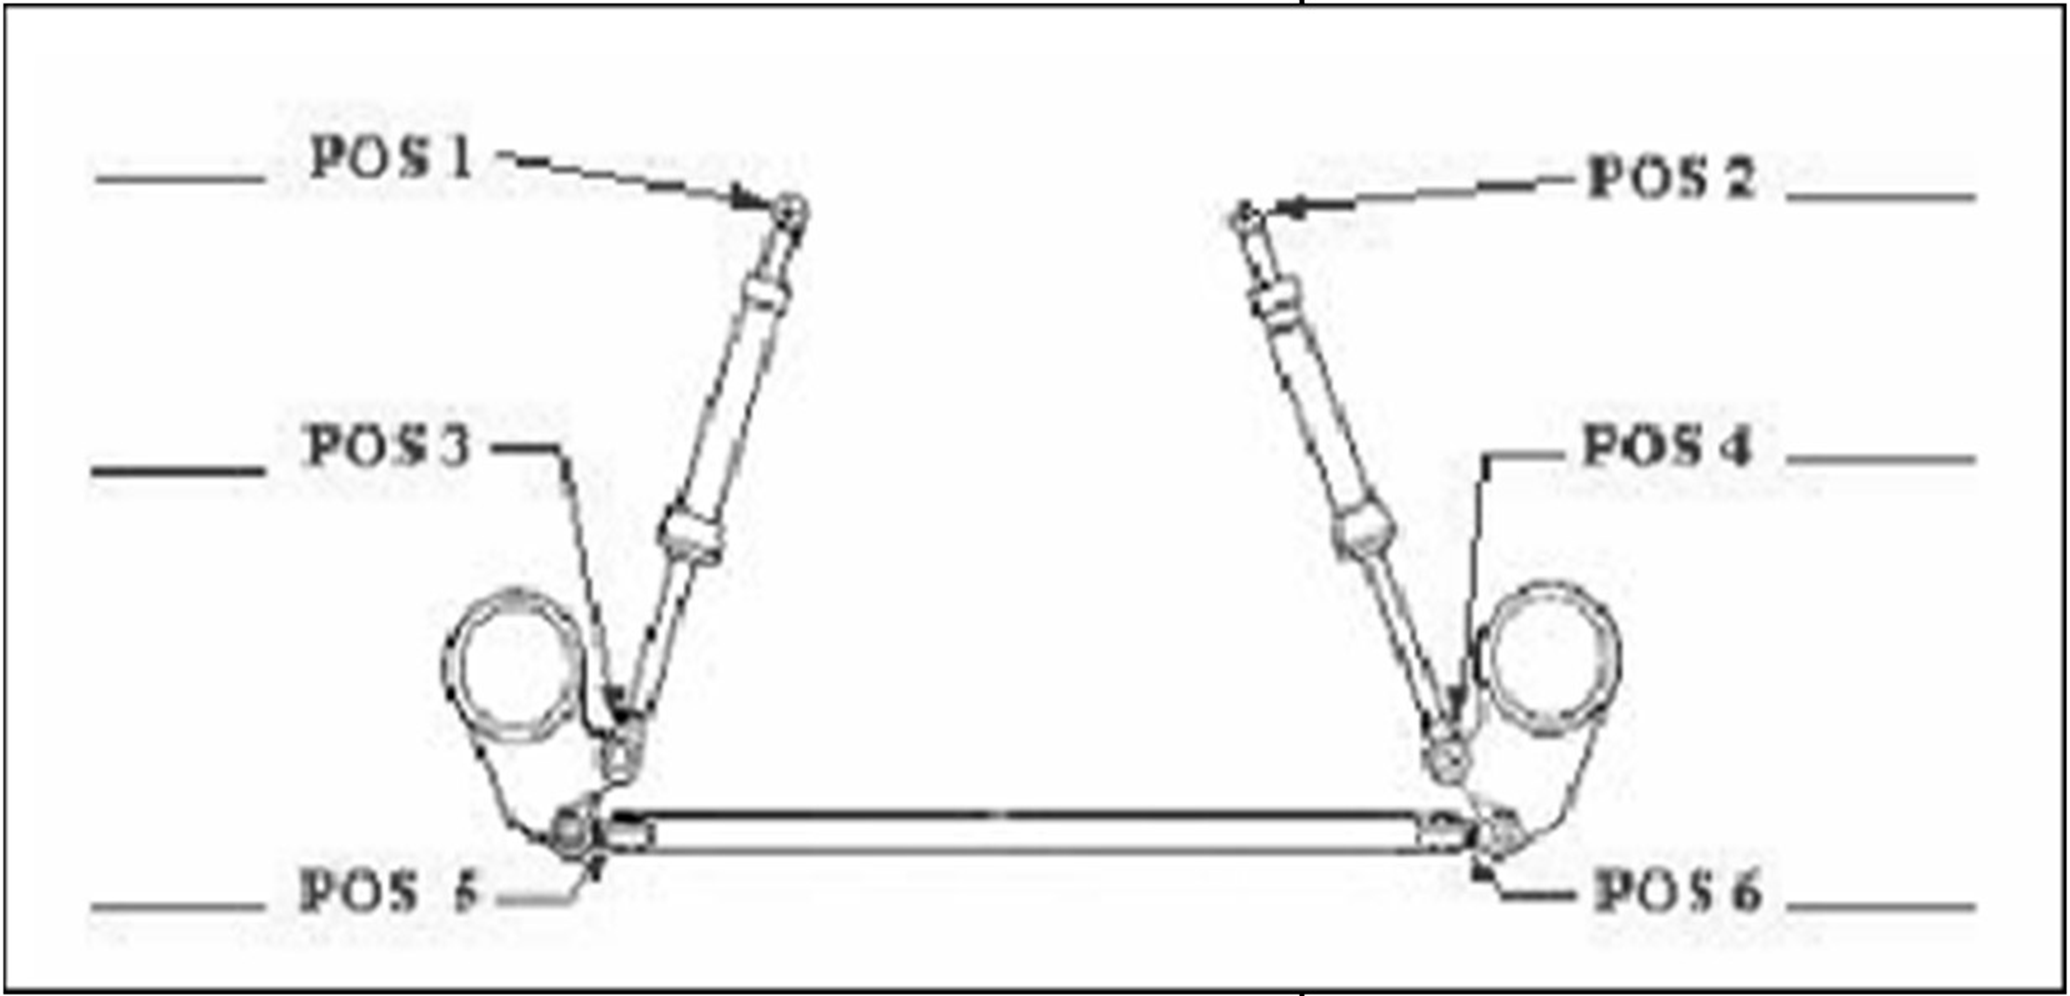
Inspect and record steering tie rod movement.
Record positions as per the diagram below.
Measure and record movement in steering linkage
bushes/bearings.
If movement exceeds 2.0 mm complete RTS, change
next service.
If movement exceeds 2.5 mm change immediately. -
Pos1 mm
-
RTS Completed
-
Requires Replacement - Notify Supervisor immediately
-
Serviceability:
- Pass
- Fail
- A
- B
- C
- D
-
Pos2 mm
-
RTS Completed
-
Requires Replacement - Notify Supervisor immediately
-
Serviceability:
- Pass
- Fail
- A
- B
- C
- D
-
Pos3 mm
-
RTS Completed
-
Requires Replacement - Notify Supervisor immediately
-
Serviceability:
- Pass
- Fail
- A
- B
- C
- D
-
Pos4 mm
-
RTS Completed
-
Requires Replacement - Notify Supervisor immediately
-
Serviceability
- Pass
- Fail
- A
- B
- C
- D
-
Pos5 mm
-
RTS Completed
-
Requires Replacement - Notify Supervisor immediately
-
Serviceability
- Pass
- Fail
- A
- B
- C
- D
-
Pos6 mm
-
RTS Completed
-
Requires Replacement - Notify Supervisor immediately
-
Serviceability
- Pass
- Fail
- A
- B
- C
- D
-
Add signature
-
Non-Tech:
Check operation of emergency shutdown system (cab
and 2x ground level emergency stop switches). -
Accumulator Discharges
- Pass
- Fail
- A
- B
- C
- D
-
Details
-
Add signature
-
Add signature
-
Check steering accumulators bleed down on shut down (90 seconds max)
-
Add signature
-
Serviceability
- Pass
- Fail
- A
- B
- C
- D
-
Add signature
-
Non-Tech: Ensure all Emergency Stop Button labelling is legible and in place
- Pass
- Fail
- A
- B
- C
- D
-
Details
-
Add signature
-
Add signature
-
Non-Tech: Ensure all Emergency Stop Buttons are: - Clearly visible and identifiable as an E-stop - Have a button that can be actuated by the palm of a person’s hand - Latch when activated
- Pass
- Fail
- A
- B
- C
- D
-
Details
-
Add signature
-
Add signature
-
Test emergency steering system as per Komatsu 930E O&M Manual. Engine running, hit emergency stop button, Key on, Wheels must turn lock to lock and back to center
- Pass
- Fail
- A
- B
- C
- D
-
Details
-
Add signature
-
Add signature
-
Check PLM strut pressures via dash panel.
Record strut pressures:
Front = 2930 kPa (425 psi +/- 43psi)
Rear = 1296 kPA (188 psi +/- 18psi) -
LH Front - Psi
-
Adjusted To
-
Add signature
-
Out of Spec - Readjust
-
Add signature
-
RH Front - Psi
-
Adjusted To
-
Add signature
-
Out of Spec - Readjust
-
Add signature
-
LH Rear - Psi
-
Adjusted To
-
Add signature
-
Out of Spec - Readjust
-
Add signature
-
RH Rear - Psi
-
Adjusted To
-
Add signature
-
Out of Spec - Readjust
-
Add signature
-
Check operation of grease pump and cycle times via
manual operation. (Override switch)
- Pressure to build up to 2000 psi in less than 120 sec.
- With grease under pressure check all injector pins
(should be retracted into body).
- Pump shut off between 2350 - 2500 psi.
- With no pressure all injector pins should be visible -
Pressure 2000 psi in less than 120 sec
-
Serviceability
- Pass
- Fail
- A
- B
- C
- D
-
Add signature
-
Serviceability
- Pass
- Fail
- A
- B
- C
- D
-
Details
-
Add signature
-
All Injector Pins Retracted
- Yes
- No
-
Add signature
-
Serviceability
- Pass
- Fail
- A
- B
- C
- D
-
Details
-
Add signature
-
Pump Shutoff 2350 - 2500 psi
-
Adjusted To
-
Out of Spec - Readjust
-
Add signature
-
Add signature
-
No Grease Press Injector Pins Visible
- Pass
- Fail
- A
- B
- C
- D
-
Details
-
Add signature
-
Add signature
-
Non-Tech:
Take the Scheduled Oil Samples (SOS) using KOWA
sample bottles.
- Ensure Machine is at Operating Temperature prior to
Live sampling.
- Complete Live sampling where possible. -
Non-Tech: Take KOWA Diesel Engine Oil sample
-
Non-Tech: Take KOWA Hydraulic Oil sample
-
Non-Tech: Take KOWA LH Wheel Motor Oil sample
-
Non-Tech: Take KOWA RH Wheel Motor Oil sample
Mechanical Engine Checks
-
Position truck and isolate, as per BCO Isolation Procedure – Before Performing
Maintenance (Sec 3-12). Ensure all accumulators are bled down -
Non-Tech: Attach Kidney machine to LH wheel motor (Duration 4hrs - kidney loop through component) Refer to Manual FM40440 for installation and operation
-
Attached by
-
Time finished
-
Detached by
-
Non-Tech: Attach Kidney machine to RH wheel motor (Duration 4hrs - kidney loop through component) Refer to Manual FM40440 for installation and operation
-
Attached by
-
Time finished
-
Detached by
-
Non-Tech: Change Engine Oil in Sump and ROS Tank.
-
Non-Tech: Change primary fuel filters. (2 x FF5782NN) Change fuel water seperator filter (1 x FS53014) if fitted.
-
Non-Tech: Check radiator coolant level and top-up if required.
-
Inspect crankcase breathers for damage and breather tubes for damage and restrictions.
- Pass
- Fail
- A
- B
- C
- D
-
Details
-
Add signature
-
Add signature
-
Inspect Alternator belt condition, no cracks or misalignment. Belt tensioner working correctly.
- Pass
- Fail
- A
- B
- C
- D
-
Details
-
Add signature
-
Add signature
-
Check engine fan belt for condition and alignment and Tensioner working correctly.
- Pass
- Fail
- A
- B
- C
- D
-
Details
-
Add signature
-
Add signature
-
CHECK the fan clutch for leaks and mounting bolts for integrity. Check fan spider for cracks and loose hardware.
- Pass
- Fail
- A
- B
- C
- D
-
Details
-
Add signature
-
Add signature
-
Inspect engine for fuel, oil and water leaks. Remove any oil/rags/build up of material.
- Pass
- Fail
- A
- B
- C
- D
-
Details
-
Add signature
-
Add signature
-
Check water pump for tell-tale coolant leakage. No leaks or weeps
- Pass
- Fail
- A
- B
- C
- D
-
Details
-
Add signature
-
Add signature
-
Check all engine area hoses for general condition (damage, leaks, chaffing, security)
- Pass
- Fail
- A
- B
- C
- D
-
Details
-
Add signature
-
Add signature
-
Check cooling system hoses for damage and signs of leaks and deterioration.
- Pass
- Fail
- A
- B
- C
- D
-
Details
-
Add signature
-
Add signature
-
Check condition of radiator (Check mounts, upper radiator stabilisers, lower radiator stabilizers and shroud bumpers, clamps, fan, guard for damage and tightness. Check radiator cap, relief valve operation).
- Pass
- Fail
- A
- B
- C
- D
-
Details
-
Add signature
-
Add signature
-
Check all guards for damage and security.
- Pass
- Fail
- A
- B
- C
- D
-
Details
-
Add signature
-
Add signature
-
Check engine mounts for wear and security. Check Engine "seats" in the middle of mounts.
- Pass
- Fail
- A
- B
- C
- D
-
undefined
-
Add signature
-
Add signature
-
Non-Tech: Manually grease front engine mount trunnion
-
Check exhaust component system for leaks: - turbochargers - exhaust manifolds - exhaust pipe work - mufflers Report any leakage to your supervisor
- Pass
- Fail
- A
- B
- C
- D
-
Details
-
Add signature
-
Add signature
-
Non-Tech: Check Turbo & Exhaust component Lagging for damage, condition and security – Report defects to your Supervisor
- Pass
- Fail
- A
- B
- C
- D
-
Details
-
Add signature
-
Add signature
-
Inspect Turbo Feed & Drain Lines for chaffing, rubbing, general condition, orientation away from lagging and security. Inspect clamps and fasteners are in place and secure.
- Pass
- Fail
- A
- B
- C
- D
-
Details
-
Add signature
-
Add signature
-
Check engine air intake mounting hardware, joints and connections. Ensure that there are no air leaks and all tubes, hoses and clamps are secure and air tight to prevent dirt entry.
- Pass
- Fail
- A
- B
- C
- D
-
Details
-
Add signature
-
Add signature
-
ROS System, HPI Engines Only Examine all hoses, including those on the reserve tank and the ones leading to and from the engine. Check for leaks, cracks or other damage. Check all fittings for tightness, leakage or damage.
- Pass
- Fail
- A
- B
- C
- D
- N/A
-
Details
-
Add signature
-
Add signature
-
Check all fuel tank and all fuel lines for damage, wear and security.
- Pass
- Fail
- A
- B
- C
- D
-
Details
-
Add signature
-
Add signature
-
Check fuel tank mounts for loose or broken bolts, as well as for cracks around mounting areas.
- Pass
- Fail
- A
- B
- C
- D
-
Details
-
Add signature
-
Add signature
Mechanical Air Conditioning System
-
Non-Tech: Replace A/C filters (Cab Air & Recirc). (1x P/N PB7001; 1x P/N EM0055). Clean cab air conditioner filter mesh. Check and clean evaporator condensation drain.
-
Inspect A/C compressor for any leaks and for loose or broken mounting bolts and no cracks or damage to brackets / guards. No leaks or weeps. Clamps are in place and secure. Hose / Pipes are not chaffing or rubbing.
- Pass
- Fail
- A
- B
- C
- D
-
Details
-
Add signature
-
Add signature
-
Check A/C compressor belts for condition, cracking and wear.
- Pass
- Fail
- A
- B
- C
- D
-
Details
-
Add signature
-
Add signature
-
Check / Wash A/C condenser with a low pressure hose, ensure no dirt build-up and leaks. Ensure the Air/Con cab drains are clear of any obstructions.
-
Inspect all A/C and heater hoses for damage, wear, and leaks, and loose or missing hold down clamps. Check for rubbing or chaffing of hoses.
- Pass
- Fail
- A
- B
- C
- D
-
Details
-
Add signature
-
Add signature
-
Inspect door strikers, door seals and windows for any damage and wear.
- Pass
- Fail
- A
- B
- C
- D
-
Details
-
Add signature
-
Add signature
Mechanical Hydraulics
-
Non-Tech: Change hydraulic tank breathers. (2x P/N PB5556) Check area around breathers is clean and free of debris.
-
Non-Tech: Change hoist high-pressure filter element, O-Ring and Back-Up Ring. (2x P/N 58E-60-00040; 2x P/N BF2196; 2x P/N 07000- 13115)
-
Non-Tech: Change steering high-pressure filter element. (1x P/N AK3572; 1x P/N 07000-03092)
-
Non-Tech: MCRS machines only Change steering/brake filter elements(2x P/N AK3568)
-
Non-Tech: Change hydraulic filter O-ring (1x P/N TL3995LP)
-
Non-Tech: Grease hydraulic pump drive shaft universal joints. Add one or two applications of grease to each grease fitting. Hand grease gun only Non - Moly grease only. Shell GADUS S3 V220C 2
-
Check hydraulic system for leaks. - Check tanks, tap / valves fully operational (open / close) - Check pumps for leaks and damage. - Check condition of hoses for rubbing, chaffing, orientation and leaks. - Check security of hose clamps and fasteners.
- Pass
- Fail
- A
- B
- C
- D
-
Details
-
Add signature
-
Add signature
-
Check all cylinders condition for (Leaks, Weeping,
Chrome Pitting, Scored or Rod Damage) -
RH Steer :
- Pass
- Fail
- A
- B
- C
- D
-
Comment:
-
Add media
-
Add signature
-
Add signature
-
LH Steer :
- Pass
- Fail
- A
- B
- C
- D
-
Comment:
-
Add media
-
Add signature
-
Add signature
-
RH Hoist :
- Pass
- Fail
- A
- B
- C
- D
-
Comment:
-
Add media
-
Add signature
-
Add signature
-
LH Hoist :
- Pass
- Fail
- A
- B
- C
- D
-
Comment:
-
Add media
-
Add signature
-
Add signature
-
Pos 1 Strut :
- Pass
- Fail
- A
- B
- C
- D
-
Comment:
-
Add media
-
Add signature
-
Add signature
-
Pos 2 Strut :
- Pass
- Fail
- A
- B
- C
- D
-
Comment:
-
Add media
-
Add signature
-
Add signature
-
Pos 3 Strut :
- Pass
- Fail
- A
- B
- C
- D
-
Comment:
-
Add media
-
Add signature
-
Add signature
-
Pos 4 Strut :
- Pass
- Fail
- A
- B
- C
- D
-
Comment:
-
Add media
-
Add signature
-
Add signature
-
Check hydraulic tank and mounts for wear, damage and security. Check tank sight glass is clean
- Pass
- Fail
- A
- B
- C
- D
-
Details
-
Add signature
-
Add signature
-
Non-Tech: Check hydraulic oil level, and top-up if required.
Mechanical Steering System
-
-
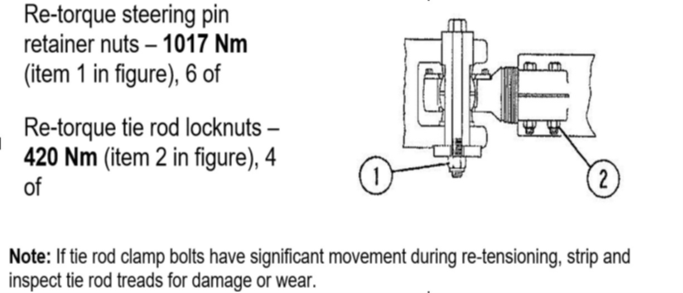
Check torque on the pin retaining nuts located on the steering linkages. Re-torque steering pin retainer nuts – 1017 Nm (750 +/- 75lb ft) (item 1 in figure), x 6 in Image 5
- Pass
- Fail
- A
- B
- C
- D
-
Details
-
Add signature
-
Add signature
-
Check complete steering systems for leaks. - Visually inspect all steering hoses for damage and condition. - Ensure all hoses are secure, all clamps are installed and in good condition. - Check tank, valves and pumps.
- Pass
- Fail
- A
- B
- C
- D
-
Details
-
Add signature
-
Add signature
Mechanical Brake System
-
Check front and rear brake hubs for oil leaks, damaged hoses and pipes. - Clamps are in place and secure. - Hose / Pipes are not chaffing or rubbing
- Pass
- Fail
- A
- B
- C
- D
-
Details
-
Add signature
-
Add signature
-
Measure the amount of disc wear on both parking brake
assemblies as follows:
Measure park brake wear with park brake applied as per
the workshop manual.
a. Insert a depth micrometre through each piston hole
and record measurement depths.
b. Add the three measurements and divide the total by
3 to determine the average.
c.I f the resulting measurement is equal to or greater
than 24mm the parking brake assembly must be
removed and rebuilt.
d. If the result is equal to or greater than 23mm fill
out RTS to replace at next service.
Notify Supervisor Immediately if :
Average measurement >24mm = remove and rebuild
assembly.
Park Brake Rebuild Kit P/N: 58F-BK-AK060 (#173595)
Dowel Park Brake P/N: VG7407 (#174087) -
Record measurements in mm
-
LHS 1
-
LHS 2
-
LHS 3:
-
LH Average mm (L1+L2+L3)/3
-
Complete an RTS to have changed at next service. Code as PASS - B
-
LH Park Brake Serviceability
- Pass
- Fail
- A
- B
- C
- D
-
Add signature
-
Park Brake is U/S. Must be replaced. Code as FAIL - A
-
LH Park Brake Serviceability
- Pass
- Fail
- A
- B
- C
- D
-
Add signature
-
In Spec
-
LH Park Brake Serviceability
- Pass
- Fail
- A
- B
- C
- D
-
Add signature
-
RHS 1:
-
RHS 2:
-
RHS 3:
-
RH Average mm (R1+R2+R3)/3
-
Complete an RTS to have changed at next service. Code as PASS - B
-
RH Park Brake Serviceability
- Pass
- Fail
- A
- B
- C
- D
-
Add signature
-
Park Brake is U/S. Must be replaced. Code as FAIL - A
-
RH Park Brake Serviceability
- Pass
- Fail
- A
- B
- C
- D
-
Add signature
-
In Spec
-
RH Park Brake Serviceability
- Pass
- Fail
- A
- B
- C
- D
-
Add signature
-
Check complete brake system for leaks. - Inspect all hoses and piping, valves and pumps. - No leaks or weeps, clamps and hardware in place and secure.
Mechanical Wheel Motors, Axle Box, Spindle and Tyres
-
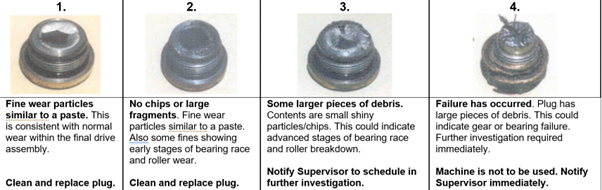
Non-Tech:
Remove and inspect front wheel hub magnetic plugs.
Record contamination rating as per attached
MAGNETIC PLUG INSPECTIONS sheet:
Notify Supervisor if abnormal amount of material is
found on any plugs (and record condition by taking
a photo).
Clean plugs prior to reinstalling. -
LHF Contamination Rating:
- 1
- 2
- 3
- 4
-
Add signature
-
Add media
-
Add signature
-
Non-Tech:
Remove and inspect front wheel hub magnetic plugs.
Record contamination rating as per attached
MAGNETIC PLUG INSPECTIONS sheet:
Notify Supervisor if abnormal amount of material is
found on any plugs (and record condition by taking
a photo).
Clean plugs prior to reinstalling. -
RHF Contamination Rating:
- 1
- 2
- 3
- 4
-
Add signature
-
Add media
-
Add signature
-
Non-Tech:
Remove and inspect wheel motor gear case mag plugs.
Record contamination rating as per attached
MAGNETIC PLUG INSPECTIONS sheet:
Notify Supervisor if abnormal amount of material is
found on any plugs (and record condition by taking
a photo).
Clean plugs prior to reinstalling. -
LH WM Contamination Rating:
- 1
- 2
- 3
- 4
-
Add signature
-
Add media
-
Add signature
-
Non-Tech:
Remove and inspect front wheel hub magnetic plugs.
Record contamination rating as per attached
MAGNETIC PLUG INSPECTIONS sheet:
Notify Supervisor if abnormal amount of material is
found on any plugs (and record condition by taking
a photo).
Clean plugs prior to reinstalling. -
RH WM Contamination Rating:
- 1
- 2
- 3
- 4
-
Add signature
-
Add media
-
Add signature
-
Non-Tech: Check oil level in LH and RH wheel motor gear cases (After Kidney Loop process is complete.) Shell Omala S4 GXV 680
-
Non-Tech: Replace LH and RH Wheel Motor Breather elements
-
Visually check for broken or missing bolts. No missing or broken bolts on Axle mounting box.
- Pass
- Fail
- A
- B
- C
- D
-
Details
-
Add signature
-
Add signature
-
Check for oil leaks around Duo seals and mounting plates. No leaks or weeps
- Pass
- Fail
- A
- B
- C
- D
-
undefined
-
Add signature
-
Add signature
-
Check axle box for grease or oil leakage
- Pass
- Fail
- A
- B
- C
- D
-
Details
-
Add signature
-
Add signature
-
Visual Inspection of axle box, check for cracking or damage.
- Pass
- Fail
- A
- B
- C
- D
-
Details
-
Add signature
-
Add signature
-
Check front wheels for loose damaged or missing nuts and studs. Use a Torch and mirror on a long rod to inspect all inner and outer wheel mounting nuts and studs
- Pass
- Fail
- A
- B
- C
- D
-
Details
-
Add signature
-
Add signature
-
Inspect nose cone for signs of cracking or excessive movement. Report any defect immediately.
- Pass
- Fail
- A
- B
- C
- D
-
Details
-
Add signature
-
Add signature
Mechanical Fire Control System
-
Non-Tech:
Check condition of all fire extinguisher and support
brackets.
- Check test tags (within 6 months inspection).
- Check pressure gauges are in the operating range on
all fire extinguishers.
- Test Tags Date: -
Test Tags Date:
-
Serviceability
- Pass
- Fail
- A
- B
- C
- D
-
Details
-
Add signature
-
Add signature
-
Non-Tech:
Check fire suppression bottles and bracket mounts are
in place and secure.
- Check pressure gauges are in the operating range on
all fire suppression bottles.
- Record bottle pressure test date -
Bottle Pressure Test Date
-
Serviceability
- Pass
- Fail
- A
- B
- C
- D
-
Details
-
Add signature
-
Add signature
-
Check fire suppression Hoses / Pipework: - No cuts, abrasions, burns, corrosion, are in good condition and securely fastened. - Discharge Nozzles are aligned & securely fastened. - Fit nozzle caps as required.
- Pass
- Fail
- A
- B
- C
- D
-
Details
-
Add signature
-
Add signature
-
Check condition of fire system actuators. Ensure safety pins and anti-tamper pins are intact on actuators
- Pass
- Fail
- A
- B
- C
- D
-
Details
-
Add signature
-
Add signature
Mechanical Lubrication Service
-
-
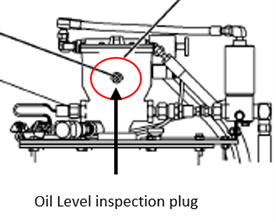
Non-Tech: Check Grease Pump Housing Oil Level and top-up if required (SAE 30).
-
Non-Tech: Check all grease hoses from the injectors to lube points. Check all grease supply line hoses from the pump to Injectors Pay particular attention to : a) Rear suspension struts top and bottom pins and dog bone pins and bushes. b) Front suspension struts top and bottom pins and steering linkages pins and bushes. c) Nose cone pin and bearing d) Body hinge pin Inspect all bearing points for a bead of grease around the bearing seal
- Pass
- Fail
- A
- B
- C
- D
-
Details
-
Add signature
-
Add signature
Mechanical Gerneral Other
-
Non-Tech: Check ladder oil level and inspect for leaks. Top-up oil if required (CX30). Ensure that breather is upright, and no kinks in hoses.
-
Non-Tech: Clean, Grease Ladder pivot shaft bearing. - Check for any cracking, loose or missing hardware - Check landing bolts are secure (4 on front mount 2 on rear). - Check for build up of dirt/mud that could affect ladder operation.
-
Non-Tech:<br>Inspect Ladder information label is in place and legible<br>(located at top landing).
-
Details
-
Add signature
-
Add signature
-
Non-Tech:
Ensure Tamper Tag is installed on Emergency Ladder
Release valve -
Tamper tag and Manual Release Valve in place
- Pass
- Fail
-
Details
-
Add signature
-
Add signature
-
Inspect and record any worn or failed emergency ladder components (hinge, latch bolt, spring, roll pin). Check for bent or misaligned structures.
- Pass
- Fail
- A
- B
- C
- D
-
Details
-
Add signature
-
Add signature
-
Non-Tech: Use drylube spray Lubricate brake and throttle pedal roller and hinge pins. - Lift the boot from the mounting plate and apply a few drops of oil between the mounting plate and the plunger. - Lubricate door latch, strikers and hinges.
-
Non-Tech: Inspect all mirrors for damage and security
- Pass
- Fail
- A
- B
- C
- D
-
Details
-
Add signature
-
Add signature
-
Check ROPS/FOPS and mounts for damage, cracks, corrosion or missing/loose bolts.
- Pass
- Fail
- A
- B
- C
- D
-
Details
-
Add media
-
Add signature
-
Add signature
-
Inspect cab mounts and bolts. Check for signs of wear / loose bolts.
- Pass
- Fail
- A
- B
- C
- D
-
Details
-
Add signature
-
Add signature
-
Check rock ejectors and mounts for wear. No excessive side way movement and 100 mm gap to wheel hub.
- Pass
- Fail
- A
- B
- C
- D
-
Details
-
Add signature
-
Add signature
-
Inspect chassis and tray pivot for wear, damage or cracking.
- Pass
- Fail
- A
- B
- C
- D
-
Details
-
Add media
-
Add signature
-
Add signature
-
Check dump body pads, shims and mounting hardware for wear, damage, cracking and tension. Pads are equally loaded / worn. Rear pads have a approx. 1.9mm gap
- Pass
- Fail
- A
- B
- C
- D
-
Details
-
Add signature
-
Add signature
-
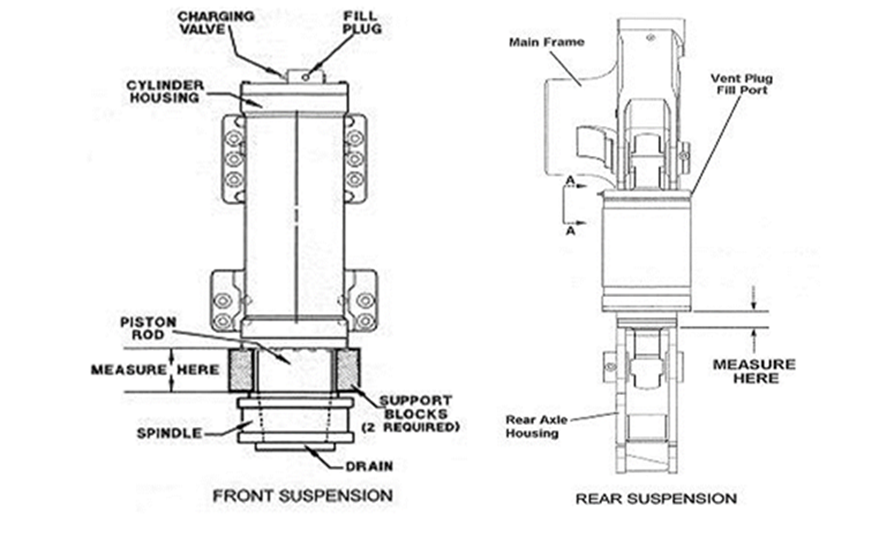
Check front suspension heights.
Spec 229+/-10 mm (9.0") -
Pos 1 - mm
-
Add signature
-
Adjusted to
-
Out of Spec - Readjust
-
Add signature
-
Check front suspension heights.
Spec 229+/-10 mm (9.0") -
Pos 2 - mm
-
Add signature
-
Adjusted to
-
Out of Spec - Readjust
-
Add signature
-
Check Rear suspension heights.
Spec Rear 218+/-13mm -
Pos 3 - mm
-
Add signature
-
Adjusted to
-
Out of Spec - Readjust
-
Add signature
-
Check Rear suspension heights.
Spec Rear 218+/-13mm -
Pos 4 - mm
-
Add signature
-
Adjusted to
-
Out of Spec - Readjust
-
Add signature
-
Inspect struts for security and missing hardware. Check that all strut covers and dust skirts are fitted and free of damage. Check PLM sensors/cabling for damage
- Pass
- Fail
- A
- B
- C
- D
-
Details
-
Add signature
-
Add signature
-
Non-Tech: Check all handrails from ground to top deck for any damage, cracks or missing or broken nuts and bolts. Check non slip step treads.
- Pass
- Fail
- A
- B
- C
- D
-
Details
-
Add signature
-
Add signature
-
Check cab deck structure from underneath for cracks.
- Pass
- Fail
- A
- B
- C
- D
-
Details
-
Add media
-
Add signature
-
Add signature
-
Check left and right wing section and centre platform section for cracks to platform and support structure.
- Pass
- Fail
- A
- B
- C
- D
-
Details
-
Add signature
-
Add signature
-
Check mounting point on top of horse collar for cracks
- Pass
- Fail
- A
- B
- C
- D
-
Details
-
Add media
-
Add signature
-
Add signature
-
-
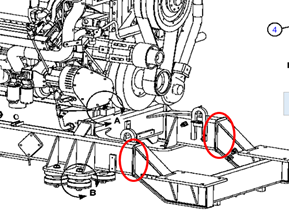
Inspect engine module frame for cracking
- Pass
- Fail
- A
- B
- C
- D
-
Details
-
Add media
-
Add signature
-
Add signature

Return To Work Checklist
-
Before starting machine, check machine is free from oil and fuel spillage.
-
Check Hyd tank tap lock plates are in place. Taps are open and locked
-
Check all fluid levels.
-
Start machine and test all operations and functions.
-
Re-check fluid levels, top up as required.
-
If any work has been performed on the brake system carry out brake testing as per procedure.
-
Check for water, fuel & oil leaks.
-
Non-Tech: Ensure cab is clean & machine is free from rag, paper or waste material
-
Non-Tech: Wash machine down after servicing, cleaning around all serviced areas of oil, fuel and grease.
-
Non-Tech: Clean windows & mirrors. Fill washer bottle.
-
Check operation of Slow Mode system including illuminated switch and external blue cab light
-
Test drive truck in Slow Mode to ensure speed is limited to 20 klms
-
Perform CLEAN TRUCK TARE
RTS form to be completed/attached for all Outstanding Work (All Code B)
-
Details of RTS attached to sheet
-
Items identified as requiring an RTS have been completed and are attached to this service sheet and photos taken?
-
Add signature
Completed Repairs
-
Details of defects rectified during service
-
Add signature
Feedback and signoff
-
If you believe that any part of this Task Instruction should be altered, expanded, rearranged, or omitted, please inform your supervisor. Make a note in the table and indicate the section that you think needs to be modified.
Continuous Improvement
-
-
Task
-
Description of Improvement
-
Submitter
-
Service Completed - create action for the Supervisor to signoff sheet.
-
Detail why service is not complete
-
Create the Action, Add this sheet "Document Number" (930E500 .....) in the header, Select the Supervisor by clicking on the assignee and then user list,
-
Click the "Complete Inspection" button to send for Supervisor approval
Supervisor Signoff
-
Add signature
