


Information
-
Technician name: (First.Last)
-
Home Office
- Fort Myers
- Tampa
- Orlando
- Jacksonville
- Tallahassee
- Gainesville
- Lake Wales
- Ocala
- Port St. Lucie
-
Customer Name
-
Work order #
-
Work Order Type
-
Conducted on
-
Location
-
Step 1 Preparation
-
This form is designed to be filled out and submitted while onsite. Filling these out off site is not an acceptable practice and may result in disciplinary action.
1.) Preparation
Pre-Arrival
-
Ensure professional appearance and conduct
-
Review the work order
-
What Receivers does the work order call for?
-
What LNBF does the work order call for?
-
Verify correct tools, equipment, and supplies
-
Pre-call the customer
-
During the pre-call introduce yourself and verify you are speaking the the account holder. *Verify the address is correct *Animals are restrained *Turn the TVs on and pull away from the wall *Someone over 18 will be present *Give the customer an ETA
Arrival
-
Update appointment status to "Start"
-
Deploy your safety cones
-
Gather Materials: 1) Cell Phone 2) PPE 3) Boot covers 4) Toners 5) Receptacle tester 6) Inclinometer 7) Hand tools 8) SHS Cecklist
-
Briefly look for line of sight *If potential LOS issue, skip to Step 4 after introduction with customer
Step 2 Customer Confirmation
Customer Conformation
-
-Introduction with customer -Put on boot covers -Verify that all pets have been restrained -Confirm customer's order *Number of rooms to install *Equipment in each room (HD, SD, DVR) *Billing amount *Terms of commitment
-
*Verify programming package • Determine program package in OFSC under pricer/config tab (for example, America’s Top 120) • Open channel lineup in Comet under Tech Documents and have customer confirm all the channels they want are in that package • Are all the channels they want part of the package. Yes or No o If No have the customer call Dish to modify it o If Yes continue with the installation
-
Are all the channels they want part of the package.
-
Get the customer on the phone with Dish right away.
-
Make sure the customer has all TVs on and pulled away from the wall so you can work on them
Step 3 Receiver/Connectivity Site Survey
Receiver/Connectivity Site Survey
-
Ensure you have a SHS checklist and that you are checking off any SHS opportunities that can improve customer experience.
TV 1 Installation
-
Is this a Hopper Job?
-
Where is the Hopper Located?
-
Where is TV1 Located?
-
What result did you have from your receptacle tester?
-
Hot neutral reverse. This is a fire hazard and we cannot install our equipment. Check the other nearby outlets for an acceptable reading.
-
If you find a nearby outlet to use test it, if it passes change your response to what it shows.
-
The outlet has an open ground. Insert a 3 prong adapter and inform the customer. Notate the account in the "inside work performed" section of the work order. Retest if this works move on, if not test alternate outlet if you can not find a passing outlet call your FSM.
-
Is TV 1 Pre-wired?
-
Does the barrel in the wall plate have a blue center?
-
Replace the barrel with a DNS approved blue barrel and move to the next step
-
Did you replace the connector on the pre-wired at the barrel with an approved Connector?
-
Then do so now.
-
Did you put Toner #1 on the barrel for TV1/Hopper?
-
Place the toner on the cable now.
-
Is there a TV2, 2nd Receiver or Joey location?
-
Proceed to step 4 of the IJA
-
Did the outlets pass the receptacle test with two yellow lights?
-
Search for another outlet that passes or explain to the customer we cannot complete install until an electrician fixes their outlets.
-
Is the TV2/Receiver 2/Joey location pre-wired with acceptable cable?
-
What options do you have for potential Cable routes? Is there a home run box you can verify correct lines with the multiline Id? Is there a crawl space/attic/garage)? Prioritize entering the room at a point closest to the Rx location through the use of: 1. Interior wall fish 2. Interior wall penetration (room-to-room for TV2 back feed) 3. Exterior penetration 4. Room wrap
-
Is the center of barrel in the wall blue?
-
Replace the barrel with a DNS approved blue barrel
-
Did you put toner #2 on barrel for TV2/Receiver 2/Joey
-
Place toner #2 on cable now.
-
Any more Joeys or receivers being installed
-
After completeing conectivity survey move to the step 4 of IJA
-
Repeat the previous steps as needed.
-
Determine the penetration for TV1 following the hierarchy below as:
Existing Penetration
Floor Penetration
Wall Penetration
Wall Fish -
Is there a TV2 or Joey location?
-
Proceed to step 4 of the IJA
-
Did the outlets pass the receptacle test with two yellow lights?
-
Search for another outlet that passes or explain to the customer we cannot complete install until an electrician fixes their outlets.
-
Is the TV2/Joey location pre-wired with acceptable cable?
-
What options do you have for potential Cable routes? Is there a home run box you can verify correct lines with the multiline Id? Is there a crawl space/attic/garage)? Prioritize entering the room at a point closest to the Rx location through the use of: 1. Interior wall fish 2. Interior wall penetration (room-to-room for TV2 back feed) 3. Exterior penetration 4. Room wrap
-
Is the center of barrel in the wall blue?
-
Replace the barrel with a DNS approved blue barrel
-
Did you put toner #2 on barrel for TV2/Joey
-
Place toner #2 on cable now.
-
Any more Joeys or receivers being installed
-
Repeat the previous steps as needed.
-
Take picture of Circuit Tester Results
IP Connectivity
-
Does the customer have Internet or will they be getting internet within 12 days?
-
Where is the router located or when is the customer getting internet with another provider (set up with your manager if within 12 days to contact the customer to verify connected)? What option did you choose from the hierarchy:
-
If the customer doesn't have internet did you see if DishNet is a viable option for them? If so call Break Out Sales.
Tell the customer you will be stepping outside for perform a site survey (LOS, Dish placement, grounding and cable runs)
Step 4 Mounting/Cable Site Survey
Mounting/Cabling Site Survey
Grounding
-
What grounding component will you use?
- Main house power grounding wire and split bolt
- Electric meter panel & side clamp
- Metal conduit and galvanized strap
- AC disconnect box and side clamp
- Steel frame under house and I-beam clamp
- Not Grounded
-
Is grounding source 20' or less from ground block or node/hub?
-
Relocate your ground block/hub to within 20' or less of the grounding source. Do not proceed until this is complete.
Determine Line of Sight
-
What dish does you work order call for you to install?
-
After inputting the Zip code into your SBSM what is the Magnetic azimuth and elevation required for 1000.2 EA DPP or Hybrid. **Remember to include the 5 degrees of clearance required. 61.5, 72
-
After inputting the Zip code into your SBSM what is the Magnetic azimuth and elevation required for 1000.2 WA DPP or Hybrid. **Remember to include the 5 degrees of clearance required. 110, 119, 129
-
After inputting the Zip code into your SBSM what is the Magnetic azimuth and elevation required for 1000.4 EA. **Remember to include the 5 degrees of clearance required. 61.5, 72, 77
-
After inputting the Zip code into your SBSM what is the Magnetic azimuth and elevation required for 500 DPP Twin. **Remember to include the 5 degrees of clearance required. 110, 119
-
After inputting the Zip code into your SBSM what is the Magnetic azimuth and elevation required for 500+/1000+ DPP . **Remember to include the 5 degrees of clearance required. 110, 118.7, 119, 129
-
Do you have clear LOS?
-
Would you be able to get clear LOS if you used a alternate dish?
-
Contact your manager and let them know you have NLOS.
-
Go back up Determine Line of Sight to select new dish.
-
What mount will you be using for this installation **Remember to follow mounting hierarchy 1-Wall 2-Fascia or Gable 3- Overhang 4-Corner Mount 5-Pole (Manger Approval) 6-Patio Block, Tripod, MDU and Apartment (Manager Approval) 7-Direct to Roof (Manager Approval)
- Wall Mount
- Facia Mount
- Direct to Overhang
- Corner Mount
- Pole Mount
- Patio Block, Tripod
- Direct to Roof
-
Determine the cable run and configuration
-
Measure/estimate messenger cable needed (from dish to ground block) How many feet will you need?
-
Measure/estimate ground wire needed (from ground block to ground source) **less then 20 Feet** How many feet will you need?
-
Go to your Van and get your SHS tote and then go inside.
Step 5 Pre-Install Customer Walk Through
Pre-Install Customer Walk Through
Walk Through
-
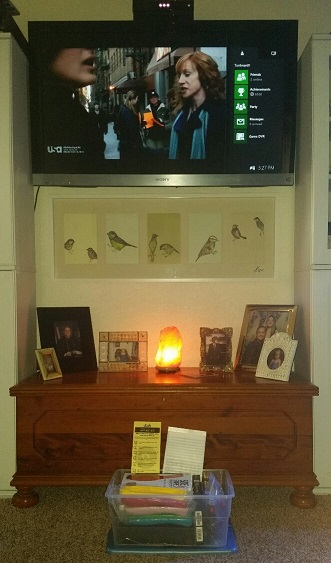
You will bring the SHS Tote inside, set it down in front of the main TV, take the lid off, and set the SHS Checklist and CSAT flyer in an upright position. Make sure to take one of the CSAT flyers with you.
-
If the customer asks about the tote respond with: “These are a couple additional items we offer to improve your entertainment experience. Feel free to look through the tote while I am completing the install, but first I need you to come outside and approve the installation plan?”
-
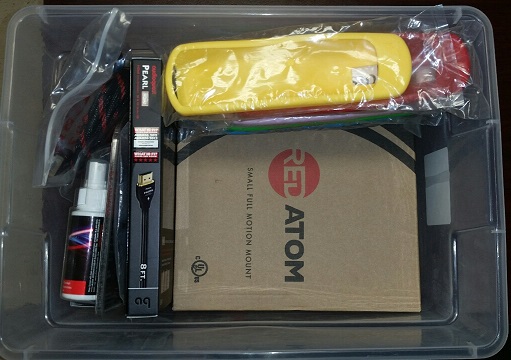
SHS Tote
-
Tote Setup in front of Main TV
-
Take a picture of your tote setup in front of the main TV
-
** Remember you are the expert** Take the customer outside and cover with them by PHYSICALLY TOUCHING where you will be mounting the dish, running the cables, installing the ground block and any points of entry (any place you will be drilling into customers house) to gain approval for the installation.
-
Gain approval for installation and estimate job length
-
Cover the first 3 questions of the CSAT flyer with customer
-
Give the SHS checklist to the customer and show them items that you checked off and leave the flyer with them to review as you complete your installation.
-
Make sure to hang your Break Out Sales flyers 3 Right, 3 Left 3 Across the street
Vehicle Run
-
Return to the vehicle
-
Adjust time on appointment in OFSC (if needed)
Step 6 Dish Preparation
Dish Assembly
-
Set up work area at the back of your vehicle
-
Gather what you will need for the install
-
Cut and prep estimated messenger cable
-
What dish will you be building
-
Adjust skew and elevation to the SBSM settings for zip code on work order.
-
Attach skew plate to reflector
-
Attach bracket to arm
-
Attach LNBF to messenger cable and bracket
-
Attach ground lug/screw to mast (if needed)
-
Assemble specialty mount (if needed)
Transport Materials
-
Gather SBSM, Dish assembly, and single RG-6 cable
-
Bring all materials to mount site including your tote.
-
If a ladder is needed, make a second vehicle trip.
Step 7 Dish Installation
DIsh Mount
-
What mount will you be using for this install. Make sure you use the required lags for the mount you are installing
- Wall Mount
- Facia Mount
- Direct to Overhang
- Corner Mount
- Pole Mount
- Patio Block, Tripod
- Direct to Roof
-
6 for wall (center 2 are in studs and 3" long)
4 for block wall -
4 or 5 lags for Fascia (2-3 in stud)
6 for angled fascia (2 centers in stud 3" long) -
6 lags 2 centers 3" long and into truss
-
Use included bolts and hardware
-
Set up and Climb the ladder (if needed)
-
Find and mark the stud (when applicable)
-
Make sure you hit a stud when mounting the dish (when applicable)
-
Level the footplate
-
Mark and pre-drill holes appropriate.
-
***Make sure you pre-drill the center holes.
-
Apply silicone to holes and foot plate or Bishop tape to foot plate.
-
Drive center lag screws in 99% of the way
-
Finish tighten center lags with hand wrench (make sure you use 3" on center lags) Snug plus 1/4 turn
-
Place level on mount to verify that it is perfectly plumb.
-
Drive in and tighten remaining lag screws
-
Tighten all hardware
-
Attach struts if required 500 plus long mast
-
Place dish on mast
Pointing and Peaking
-
Connect SBSM to messenger cable and confirm settings
-
ID each orbital to verify pointing at proper satellite Point dish to optimum signal (make sure to do the push pull test)
-
Peak dish with fine tune adjustment (if needed)
-
Lock dish in and tighten hardware
-
Perform Limit scans and make sure they are all passing limits
-
Make sure to get your LOS picture
-
Get picture of Mount
Step 8 Grounding
Grounding
-
Attach messenger wire to ground lug/screw
-
Run messenger cable to ground block Secure cable every 12"-24" Build drip/service loops Do not include messenger in loops
-
Install ground block
-
Connect messenger cable to ground block ***Torque all outdoor connections to 30 in-lbs.***
-
Connect messenger wire and ground wire to ground block
-
What grounding component will you be installing?
- Main house power grounding wire and split bolt
- Electric meter panel & side clamp
- Metal conduit and galvanized strap
- AC disconnect box and side clamp
- Steel frame under house and I-beam clamp
- Not Grounded
-
Install grounding component
-
Run the ground wire to grounding component and connect
-
Get picture of Ground block / Node / Hub / Switch
-
Get picture of where system is grounded
Step 9 Cabling
Exterior Cabling
-
What cable you will use for installation
-
Identify a reference point
Measure both entrance and exit points
Steps
1. Clear both entrance and exit points
2. Cut inspection hole
3. Inspect for obstructions
4. Drill through the wall inside out
** Repeat these steps for every penetration -
Drill all penetrations
-
Feed the cable through bushing and apply Silicone
-
Run remaining exterior cables **Secure cables every 12"-24"
-
Make sure if you are using cable that it meets all DNS standards
-
Use Multi-line toner to identify proper lines
-
Connect proper cables to ground block/diplexer/hub
-
Get picture(s) of overall cable runs
-
Get Picture(s) of all points of entry
Vehicle Run #3
-
Collect your receivers and surge protector for each receiver
-
Get your Sound Bar to hook up inside for the customer
-
Tell your customer, “I will be starting my inside work shortly. This will include me drilling through the wall, floor, or up in the attic. I know that can be a bit noisy so I brought in the sound bar that we sell and I figured I would hook up to your phone so you could listen to music while I work. Ask the customer “Do you listen to music on your smart phone? Have them get their phone and help them to connect their Bluetooth to the sound bar.
Show them that they can control the volume from their phone as well as from the sound bar remote. Pay attention to how much they listen, change music stations and volume. The more they use it, the more they may want it. (If they do not have a smart phone or don’t want to use theirs, then connect your phone, ask them what type of music or what artist they listen to, then go to Pandora or another music service and play their favorite. Be sure to show them how to use the sound bar remote and listen for them changing the volume while you work). -
When returning to complete the inside portion of your work order, take a look at your tote to see if the customer has moved any items. Make a mental note of what is out of order in the tote so that you can discuss them with the customer.
Interior Cabling
-
Complete all inside cabling including any Wall-fish's, floor pen, or room to room cabling
-
Slide new wall plates over cable and attach to the wall
-
Install new connector
-
Run interior cable to the TV
Step 10 Receiver Installation
Receiver set up
-
Check Limit Scan behind every receiver (not Joeys)
-
Upload your limit scan photos for all orbitals
-
Unwrap receiver and place in well-ventilated area
-
Connect appropriate items (coax, triplexes, and/or remote antenna)
-
Hook up the Pearl HDMI
-
The HDMI cable that comes with the receiver is a generic cable, I went ahead and connected your TV with a top of the line Audio Quest Pearl HDMI cable with its solid copper core and better insulation it provides the best possible video experience and even improves the sound.
-
Connect receiver to TV (coax, AV cables, HDMI)
-
Plug receiver into Surge Protector (if customer doesn't have one use ours)
-
Run check switch and download receivers
-
Prepare the Remotes
-
Put labels and insert batteries
Device code - Power scan
*[TV mode} hold - [power] - [up arrow] - TV turns off - [#]
Limited mode
*[TV mode] hold - [page up] - [#]
SAT Auto Tune
*program [TV mode] hold - [*] - [TV2 channel, ex. 60] - [#]
*Enable [sat mode] hold - [*] - [vol up] - [#]
Remote Address
* at the system info screen: [sat mode] hold - enter digits [1-15] - [#] - [Record] -
Do you have any Joeys or TV2 to hook up?
-
At TV2 or Joey location *connect to coax * Hook up a surge protector to Joey if the customer does not have one * Program remote *[TV mode} hold - [power] - [up arrow] - TV turns off - [#] * set Sat auto tune *program [TV mode] hold - [*] - [TVF2 channel, ex. 60] - [#] * Run auto channel scan on TV 2 *****Repeat for all TV 2 or Joeys
-
Repeat for all receivers
-
Clean up receiver trash
Activate and Finalized Set Up
-
Activate Receivers with Mobility Device
-
Connect Receiver to Internet/Phone
-
Send Status and get connectivity code (if applicable)
-
Change HDTV settings
-
Verify Programming on all TVs
-
Clean up any mess (vacuum when needed)
-
HINT** Vacuum even if you do not believe you made a mess. This will instill a level of confidence with the customer that we clean up after installations. This task can help your CSAT
-
Enter all site work and notes into OFSC
Step 11 Customer Education
Customer education
-
Show and explain all work complete to the customer
-
"While I was installing your receiver, I also installed a premium surge protector to protect the receiver and your electronics as well as myself while I was working on the system. With Florida being the lightning capital of the United States, we recommend that every system be protected. I didn’t see a surge protector hooked up to your system, do you have one in another room I can hook up? I highly recommend having a surge protector in your system”…then explain the benefits of our surge protectors
-
Make sure to cover the SHS check list you filled out in the walk through, be sure to explain each of the items you checked and why you recommended them
-
Hand the customer the remote
-
Use the getting started with DISH guide for customer education
-
Quiz the customer on the basics of the system, including the five troubleshooting steps. Have the customer show you that they can get back on correct channel or input
-
To show the customer the remote skins place a remote skin on the remotes. Use the ones that have been moved out of order by the customer. If they were untouched, then use them from the top down. When you hand the remote to the customer tell them, “You can see that I’ve placed a remote skin on your remote. The benefits of this are: first it makes it easier to find the remote, second it identifies the remote that belongs to this TV, and third it provides a slip resistant cover to keep the remote in place when you set it on the arm of your chair/couch.”
-
Use the getting started with DVR guide for customer education (if applicable)
-
Make sure to cover steps 1 thru 4 on the Getting started guide on all additional TV locations
-
With permission clean all TV screens and offer the Screen cleaner.
-
IMPORTANT NOTES: Purchasing a surge protector is not required, although it is strongly recommended. If they choose to not get one from us, let them know that they should still get a premium surge protector from someone. Other benefits: USB charging ports, $400,000 connected equipment warranty
Step 12 Post Installation
-
Run the STBH Mobile app On all hopper equipment
-
Is pole mount required
-
Call dash and setup pole mount appointment for 7 days out.
-
Have the customer sign the Agreements
-
Thank the customer and make sure to cover with the customer again the CSAT flyer
-
Ensure you have all your tools and Equipment
-
Return to your van do a 360 walk around and put your cones away
-
Update your status in OFSC to complete
-
Upload required LOS and Limit Scan photos to Comet
-
Make sure to log out in Comet and if this is your last job clock out before you go home for the day.
-
Make sure you have hung your Break Out Sales Flyers 3 Left, 3 Right and 3 Across the street. If you have not do so now.
-
Depart
All installations are up to DNS standards
-
Sign that you followed all steps and the entire installation is up to DNS standards.
