


Title Page
-
Site conducted
-
Conducted on
-
Address
-
Prepared by
-
Certificate Number: 224840A
-
Certificate Number: 137870A
-
Certificate Number:
FURNACE
-
Make of Furnace:
- Goodman
- Trane
- Comfortmaker
- York
- American Standard
- Frigidaire
- Ameristar
- OTHER
-
Type Make of Furnace
-
Model Number:
-
Furance Serial Number:
-
BTU Input Rating:
- 40,000
- 50,000
- 60,000
- 70,000
- 80,000
- 90,000
- 100,000
- Other
-
undefined
-
Year Installed:
-
Access Tee installed
-
Size of Port Installed
-
Thermostat Make:
-
undefined
-
Thermostat Model:
-
undefined
-
Thermostat
-
inform DCC and take note here
-
Automatic gas/fuel control valve assembly
-
inform DCC and take note here
-
System operating pressure
-
inform DCC and take note here
-
Operation of safety limit controls
-
inform DCC and take note here
-
Flame spreader
-
inform DCC and take note here
-
Flow switch
-
inform DCC and take note here
-
Clean & adjust burner orifices
-
inform DCC and take note here
-
Gas regulator
-
inform DCC and take note here
-
Thermocouple
-
inform DCC and take note here
-
Perform necessary adjustments to achieve peak performance
-
inform DCC and take note here
-
Efficiency (%)
-
Gas piping to appliance
-
inform DCC and take note here
-
Automatic vent damper & motor
-
inform DCC and take note here
-
Lube pumps and motors
-
inform DCC and take note here
-
Check and clean venting, flue and fresh air intake
-
inform DCC and take note here
-
Perform CO/Combustion efficiency test (heat exchanger and flues)
-
inform DCC and take note here
-
Check and clean blower motor, wheel and fan
-
inform DCC and take note here
-
Check and clean Heat Exchanger
-
inform DCC and take note here
-
Fan belt tension
-
inform DCC and take note here
-
Fan alignment
-
inform DCC and take note here
-
Electric ignition system
-
inform DCC and take note here
-
Check all electrical connections for tightness and cleanliness (clean and tighten where necessary)
-
inform DCC and take note here
-
Inspect 636 PVC exhaust/intake piping to exterior of RHU
-
inform DCC and take note here
-
Inspect furnace condensate lines and inspect condensate pump
-
inform DCC and take note here
-
Low voltage fuse
-
inform DCC and take note here
-
Relays
-
inform DCC and take note here
-
Replace Air filter
-
Size of filter
-
Additional Notes:
HUMIDIFIER
-
Is there a Humidifier
-
Make
-
Model
-
Humidistat
-
inform DCC and take note here
-
Clean Humidifier tray, float and pad.
-
inform DCC and take note here
-
Additional Note
HOT WATER TANK
-
Make of HWT
- Rheem
- John Wood
- Bradford White
- GSW
- AO Smith
- Other
-
Type Make of HWT
-
Type
-
BTU Input Rating
-
undefined
-
Year Installed
-
HWT Serial Number
-
Access Tee installed
-
Size of Port Installed
-
Automatic gas/ fuel control valve assembly
-
inform DCC and take note here
-
Gas / fuel regulator
-
inform DCC and take note here
-
Thermocouple
-
inform DCC and take note here
-
Inspect and clean intake screen on bottom of tank.
-
inform DCC and take note here
-
Perform CO/Combustion efficiency test (heat exchanger and flues)
-
inform DCC and take note here
-
Gas piping to appliance.
-
inform DCC and take note here
-
Electric ignition system
-
inform DCC and take note here
-
Check all electrical connections for tightness and cleanliness (clean and tighten where necessary).
-
inform DCC and take note here
-
Temperature set to maximum 40 C
-
inform DCC and take note here
-
Thermostat
-
inform DCC and take note here
-
Relief tube extends to 300mm off floor
-
inform DCC and take note here
-
Venting and fresh air intake
-
inform DCC and take note here
-
Manually operate HWT pressure relief valve
-
inform DCC and take note here
-
Perform necessary adjustments to achieve peak performance
-
inform DCC and take note here
-
Additional Notes:
SMOKE & CO DETECTORS
-
Smoke Detector
-
Quantity
Model
-
Model Number
-
Type Model Number
-
Replace By
-
CO Detector
-
Quantity
Model
-
Model Number
-
Type Model Number
-
Replace By
-
Smoke & CO Combination Detector
-
Quantity
Model
-
Model Number
-
Type Model Number
-
Replace By
-
Garage or Other location
-
Quantity
Model
-
Model Number
-
Type Model Number
-
Replace By
-
AA Quantity:
-
AAA Quantity:
-
9V Quantity:
-
Attached Garage?
-
Condition of Detectors on arrival?
-
inform DCC and take note here
-
Clean all detectors & vent holes free of obstructions.
-
inform DCC and take note here
-
Interconnection between detectors?
-
inform DCC and take note here
-
Verification of all detectors in power failure mode?
-
inform DCC and take note here
-
Reinstalled any detectors that have been removed and securely fastened to wall/ceiling?
-
Please inform DCC immediately !!!
-
Is there a disconnect switch between breaker and alarm?
-
Additional Notes:
DRYER VENT
-
Clean & Re-installed
-
Please inform DCC
SUMP PUMP
-
Does this unit have a sump?
-
Manufacturer’s instructions available (On Site ?)
-
Clean sump pit
-
inform DCC and take note here
-
Check and clean sump float, relocate float for proper operation in sump hole if required
-
inform DCC and take note here
-
Flush sump pit
-
inform DCC and take note here
-
Lubricate as required
-
inform DCC and take note here
-
Verify operation of check valves - clean as necessary
-
inform DCC and take note here
-
Check discharge piping condition and connections, tighten/secure as necessary
-
inform DCC and take note here
-
Pump discharges adequate distance from foundation wall
-
inform DCC and take note here
-
Sump pit covered
-
inform DCC and take note here
-
Clean pump including screen(s)
-
inform DCC and take note here
-
Check electrical wiring and connections – tighten/secure as necessary
-
inform DCC and take note here
-
Sump pump operates as intended
-
inform DCC and take note here
-
Additional Notes
ELECTRICAL PANEL
-
Year Installed
-
Amperage
-
Available Slots
BACKWATER CHECK VALVE
-
Backwater Check Valve in Unit?
-
Manufacturer:
-
Year Installed:
-
Model:
-
Valve Location:
-
Manufacturer's Instructions Availble on Site?
-
Inpect body and gate for debris
-
inform DCC and take note here
-
Clean and flush valve body and gate
-
inform DCC and take note here
-
Inspect and confim propoer operation
-
inform DCC and take note here
-
Test Valve for proper operation
-
inform DCC and take note here
-
Alert occupants of its presence and operation, Contact CFHA if Required.
-
Back valve operates as intended
-
inform DCC and take note here
-
Inspect and Clean Floats as necessary
-
inform DCC and take note here
-
Additional Notes:
TANKLESS WATER HEATER
-
Boiler system in Unit?
-
Manufacturer:
-
Type Manufacturer here
-
Model:
-
Year Installed:
Total Batteries Replaced
-
AA
-
9V
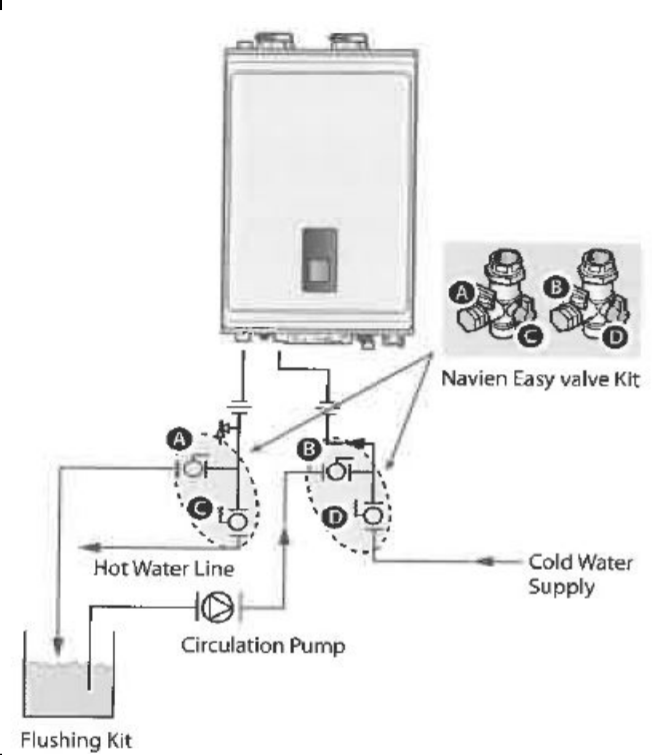
Before flushing gather the following items:
-
* Refer to Annex C in Boilers Manufacturers Maintenance Manual for further details and diagram below of steps to complete flushing of system.
-
A 5 galon bucket, cleaning solution with water, 3 hoses, and a water circulation pump. - OK
-
1. Press the Power button on the front panel to turn off boiler.
-
2. Disconnect the power supply to the boiler.
-
3. Close the "C" and "D" valves on the supply and return water lines.
-
4. Connect one tube to the "A" valve and place the free end on the bucket.
-
5. Connect one of the tubes to the circulation pump outlet and the return water line at the "B" valve.
-
6. Connect one tube to the circulation pump inlet and place the free end in the bucket.
-
7. Pour the cleaning solution into the bucket.
-
8. Open both "A" and "B" valves.
-
9. Turn on the circulation pump and allow the solution to circulate through the boiler for at least 45 minutes.
-
10. Rinse the cleaning solution from the boiler:<br><br>a. Remove the free end of the drain tube from the bucket and place it in the condensate drain or laundry tub (whereever the boiler drains).<br>b. Close the "B" valve and open the "D" valve. Do not open the "C" valve yet.<br>c. Allow the water to flow through the boiler for 5 minutes.<br>Close the "A" valve and open the "C" valve.
-
11. Disconnect all tubes.
-
12. Remove the strainer from the boiler and clean out any residue.
-
13. Reinsert the filter and ensure the filter cap is securely tightened.
-
14. Reconnect the power supply to the boiler.
-
15. Press the Power button on the front panel to turn on the boiler.
-
16. Ensure the boiler is operating normally for a few minutes before leaving the residence.
-
17. Clean and rinse out condensate trap.
-
Additional Notes:
HRV / ERV
-
Air Exchanger (HRV/ERV) in Unit?
-
HRV/ERV
-
Manufacturer:
-
Model:
-
Year Installed:
-
Manufacturer's Instructions Availble on Site?
-
Cleaned or replaced filters?
-
Clean recovery core
-
Clean wheels/blades
-
Clean blower motor
-
Clean condensation tray
-
Oil components as per manufacturer instructions
-
Wipe down entire unit inside and out
-
Clean exterior intake and exhaust hoods and grilles
-
Clean all interior exhast grilles (fully ducted only)
-
Clean as necessary, ducting between unit & exterior intake & exhaust hoods
-
Checked controls
-
Checked all operating modes
-
Balanced HRV given exisitng house ventilation systems
-
Air exchanger installation conforms to manufacturers requirements?
-
Air exchanger operates as intended?
-
inform DCC and take note here
-
Additional Notes:
INSPECTION VERIFICATION
-
Inspector Signature
