Information
-
Wet Blast Maintenance Schedule
-
Location of Wet Blast Cabinet
- Welding Shop
- On Highway Trucks
-
Conducted on
-
Name and signature of person completing Maintenance Tasks
8 Hour Maintenance Tasks
8 Hour Maintenance Tasks
Media and Air Hoses
-
Check condition of hoses
-
Check hose clamps
- No action required
- Tightened or replaced clamps
Work Gloves
-
Check condition of gloves
Machine Sump
-
Check condition of agitation hose.
- No action required
- Replace as necessary
-
Check sump grids undamaged, correctly fitted and free of damageable objects.
-
Check sump water level.
-
Check Media Concentration Level.
- No Action Required
- Adjust Media Concentration as Required
-
Switch ON to see Media Concentration Sample Information
Tap to enter information
-
MEDIA CONCENTRATION
For best results the machine should be processing at around 25% to 30 % by volume media to water.
Too much media can overload the machine and too little will result in inefficiency ie. poor cleaning and long cleaning times.
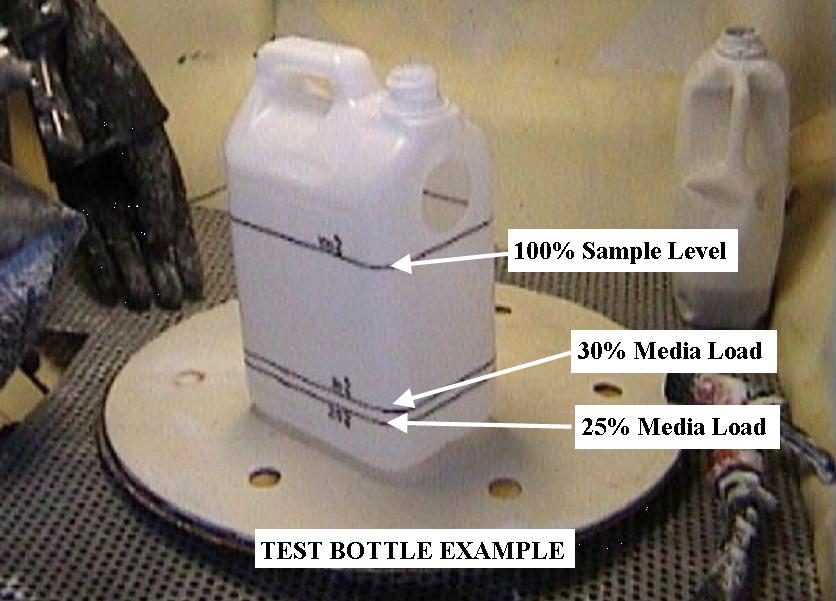
To measure the media concentration, take a sample of the slurry mix from the Process Gun using following steps and the Test Bottle (see TEST BOTTLE EXAMPLE).
DO NOT take too long when taking the sample, it will take less than 20 to 30 seconds in total.
1. Turn the air supply off to the machine.
2. Aim the Process Nozzle into the hole in the side of the test bottle.
3. Press the left-hand pedal to produce a slurry mix into the test bottle. DO NOT allow the water to overflow from the bottle when taking the sample, otherwise an inaccurate sample will occur.
4. As soon as the sample reaches the desired quantity press the right-hand pedal to stop the flow of slurry.
5. Allow the sample to settle of 10 to 20 seconds.
6. The level of media will be evident in the test bottle. You should see the media level between the 25% and 30% markings on the test bottle if the water level is at the 100% marking.
7. Make adjustments to media concentration as required to reach desired concentration. When adding media it is recommended to add slowly by placing the media onto the turntable and washing into the sump using the wash gun.
8. Take another sample if an adjustment was made to check new concentration ratio.
Window Wiper
-
Check condition of wiper blade.
- No action required
- Replace as necessary
40 Hour Maintenance Tasks
40 Hour Maintenance Tasks
Process Gun
-
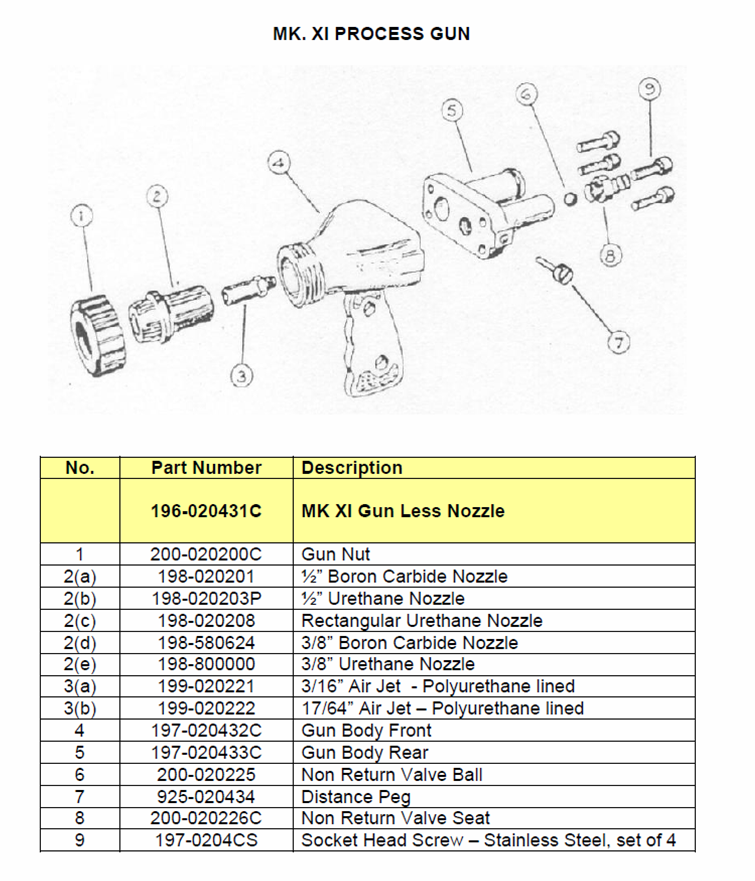
Show Process Gun Parts Diagram
Tap to enter information
-
Process Gun Parts Diagram
-
Check gun body for wear or damage
- No action required
- Replace as necessary
-
Check gun nut for wear or damage
- No action required
- Replace as necessary
-
Check process nozzle for wear or damage
- No action required
- Replace as necessary
-
Check non-return valve ball for wear or damage
- No action required
- Replace as necessary
-
Check distance peg for wear or damage
- No action required
- Replace as necessary
-
Check air jet for wear or damage
- No action required
- Replace as necessary
-
*** Warning - When replacing air jet, ensure that it is centrally fitted in gun body and inline with process nozzle in order to avoid irregular wear pattern in nozzle.
Media Change
-
Switch ON to show media change information.
Tap to enter information
-
How to Change Media in the Sump
1. With the wash gun, thoroughly wash down the cabinet interior to return all the old media to sump.
2. Place a heavy duty 20 litre plastic bucket onto the turntable. Close and clamp the cabinet door.
3. Turn off the compressed air supply to the machine.
4. Start the pump and direct the flow from the nozzle into the bucket at an angle to create a spinning action of the water flow. Allow the bucket to fill and overflow. Continue this operation for about one minute. Switch off pump. Allow bucket to stand for the media to settle. Gently tilt the bucket to empty the water down to the media level. Discard old media from bucket. Repeat process until only a small amount of media settles in bucket. YOU WILL HAVE NOW REMOVED THE MAJORITY OF MEDIA FROM THE MACHINE.
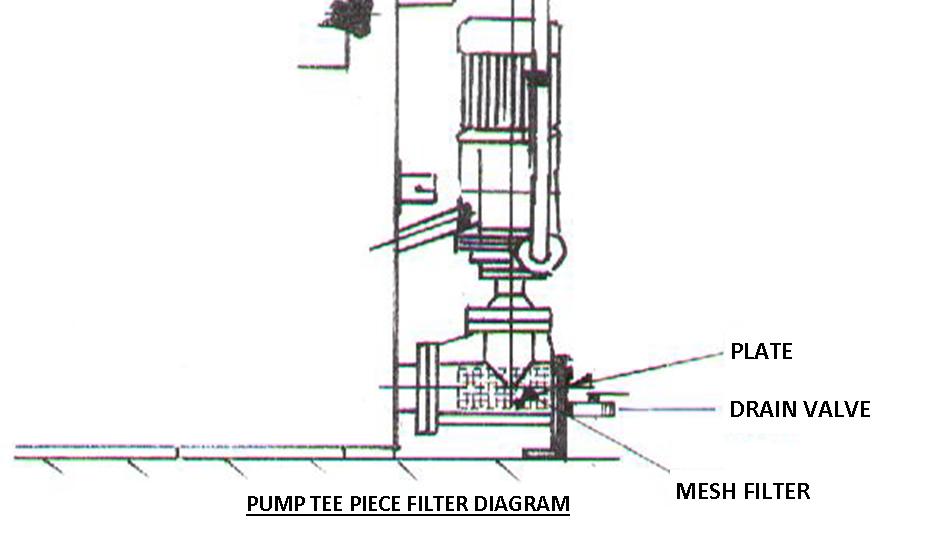
5. Ensure the sump drain hose is attached to the pump tee piece drain valve (see Pump Tee Piece Mesh Filter for diagram) and open drain valve slightly to start sump contents flowing.
6. Place a foot on the left-hand footswitch. Press down to start media pump. Remove foot from switch.
7. Allow the pump to run for a short period to ensure suspension of the remaining media in the sump water, then place foot on the right-hand footswitch and press down to stop the media pump. Remove foot from switch.
8. Progressively open the drain valve to the maximum position to allow the sump to drain.
9. Unclamp and open cabinet door. With the wash gun, wash down cabinet interior and sump slopes to ensure complete removal of old media.
10. Once completely drained and rinsed, remove the Pump Tee Piece Mesh Filter and clean of any foreign objects (see Tee Piece Mesh Filter for diagram). Reassemble and close drain valve fully.
11. Refill sump with fresh water and add media. It is recommended to slowly add the media by placing onto the turntable and wash into the sump using the wash gun. Do not pour the media directly into the sump.
12. Check the media concentration level to ensure desired ratio has been achieved.
Media Change Information
Concentration
The unit should be refilled with a concentration of 1 Kg of Media to 5 Litres of water.
Sump Capacity
The sump holds approx 125 Litres.
Pump Tee Piece Mesh Filter
It is important to check the pump tee piece cylindrical mesh filter for foreign objects every time the machine is emptied.
• Unbolt the Main Plate and withdraw the filter from the Tee Piece.
• Clean filter and housing then reassemble. -
Switch ON to see Media Concentration Sample Information
Tap to enter information
-
MEDIA CONCENTRATION
For best results the machine should be processing at around 25% to 30 % by volume media to water.
Too much media can overload the machine and too little will result in inefficiency ie. poor cleaning and long cleaning times.
To measure the media concentration, take a sample of the slurry mix from the Process Gun using following steps and the Test Bottle (see TEST BOTTLE EXAMPLE).
DO NOT take too long when taking the sample, it will take less than 20 to 30 seconds in total.
1. Turn the air supply off to the machine.
2. Aim the Process Nozzle into the hole in the side of the test bottle.
3. Press the left-hand pedal to produce a slurry mix into the test bottle. DO NOT allow the water to overflow from the bottle when taking the sample, otherwise an inaccurate sample will occur.
4. As soon as the sample reaches the desired quantity press the right-hand pedal to stop the flow of slurry.
5. Allow the sample to settle of 10 to 20 seconds.
6. The level of media will be evident in the test bottle. You should see the media level between the 25% and 30% markings on the test bottle if the water level is at the 100% marking.
7. Make adjustments to media concentration as required to reach desired concentration. When adding media it is recommended to add slowly by placing the media onto the turntable and washing into the sump using the wash gun.
8. Take another sample if an adjustment was made to check new concentration ratio. -
Empty sump of old media and refill sump with new media.
- Media changed
-
*** Important: Always check the pump Tee Piece Filter when the machine has been emptied.
200 Hour Maintenance Tasks
200 Hour Maintenance Tasks
Media Pump Unit
-
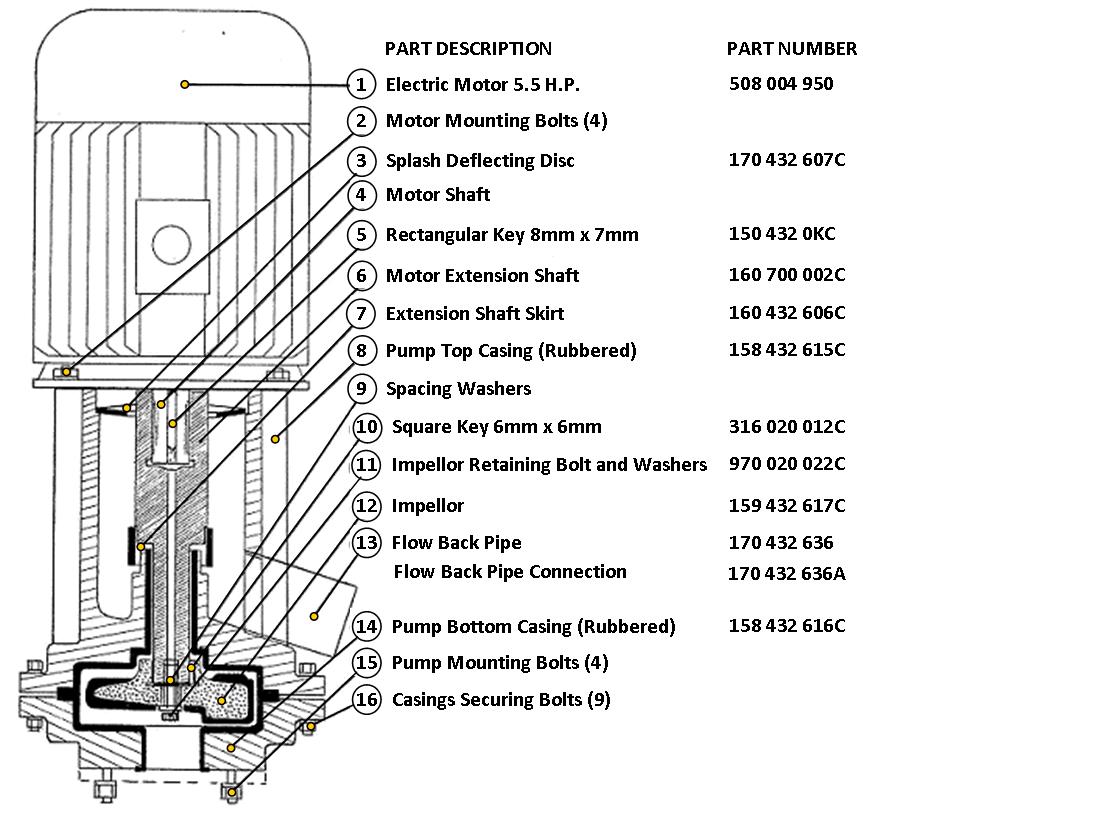
Switch ON to see PUMP MAINTENANCE INSTRUCTIONS
Tap to enter information
-
Tap to enter information
-
Remove and dismantle pump unit.
*** See Pump Maintenance Instructions for method of dismantling and reassembly. -
Check top and bottom casings for excessive wear or damage
- No action required
- Replace as necessary
-
Check impellor for excessive wear or damage
- No action required
- Replace as necessary
-
Check motor extension shaft for excessive wear or damage
- No action required
- Replace as necessary
-
Check flow back hose for excessive wear or damage
- No action required
- Replace as necessary
-
Check pump motor bearings for excessive wear or damage
- No action required
- Replace as necessary
Air Line Equipment
-
Drain Sediment from airline regulator filter.
- Sediment drained
-
Refill oil lubrication bottle if fitted with 10w fluid
- Refilled with 10w
Fastenings and Connections
-
Check mechanical fastenings and electrical connection for tightness
- No action required
- Advise supervisor if work is required
Turntable
-
Check turntable bearing for excessive wear.
Troubleshooting Cabinet
Fault Finding Guide
1. Motor running but pump not operating
-
Is this the problem?
Tap to enter information
-
1.1 Sump level too low
-
Top up sump to overflow outlet
-
1.2 Pump flow back hose clips too loose, or hose collapsed, or hose damaged
-
Tighten clips
-
Replace hose
-
1.3 Insufficient agitation. Media packing down in sump
-
Check the agitation hoses is not blocked and the nozzle is correctly positioned
-
1.4 Pump tee piece filter blocked
-
Check the filter and clean as necessary
-
Switch ON to show Pump Tee Piece Mesh Filter Information
Tap to enter information
-
How to Change Media in the Sump
1. With the wash gun, thoroughly wash down the cabinet interior to return all the old media to sump.
2. Place a heavy duty 20 litre plastic bucket onto the turntable. Close and clamp the cabinet door.
3. Turn off the compressed air supply to the machine.
4. Start the pump and direct the flow from the nozzle into the bucket at an angle to create a spinning action of the water flow. Allow the bucket to fill and overflow. Continue this operation for about one minute. Switch off pump. Allow bucket to stand for the media to settle. Gently tilt the bucket to empty the water down to the media level. Discard old media from bucket. Repeat process until only a small amount of media settles in bucket. YOU WILL HAVE NOW REMOVED THE MAJORITY OF MEDIA FROM THE MACHINE.
5. Ensure the sump drain hose is attached to the pump tee piece drain valve (see Pump Tee Piece Mesh Filter for diagram) and open drain valve slightly to start sump contents flowing.
6. Place a foot on the left-hand footswitch. Press down to start media pump. Remove foot from switch.
7. Allow the pump to run for a short period to ensure suspension of the remaining media in the sump water, then place foot on the right-hand footswitch and press down to stop the media pump. Remove foot from switch.
8. Progressively open the drain valve to the maximum position to allow the sump to drain.
9. Unclamp and open cabinet door. With the wash gun, wash down cabinet interior and sump slopes to ensure complete removal of old media.
10. Once completely drained and rinsed, remove the Pump Tee Piece Mesh Filter and clean of any foreign objects (see Tee Piece Mesh Filter for diagram). Reassemble and close drain valve fully.
11. Refill sump with fresh water and add media. It is recommended to slowly add the media by placing onto the turntable and wash into the sump using the wash gun. Do not pour the media directly into the sump.
12. Check the media concentration level to ensure desired ratio has been achieved.
Media Change Information
Concentration
The unit should be refilled with a concentration of 1 Kg of Media to 5 Litres of water.
Sump Capacity
The sump holds approx 125 Litres.
Pump Tee Piece Mesh Filter
It is important to check the pump tee piece cylindrical mesh filter for foreign objects every time the machine is emptied.
• Unbolt the Main Plate and withdraw the filter from the Tee Piece.
• Clean filter and housing then reassemble.
2. Pump operating but at a much reduced pressure
-
Is this the problem?
Tap to enter information
-
2.1 Loose Impellor
-
Tighten impellor screw
-
2.2 Badly worn or damaged impellor and/or pump casings
-
Replace the impellor as necessary
-
Replace the casings as necessary
-
2.3 Insufficient agitation. Media packing down in sump
-
Check the agitation hoses is not blocked and the nozzle is correctly positioned
-
2.4 Pump tee piece filter blocked
-
Check the filter and clean as necessary
-
Switch ON to show Pump Tee Piece Mesh Filter Information
Tap to enter information
-
How to Change Media in the Sump
1. With the wash gun, thoroughly wash down the cabinet interior to return all the old media to sump.
2. Place a heavy duty 20 litre plastic bucket onto the turntable. Close and clamp the cabinet door.
3. Turn off the compressed air supply to the machine.
4. Start the pump and direct the flow from the nozzle into the bucket at an angle to create a spinning action of the water flow. Allow the bucket to fill and overflow. Continue this operation for about one minute. Switch off pump. Allow bucket to stand for the media to settle. Gently tilt the bucket to empty the water down to the media level. Discard old media from bucket. Repeat process until only a small amount of media settles in bucket. YOU WILL HAVE NOW REMOVED THE MAJORITY OF MEDIA FROM THE MACHINE.
5. Ensure the sump drain hose is attached to the pump tee piece drain valve (see Pump Tee Piece Mesh Filter for diagram) and open drain valve slightly to start sump contents flowing.
6. Place a foot on the left-hand footswitch. Press down to start media pump. Remove foot from switch.
7. Allow the pump to run for a short period to ensure suspension of the remaining media in the sump water, then place foot on the right-hand footswitch and press down to stop the media pump. Remove foot from switch.
8. Progressively open the drain valve to the maximum position to allow the sump to drain.
9. Unclamp and open cabinet door. With the wash gun, wash down cabinet interior and sump slopes to ensure complete removal of old media.
10. Once completely drained and rinsed, remove the Pump Tee Piece Mesh Filter and clean of any foreign objects (see Tee Piece Mesh Filter for diagram). Reassemble and close drain valve fully.
11. Refill sump with fresh water and add media. It is recommended to slowly add the media by placing onto the turntable and wash into the sump using the wash gun. Do not pour the media directly into the sump.
12. Check the media concentration level to ensure desired ratio has been achieved.
Media Change Information
Concentration
The unit should be refilled with a concentration of 1 Kg of Media to 5 Litres of water.
Sump Capacity
The sump holds approx 125 Litres.
Pump Tee Piece Mesh Filter
It is important to check the pump tee piece cylindrical mesh filter for foreign objects every time the machine is emptied.
• Unbolt the Main Plate and withdraw the filter from the Tee Piece.
• Clean filter and housing then reassemble.
3. Pump motor starts then cuts off
-
Is this the problem?
Tap to enter information
-
3.1 Sump overloaded with media
-
Empty sump and refill with media as per instructions
-
Switch ON to show Media Refill Information
Tap to enter information
-
How to Change Media in the Sump
1. With the wash gun, thoroughly wash down the cabinet interior to return all the old media to sump.
2. Place a heavy duty 20 litre plastic bucket onto the turntable. Close and clamp the cabinet door.
3. Turn off the compressed air supply to the machine.
4. Start the pump and direct the flow from the nozzle into the bucket at an angle to create a spinning action of the water flow. Allow the bucket to fill and overflow. Continue this operation for about one minute. Switch off pump. Allow bucket to stand for the media to settle. Gently tilt the bucket to empty the water down to the media level. Discard old media from bucket. Repeat process until only a small amount of media settles in bucket. YOU WILL HAVE NOW REMOVED THE MAJORITY OF MEDIA FROM THE MACHINE.
5. Ensure the sump drain hose is attached to the pump tee piece drain valve (see Pump Tee Piece Mesh Filter for diagram) and open drain valve slightly to start sump contents flowing.
6. Place a foot on the left-hand footswitch. Press down to start media pump. Remove foot from switch.
7. Allow the pump to run for a short period to ensure suspension of the remaining media in the sump water, then place foot on the right-hand footswitch and press down to stop the media pump. Remove foot from switch.
8. Progressively open the drain valve to the maximum position to allow the sump to drain.
9. Unclamp and open cabinet door. With the wash gun, wash down cabinet interior and sump slopes to ensure complete removal of old media.
10. Once completely drained and rinsed, remove the Pump Tee Piece Mesh Filter and clean of any foreign objects (see Tee Piece Mesh Filter for diagram). Reassemble and close drain valve fully.
11. Refill sump with fresh water and add media. It is recommended to slowly add the media by placing onto the turntable and wash into the sump using the wash gun. Do not pour the media directly into the sump.
12. Check the media concentration level to ensure desired ratio has been achieved.
Media Change Information
Concentration
The unit should be refilled with a concentration of 1 Kg of Media to 5 Litres of water.
Sump Capacity
The sump holds approx 125 Litres.
Pump Tee Piece Mesh Filter
It is important to check the pump tee piece cylindrical mesh filter for foreign objects every time the machine is emptied.
• Unbolt the Main Plate and withdraw the filter from the Tee Piece.
• Clean filter and housing then reassemble. -
3.2 Impellor binding
-
Refer to Dana-Ridge for assistance (07) 3860 4913
4. Pump leaks when operating
-
Is this the problem?
Tap to enter information
-
4.1 Sump overflow outlet blocked
-
Remove the blockage
-
4.2 Cabinet exhaust vent blocked
-
Check and remove cause of blockage
-
4.3 Skirt missing from motor extension shaft or faulty
-
Remove and dismantle pump. Check and fit or replace skirt
-
4.4 Deflector disc faulty or missing
-
Remove and dismantle pump. Check and fit or replace Deflector disc
-
Show 25mm Pump disassembly and reassembly instructions
Tap to enter information
-
Add pump information
5. Processing liquid not circulating although levels and loadings correct.
-
Is this the problem?
Tap to enter information
-
5.1 Airlock in pump. This may occur after a sump refill.
-
Place a stopper in sump overflow outlet. Increase water level above outlet. Start pump. When pump delivering normally, stop pump and remove overflow stopper.
-
5.2 Fault may also be caused by items shown in 1 and 2 above.
6. No media from process gun.
-
Is this the problem?
Tap to enter information
-
6.1 Media Hose detached from gun or adaptor.
-
Reconnect hose
-
6.2 Media hose blocked or damaged
-
Clear hose blockage
-
Replace damaged hose
-
6.3 Distance peg in process gun missing or worn-away allowing non-return valve ball to block gun nozzle
-
Dismantle process gun and replace distance peg
-
Switch ON to show Process Gun Parts Diagram
Tap to enter information
-
Tap to enter information
7. No air from process gun.
-
Is this the problem?
Tap to enter information
-
7.1 Air hose detached from gun or adaptor
-
Reconnect hose
-
7.2 Air hose damaged
-
Replace hose
-
7.3 Non-return valve ball in process gun damaged or worn-away allowing media to feed back and block air hose
-
Detach process gun and hose. Dismantle gun. Replace non-return valve ball. Clear air hose blockage.
-
7.4 Air jet in gun blocked or damaged
-
Dismantle process gun. Replace air jet.
-
Switch ON to show Process Gun Parts Diagram
Tap to enter information
-
Tap to enter information
8. Machine light not working.
-
Is this the problem?
Tap to enter information
-
8.1 Loss of power
-
Check supply to unit light
-
8.2 Faulty tubes
-
Replace tubes
-
Faulty starter
-
Replace starter
9. Air operated window wiper not working.
-
Is this the problem?
Tap to enter information
-
9.1 Motor at rest in one position becomes stiff
-
With air on, move the arm manually and driven movement should start
-
9.2 Operating pressure too low
-
Fully open valve on the motor. Go to rear of machine and turn up the pressure on the small regulator until wiper starts working
-
9.3 Water or dirt restricting airflow in motor
-
Carry out procedure as per 9.1 to blow contamination through
-
9.4 Failing to complete full stroke
-
When the arm reaches the top of each stroke, valves reverse to drive it in the other direction. This changeover causes an audible 'click'. With the air off, move the arm manually to the top of the stroke on each side to check it 'clicks'. If it does not 'click' on one side, check the stop screw on that side to see if it is loose. If it is loose unscrew it gradually and move the arm until it does 'click'. Then tighten the lock nut on the screw. IMPORTANT: If the above remedies fail to work, the problem is internal. We do not recommend that you dismantle the unit. It is recommended that you send the wiper unit back to Dana-Ridge for testing or repairs. Dana-Ridge Ph: (07) 3860 4913
10. Pump operating but at a much reduced pressure and flow.
-
Is this the problem?
Tap to enter information
-
10.1 Pump motor running in wrong direction. (ie. Anti-Clockwise)
-
Change over any two wires on the motor connection and motor will reverse direction. This must be performed by an appropriately qualified tradesperson.


