")


Title Page
-
Conducted on
-
Prepared by
-
MP-ELEC-022
-
Location - SHED?
-
Before You Start
• The information included in this document is intended for experienced personnel familiar with this type of equipment.
• If there are any questions regarding the information provided or the application of the provided information, please contact, aftersales@terex.com
• Operation and maintenance of the machine must be done in accordance with the instructions in the operation manual for the machine. -
• WHEN CARRYING OUT MAINTENANCE OR ADJUSTMENT THE FOLLOWING PROCEDURE MUST BE FOLLOWED
• Ensure the plant is empty of material
• Place appropriate maintenance warning sign.
• Ensure the machine is in a safe and controlled area
• Never work alone. -
FOLLOW ALL SAFETY PRECAUTIONS AS OUTLINED IN THE OPERATOR’S MANUAL.


General Information
-
Date
-
Machine Type & Tier:
-
Machine Serial Number:
-
PDM Software Version:
-
PLC Software Version:
-
Panel Serial Number:
-
Panel MK Number:
-
Tested By:
-
Reason for testing:
Ensuring the initial software works.
Making sure the changes to the software hasn’t impacted anything within the machine’s functionality.
Ensuring that all the main safety features of the machine are still functional. -
Brief description of software change:
Test
Tests Carried Out:
-
Emergency Stop Button Tests
-
Test Function: E-Stop Test<br>Test Steps: <br> 1 Activate/Press E-Stop on Machine<br> 2 Key Panel on<br> 3 Crank/Activate the Engine <br>Expected Result: <br> 1 E-Stop Alarms<br> 2 Engine won’t crank<br>Add Note For Actual Result Achieved:
-
Test Function: E-Stop Test<br>Test Steps: <br> 1 Re-Set E-Stop on the machine<br> 2 Crank/Activate the Engine<br>Expected Result: <br> 1 E-Stop alarm Clears<br> 2 Engine won’t crank<br>Add Note For Actual Result Achieved:
-
Test Function: E-Stop Test<br>Test Steps: <br> 1 Key Panel Off<br> 2 Re-Set the E-stop<br> 3 Key Panel on<br> 4 Crank/Activate the Engine<br> 5 Press the E-Stop Button<br>Expected Result: <br> 1 E-Stop Alarms<br> 2 Engine shuts down<br>Add Note For Actual Result Achieved:
-
Test Function: E-Stop Test<br>Test Steps:<br> 1 Re-Set the E-stop<br> 2 Crank/Activate the Engine<br>Expected Result: <br> 1 E-Stop Alarm Clears<br> 2 Engine won’t crank<br>Add Note For Actual Result Achieved:
-
Umbilical Machine Stop Tests (NOTE: Ensure Key Panel Off and Re-set E-Stop before continuing)
-
Test Function: Machine-Stop Test<br>Test Steps: <br> 1 Activate/Press Machine-Stop on Umbilical<br> 2 Key Panel on<br> 3 Crank/Activate the Engine <br>Expected Result: <br> 1 Umbilical Stop Alarms<br> 2 Engine wont crank<br> Add Note For Actual Result Achieved:
-
Test Function: Machine-Stop Test<br>Test Steps:<br> 1 Re-Set Machine-Stop on the Umbilical<br> 2 Crank/Activate the Engine<br>Expected Result: <br> 1 Umbilical Stop Alarm Clears<br> 2 Engine won’t crank<br> Add Note For Actual Result Achieved:
-
Test Function: Machine-Stop Test<br>Test Steps: <br> 1 Key Panel Off<br> 2 Re-Set the Machine-Stop on the Umbilical<br> 3 Key Panel on<br> 4 Crank/Activate the Engine<br> 5 Press the E-Stop Button<br>Expected Result: <br> 1 Umbilical Stop Alarms<br> 2 Engine shuts down<br>Add Note For Actual Result Achieved:
-
Test Function: Machine-Stop Test<br>Test Steps: <br> 1 Re-Set the Machine-Stop on the Umbilical<br> 2 Crank/Activate the Engine<br>Expected Result: <br> 1 Umbilical Stop Alarm Clears<br> 2 Engine won’t crank<br>Add Note For Actual Result Achieved:
-
Radio Stop Tests (NOTE: Ensure Key Panel Off and Re-set Machine Stop on Umbilical before continuing) if the Radio is Installed
-
Test Function: Radio Stop Test<br>Test Steps: <br> 1 Key Panel Off<br> 2 Re-Set Radio Stop<br> 3 Key Panel on<br> 4 Crank/Activate the Engine<br> 5 Press the E-Stop Button<br>Expected Result: <br> 1 Radio Stop Alarms <br> 2 Engine shuts down<br>Add Note For Actual Result Achieved:
-
Test Function: Radio Stop Test<br>Test Steps:<br> 1 Re-Set Radio Stop<br> 2 Crank/Activate the Engine<br>Expected Result: <br> 1 Radio Stop Alarm Clears<br> 2 Engine won’t crank<br>Add Note For Actual Result Achieved:
-
Hydrualic Oil Level Sensor Tests (NOTE: Ensure Key Panel Off and Re-set Radio Stop before continuing)
-
Test Function: HYD oil Sensor Test<br>Test Steps: <br> 1 Key Panel on<br> 2 Crank/Activate the Engine<br> 3 Disconnect HYD oil level<br>Expected Result: <br> 1 Hydraulic oil level alarms<br> 2 Engine shuts down<br>Add Note For Actual Result Achieved:
-
Test Function: HYD oil Sensor Test<br>Test Steps:<br> 1 Crank/Activate the Engine <br>Expected Result: <br> 1 Hydraulic oil level alarms<br> 2 Engine won’t crank<br>Add Note For Actual Result Achieved:
-
Umbilical Track Enabled Before Countdown Tests (NOTE: Ensure Key Panel Off and Reconnect HYD oil level before continuing)
-
Test Function: Umbilical Track Enabled before countdown Test<br>Test Steps: <br> 1 Key Panel on<br> 2 Crank/Activate the Engine<br> 3 Enter Tracking Page<br> 4 Select Umbilical option <br> 5 Enable Tracks<br> 6 Press any Track button on the umbilical before the 7 second countdown has elapsed.<br>Sub-Test Steps: <br> 7 After step 6 repeat the same step on each of the track buttons on the umbilical. <br>Expected Result: <br> 1 Countdown Timer Restarts <br>Add Note For Actual Result Achieved:
-
Test Function: Umbilical Track Enabled before countdown Test<br>Test Steps: <br> 1 Key Panel on<br> 2 Crank/Activate the Engine<br> 3 Enter Tracking Page<br> 4 Select Umbilical option <br> 5 Enable Tracks<br> 6 Press any Track button on the radio before the 7 second countdown has elapsed.<br>Sub-Test Steps: <br> 7 After step 6 repeat the same step on each of the track buttons on the Radio. <br>Expected Result: <br> 1 Nothing<br>Add Note For Actual Result Achieved:
-
Radio Track Enabled Before Countdown Tests (NOTE: in this test deselect the UMBILICAL and enable track with RADIO)
-
Test Function: Radio Track Enabled before countdown Test<br>Test Steps: <br> 1 Key Panel on<br> 2 Crank/Activate the Engine<br> 3 Enter Tracking Page<br> 4 Select Radio option <br> 5 Enable Tracks<br> 6 Press any Track button on the Radio before the 7 second countdown has elapsed.<br>Sub-Test Steps: <br> 7 After step 6 repeat the same step on each of the track buttons on the Radio. <br>Expected Result: <br> 1 Countdown Timer Restarts<br>Add Note For Actual Result Achieved:
-
Test Function: Radio Track Enabled before countdown Test<br>Test Steps: <br> 1 Key Panel on<br> 2 Crank/Activate the Engine<br> 3 Enter Tracking Page<br> 4 Select Radio option <br> 5 Enable Tracks<br> 6 Press any Track button on the umbilical before the 7 second countdown has elapsed.<br>Sub-Test Steps: <br> 7 After step 6 repeat the same step on each of the track buttons on the Umbilical.<br>Expected Result: <br> 1 Nothing Add Note For Actual Result Achieved:
-
Umbilical/Radio Track Enabled After Countdown Tests
-
Test Function: Umbilical Track Enabled after countdown Test<br>Test Steps: <br> 1 Key Panel on<br> 2 Crank/Activate the Engine<br> 3 Enter Tracking Page<br> 4 Select Umbilical option <br> 5 Enable Tracks<br> 6 Press any Track button on the radio after the 7 second countdown has elapsed.<br>Sub-Test Steps: <br> 7 After 6 repeat the same step on each of the track buttons on the radio. <br>Expected Result: <br> 1 Nothing<br>Add Note For Actual Result Achieved:
-
Test Function: Radio Track Enabled after countdown Test<br>Test Steps: <br> 1 Key Panel on<br> 2 Crank/Activate the Engine<br> 3 Enter Tracking Page<br> 4 Select Radio option <br> 5 Enable Tracks<br> 6 Press any Track button on the Umbilical before the 7 second countdown has elapsed.<br>Sub-Test Steps: <br> 7 After 6 repeat the same step on each of the track buttons on the umbilical. <br>Expected Result: <br> 1 Nothing<br>Add Note For Actual Result Achieved:
-
Testing to track a Machine in TEST mode
NOTE: NOT APPILICAPBLE TO PLCs CR721xS
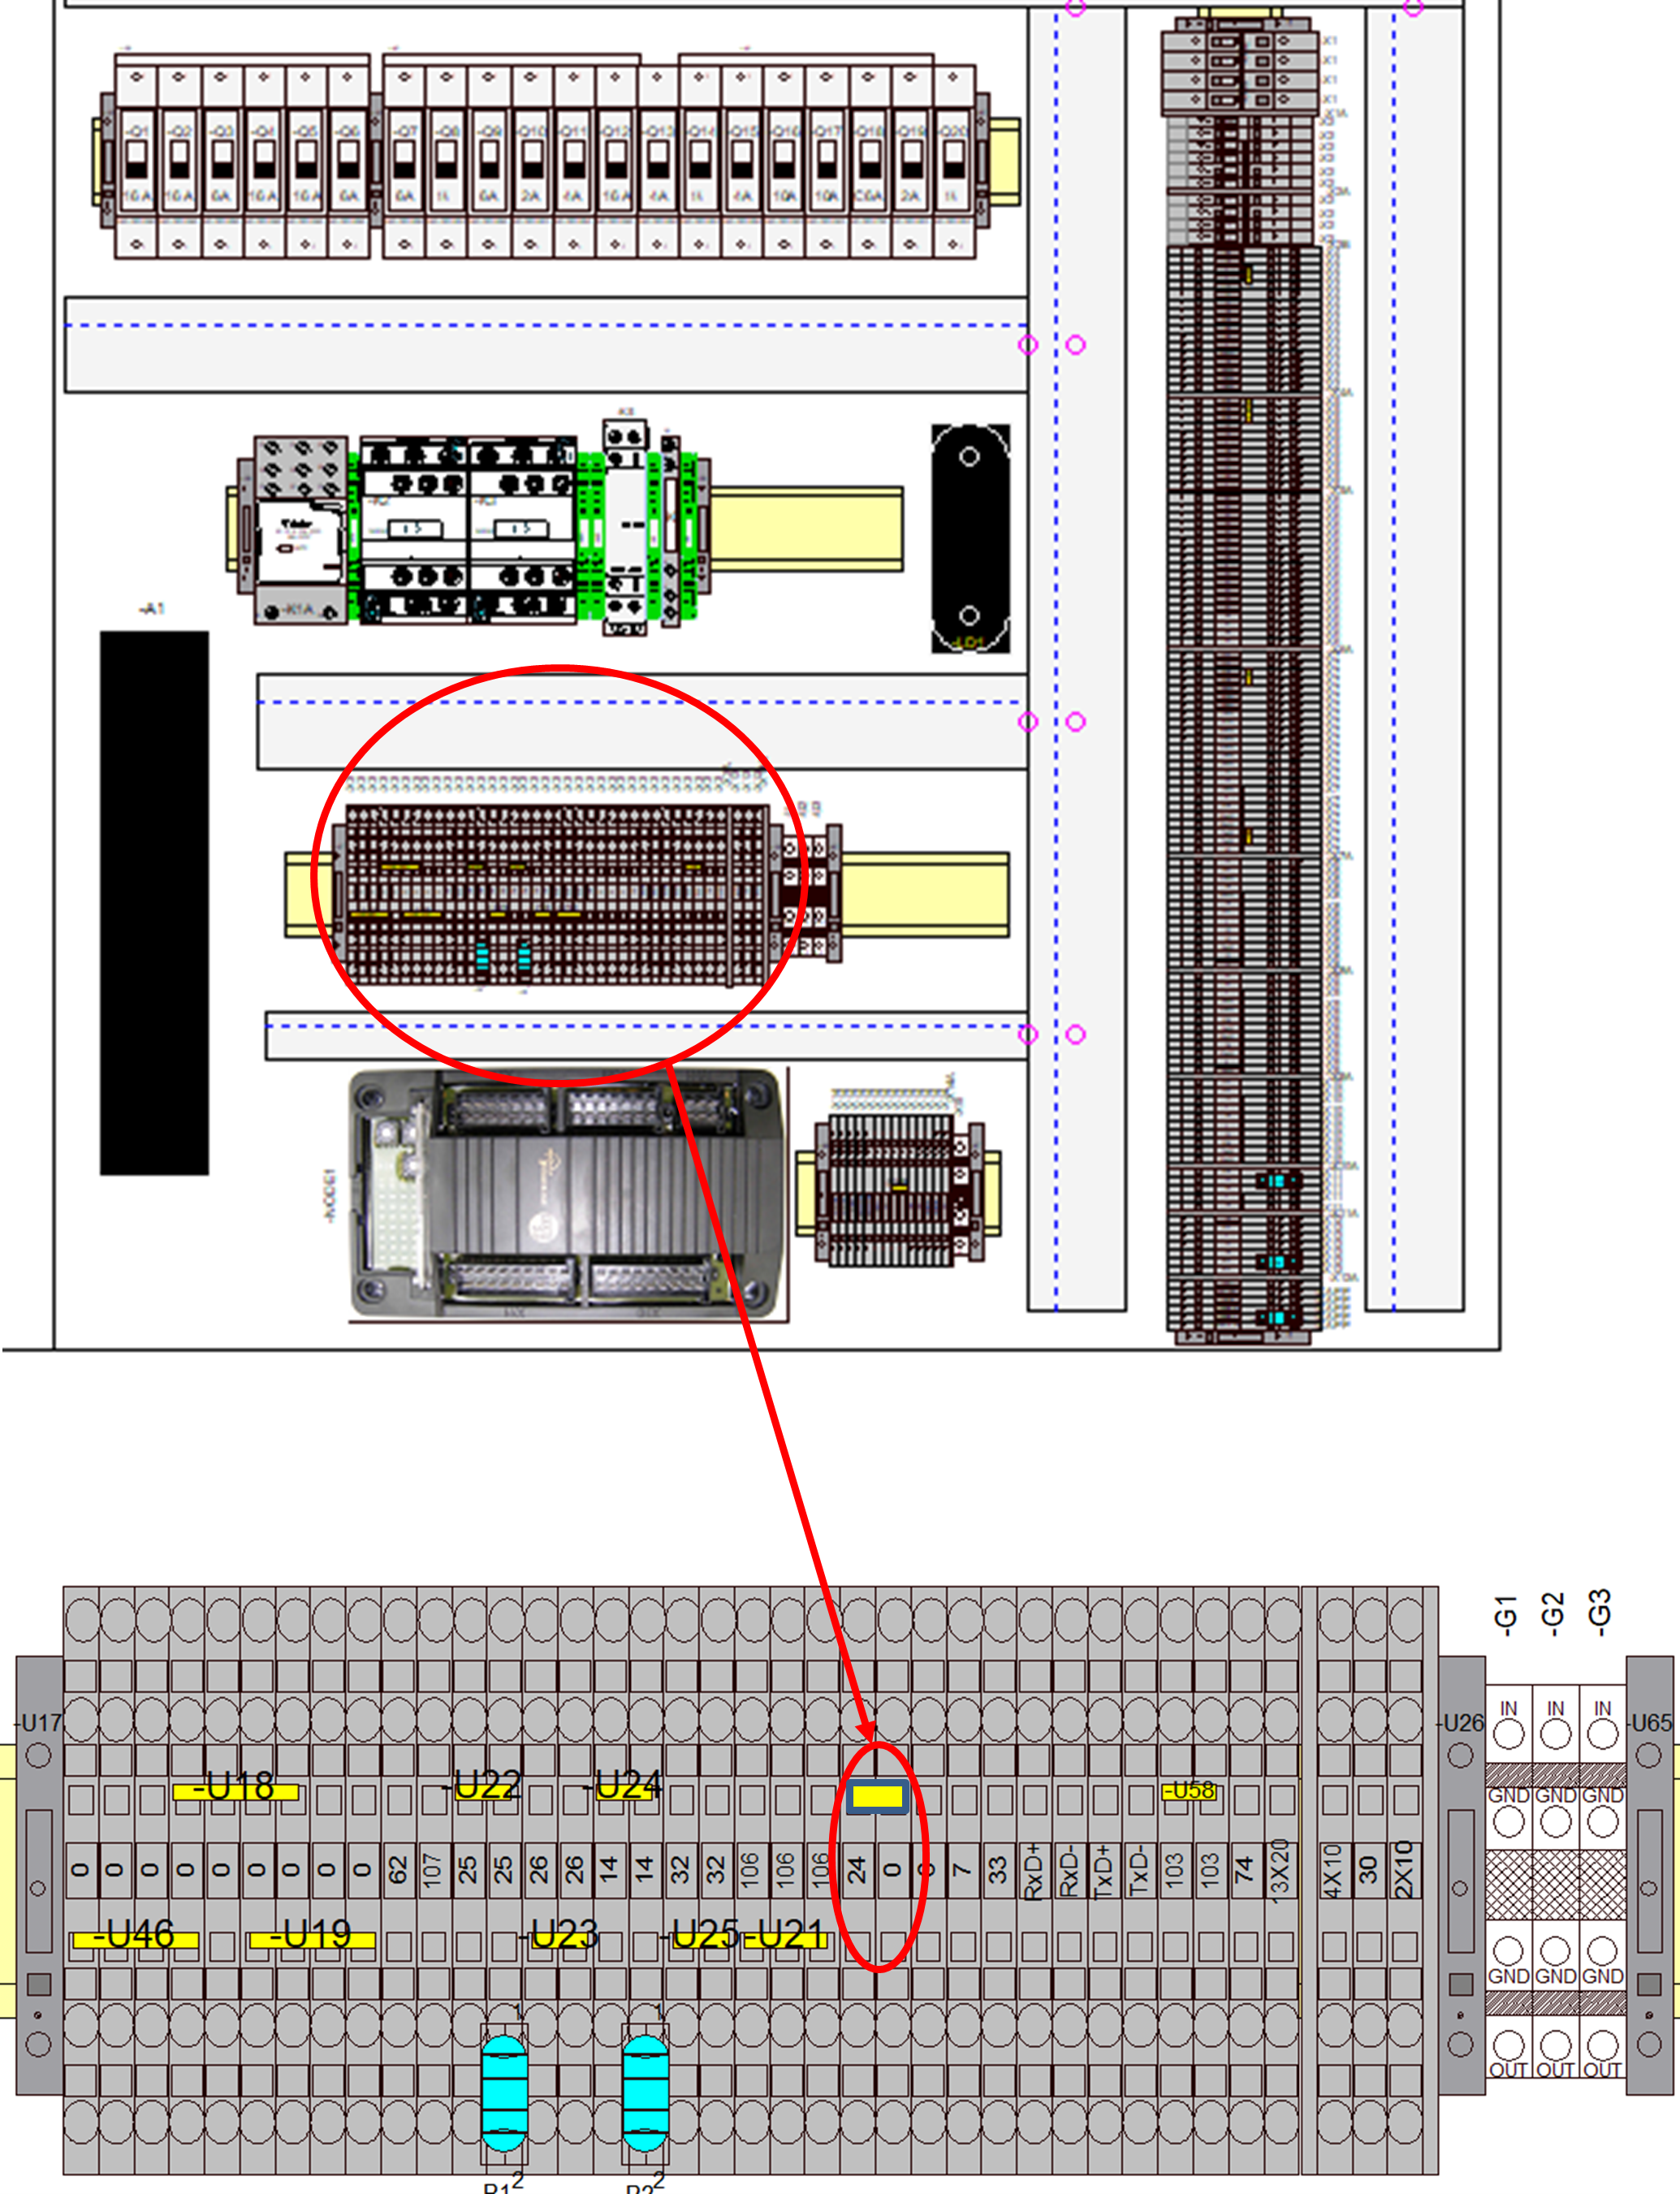
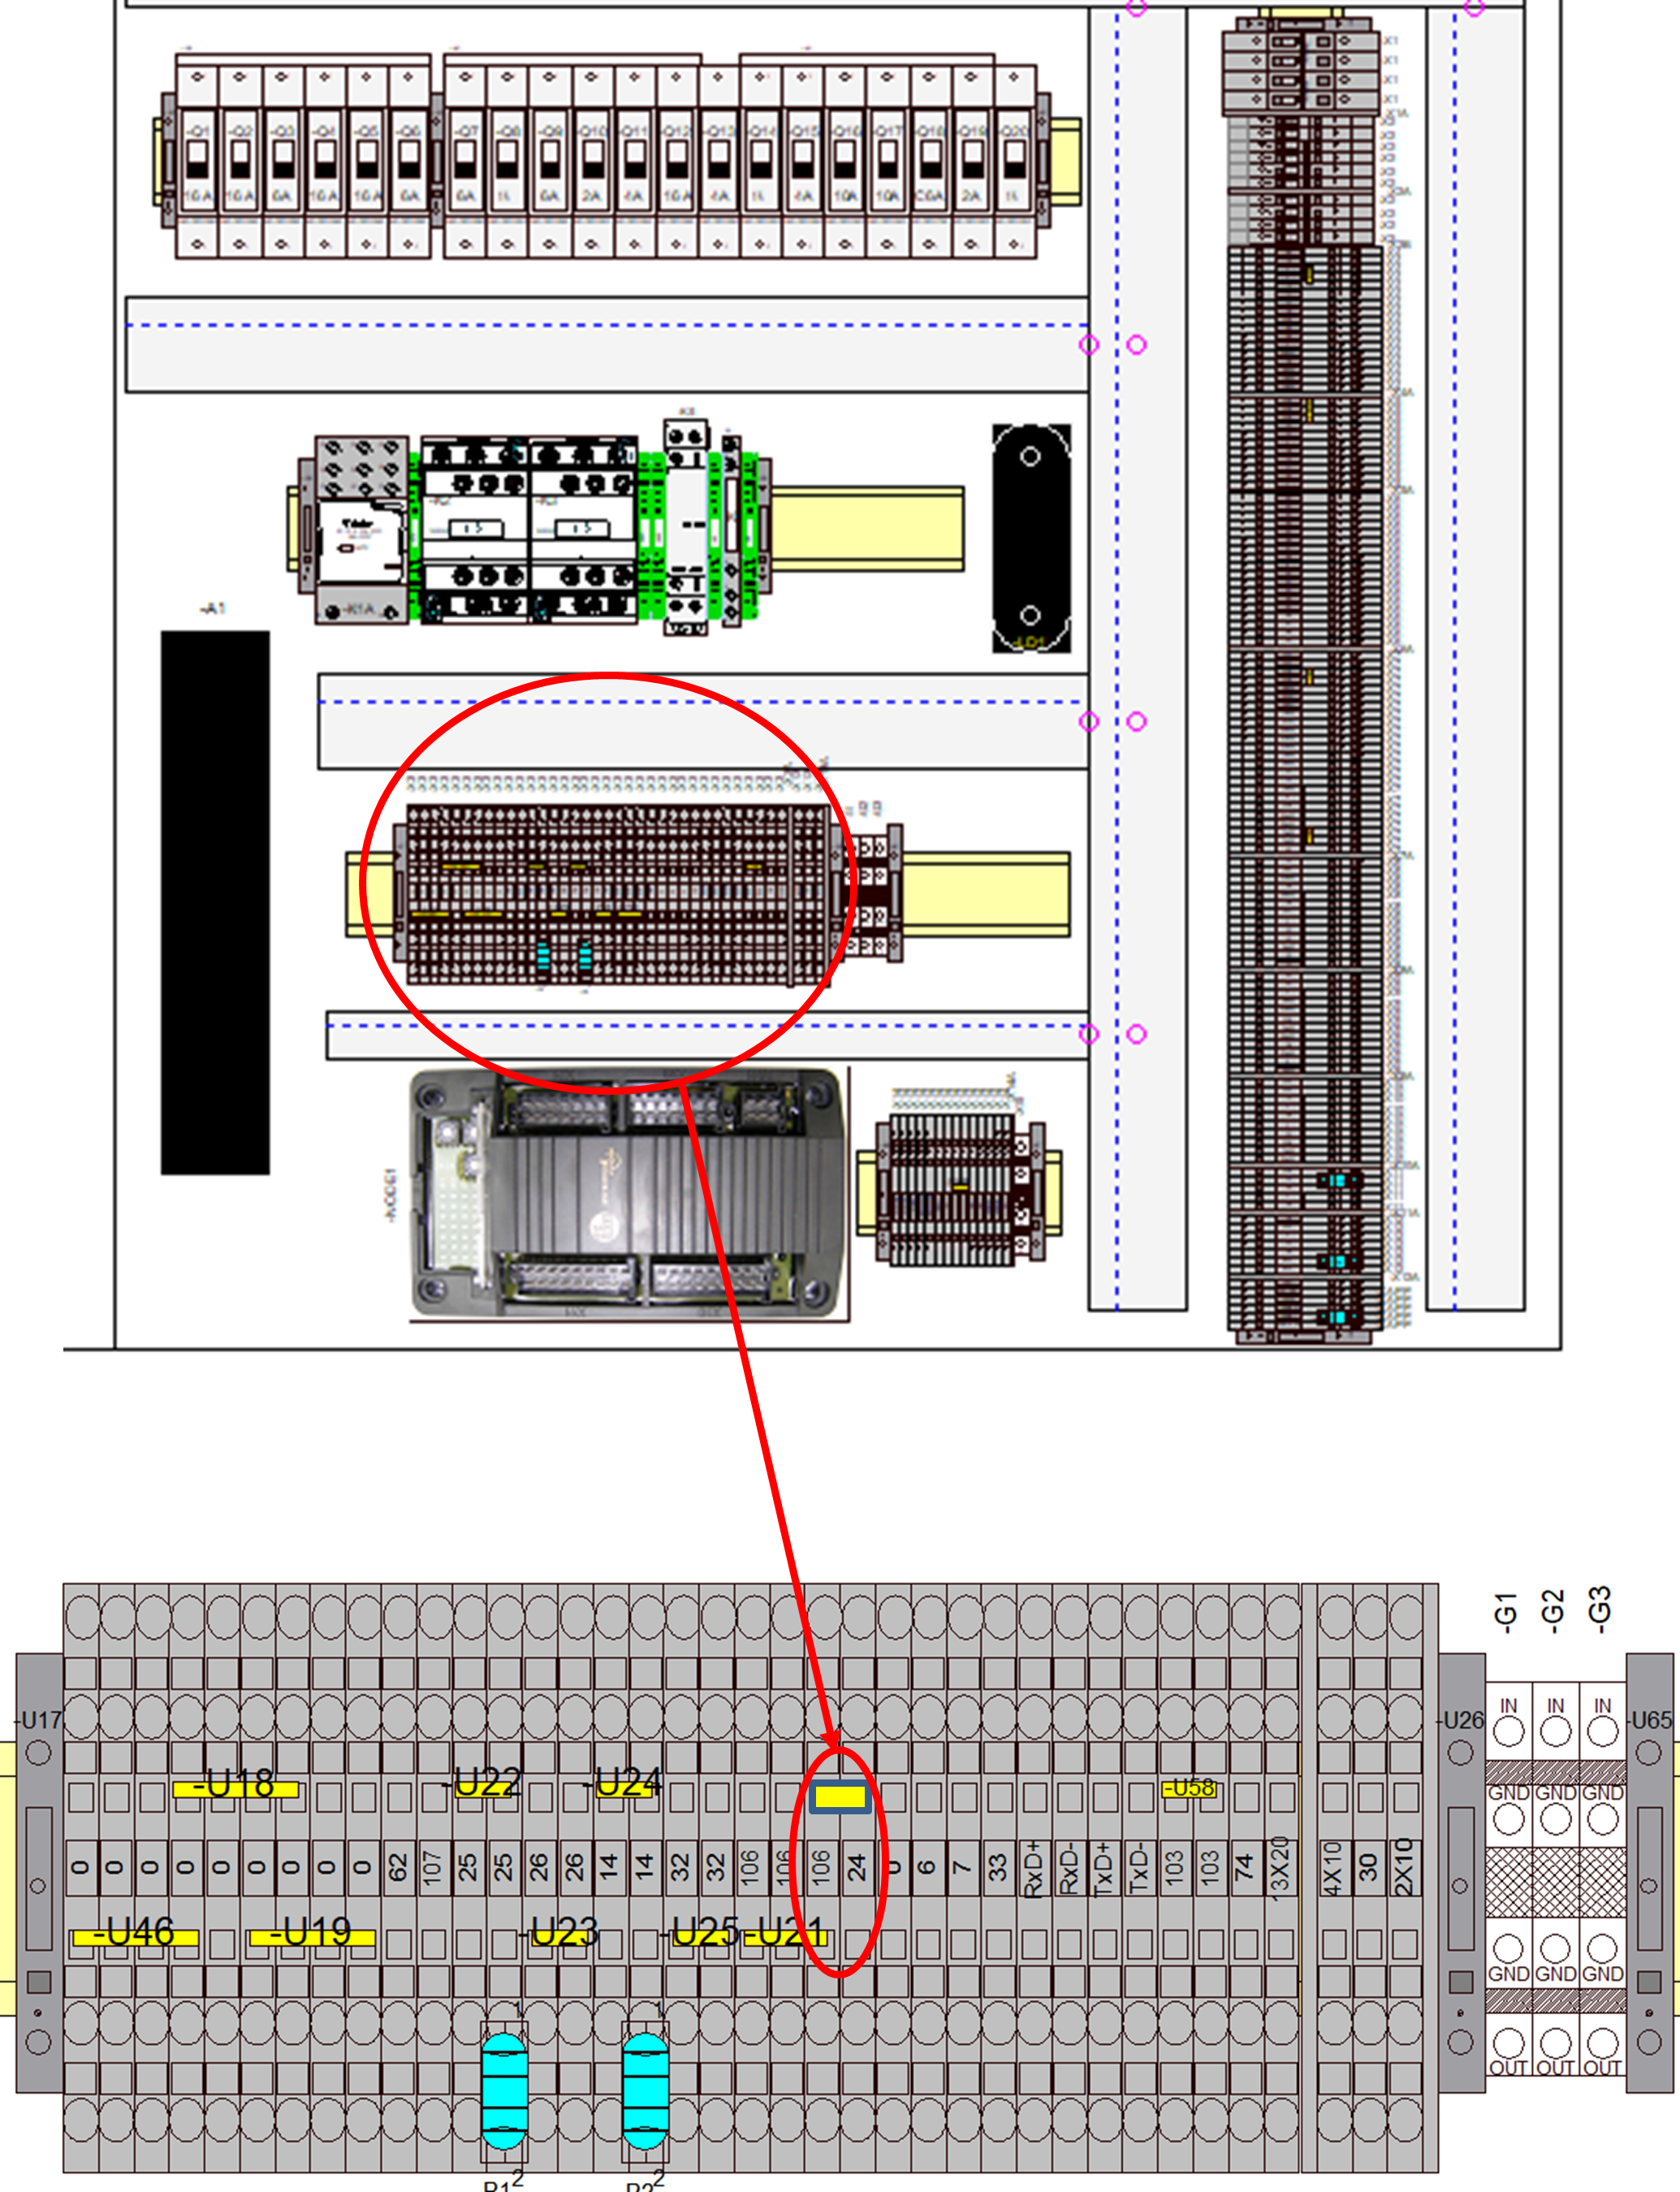
NOTE: PLEASE ENSURE WHEN TEST COMPLETED JUMPER IS PLACED BACK INTO ORGINAL POSITION -
JUMPER IN THE RUN POSITION
-
JUMPER IN THE TEST POSITION
-
Test Function: PLC TEST / RUN Mode Function<br>Test Steps: <br> 1 Place the PLC into download mode (move Jumper between “24V” terminal & terminal “24”)<br> 2 Key Panel ON<br> 3 Crank/Activate the Engine<br> 4 Enter Tracking Page <br> 5 Select Umbilical <br> 6 Enable Tracks<br>Expected Result: <br> 1 Machine will not crank<br>Add Note For Actual Result Achieved:
-
Umbilical & Track Enabled After Countdown Tests
(NOTE: This test will assess the functionality based off the buttons pressed) -
Test Function: Tracking the Machine with the Umbilical Test<br>Test Steps: <br> 1 Key Panel On<br> 2 Crank/Activate the Engine<br> 3 Enter the Tracking Page<br> 4 Select Umbilical<br> 5 Enable Tracks<br> 6 Wait for the 7 second Countdown<br>Sub-Test Steps: <br> 7 Press/Hold the Forward in Low Speed Button<br>Expected Result: <br> 1 Machine tracks as expected<br>Add Note For Actual Result Achieved:
-
Test Function: Tracking the Machine with the Umbilical Test<br>Test Steps: <br> 1 Key Panel On<br> 2 Crank/Activate the Engine<br> 3 Enter the Tracking Page<br> 4 Select Umbilical<br> 5 Enable Tracks<br> 6 Wait for the 7 second Countdown<br>Sub-Test Steps: <br> 7 Press/Hold the Reverse in Low Speed Button<br>Expected Result: <br> 1 Machine tacks as expected<br>Add Note For Actual Result Achieved:
-
Test Function: Tracking the Machine with the Umbilical Test<br>Test Steps: <br> 1 Key Panel On<br> 2 Crank/Activate the Engine<br> 3 Enter the Tracking Page<br> 4 Select Umbilical<br> 5 Enable Tracks<br> 6 Wait for the 7 second Countdown<br>Sub-Test Steps: <br> 7 Press/Hold the Forward in Fast Speed Button.<br>Expected Result: <br> 1 Machine tacks as expected<br>Add Note For Actual Result Achieved:
-
Test Function: Tracking the Machine with the Umbilical Test<br>Test Steps: <br> 1 Key Panel On<br> 2 Crank/Activate the Engine<br> 3 Enter the Tracking Page<br> 4 Select Umbilical<br> 5 Enable Tracks<br> 6 Wait for the 7 second Countdown<br>Sub-Test Steps: <br> 7 Press/Hold the Reverse in Fast Speed Button.<br>Expected Result: <br> 1 Machine tacks as expected<br>Add Note For Actual Result Achieved:
-
Radio & Track Enabled After Countdown Tests
(NOTE: This test will assess the functionality based off the buttons pressed) -
Test Function: Tracking the Machine with the Radio Test<br>Test Steps: <br> 1 Key Panel On<br> 2 Crank/Activate the Engine<br> 3 Enter the Tracking Page<br> 4 Select Radio<br> 5 Enable Tracks<br> 6 Wait for the 7 second Countdown<br>Sub-Test Steps: <br> 7 Press/Hold the Forward in Low Speed Button.<br>Expected Result: <br> 1 Machine tacks as expected<br>Add Note For Actual Result Achieved:
-
Test Function: Tracking the Machine with the Radio Test<br>Test Steps: <br> 1 Key Panel On<br> 2 Crank/Activate the Engine<br> 3 Enter the Tracking Page<br> 4 Select Radio<br> 5 Enable Tracks<br> 6 Wait for the 7 second Countdown<br>Sub-Test Steps: <br> 7 Press/Hold the Reverse in Low Speed Button.<br>Expected Result: <br> 1 Machine tacks as expected<br>Add Note For Actual Result Achieved:
-
Test Function: Tracking the Machine with the Radio Test<br>Test Steps: <br> 1 Key Panel On<br> 2 Crank/Activate the Engine<br> 3 Enter the Tracking Page<br> 4 Select Radio<br> 5 Enable Tracks<br> 6 Wait for the 7 second Countdown<br>Sub-Test Steps: <br> 7 Press/Hold the Forward in Fast Speed Button.<br>Expected Result: <br> 1 Machine tacks as expected<br>Add Note For Actual Result Achieved:
-
Test Function: Tracking the Machine with the Radio Test<br>Test Steps: <br> 1 Key Panel On<br> 2 Crank/Activate the Engine<br> 3 Enter the Tracking Page<br> 4 Select Radio<br> 5 Enable Tracks<br> 6 Wait for the 7 second Countdown<br>Sub-Test Steps: <br> 7 Press/Hold the Reverse in Fast Speed Button.<br>Expected Result: <br> 1 Machine tacks as expected<br>Add Note For Actual Result Achieved:
-
Radio Low Battery Check Test
-
Test Function: Confirm radio outputs turn off on low battery<br>Test Steps: <br> 1 Navigate to radio diagnostic page (running engine not necessary)<br> 2 Hold on any track directional button/paddle<br> 3 Confirm relevant LED lights on screen<br> 4 Remove battery from handset with directional button still pressed<br>Expected Result: <br> 1 LED on screen should turn off as soon as battery is unplugged<br>Add Note For Actual Result Achieved:
-
Screen Navigation Check Test
-
Test Function: Checking For Screen Navigation errors<br>Test Steps: <br> 1 Key Panel On<br> 2 Check Through EVERY Page to confirm that all icons, decals, and other features are correct based on machines BRAND<br> 3 Crank/Activate the Engine<br> 4 Repeat step 2 to check if ALL the pages are correct when engine is active<br>Expected Result: <br> 1 Pages should all be correct as per BRAND<br>Add Note For Actual Result Achieved:
-
Engineer Signature