Title Page
-
Site conducted
-
Conducted on
-
Inspected by
-
Assembly Part Number (Scan Via Barcode)
-
Work Order Number (Scan Via Barcode)
-
Sales Order Number (Scan Via Barcode if applicable)
-
Part Description
Inspection Checklist
-
Which rotor assembly are you inspecting?
-
The Pinion, Impeller and Bearing part numbers match the BOM? (If impeller PN is not visible on part, measure eye diameter and outer diameter to ensure it matches print)
-
Are the bearings built correctly?<br>o Rotation arrows are correct<br>o Inner bearing has movement within anti-rotation pin slot and bearing housing<br>o Inner bearing serial numbers are recorded on exterior of bearing housing with permanent marker<br>
-
Review TA-2000 / 2020 / 3000 / 6000 / 9000 Runout Sheet (QAF-181) for completeness:<br>o Verify header information is complete and Pinion / Impeller part numbers and serial numbers are recorded<br>o Verify runout readings are recorded<br>o Verify runout readings are within tolerance<br><br>Is the above documentation complete?
-
Review applicable Balance Data Form for completeness:<br><br>TA-2000 Balance Data Form (QAF-102)<br>TA-3000 Balance Data Form (QAF-127)<br>TA-6000 Balance Data Form (QAF-174)<br><br>o Verify Date, Rotor Part Number, Bearing Serial Numbers and Arbor Runouts are recorded<br>o Verify balance readings are within tolerance<br>o Verify balance machine printouts for Pinion and Impellers match the Data Form<br><br>Is the above documentation complete?
-
All New Part Inspection Forms are completely filled out?
-
Review BOM to ensure all Repair Operations for completeness and verify sign off by operator (if applicable). Has the following been completed?
-
Perform visual inspection of Rotor Assembly<br>o Verify bearings are installed on correct stages and rotation arrows are correct<br>o Verify pinion rotates freely within bearings<br>o Inspect end balance washers for no excessive grinding. LIGHT BUFFING ONLY<br>o Inspect balance markings on OD of impeller, should be a min of 0.050" material remaining and deburred<br>o Inspect bearing journals to ensure no dings or gouges<br>o Ensure oil drain holes are aligned correctly on bearings <br>o Inspect pinion gear teeth for no deformities or gunk<br>o Verify oil manifold installed or sealed in zip-loc bag for shipping purposes<br><br>Is the assembly conforming?
-
The impeller is free of any surface finish issues on blades or fillets
-
The impeller is free of any excessive undercuts on fillets of impeller
-
Take photos of pinion, impellers, and full rotor assembly
-
Organize and scan in rotor assembly paperwork in the specified order below: 1.4.1.1. Work Order 1.4.1.2. Runout Sheet 1.4.1.3. Balance Sheet 1.4.1.4. Balance printouts (Final, Pinion, Impeller #1, Impeller #2 (if applicable)) 1.4.1.5. Arbor Balance Sheet (if applicable) 1.4.1.6. New Part Inspection sheets 1.4.1.7. Miscellaneous forms (e.g. Internal Worksheets, Vendor Inspection Forms) 1.4.1.8. Copy of the blue hydraulic taper tag (if applicable) 1.4.1.9. Rotor Checklist 1.4.1.10. Bill of Material & Router (if applicable) **Use Xerox printer to scan in paperwork and then attach PDF** **Name PDF as follows: “Part Number_Work Order Number_Part Description.pdf”**
-
The rotor assembly is ready to ship? If there are any other comments or concerns add them in the notes section here
-
The Pinion and Impeller part numbers match the BOM?
-
Review TA-2000 / 2020 / 3000 / 6000 / 9000 Runout Sheet (QAF-181) for completeness:<br>o Verify header information is complete and Pinion / Impeller part numbers and serial numbers are recorded<br>o Verify runout readings are recorded<br>o Verify runout readings are within tolerance<br><br>Is the above documentation complete?
-
Review applicable Balance Data Form for completeness:<br>o Verify Date, Rotor Part Number and Arbor Runouts are recorded<br>o Verify balance readings are within tolerance<br>o Verify balance machine printouts for Pinion and Impellers match the Data Form<br><br>Is the above documentation complete?
-
All New Part Inspection Forms are completely filled out?
-
Review BOM to ensure all Repair Operations for completeness and verify sign off by operator (if applicable). Has the following been completed?
-
Perform visual inspection of Rotor Assembly<br>o Inspect end balance washers for no excessive grinding. LIGHT BUFFING ONLY<br>o Inspect balance markings on OD of impeller, should be a min of 0.050" material remaining and deburred<br>o Inspect bearing journals to ensure no dings or gouges<br>o Inspect pinion gear teeth for no deformities or gunk<br>o Critical areas are covered with protective tape? (Vibration probe locations, etc.)<br><br>Is the assembly conforming?
-
The impeller is free of any surface finish issues on blades or fillets?
-
The impeller is free of any excessive undercuts on fillets of impeller?
-
There are no non-conformances present according to the rotor assembly drawing?<br>o No grinding or markings in the no grind locations<br>o Balance markings are being performed in the correct locations<br>o Rotor assembly PN and WO are etched in correct location on pinion
-
Take photos of pinion, impellers, and full rotor assembly
-
Organize and scan in rotor assembly paperwork in the specified order below: 1.4.1.1. Work Order 1.4.1.2. Runout Sheet 1.4.1.3. Balance Sheet 1.4.1.4. Balance printouts (Final, Pinion, Impeller #1, Impeller #2 (if applicable)) 1.4.1.5. Arbor Balance Sheet (if applicable) 1.4.1.6. New Part Inspection sheets 1.4.1.7. Miscellaneous forms (e.g. Internal Worksheets, Vendor Inspection Forms) 1.4.1.8. Copy of the blue hydraulic taper tag (if applicable) 1.4.1.9. Rotor Checklist 1.4.1.10. Bill of Material & Router (if applicable) **Use Xerox printer to scan in paperwork and then attach PDF** **Name PDF as follows: “Part Number_Work Order Number_Part Description.pdf”**
-
The rotor assembly is ready to ship? If there are any other comments or concerns add them in the notes section here
-
The Pinion and Impeller part numbers match the BOM?
-
Visually Inspect Rotor Assembly<br>o Verify initial gap and final gap are scribed on back of impeller (for hydraulic and recycle taper fits)<br>o Verify “F” distance is scribed on back of impeller (for hydraulic and recycle taper fits)<br>o Verify flats on hydraulic taper are machined correctly and align with oil holes (for hydraulic and recycle taper fits)<br>o Verify overall cleanliness of rotor assembly<br>o Verify Aero ply coating is applied correctly AND FULLY DRY<br>o Verify no gouges or scratches on journals<br>o Verify balance grind marks in the correct locations and deburred <br><br>Is the rotor assembly conforming?
-
The impeller is free of any surface finish issues on blades or fillets?
-
The impeller is free of any excessive undercuts on fillets of impeller?
-
Take photos of pinion, impellers, and full rotor assembly
-
Review MSG Rotor Assembly Runout Sheet (RFM-003) for completeness;<br>o Verify header information is complete and Pinion / Impeller part numbers and serial numbers are recorded<br>o Verify runout readings are recorded<br>o Verify final electrical runout(s) are recorded<br><br>Is the above documentation complete?
-
Review MSG Balance Data Sheet (QAF-054) for completeness;<br>o Verify Date, Rotor Part Number, Balance Machine, Rotor and Impeller stages are all recorded<br>o Verify balance specification and tolerance limits to BOM<br>o Verify torque specification to BOM (if applicable)<br>o Verify initial gap, delta and final gap to BOM (for hydraulic and recycle taper fits)<br>o Verify “F” distance is record (if applicable for Gas Rotors and for hydraulic/recycle taper fits)<br>o Verify Balance machine printouts for Pinion, Impellers and Final Balance match the Data Sheet<br><br>Is the above documentation complete?
-
Review Arbor Balance Data Sheet (FM-2100-02-036) for completeness (if applicable); <br>o Verify Date, Rotor Assembly Part Number, Balance Machine, Rotor and Impeller stages are all recorded<br>o Verify balance specification and tolerance limits to BOM<br>o Verify Arbor # is recorded for each applicable stage<br><br>Is the above documentation complete?
-
All New Part Inspection Forms are completely filled out?
-
Review BOM to ensure all Repair Operations for completeness and verify sign off by operator (if applicable). Has the following been completed?
-
Rotor Prepared for Shipping<br>o Slip fit or hydrualic taper impeller removed from assembly to be shipped loose in box with applicable hardware (balance washer, nut, dowel pin)<br><br>Is the following complete?
-
Hydraulic Impeller blue tag is complete? Take photo.
-
Organize and scan in rotor assembly paperwork in the specified order below: 1.4.1.1. Work Order 1.4.1.2. Runout Sheet 1.4.1.3. Balance Sheet 1.4.1.4. Balance printouts (Final, Pinion, Impeller #1, Impeller #2 (if applicable)) 1.4.1.5. Arbor Balance Sheet (if applicable) 1.4.1.6. New Part Inspection sheets 1.4.1.7. Miscellaneous forms (e.g. Internal Worksheets, Vendor Inspection Forms) 1.4.1.10. Bill of Material & Router (if applicable) **Use Xerox printer to scan in paperwork and then attach PDF** **Name PDF as follows: “Part Number_Work Order Number_Part Description.pdf”**
-
The rotor assembly is ready to ship? If there are any other comments or concerns add them in the notes section here
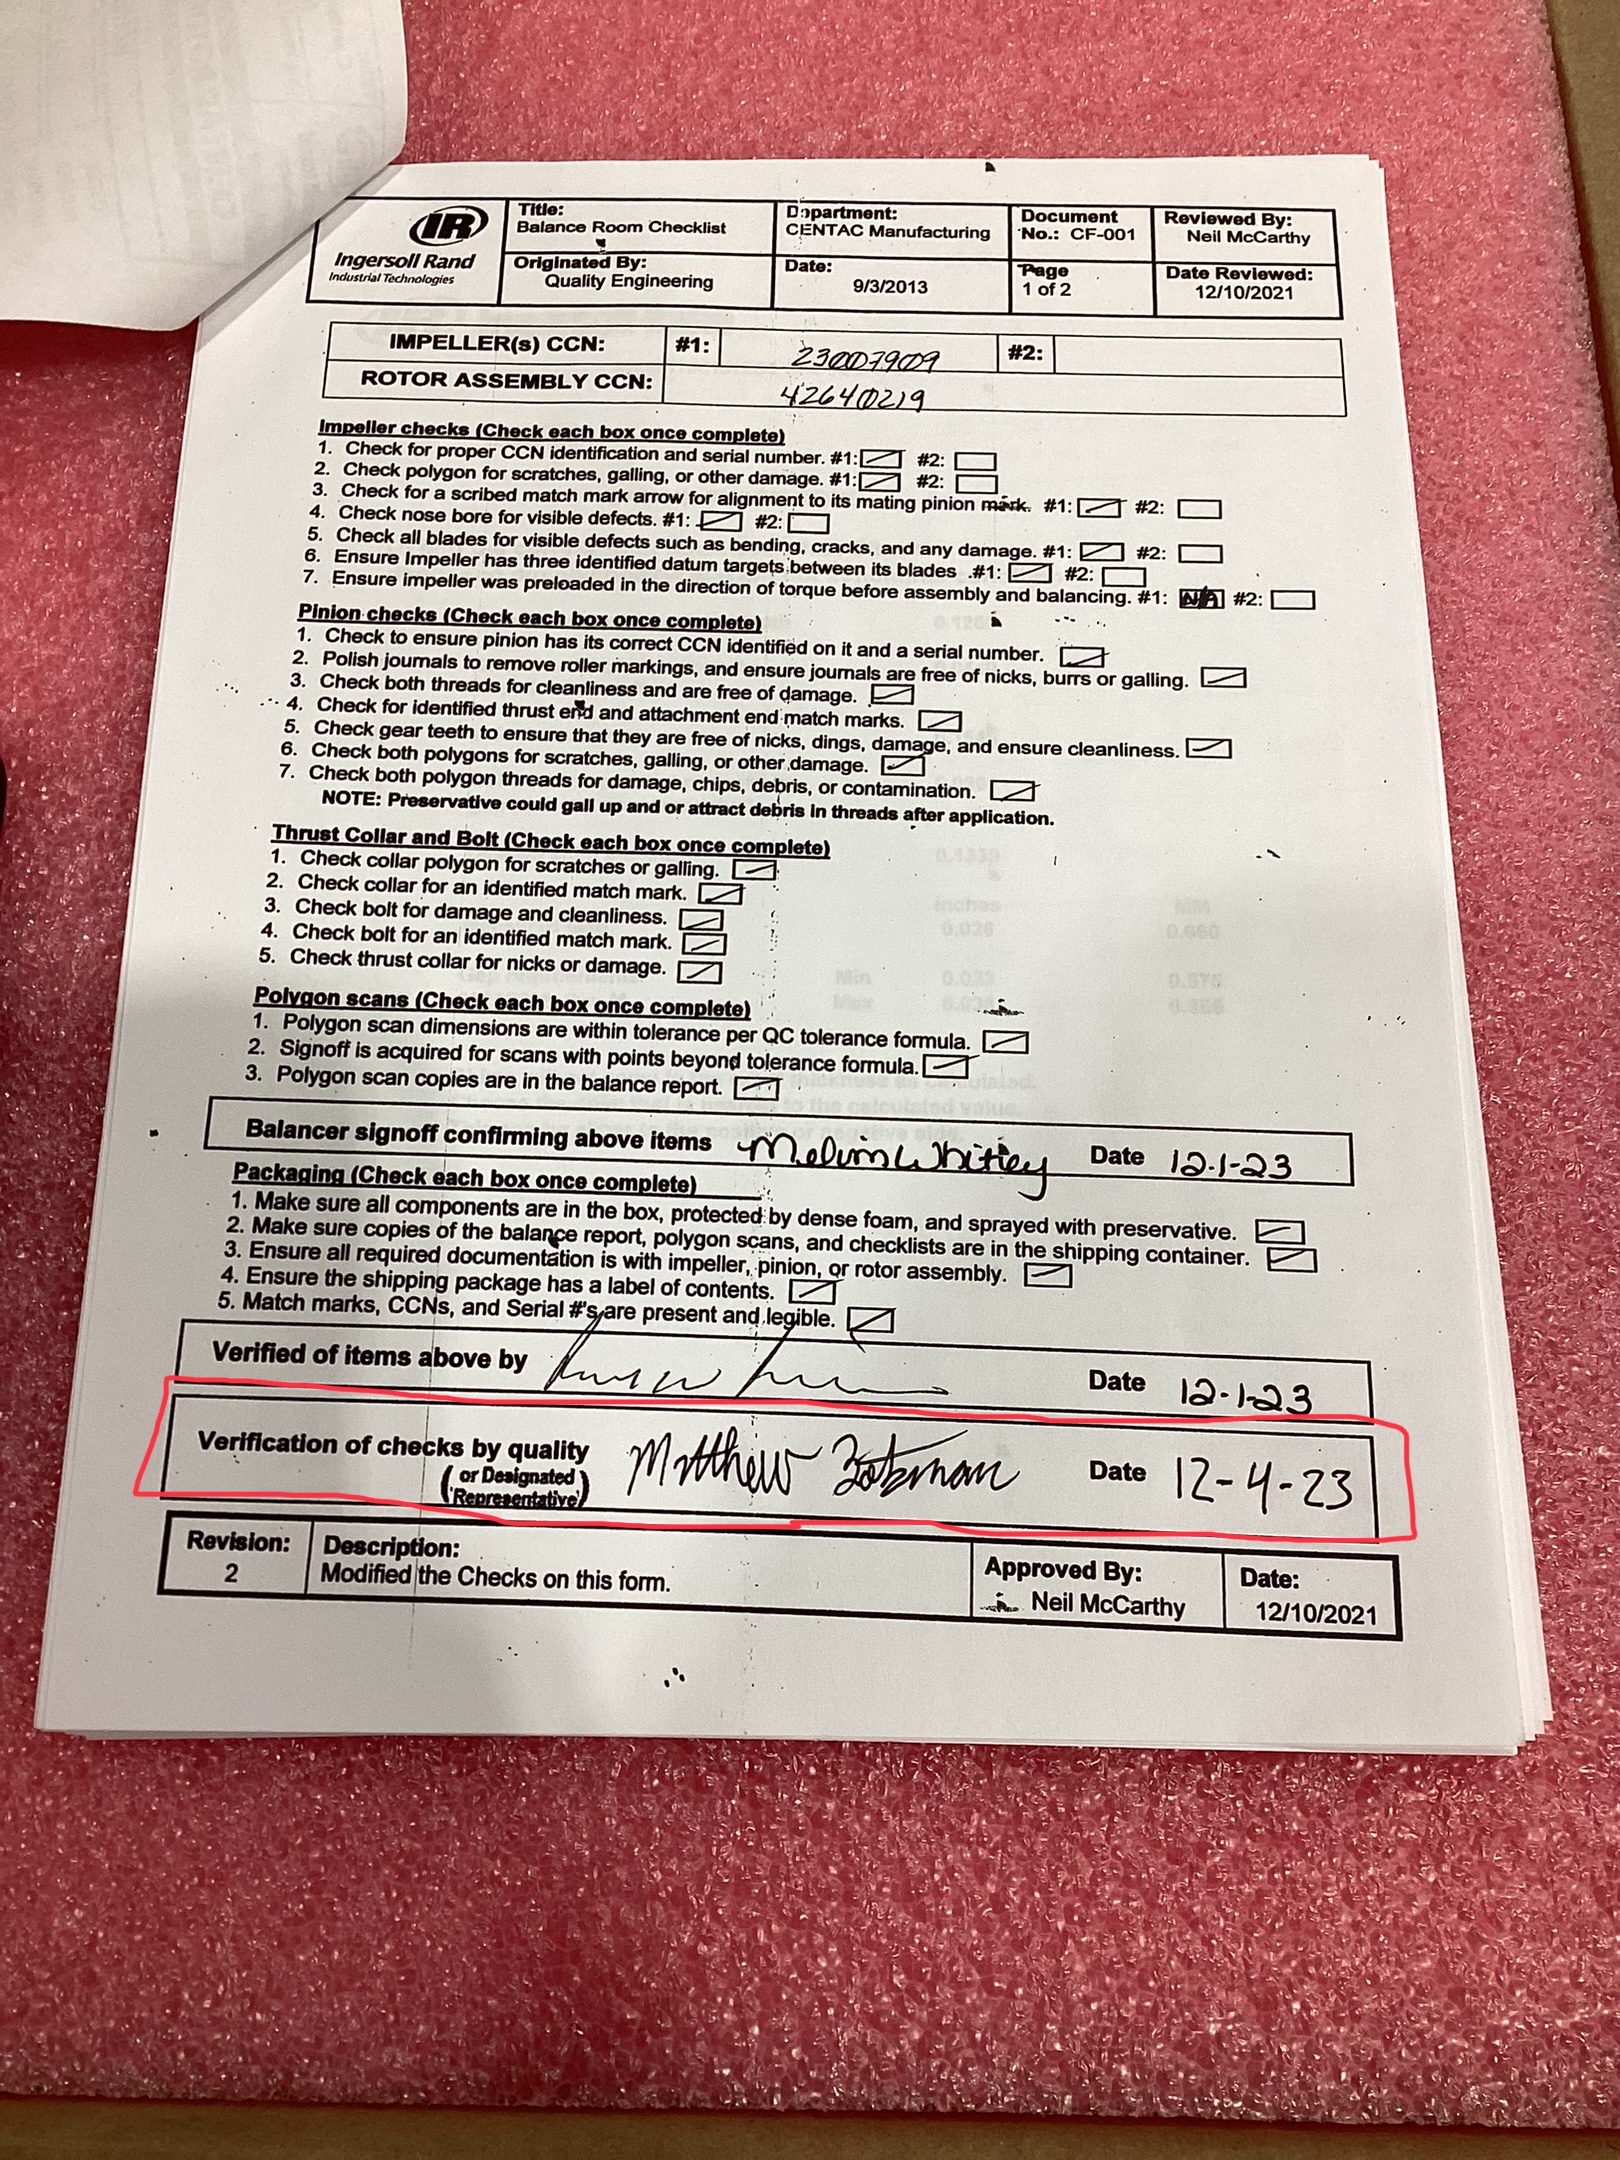
Impeller Checks
-
Verify proper CCN identification and serial number?
-
Verify polygon has no scratches, galling, or other damage?
-
Verify a scribed match mark arrow for alignment to its mating pinion mark?
-
Verify nose bore has no visible defects?
-
Verify all blades have no visible defects such as bending, cracks, and any damage?
Pinion Checks
-
Verify pinion has its correct CCN identified on it and a serial number?
-
Verify journals are polished, and ensure journals are free of nicks, burrs or galling?
-
Verify both threads for cleanliness and are free of damage?
-
Verify identified thrust end and attachment end match marks?
-
Gear teeth are free of nicks, dings, damage, and ensure cleanliness?
-
Verify both polygons have no scratches, galling, or other damage?
-
Verify both polygon threads have no damage, chips, debris, or contamination?
Thrust Collar and Bolt
-
Check collar polygon has no scratches or galling?
-
Collar has an identified match mark?
-
Bolt has no damage and is clean?
-
Bolt has an identified match mark?
-
Thrust collar has no nicks or damage?
Polygon Scans
-
Polygon scan dimensions are within tolerance per QC tolerance formula? No polygon scans for C750 Stg 1
-
Signoff has been acquired for scans with points beyond tolerance formula? No polygon scans for C750 Stg 1
-
Polygon scan copies are in the balance report? No polygon scans for C750 Stg 1
Packaging
-
Make sure all components are in the box, protected by dense foam, and sprayed with preservative?
-
Make sure copies of the balance report, polygon scans, and checklists are in the shipping container?
-
Ensure all required documentation is with impeller, pinion, or rotor assembly?
-
Ensure the shipping package has a label of contents?
-
Match marks, CCNs, and Serial #'s are present and legible?
-
Preload In Direction of Torque Sticker
-
Is the preload sticker shown above on the inside of the box?
-
Take photos of pinion, impellers, and full rotor assembly
-
The rotor assembly is ready to ship? If there are any other comments or concerns add them in the notes section here
-
Quality Signature/Date on Checksheet
-
Signature and Date the paperwork as shown above
-
Verify Part Numbers and Quantities in the kit match the BOM. Is everything accounted for?
-
Verify no paint imperfections on things like inlets and diffusers. Does everything look good?
-
Take photos of overall kit
-
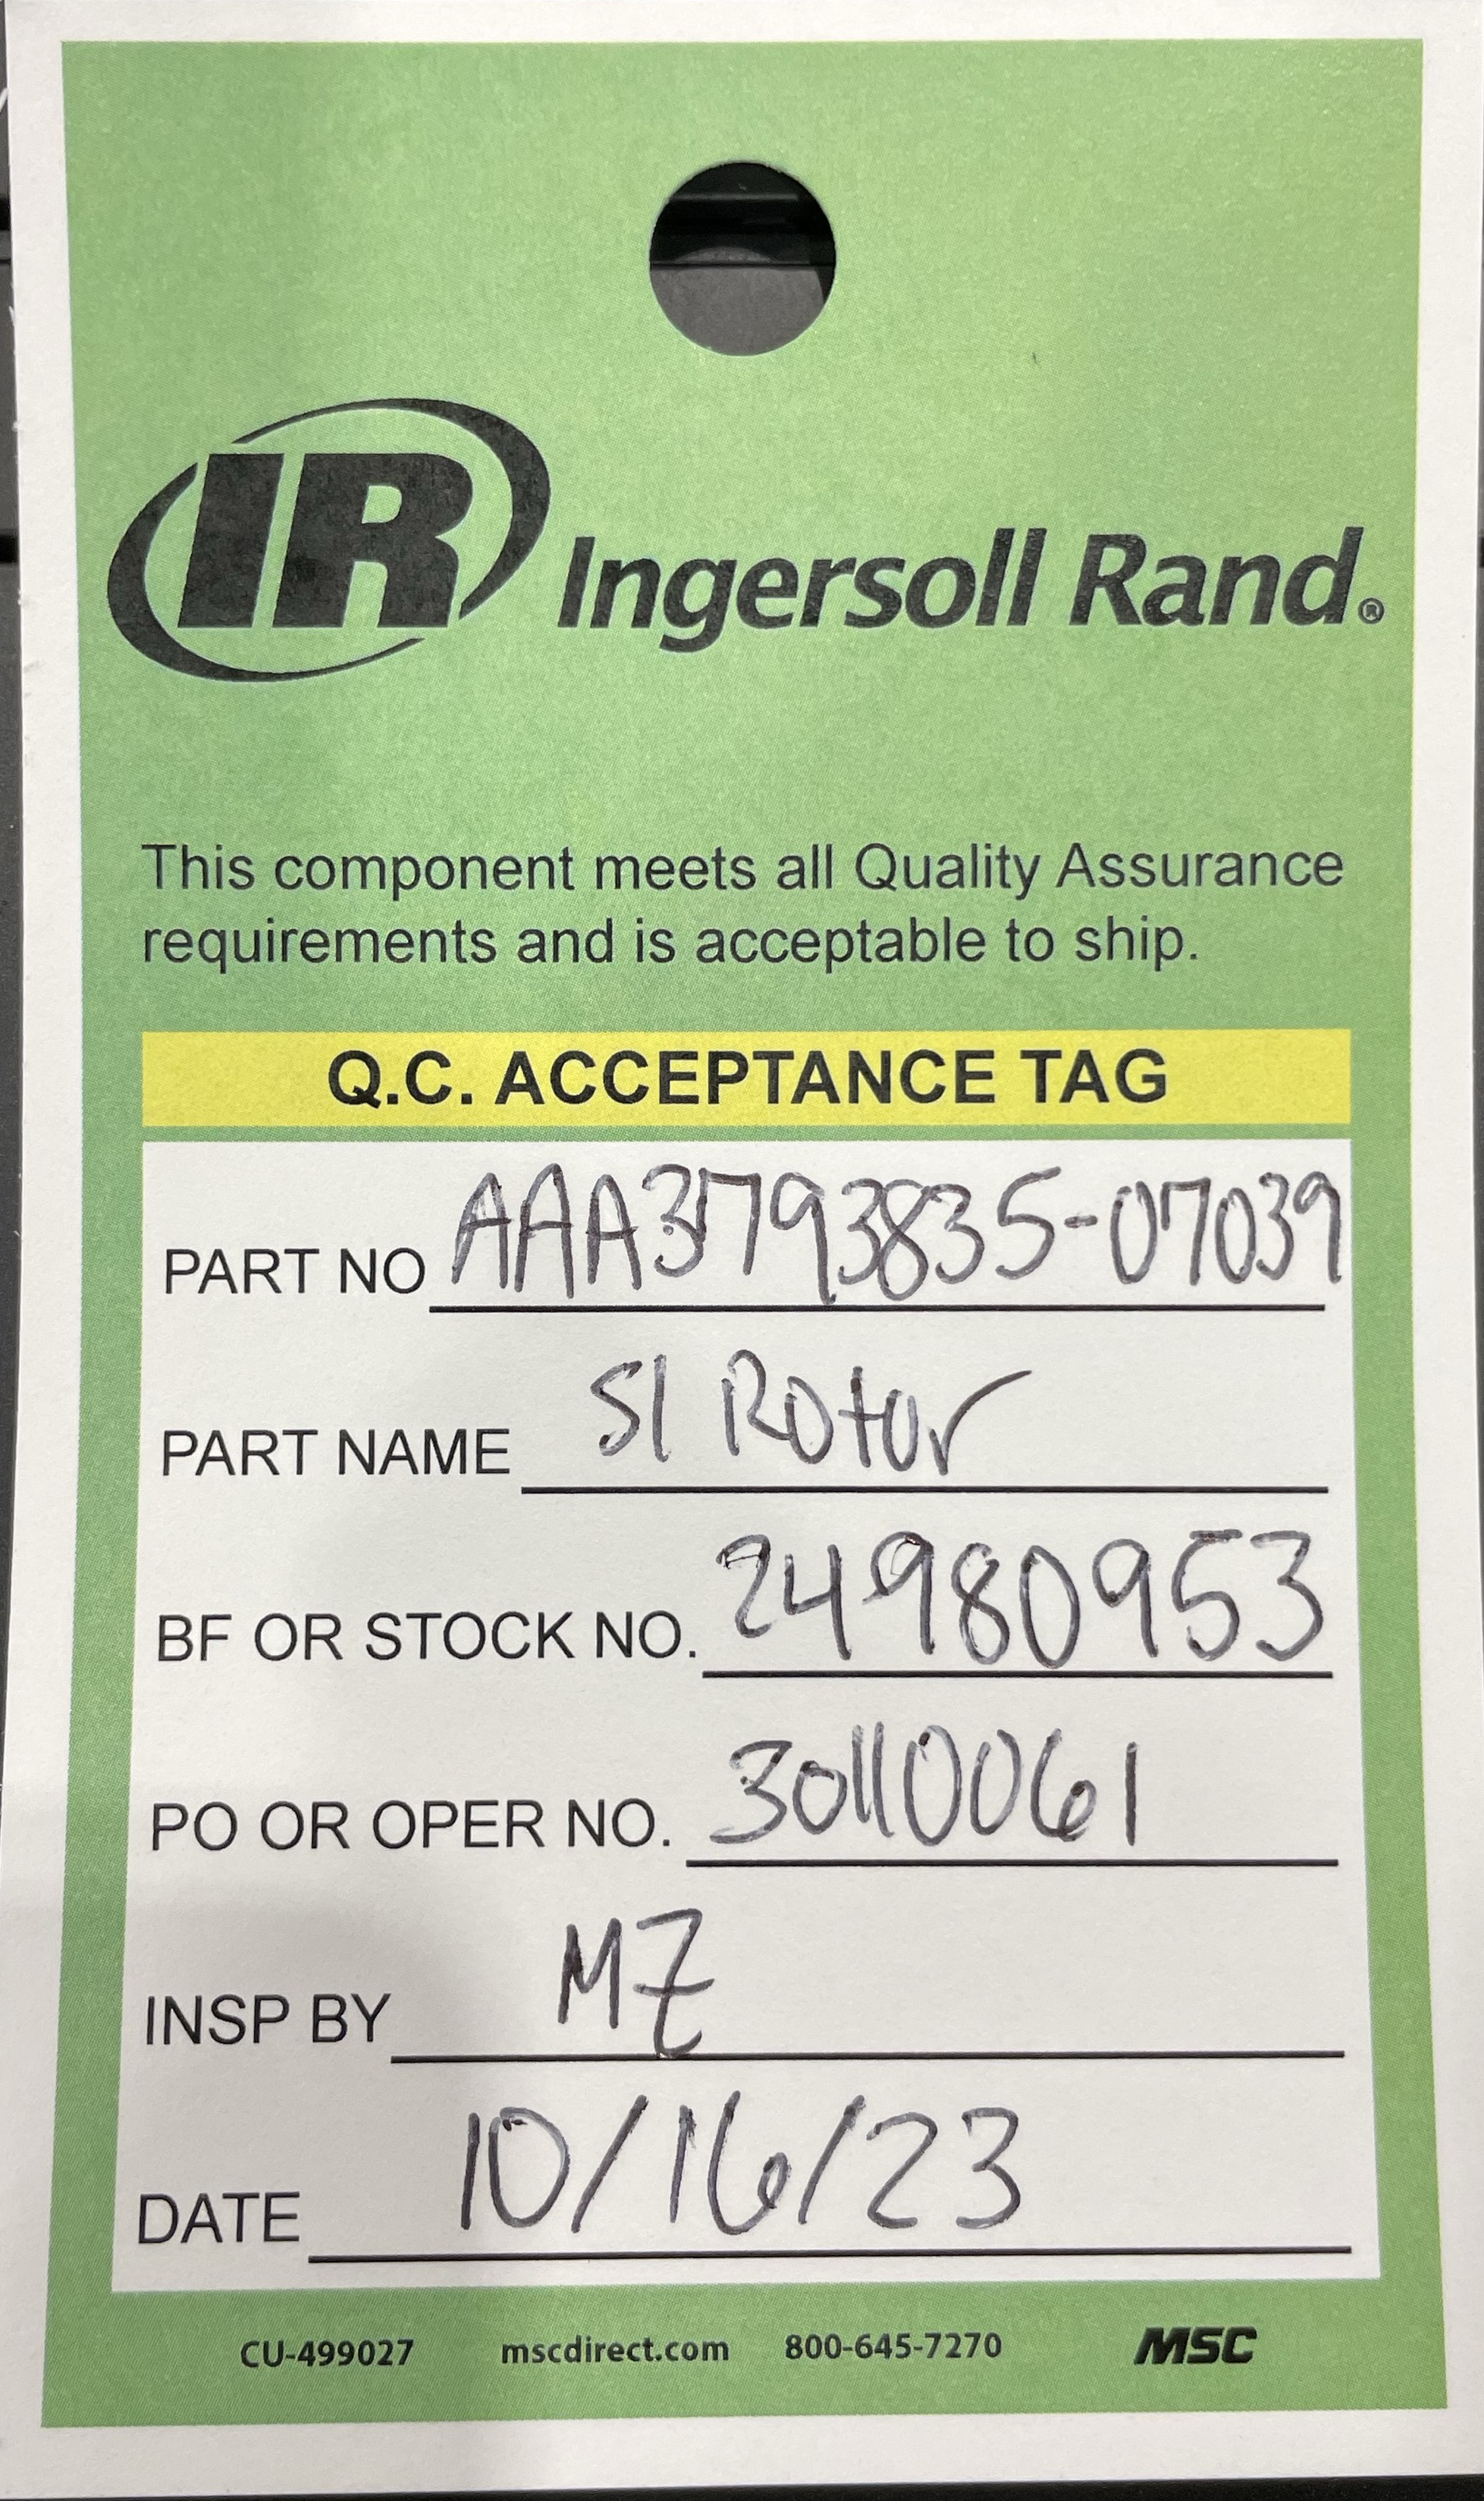
Sign Q.C. ACCEPTANCE TAG PART NO. – Part Number PART NAME – Rotor Description (i.e. LS Rotor, Cover Rotor, 1st Stg Rotor, 3rd Inlet, 2nd Diffuser) BF.OR STOCK NO. – Sales Order Number P.O. OR OPER. NO. – Work Order Number INSP. BY – Quality Engineer Initials DATE - Date Take Photo of tag as shown below:
-
Example Photo of Acceptance Tag