Title Page
-
Conducted on
-
Engineer Name:
-
Tech Number:
-
Visit Number:
Visit Type
-
Install
-
Service
Dish Work
-
Is the Dish Face Clear of Damage?
-
If No: Replace Dish
-
Is the LNB Reflector Face Clear of Damage, Rust or Decoloured?
-
If No: Replace LNB
-
Have you tested all the Ports on the LNB (Not just the ones in use)?
-
Are the F Connectors Compliant?
-
If No: Replace F Connectors.
Cable Work
-
Is the Cable CT63 or CT100?
-
Is there any visible joins or damage to the Cable Route?
-
If Yes: The cable MUST be replaced.
-
Is there a difference type of cable at Dish & STB end?
-
If YES: The Cable MUST be replaced.
STB Work
-
What is the STB in Place Recordable or Non-Recordable?
-
If a Recordable STB, is this running on Single Feed Mode?
-
All Recordable STBs should run with a minimum of 2 Cables.
However if Single Feed Mode is required please follow the below guide:
Switching the Single Feed Mode to ‘ON’
1 First, ensure that the satellite feed is connected to Dish Input 1 on
the back of your set top box.
2 Press services on your remote to highlight options in the Top
Menu, then the right arrow once so that Settings is highlighted.
3 Now press select to highlight the Picture tab.
4 Press 0, 1, select in quick succession to enter the Installer menu.
5 The Setup tab will then be highlighted within the Installer menu.
Press down to highlight Single Feed Mode within the menu.
6 Press the right arrow once to turn Single Feed Mode to ‘ON’.
7 Press the green button to Save Settings and the Single Feed
Mode Caution message will be displayed.
8 Your Sky±HD box is now ready to be rebooted. When this happens:
a. Any current recordings will be stopped
b. On Demand Showcase will be disabled
c. Auto Standby will be enabled
To reboot your box, press select, but please allow a little time for this
to happen. -
What Source/Input is the STB on?
-
If Connected via Scart Lead - Make sure the Scart Control is turned on via Picture Settings.
-
Prior to swapping out the Faulty STB, ensure you have checked the following settings:<br>Picture Resolution<br>Picture Size<br>Optical Sound Delay<br>HDMI / Scart
-
Changing the picture settings
When your Sky±HD box was installed, your engineer should have
set the picture settings at the right level to suit your equipment,
so we recommend you don’t adjust them here unless you find it
absolutely necessary.
Sky’s HD service uses two HD picture formats. The first, 1080i, brings
the number of rows in the frame up to 1080 — that’s over 500 more
than a standard PAL image. The other, 720p, shows 720 rows in each
frame and refreshes the screen at twice the rate of 1080i.
In rare cases, your TV may be able to display only one of these formats.
Check your TV’s settings if you find the picture isn’t as sharp as it should
be. Otherwise, you can change your HD picture settings to find the ideal
resolution output.
You can change the resolution setting as follows:
1 Press services, scroll right and select Settings then select
the Picture tab.
2 Highlight HD Resolution Output and use the left/right arrow to
choose from Automatic (this is the default and recommended
setting), 576 (which is for programmes other than HD only),
720p and 1080i.
3 Follow the instructions on screen to confirm the changes.
If your TV doesn’t display anything after you confirm the changes, the
new setting is incompatible with the TV. Restart your Sky±HD box as
follows to go back to the previous setting. Switch the box to standby
then wait at least 60 seconds before unplugging it from the mains
supply. After another 30 seconds, plug the box back in to the mains.
Wait another 60 seconds before turning the box back on again. -
A Software download MUST be completed on all Visits. This Action is Mandatory not Optional !!
The latest software can be found in Model Look Up Tool via IKnow2. -
Please add a picture of the Software Download conducted.
-
NOTE: If a STB requires a swap out this must be like for like. Follow the A Grade Box Swap Compliance PDF Document, which provides this information.
Magic Eye / TV Link
-
Is there a Magic Eye / IO Link Present?
-
If Yes: Refer to Iknow2, TV Link / Magic Eye Guide.
RF Output
-
Is the Cable connected to RF1?
-
If the cable is plugged into RF1 this will usually mean that there is no Magic Eye system in place.
-
Is the Cable connected to RF2?
-
If the cable is connect to RF2 via the STB, this will usually mean a Magic Eye system is in place.
Check with the customer if they can watch Sky on any other TV and then refer to Refer to Iknow2, TV Link / Magic Eye Guide.
Please check this before you swap any boxes. If you need to swap the box please ensure to check the channel output through engineer mode in the settings so that you can put this in place on the new box. -
Are all the TVs affected?
-
If Yes: This would be a fault with the RF2 Output, Refer to Iknow2, TV Link / Magic Eye Guide
If No: This would indicate there is a splitter in place that may be faulty. As a business we do not supply or service Splitters, therefore the customer would need to seek independent advice.
Final Checks
-
Datalogger (full & mini) completed and uploaded to the job sheet.
-
If No: Refer to a Team Manager.
-
If multi room - All boxes within the property checked and in working order.
-
If No: Take Relevant Steps to resolve issues.
-
Is the remote control paired to the customers TV?
-
If No: Pair Remote Control to TV(s)
-
Setting up and resetting your remote
If you leave empty batteries in your remote for too long, you may need to
reset it to work with your TV.
If this has happened, or for any other reason the remote doesn’t work with
your TV, follow these steps carefully:
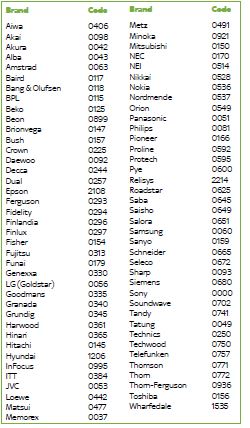
1 Look up your TV’s brand and code in the list on the right. If you can’t
find it here, see Alternative Set Up (page 97).
2 Turn your TV and Sky±HD box on and press tv on your remote control.
3 Hold down select and the red button together until the red light
on your remote blinks twice (this is after about two seconds).
4 Press tv again.
5 Key in your TV’s brand code. The light on your remote blinks twice.
6 Press standby on your remote. If your TV switches off, press select.
The light on your remote should blink twice. If your TV does not switch
off, press tv, then press standby. Repeat the sequence of pressing tv
then standby until the TV switches off, then press select. If the light
blinks three times, your remote has checked all the possible settings
for the code you used. Check you have the right code and start again
at step 1.
7 Turn your TV back on and press the tv guide button on your remote.
The Sky± Hompeage appears, meaning the remote settings have
been reset. -
Brief description of the fault found on arrival and the work you have carried out to fix this.
-
Engineer signature