


Title Page
-
Customer and brand
-
Work request
-
Store name
-
Store number
-
Conducted on
-
Engineer name
-
Managers name
-
Store Location
-
Parking
Data back up and deinstallation
-
Template version LIVE v 5 This audit guides you through the various stages of the TESCO installation process.
ENSURE THAT YOU CHECK IF THIS IS A BACK TO BACK SITE THIS EQUIPMENT LEAVE THE ORIGINAL EQUIPMENT IN LOCATION. ENSURE BOTH ARE ACCESSABLE.
Stage 1 - Back up - locate the OLD PC and back up all required data onto a USB stick.
Stage 2 - Deinstallation - label, remove all equipment and pack into boxes and bring back to unit 18. Note serial numbers as prescribed.
Stage 3 - Installation - installation of the new PC, monitor after the refurbishment.
Stage 4 - Restore data - Restore the data onto the new PC and confirm all data is restored.
Stage 5 - Test - full systems sign off with the manager and comms tests.
BEFORE YOU ATTEND SITE MAKE SURE YOU HAVE THE BELOW EQUIPMENT. ESCALATE TO YOUR LINE MANAGER IF YOU NEED ANYTHING.
TEXT ATTENDANCE TO PROJECT CONTROL
Equipment
Multi tester for walls, tests for electric, copper pipes
Shelving bracket
Shelving mounts
Shelves
Spirit level
Drill
Raw plugs
Fixings for different surfaces
Labelling machine
LAN testers
Ladders
Analogue phone
Measuring tape
Modules
Back boxes
Faceplates
Patch leads
Screw driver
Drill
Filler
Cable ties
Torch
RAMS
ID Badge
USB STICK
Site PC and peripherals
Spare PC and peripherals
Site control sheet and Router configuration details.
Data back up and Deinstallation.
-
Upon arrival to site:- advise project control you are on site.<br>GO STRAIGHT TO THE CAFE AREA. DO NOT CHECK IN WITH CUSTOMER SERVICES OR SECURITY.<br>Introduce yourself to the cafe manager / team leader and ensure access to cafe office is established to proceed with the installation.<br><br>If you are unable to proceed please escalate immediately. Are you able to proceed?
-
Please specify below
-
Suitability of the new equipment location must be checked. In some instances brackets and shelving is required to be installed.
Write a brief summary of the required works. For example : The current location is not suitable, it is next to a door entrance. Re position 1 meter away from the door and install shelving on wall. The wall is a solid brick wall.
Take photographs of both locations. Annotate the photographs to highlight locations.
YOU MUST TEST THE WALLS FOR POWER, GAS PIPES, STUD WALLS. If present another location will need to be evaluated. Please ensure if shelving is to be installed. A photo of the wall test is taken and recorded below. -
Is shelving or carpentry work required?
-
Photograph of current and suggested works.
-
Please specify the works required below. Shelving must be installed above the current PC location.
-
Test the wall for electricity wires and gas pipes. Has the location for mounting and drilling the shelf placement on the wall passed?
-
Find an alternative location. If no location is suitable, escalate to Project control immediately.
-
Please specify details.
-
Photograph of test in locations.
-
Continue with the installation. Take test and completion of shelving below.
Ensure the test results are clearly visible.
Ensure completion shelf has the spirit level in view. -
Photograph of test in locations and shelving completion.
-
Log onto the old PC with the manager. <br>Label all equipment with the store name and store ID.<br>Locate the folder and ensure all documents are below 2 Gig. Work with the manager to reduce the size of the folder if required.<br>THIS IS MANDATORY.<br>Back up all the documents and transfer them onto the USB Drive.<br>Check the number of documents and file sizes match in both files. Do they match?
-
Escalate to Project Control Immediately and enter below why this is not possible.
-
On the old PC with the manager confirm all email accounts used.<br>For each email set an out of office email advising the below.<br><br>Thank you for your email. This email address is no longer active. Please could you resend the email to the below address.<br><br><enter email address> THIS IS AS PER THE CONTROL SHEET<br><br>Thank you<br><br><enter the Managers name>
-
Escalate to Project Control Immediately and enter below why this is not possible.
-
Take a photo of the out of office message that has been set up.
-
What is the total size of files transferred?
-
All photos taken must be checked for blurriness. Photos must be visible and annotated to display detail.
-
Enter the PC Make and Model.
-
Device serial number
-
Select the Device condition from the below.
-
Please specify below
-
Enter the LED Monitor Make and Model.
-
Device serial number
-
Select the Device condition from the below.
-
Please specify below
-
Enter the Printer Make and Model.
-
Device serial number
-
Select the Device condition from the below.
-
Please specify below
-
Enter the Router Make and Model.
-
Enter the line number that is connected to it.
-
Device serial number
-
Select the Device condition from the below.
-
Please specify below
-
Enter the Switch Make and Model.
-
Device serial number
-
Select the Device condition from the below.
-
Please specify below
-
Enter the Keyboard Make and Model.
-
Device serial number
-
Select the Device condition from the below.
-
Please specify below
-
Enter the Mouse Make and Model.
-
Device serial number
-
Select the Device condition from the below.
-
Please specify below
-
Has all old equipment been labelled and DE installed? THIS EQUIPMENT IS NOT TO BE DEINSTALLED FOR SITES THAT ARE BACK TO BACK
-
Please explain below.
-
CHECK THAT ALL OF THE OLD EQUIPMENT IS LABELLED WITH THE SITES NAME AND STORE ID NUMBER.
DEINSTALL ALL OLD EQUIPMENT AND STORE IN THE NEW BOXES.
Restore data and installation
-
YOU MUST HAVE THE KIT LISTED ON THE SECOND PAGE OF THIS DOCUMENT. IF NOT ESCALATE TO PROJECT CONTROL PRIOR TO ATTENDING SITE.
TEXT ATTENDANCE TO PROJECT CONTROL.
Check you have all of the kit and escalate immediately if there are any issues with missing or faulty kit to project control. Ensure that you have the correct site details and password logins to proceed.
Install the new PC along with the monitor, keyboard and mouse.
Install the router and enter the configuration details and test comms.
The office equipment is to be installed and fully labelled including the power sockets.
Restore data and installation
-
Complete the physical install of the new equipment, once completed turn on the PC and await 1st boot.
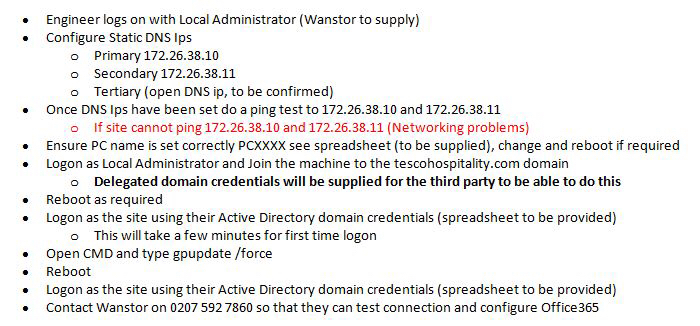
Install the new PC and enter the below DNS SETTINGS. -
Following the physical install and completion of the above. Restore the folder containing the transferred documents from the USB DRIVE onto the new PC.<br>Log onto the NEW PC with the manager. <br>Have all the documents been restored fully?
-
Check all documents and show the manager how to access the Internet.
All photos taken must be checked for blurriness. Photos must be visible and annotated to display detail. Ensure you include both power and data. -
Take a photo of the NEW cable installation.
-
Take 3 photographs. 1. Photograph of the PC pinging both DNS Settings 2. Photograph of the PC accessing the Internet 3. Photograph of the PC IP ADDRESS.
-
Take a photo of the NEW PC so that the perspective and close up is available. The photo should also include the PC, Monitor, Keyboard and Mouse.
-
Enter the PC Make and Model.
-
Device serial number
-
Select the Device condition from the below.
-
Please specify below
-
Enter the LED Monitor Make and Model.
-
Device serial number
-
Select the Device condition from the below.
-
Please specify below
-
Enter the Keyboard Make and Model.
-
Device serial number
-
Select the Device condition from the below.
-
Please specify below
-
Enter the Mouse Make and Model.
-
Device serial number
-
Select the Device condition from the below.
-
Please specify below
-
Install the printer onto the desk. Making it easy to access.
All photos taken must be checked for blurriness. Photos must be visible and annotated to display detail.
Ensure that the manager knows how to use the printer correctly. -
Take a photo of the NEW Printer.
-
Take a photo of a printer test page and a document that has been printed. Test the scanner and copier. Is the printer fully working? THIS MUST BE COMPLETED UNDER THE MANAGERS LOGON.
-
Enter the Printer Make and Model.
-
Device serial number
-
Select the Device condition from the below.
-
Please specify below
-
On the new PC On a internet explorer browse go to https://tescocafe.sharepoint.com<br>Log in using the site office 365 details and click to remember the the password.
-
Take a photo with the logon details selected to remember the password
-
All photos taken must be checked for blurriness. Photos must be visible and annotated to display detail.
-
Take a photo of the New Router. Ensure the data connectivity light is visible.
-
Enter the Router Make and Model.
-
Enter the line number that is connected to it.
-
Device serial number
-
Select the Device condition from the below.
-
Please specify below
-
All photos must be taken and checked for blurriness. They must be visible and annotated to display detail.
-
Take a photo of the NEW Gigabit 16 Port Rack Mounted Switch.
-
Enter the Switch Make and Model.
-
Device serial number
-
Select the Device condition from the below.
-
Please specify below
-
-
Enter the KVM make and model
-
Device serial number
-
Has any modification of the desk been required to complete the installation?
-
Capture details of any modifications made. Take photos of the modifications.
-
Where any power extension leads are used? Select the quantity
-
Where any monitor brackets are used? Select the quantity
-
Where any shelves are installed? Select the quantity
-
Where any extra long data cables are used? Select the quantity
-
Enter the cable lengths used below.
-
Ensure you label all old equipment and the boxes with the site name, site ID and location.
-
Pack all old equipment into the new boxes and ensure that this is all removed from site.<br>Has this been completed successfully?
-
Escalate to Project Control Immediately and enter below why this is not possible.
PC and Software Setup
-
Double click the Office 365 shortcut. Does this launch successfully?
-
Escalate to Project Control Immediately and enter behaviour below
-
Double click the Office internet shortcut. Does this launch successfully?
-
Escalate to Project Control Immediately and enter behaviour below
-
Double click the Payroll shortcut. Does this launch successfully?
-
Escalate to Project Control Immediately and enter behaviour below
-
Double click the Fuse shortcut. Does this launch successfully?
-
Escalate to Project Control Immediately and enter behaviour below
-
Double click the FnB shortcut. Does this launch successfully?
-
Escalate to Project Control Immediately and enter behaviour below
-
Handover to support. Contact Winsor on 0333 123 0360 Note the log number from support. Note the name of the representative spoken to below.
Manager sign off
-
Ensure that you have physically shown the manager full use of the PC.
Explain any follow ups including timescales.
Ensure the manager has written down or saved their username and password logon and that they have accessed the Internet on their logon.
Manager sign off
-
Username and password set up. ( This must only be the Cafe manager or team leader only) Please enter full name below and sign to say you are the manager or team leader that has set up the passwords.
-
I confirm that all documents have been transferred successfully.
-
Please enter any comments.
