


Title Page
-
Final inspection ...... electronic form found in .... Vdrive\inspections
-
Conducted on
-
Prepared by:
-
Manufactured for: BEER STORE
-
Window sheet matches work order and body serial number
-
Radio / Antenna
- Radio
- Antenna
-
Gate serial number
-
Rear door and side door serial numbers
-
Completed by: _____________________________________________________________________
-
Signature / Date / Time _____________________________________________________________________
Cab
-
Damages if none "Pass"
-
Window sheet matches serial tag and chassis Vin number
-
Check interior (dash, headliner, seats, door panels, windows, radio
-
Ensure material removed off rear window
-
Other
Front wall
-
Damages if none "Pass"
-
Stainless steel mono bolts on front corner posts (tandem Axle)
-
Double up front wall aluminum sheets (0.080 AL)
-
Rub rail bolts tight
-
Caulking ... Radius lower edge<br>Caulking ... Corner post edges<br>Caulking ... Rub top edge
-
Other
Body sides
-
Damages if none "Pass"
-
Rub rail bolts tight
-
Rub rail straight not wavy
-
Fasteners properly installed in front and rear corner posts
-
Top edge of rub rail (caulked with clear caulking)
-
1 1/4" x 1/4" x36" stainless steel flat bar installed on rear corner post and roof rails DS PS rear areas....
-
Other
Side doors
-
Damages if none "Pass"
-
Door seals on all sides
-
Door hinge bolts installed and tight
-
Eavestrough
-
Reinforcement bolts installed by door frame (all corners ... 8 bolts total)
-
Grab handle installed, either side of each side door
-
Other
Rear
-
Damages if none "Pass"
-
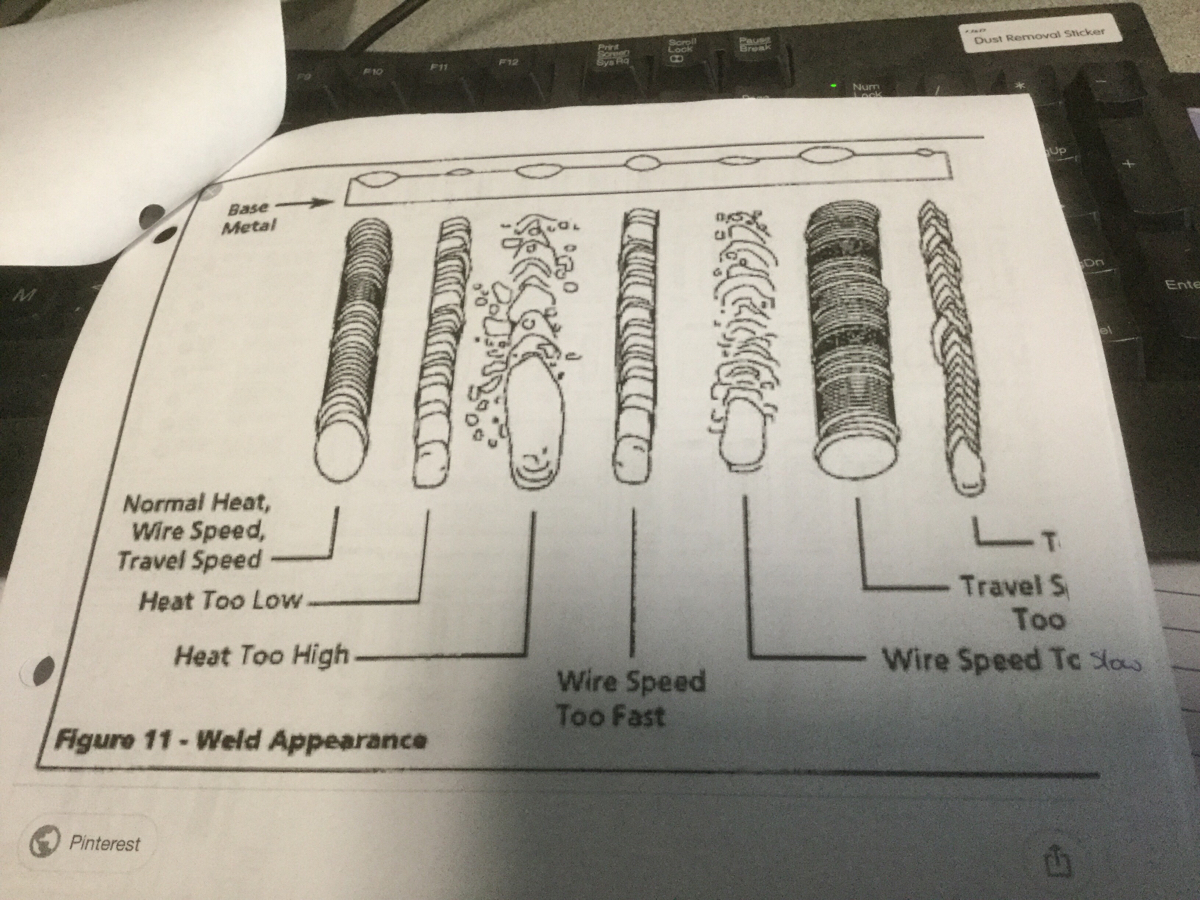
All welds proper and neatly done ..... see good / bad weld pictures ...... attach pictures
-
Check welds
-
Welds properly done and located as per installation instructions
-
Railgate operates properly ... fully cycle gate
-
Stainless steel flat bar installed on roof rails to rear corner posts (6000 Lb gates or as per work order)
-
All gate wires tied up not wrapped around or hitting any moving parts
-
Angle of deflection (measure from centre of rear wheels to end of body, and from the ground to the lowest portion of the ICC bumper) attached link ..... document angle .....
http://www.visualtrig.com -
LED licence plate light (mounted under chassis light RS)
-
Other
Rear Roll Up Door
-
Damages if none "Pass"
-
Door panels not delaminated
-
Side seals installed
-
Rear door installed as per work order
-
Door seals top header area and bottom sill
-
Door latches easily in sill
-
Other
Interior
-
Damages if none "Pass"
-
16" Galvanized crash angle for 102" wire bodies (check all bolts in floor, and front wall fasteners)
-
2 screws installed in each floor board
-
No cracks/gaps in floor seam areas
-
All screws installed in plywood recessed
-
Scuffliner not wavy against side wall
-
Scuffliner installed, no gaps between floor and side wall (maximum gap 1/4")
-
Drain holes in front corners (Flush with floor, & Avoiding any steel crash angle or scuff)
-
All door track fasteners installed (mono bolts/screws .... check track for looseness
-
Check clearance light interior wires on header area
-
Steel Scuff liner installed on front and sides 48" high front stick weld front corner seams with 1"x1" angle (2" welds every 8") evenly spaced from the top and bottom areas.<br>ALL SEAM (WELDED /SPLICED) WILL BE ON A Z POST <br>
-
Scuff will extend over the top of the door track and will be welded to door track with 2" welds every 8" ...evenly spaced from the top or bottom areas
-
Interior wood painted with water base wood shield (walls and floor) ... neatly trimmed not splattered all over)
-
Other
-
Other
Underbody
-
3 layers of Ins. tape on cross member ends
-
Check crash angle bolts and nuts
-
Gussets in place and welded
-
Tie downs in place ...... need locations ".......(Need to be determined, Need to be the same on each unit)
-
Tie downs torqued to 60 Lb Ft.
-
Chassis clips welded (minimum 3 tack welds per clip)
-
Minimum clearance between tire and cross members (5")
-
Wheel pans centered over wheels (welded 3 locations front and rear along each crossmember)
-
Conveyor Box (Open front enclose (hasp) ) check that no creases (bent areas on interior)
-
Long sill doublers installed (see Drwg 9E-A-0248) drawing needs to be attached
-
Long sills welded to sill (welded front and rear areas of sill)
-
tool box location behind drain tube in front corners
-
Mud flaps installed on brackets properly welded in place ( 3 welds ... one each end one evenly spaced in the centre)
-
Mud flaps installed on bracket (with nuts and bolts) flap installed on tire side of bracket.
-
Mud flaps fully cover tires
-
Check Underbody floor for wood chips / cracks
-
Check Underbody fully undercoated
-
Other
Lights
-
All clearance lights
-
Brake lights
-
Indicators
-
Backup lights
-
3 LED Dome lights wired to supplied Aux. switch in cab (Need locations ..............
General information
-
Check paint on each side of body, (should be uniform through out body)<br>Check black paint on rear (conveyor box door & hasp areas) make sure door is locked shut (use a plastic tie)
-
Pictures of unit required
-
Sign when completed