Title Page
-
Site conducted
-
Trainee Name:
-
Trainers Name:
-
Department:
-
Training Start Date:
Customer Care
THE IMPORTANCE OF CUSTOMER CONTACT AND CONDUCT
-
Appearance:
-
1/ Being Presentable on Site
2/ To Wear Company Issued Uniform Only
3/ Wearing Company Uniform is Compulsory
4/ Keeping Uniform Clean and Tidy -
Photo Of Applicant:
-
Communication:
-
1/Call Client before arrival to confirm appointment, This can also help to prepare site eg: Move cars, Remove items from window sills, Close windows, Remove washing from the Line, etc
2/ Keep Line Manager informed of any Issues.
3/ Keeping Client informed of any delays.
4/ Being confident and informative with Clients.
5/ Reporting issue to Line Manager before confronting Clients. -
Consideration:
-
1/ You are Working at the Client Home Show respect To Client and Property
2/ Comply with Clients Requests -
Punctuality:
-
1/ You are contracted to work 40 Hours a Week
2/ Working day Starts 8am on Site Without Fail
3/ Working Day hours 8am to 4:30pm
3/ Plan your Week
4/ Keep Clients Informed of any Delays -
Civility:
-
1/ Being Polite and Courteous
2/ Be Professional
3/ No Use of Foul Language -
Site Consideration and Site Preparation:
-
1/ Correct positioning of Equipment
2/ Being aware of trip hazards
3/ Keeping work areas clear of clutter
4/ Moving Plant pots and other obstructions
5/ Clients to move Vehicles
6/ Asking Clients to remove Ornaments from window sills and shelves, Remove items off external walls -
Use of Dustsheets:
-
To Protect Carpets, Floors and Furniture
-
Use of Shoe Protectors:
-
To Protect Carpets and Floors
-
Site Clean Up:
-
1/ Sweep up all dust and Debris
2/ Remove all Waste
3/ Wash Down All Windows, Roofs and pathways
4/ Ensure Client is Happy with Clean Up -
Sign to acknowledge you fully understand and will comply to company standards
-
Completed Date:
-
Trainee Signature:
-
Trainer Signature:
-
Comments:
Health And Safety
-
THE IMPORTANCE OF PPE (Personal Protective Equipment)
-
When to wear Protective Footwear:
-
Protect Footwear to worn at all times During the Working Day
-
When to wear a Hard Hat:
-
Hard Hat to be Worn At all Times on Site
-
When and how to wear a Harness:
-
Harness to be worn When Ladders are used on Site
-
When to wear Ear Protection:
-
Ear Protection To be Worn Whilst working on Site
-
When to wear Eye Protection:
-
Eye Protection To be Worn whilst working On site
-
When to wear Dust Mask:
-
Dust Mask To be Worn whilst working On Site
-
When to wear Gloves:
-
Gloves To be worn Whilst Drilling And Manual Handling
-
Photo of Trainee wearing full PPE:
-
Sign to acknowledge you fully understand and will comply to company standards
-
Completion Date:
-
Trainee Signature:
-
Trainers Signature:
-
Comments:
-
THE IMPORTANCE OF ONSITE SAFETY
-
Safe parking of vehicle at site:
-
1/ Park as close to Site as Possible
2/ Always Park Safely and Legally -
Safe Loading and unloading of equipment:
-
Correct manual handling:
-
Safe positioning of equipment on site:
-
Correct use of Safety cones and pipe ramps:
-
Identifying potential risks and reporting:
-
Lance 1st Option:
-
1/ Reduces the Number of Ladder Movements
2/ Reduces the Risk Of accessing Obstructions
3/ Less Area to Drill -
Sign to acknowledge you fully understand and will comply to company standards
-
Completion Date:
-
Trainee Signature:
-
Trainers Signature:
-
Comments:
VEHICLE AND EQUIPMENT
-
KEEPING VEHICLE PRESENTABLE AND MAINTAINED
-
Vehicle Organisation:
-
1/All Items have there place
2/ Kept organised at all times. -
Vehicle Cleanliness:
-
1/ Cab and Works areas Kept Clean
2/ Vehicles jet washed at least once a week or at Supervisors Request -
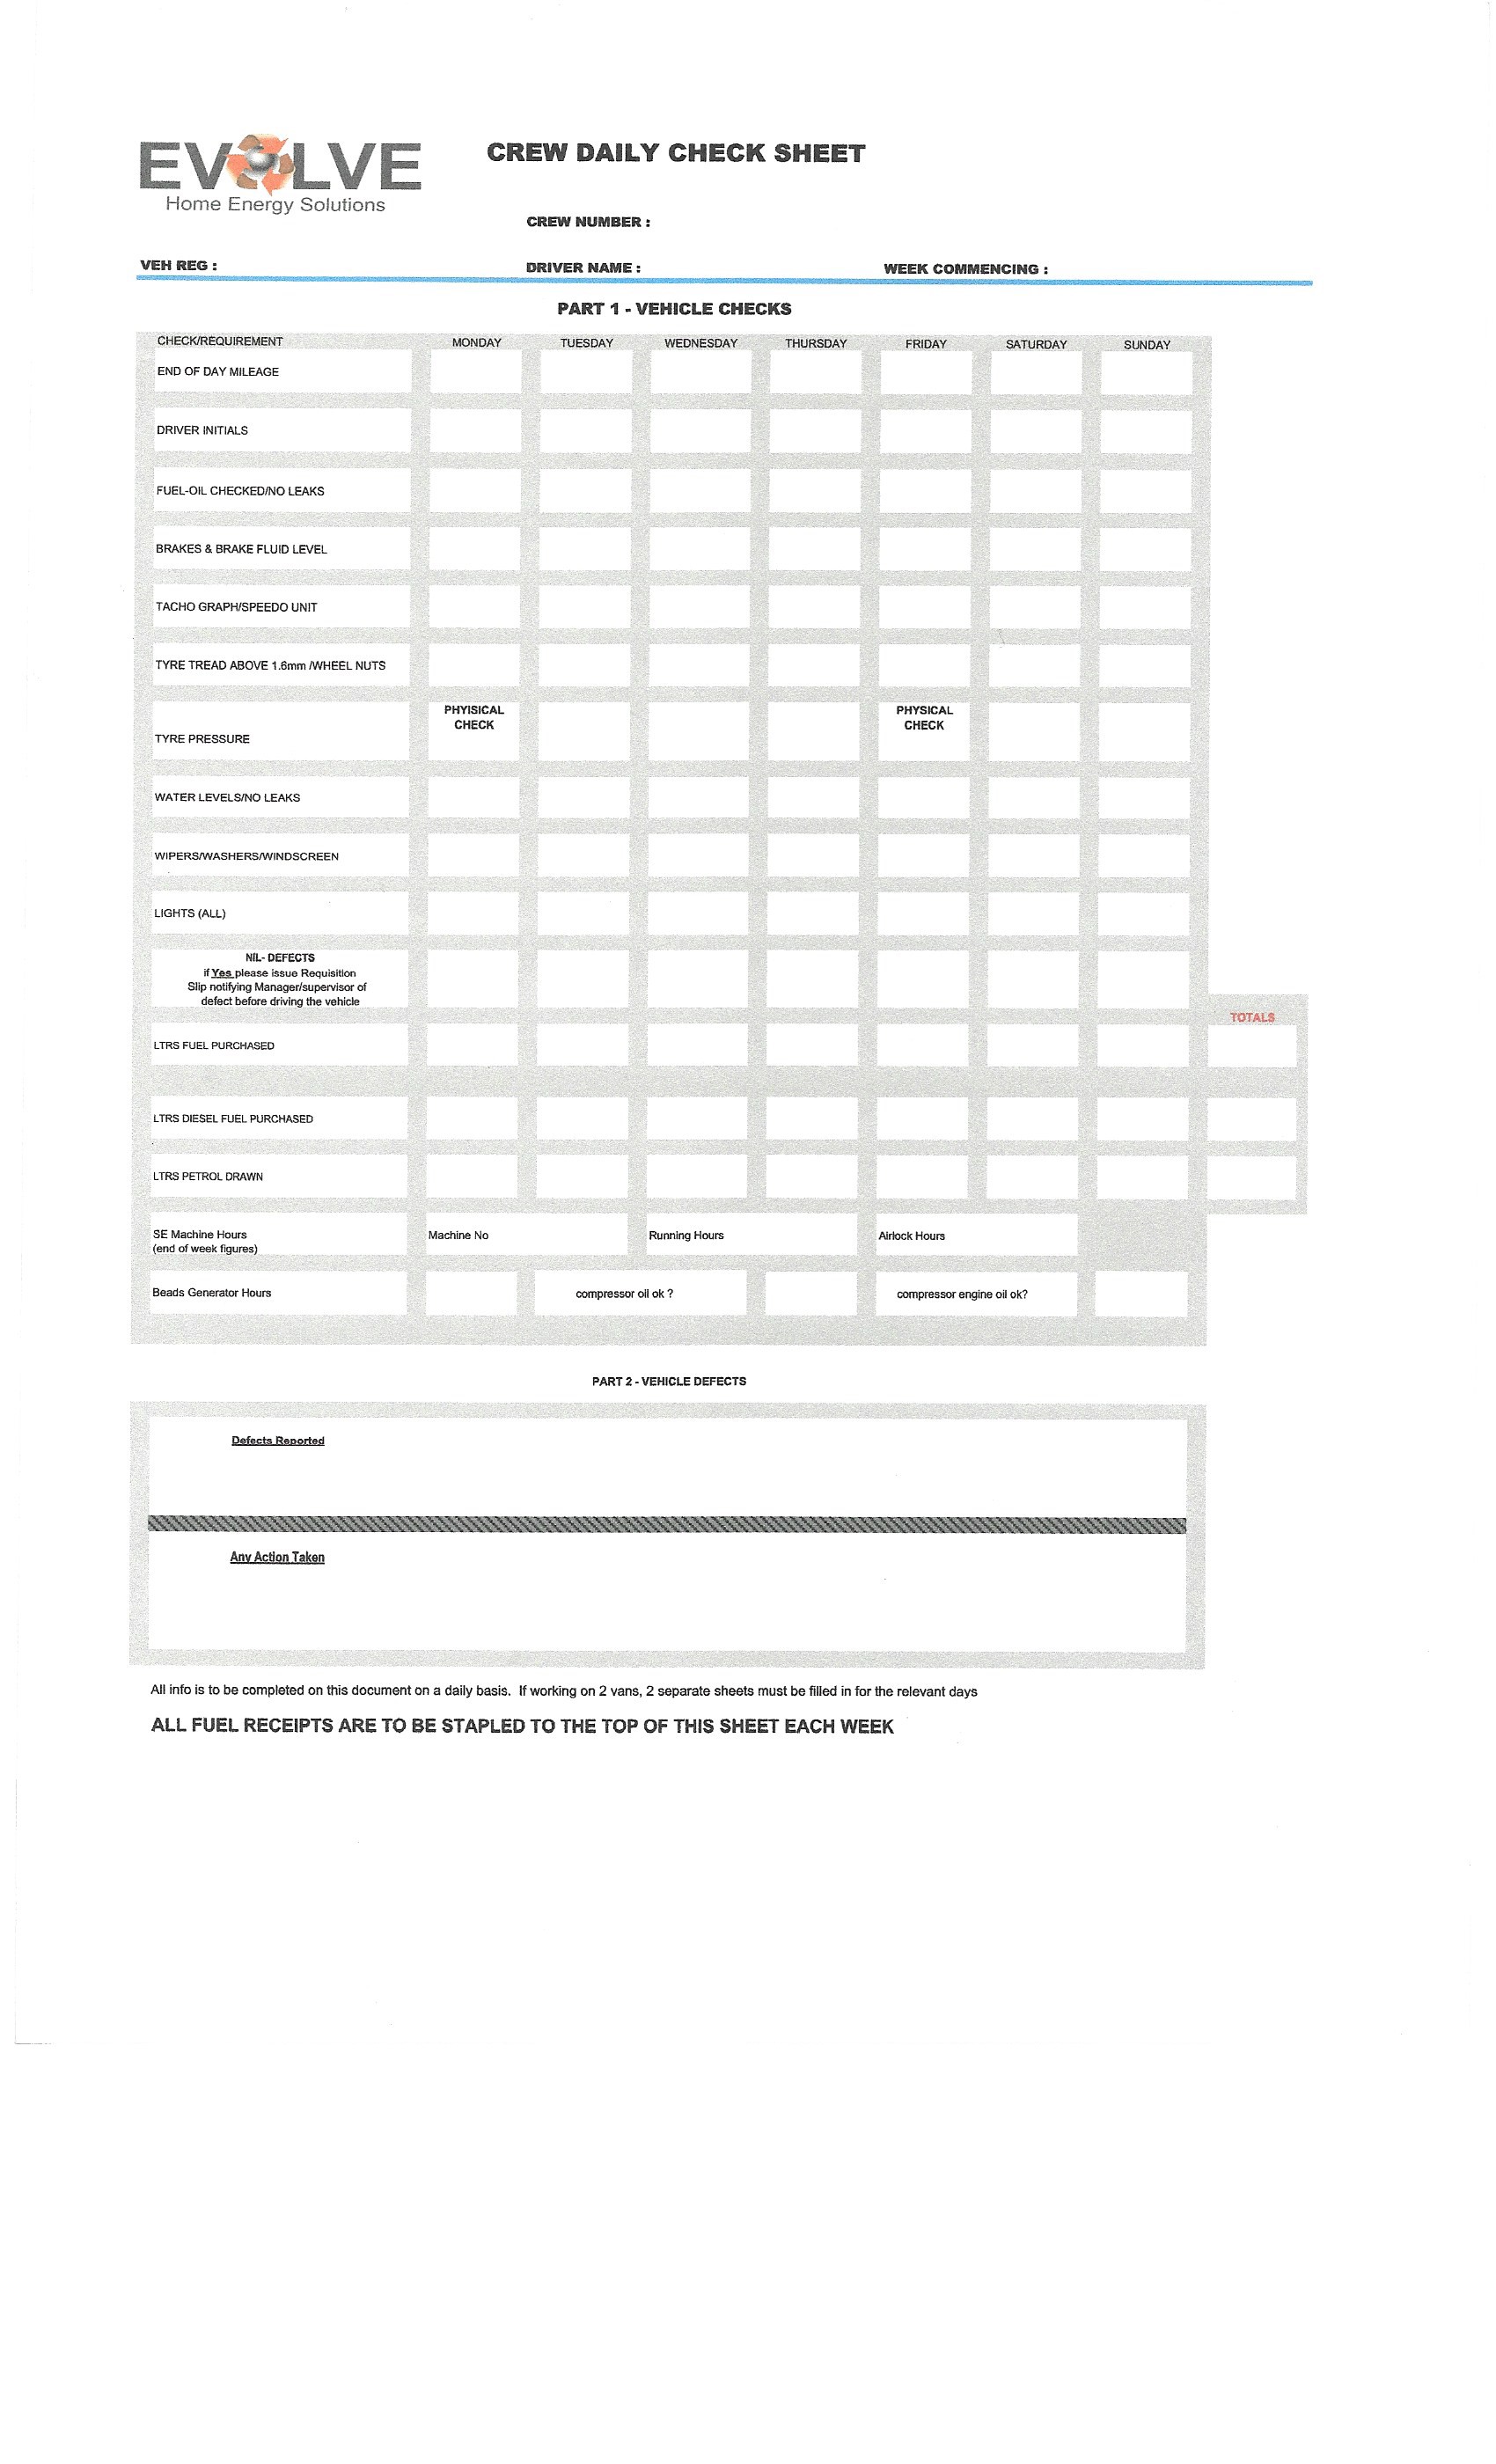
Daily Checks and completing Inspection sheet:
-
1/ Complete Vehicle Checks Daily
2/ Complete Check Sheet Daily
3/ Report any Defect in Box Provided
4/ Contact Line Manager to Report Defect
5/ Follow instructions given
6/ Any Change in Vehicle Handling or Performance to Be reported immediately -
Checking Oil Level:
-
Oil Check Photo:
-
Checking Coolant Level:
-
Coolant Check Photo:
-
Monthly Van Audit:
-
1/ To be completed on the last Friday of every Month
2/ All required photos to be taken
3/ All defects documented and photos taken
4/ Audit to be sent on the last Friday of every Month -
Fault Identification and Reporting:
-
Sign to acknowledge you fully understand and will comply to company standards
-
Completion Date:
-
Trainee Signature:
-
Trainer Signature:
-
Comments:
-
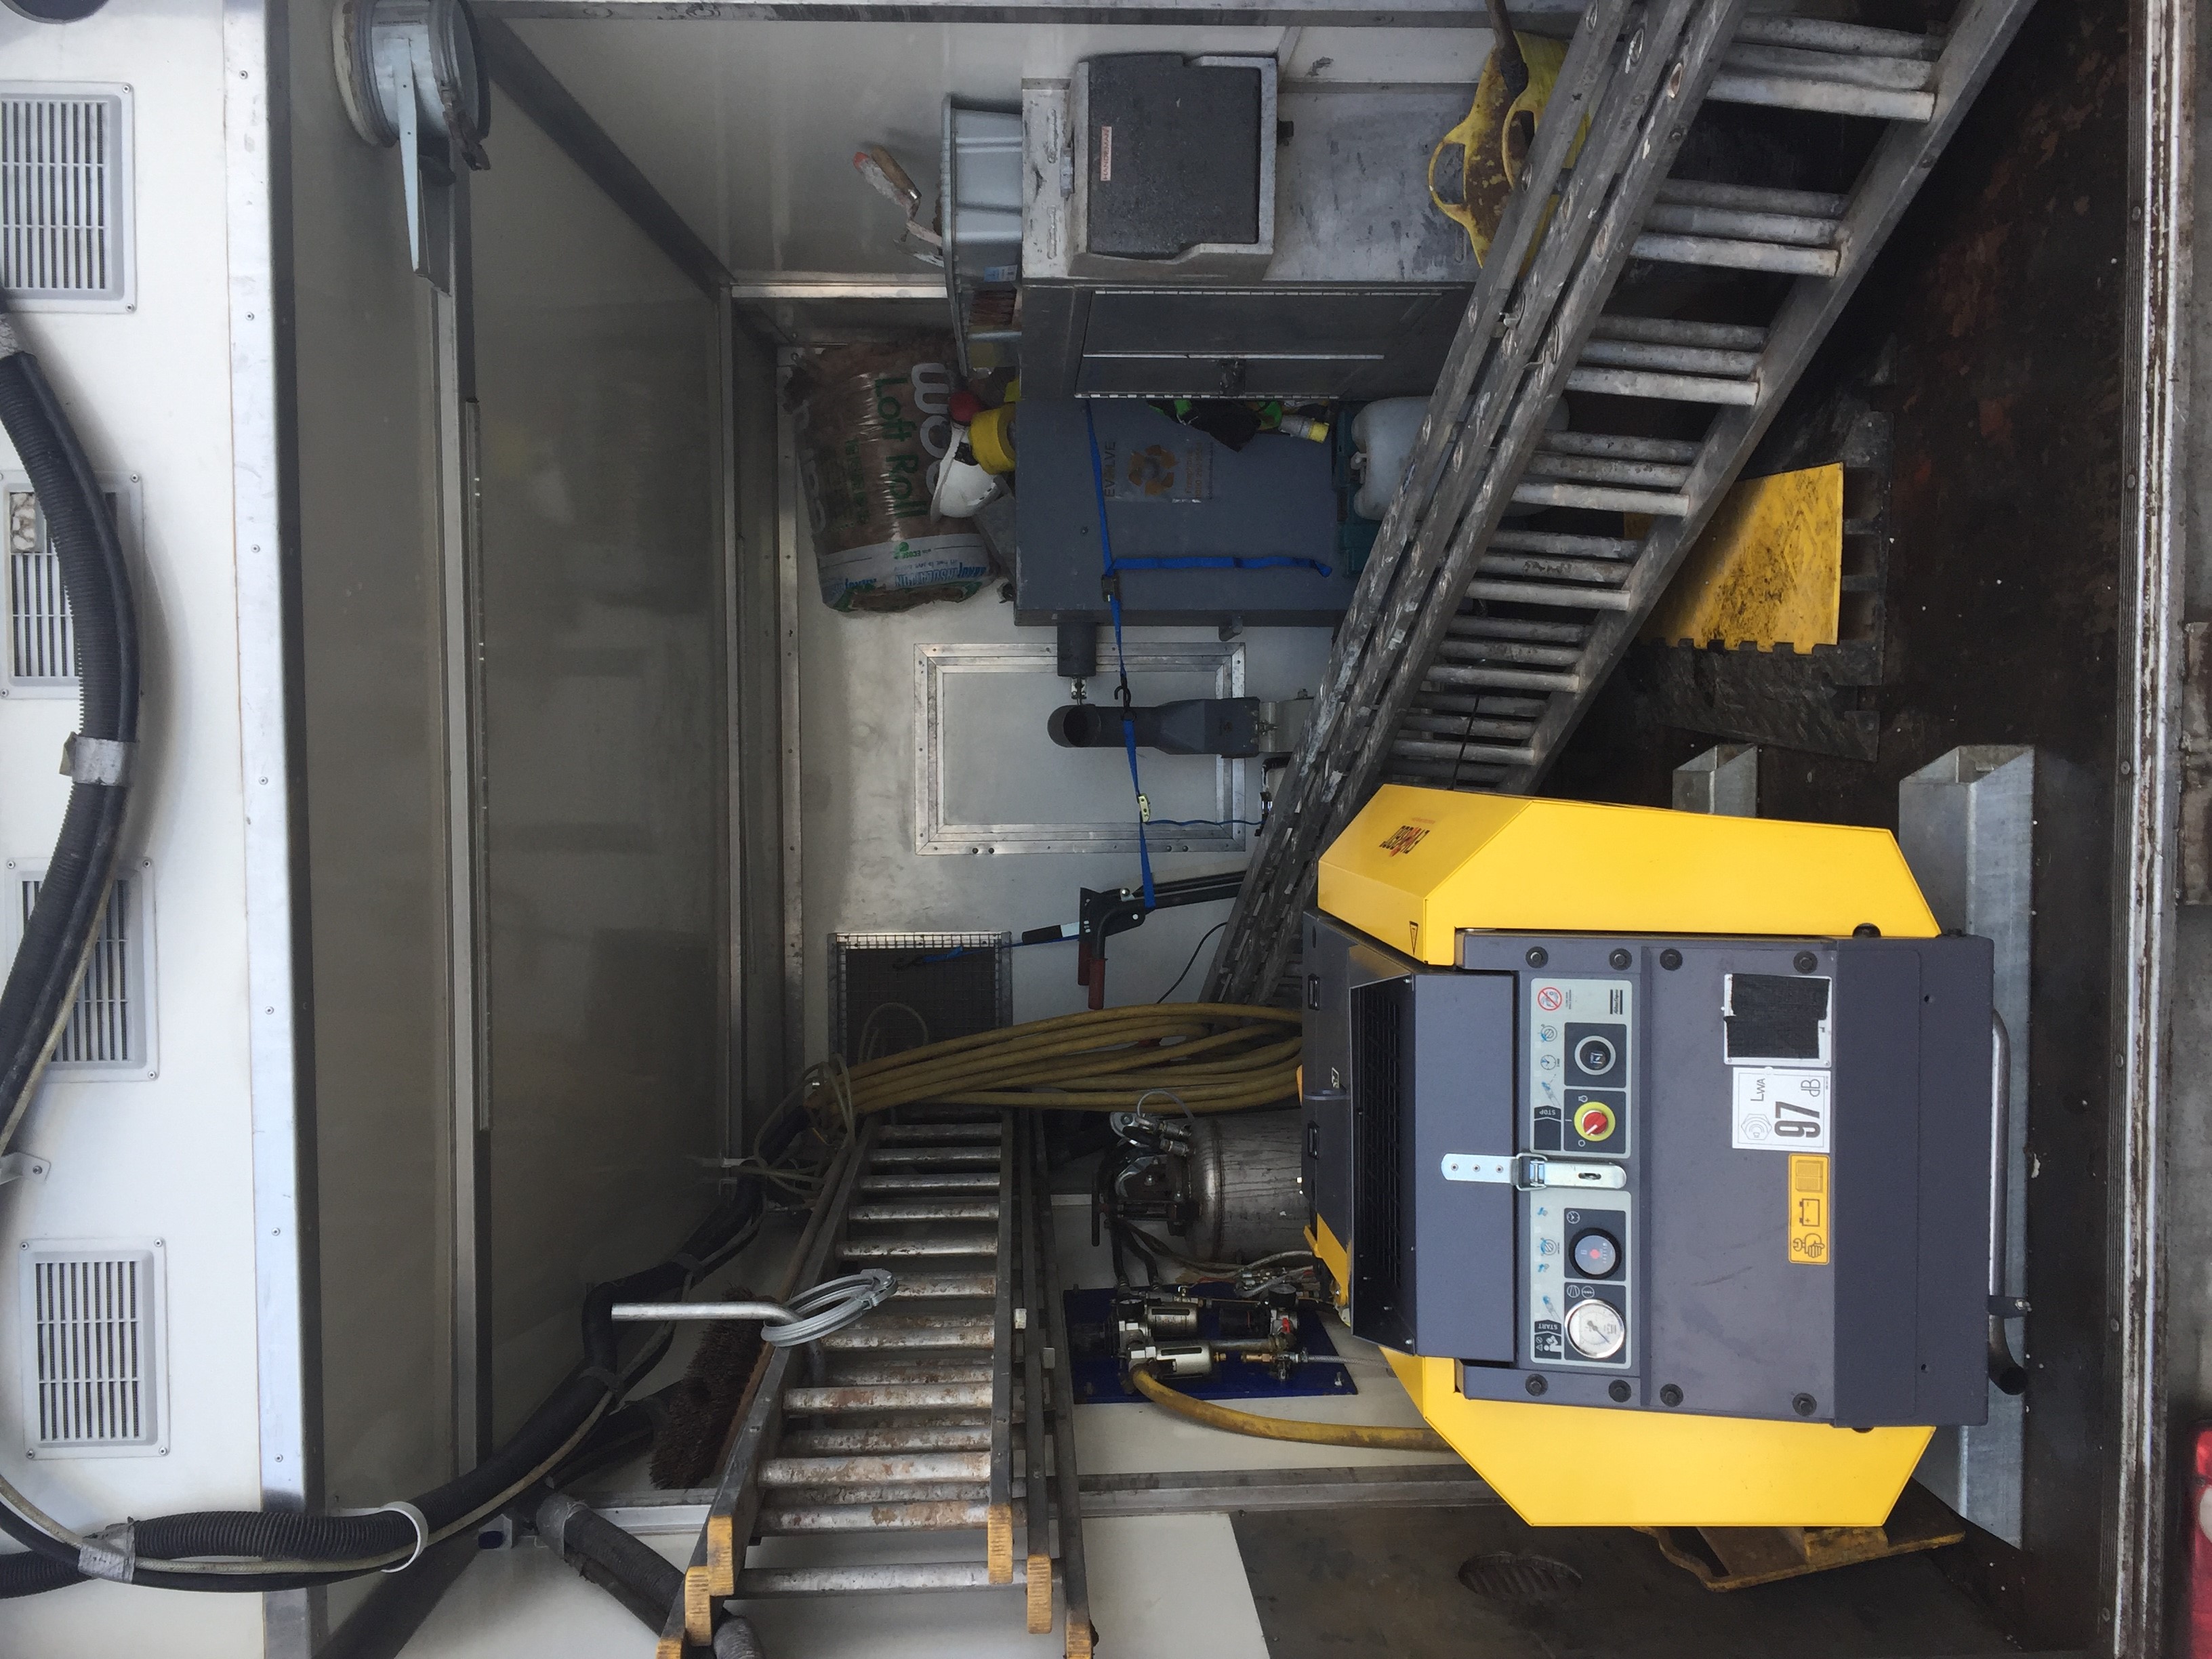
Equipment:
- Compressor
- Extraction Fan
- Drill
- Transformer and Leads
- Ladders
-
COMPRESSOR OPERATION AND MAINTENANCE
-
Understanding Safe Operation of Compressor:
-
Checking Engine Oil:
-
Engine Oil Check Photo:
-
Checking Hydro-vane Oil:
-
Hydro-vane Check Photo:
-
Keep Compressor Clean and Maintained:
-
1/ Check Oil Levels at Least Once a Week
2/ Always Check you are using Correct Fuel
3/ Keep Equipment Clean
4/ Any issues with Equipment Report Immediately -
Fault Identification and Reporting:
-
Sign to acknowledge you fully understand and will comply to company standards
-
Completion Date:
-
Trainee Signature:
-
Trainer Signature:
-
Comments:
-
EXTRACTOR FAN OPERATION AND MAINTENANCE
-
Understanding Safe Operation of Extractor Fan:
-
Check Engine Oil:
-
Engine Oil Check Photo:
-
Keeping Extraction Fan Clean and Maintained:
-
1/ Check Oil Levels at Least Once a Week
2/ Always Check you are using Correct Fuel
3/ Keep Equipment Clean
4/ Any issues with Equipment Report Immediately -
Fault Identification and Reporting:
-
Sign to acknowledge you fully understand and will comply to company standards
-
Completion Date:
-
Trainee Signature:
-
Trainer Signature:
-
Comments:
-
DRILL OPERATION AND MAINTENANCE
-
Understanding Safe Operation of Drill:
-
Importance of Two Hand Drilling:
-
Importance in sharing drilling process 50/50 to reduce the risk of vibration
-
Keeping Drill Greased:
-
Checking Power Lead and Connections for Damage:
-
Drill to be Kept in Box when not in Use
-
Fault Identification and Reporting:
-
Keeping Drill Clean and Maintained:
-
Sign to acknowledge you fully understand and will comply to company standards
-
Completion Date:
-
Trainee Signature:
-
Trainer Signature:
-
Comments:
-
TRANSFORMER AND LEADS OPERATION AND MAINTENANCE
-
Understanding Safe Operation of Transformer:
-
Checking Transformer, Power Lead & Plug for Damage:
-
Checking Power Lead and Connections for Damage:
-
Fault Identification and Reporting:
-
Sign to acknowledge you fully understand and will comply to company standards
-
Completion Date:
-
Trainee Signature:
-
Trainer Signature:
-
Comments:
-
Safe Loading and Unloading Of Ladders on Vehicle
-
Safe carrying Of Ladders
-
Inspect Ladders for Safe Operation
-
Safe Positioning of Ladders
-
Safe Storage of Ladders
-
Safe and correct use Of Ladder Restraints
-
Safe use of Harness On Ladder
-
Safe Positioning of Ladders on Soft Ground
-
Safe use Of Ladder Restraints
-
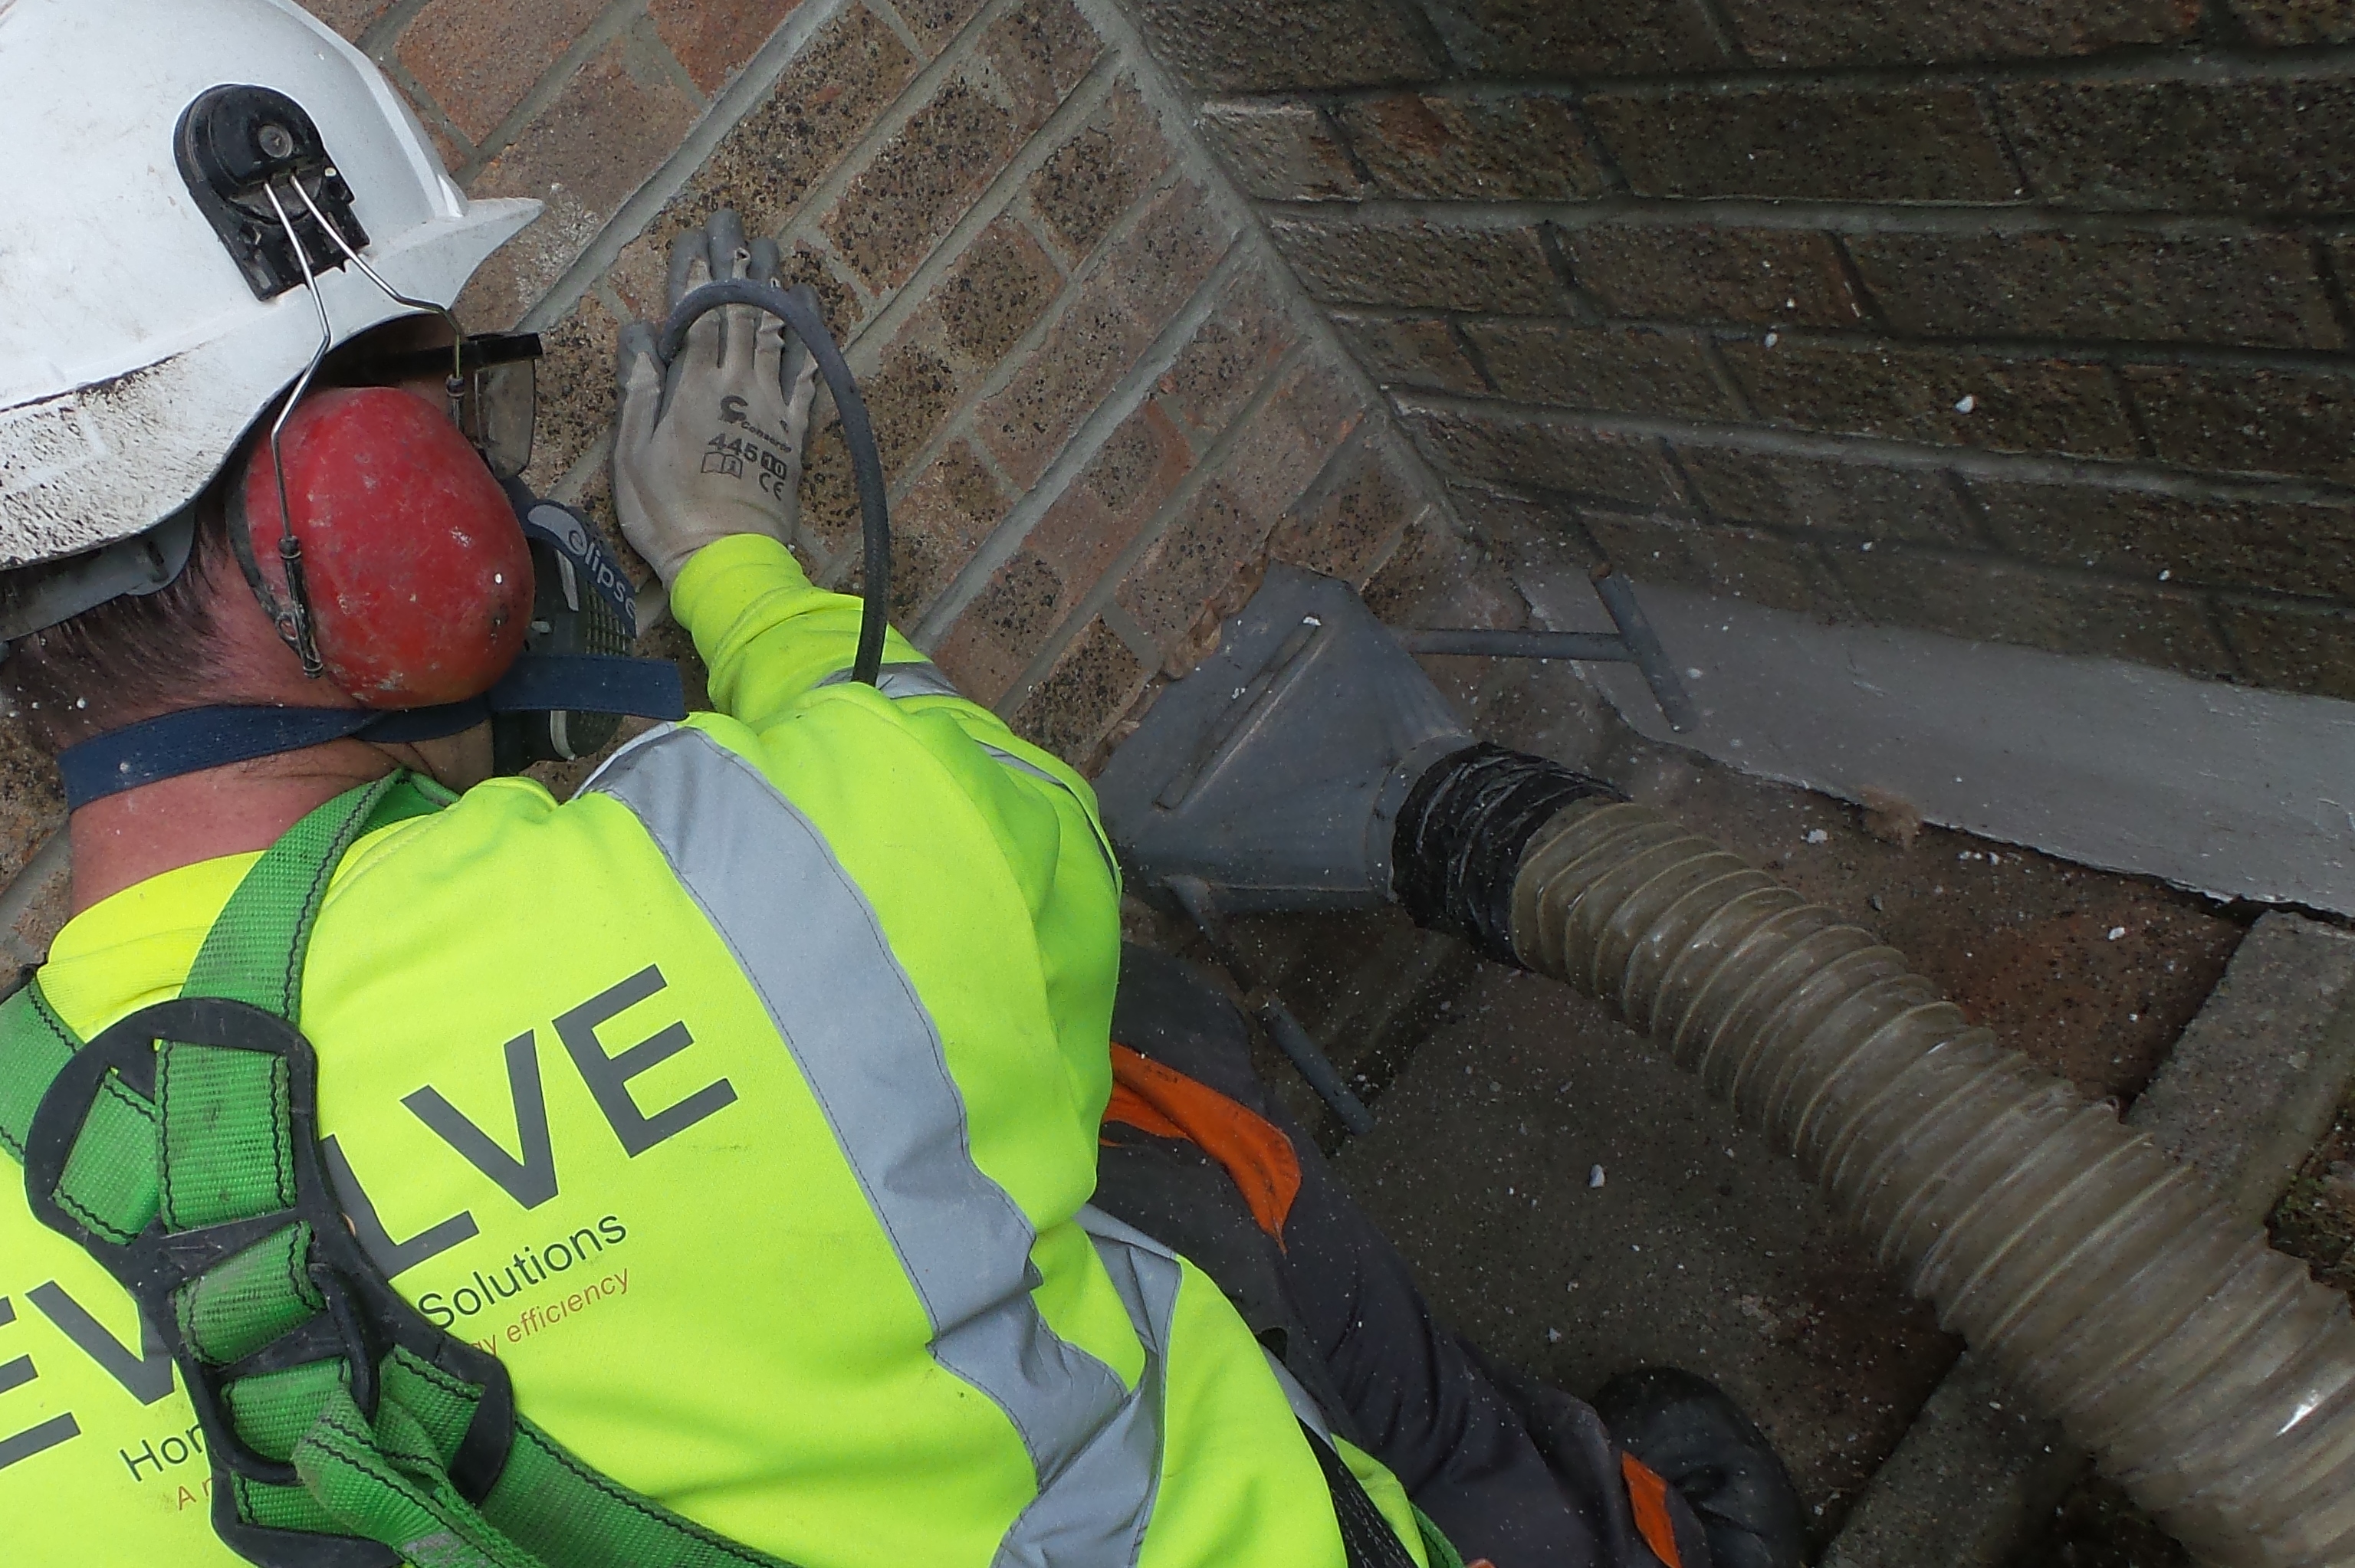
Safe Use of Drill On Ladder
-
Safe Use of Drill On Ladder
-
Safe Use of Air lines on Ladder
-
Safe Use of Ladder M8 (Slip Mat)
-
Fault Identification and Reporting:
-
Photo Of Trainee Using Harness and Restraint System
-
Sign to acknowledge you fully understand and will comply to company standards
-
Completion Date:
-
Trainee Signature:
-
Trainer Signature:
-
Comments:
Profile
-
Training Profile
- Extraction
- Cavity
- Loft
-
CAVITY CLEARANCE
-
1/ Clients Requirements
2/ Additional measures
3/ Special Requirements -
Pre-Works Checks:
-
1/ Check Around Waste pipes etc
2/ Seal Vents Internally with masking tape
3/Check Wall Construction and Condition (Evidence Defects)
4/Confirm Ventilation Requirements (Combustion Vents, Underfloor Vents, Cavity/Non essential Vents)
5/ Carry out Smoke Test (were applicable)
6/ Check Fuel Burning Appliances
7/ Assess Loft space for Chimney Position and wall Integrity. (Check for areas of possible ingress)
8/ Check Individual walls (single skin)
9/ Check for internal walls defects
10/ Aware of Movable and Non-Movable Obstructions -
The Importance Of Following Survey/Report Details:
-
Sign to acknowledge you fully understand and will comply to company standards
-
Completion Date:
-
Trainee Signature:
-
Trainer Signature:
-
Comments:
-
Correct Positioning of Equipment:
-
1/ Positioning Extraction Fan as Close to Extraction Point as Possible
2/ Correct Length of Extraction Pipe (Short as Possible)
3/ Extraction Bin to be Positioned within one metre of fan with Short connection Pipe
4/ Compressor to be Located as close as Possible to Work Area
5/ Only use Length of Contractor hose required -
Correct Use of Brick Connectors:
-
1/ Delivers a Greater Area of Suction
2/ Reduces Damage to Extraction Pipe -
Sign to acknowledge you fully understand and will comply to company standards
-
Completion Date:
-
Trainee Signature:
-
Trainer Signature:
-
Comments:
-
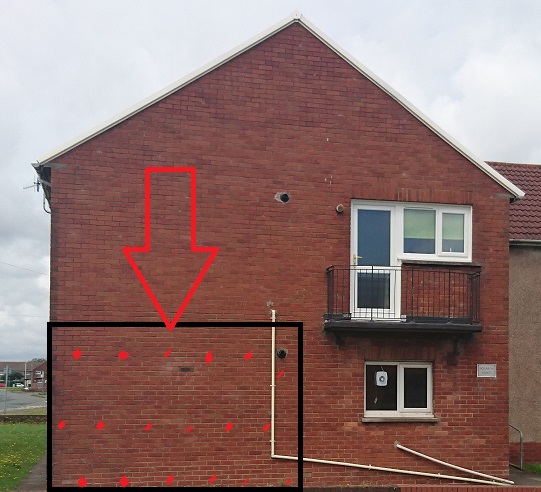
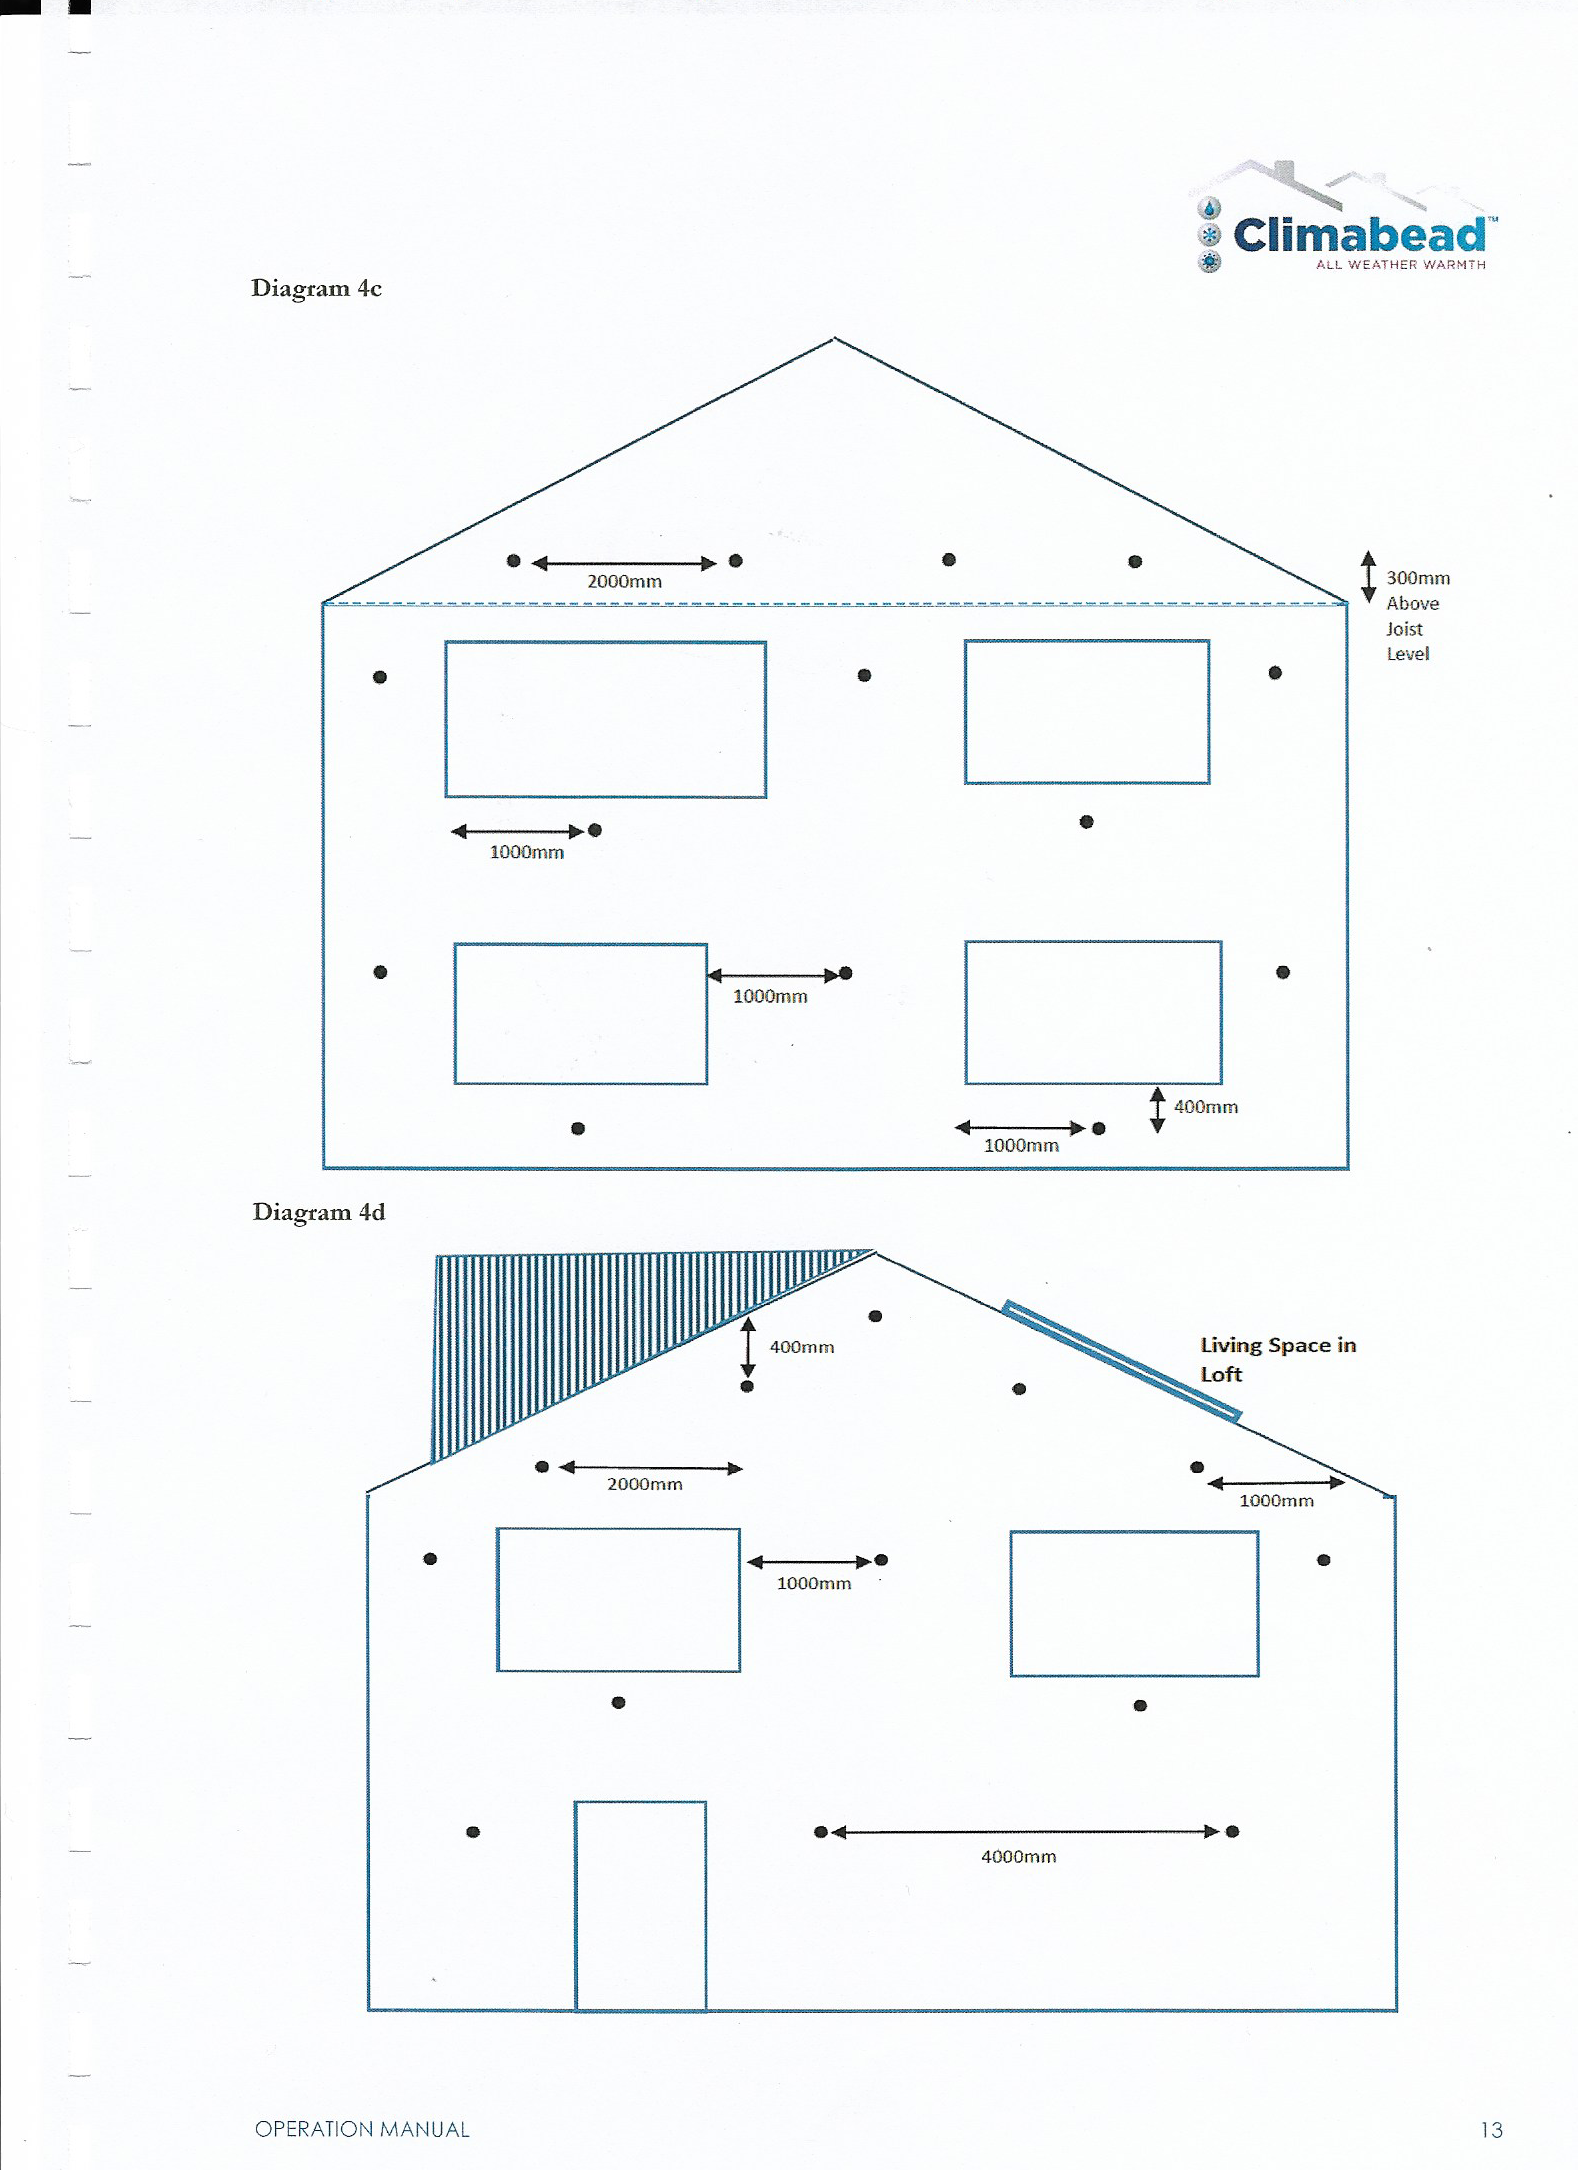
Optimum Extraction Points
-
1/ Always Remove from Corners
2/ Gives a Clear Channel to the Cavity assisting Product Removal
3/ Gives access from Either Direction
4/ Only Add Additional extraction Points if Product Failing to Move -
5 Metre Rule
-
1/ Remove Extraction Point
2/ Drill out 5 metre sq
3/ Extract area (check how Product is moving)
4/ Modify Drill Pattern on Results -
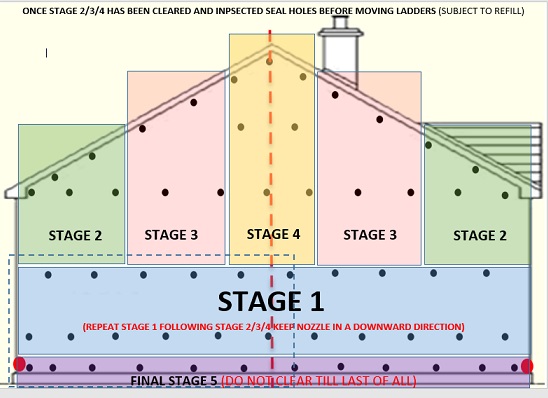
Staged Process
-
1/ Worked to a Staged Process
2/ Finish an Area before moving on
3/ Complete all tasks required from one ladder position
4/ Use Boroscope on Each Stage to Confirm Clear -
Sign to acknowledge you fully understand and will comply to company standards
-
Completion Date:
-
Trainee Signature:
-
Trainer Signature:
-
Comments:
-
Post Works Checks
-
1/ Carried out all works on Survey/Report
2/ Carry out Smoke Test (where applicable)
3/ Check All fuel burning Appliances
4/ Check all Vents
5/ Check Rooms for Ingress
6/ Check Loft space and Eaves for material Ingress
7/ Ensure Site Cleanliness
8/ Replace all Moved Items
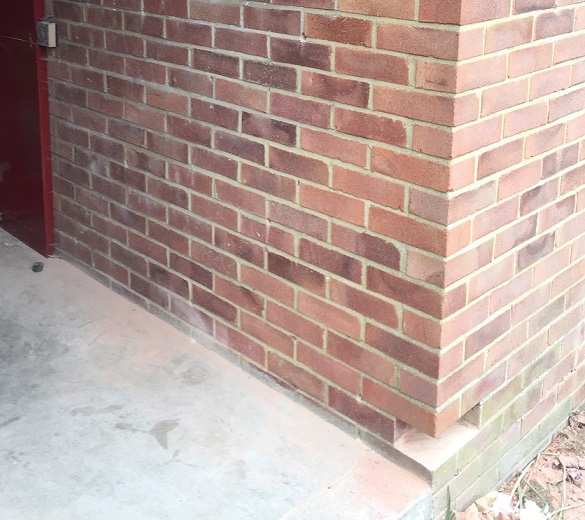
9/ Check all drill holes and Extraction points are pointed and sealed
10/ All holes and Extraction points are painted (If applicable)
11/ Ensure all paperwork is Completed
12/ Ensure all required paperwork is Signed upon completion
13/ Works Report is Completed, Signed and Forwarded -
Extraction Report
-
1/ Photos of all Elevation Before works commence
2/ Photos Evidencing Pre-existing Property Damage (Cracked Mortar or Render, Damaged Gutters or Drain Pipes etc)
3/ Cavity Photos of each elevation post extract
4/ Photos of all elevation on completion
5/ Photos of all extraction points Post works
6/ Photos of pathways and Drives post works showing cleanliness
7/ All required Signatures on Completion (Crew Leader and Client)
8/ Sending process -
Sign to acknowledge you fully understand and will comply to company standards
-
Completion Date:
-
Trainee Signature:
-
Trainer Signature:
-
Comments:
-
Cavity Wall Insulation
-
Cavity Wall Insulation General
-
1/ safe unloading of ladders from vehicle
2/ how to inspect ladders for safe operation
3/ storing of ladders at clients property
4/ safe sighting of ladders against walls -
Pre- works check
-
1/ check wall construction
2/ checking fuel burning appliances
3/ undertaking smoke test ( where applicable
4/ confirming ventilation requirements
5/ checking loft area for chimney position and integrity of wall
6/ inspection of individual rooms
7/ why we inspect individual rooms
8/ inform clients to remove movable objects ( vibration)
9/ client to close all windows -
sign to acknowledge you fully understand and comply to company standards
-
completion Date
-
Trainee signature:
-
Trainer signature:
-
Comments
-
safe handling of drills
-
1/ check cables for damage
2/ correct way to drill into wall
3/ using above head height
4/ using below head height
5/ using whilst on a ladder
6/ lowering from height
7/ always use grease at least twice a week with drill bit
8/ correct storage of drill -
sign to acknowledge you fully understand and comply to company standards
-
completion Date
-
Trainee signature
-
Trainer signature
-
Comments
-
Adhesive Vessel
-
1/Demonstrate safe loading and sealing of adhesive vessel
2/ safe checks to carry out before pressuring the vessel
3/ demonstrate how to pressure the adhesive vessel correctly and safely
4/ understands how to drain the vessel correctly
5/ understands how to clean and run water through the vessel and lines every night after using during the cold months from October to march -
sign to acknowledge you fully understand and comply to company standards
-
completion Date
-
Trainee Signature
-
Trainer Signature
-
Comments
-
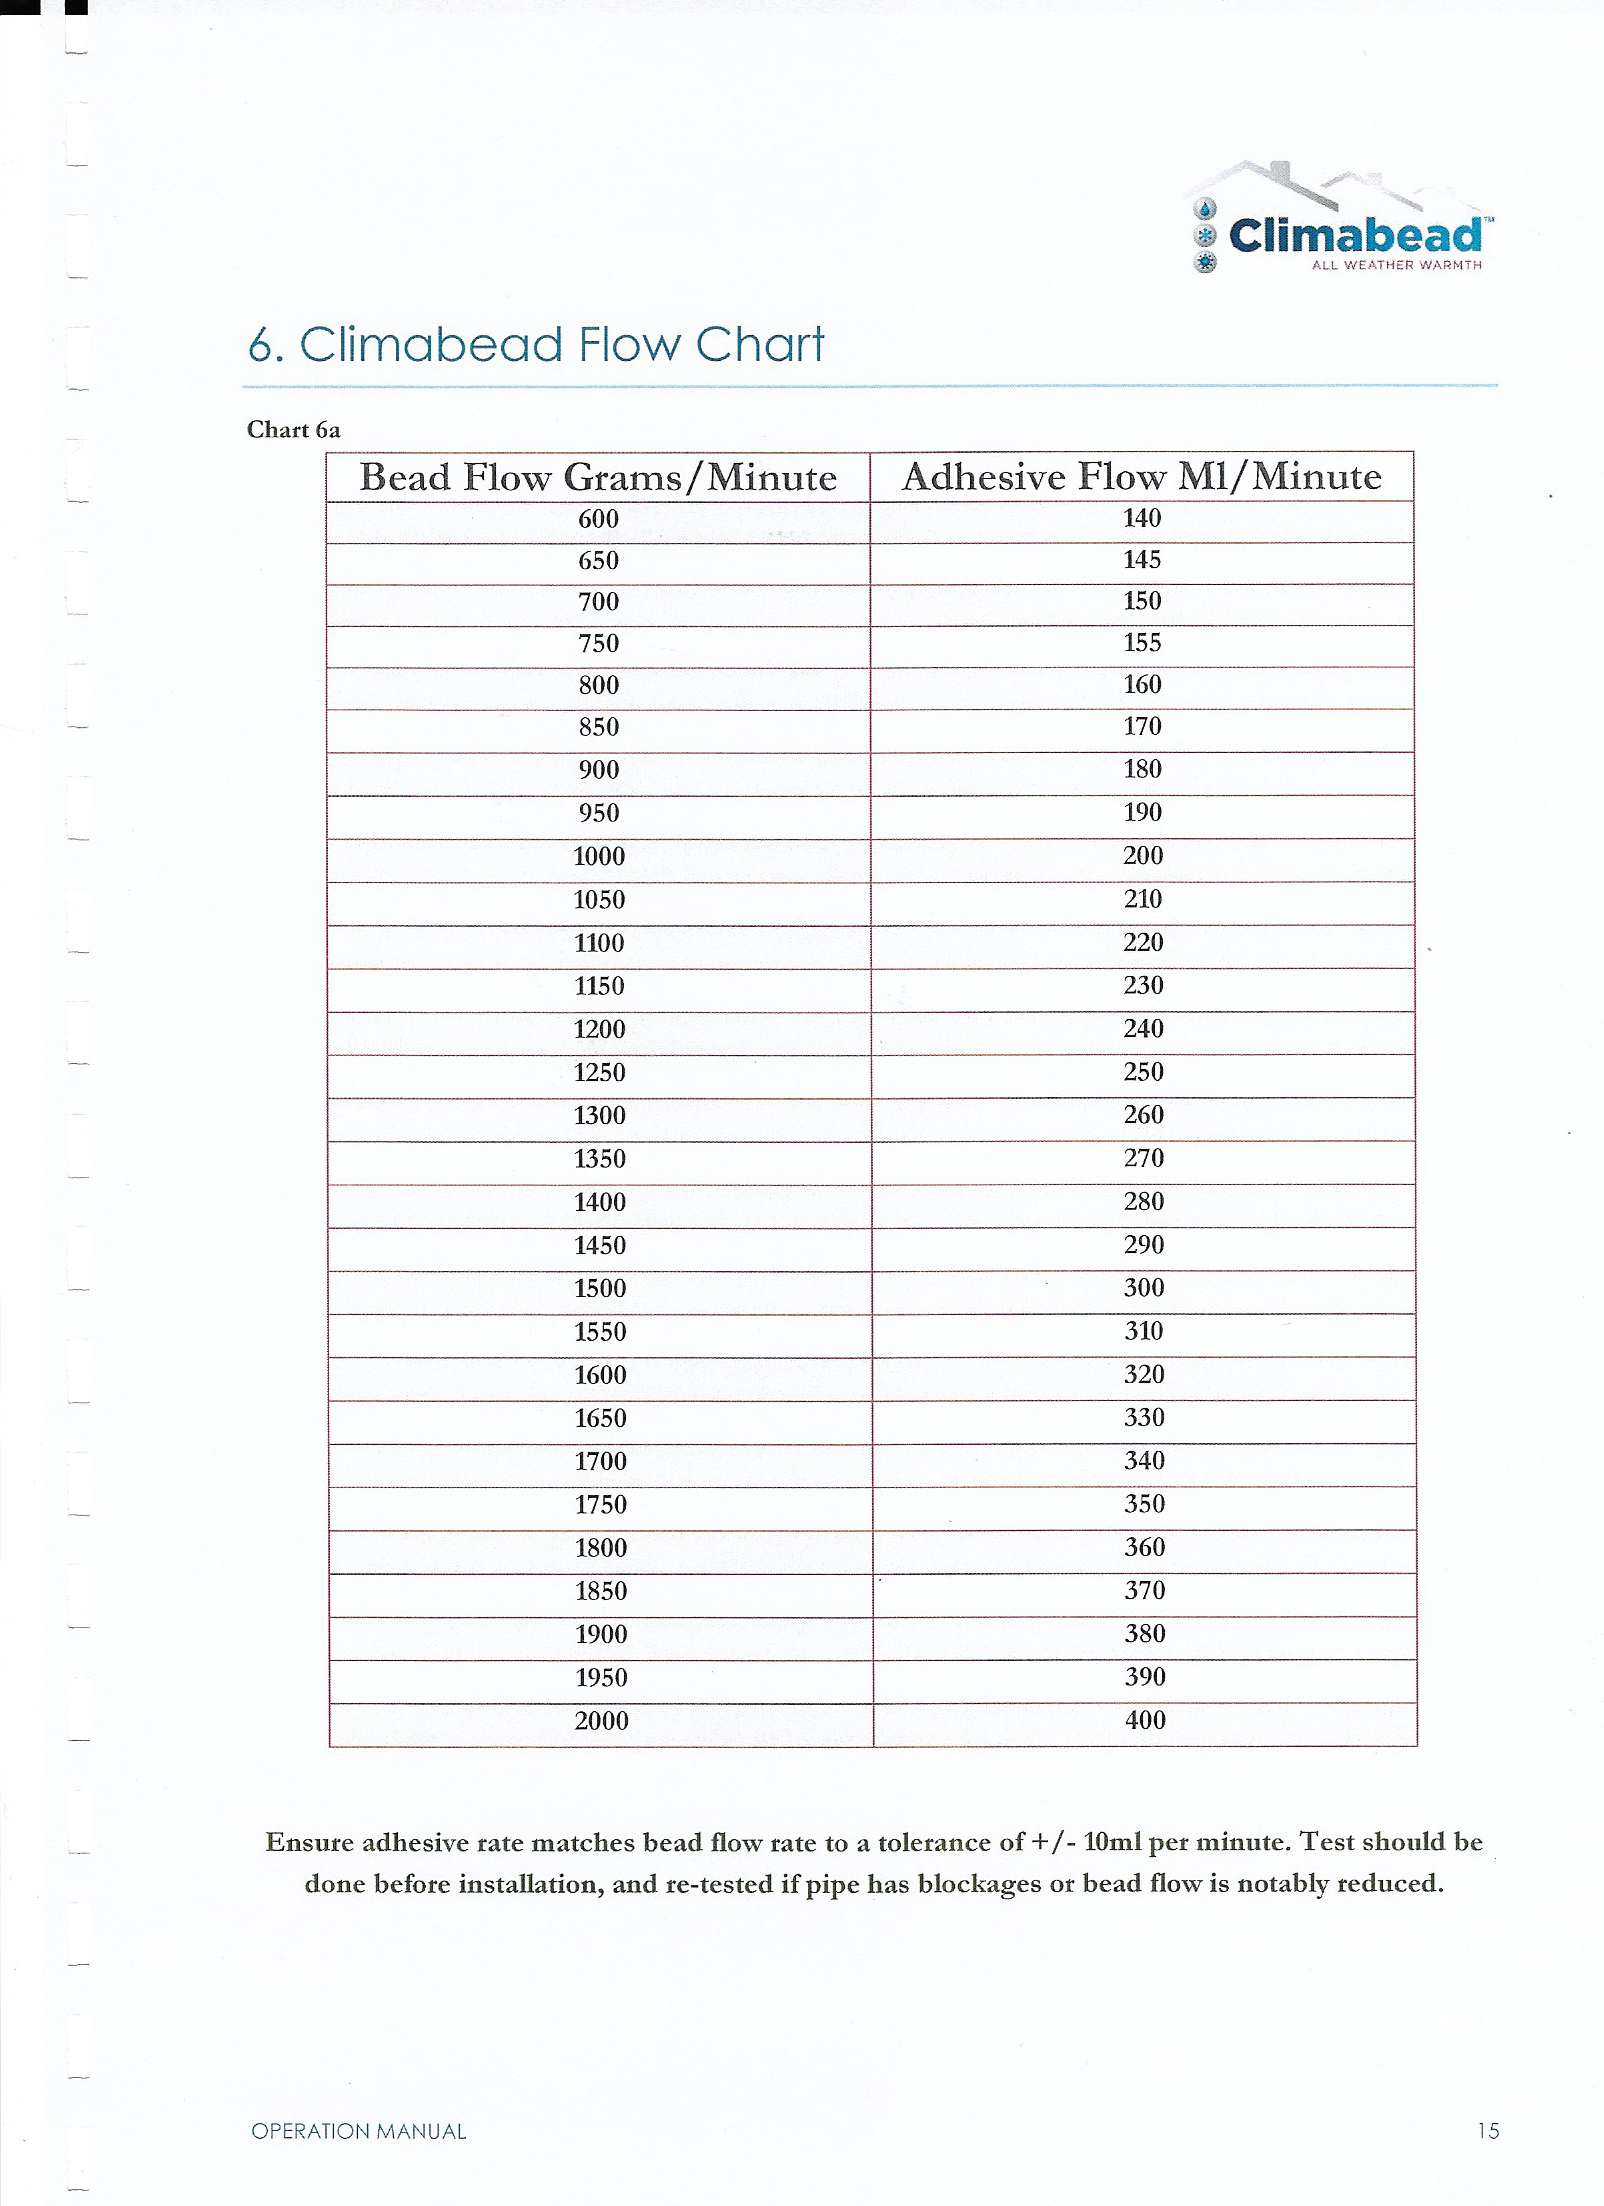
Injection guns and flow rate checks
-
1/ demonstrate how to use injection gun safely and correctly
2/ importance of keeping injection guns clean and tidy and why
3/ understands the on off sequence and why
4 how to split the adhesive
5/ demonstrate a bead and adhesive flow test
6/ understand why we need to carry out flow rate test
7/ if flow checks are incorrect demonstrate how to correctly adjust to obtain the correct flow -
sign to acknowledge you fully understand and comply to company standards
-
completion date
-
Trainee Signature
-
Trainer Signature
-
Comments
-
Drill Pattern / preparation/ Correct Filling and making good
-
1/ demonstrates the correct drill pattern
2/checking Cavity widths
3/ fitting cavity brush
4/demonstrate the correct filling sequence
5/ understand the reason for the sequence
6/ demonstrates the mixing of correct mortar match and texture
7/correctly and tidily on a smooth finish
8/ correctly and tidily on a brick finish
9/ correctly and tidily on a dashed/spar finish -
media
-
media 2
-
media 3
-
sign to acknowledge you fully understand and comply to company standards
-
Completion Date
-
Trainee Signature
-
Trainer Signature
-
Comments
-
Loft Installation
-
General Checking what is required
-
1/ Clients Requirements
2/ Additional measures
3/ Special Requirements -
Before Entering The Loft
-
1/ Correctly identify location of stop cock, checking on working order
2/ Correctly check ceilings for cracks, and inform the customer if required
3/ Correctly identify and understand why we check for an electric shower
4/ Correctly identify and understand why we check for an electric cooker
5/ Correct laying of dust sheets
6/ Ensure leadlight is safe and operable before entering loft
7/ Advise client of hazards such as cables and ladders around hatch
8/ Safely clear space around loft to ensure no chance of accidental damage
-
Entering The Loft
-
1/ Correctly identify necessary PPE to be worn; dust masks and knee pads
2/ Safely ensure location of joists before placing full weight on them
3/ Safely identify if walkboards will be required
4/ Ascertain joist strength, and what to do if not sure
5/ Safely identify if ventilation is adequate
6/ Check condition of cold water tanks
7/ Identify old metal tanks and what to do with them
8/ Safely check for no leaking pipes prior to commencing any install -
Sign to acknolowlege you fully understand and comply to Company Standards
-
Completion Date
-
Trainee Signature
-
Trainer Signature
-
Comments
-
Insulating the Loft
-
1. General
a. Checking existing insulation level
b. Check insulation to be added reaches desired level
c. Confirmation of regulation depth being 270mm after install -
What to do if loft is empty
-
2. What to do if the loft is empty
a. Safely lay the fibre between joists, leaving no gaps
b. Ensure 2" space between top edge of the fibre and the felt at the eaves
c. Awareness required that the fibre must reach the wallplate (top of inner wall)
d. Correctly stagger the thickness of the fibre from the wall plate, where required
e. Identify initial lay as 100mm at wall plate, and where practiacable install the required level of insulation to prodcue the necessary depth and ventilation requirements
f. Safely ensure all eaves are clear of any obstructions
g. Safely fit wedges to all lofts with felt, in the lowest possible position
h. Safely cut fibre on joists width or length where required
i. Be aware to cut away from yourself to avoid injury
j. Be aware to check for electric cables which could be severed -
What to do if loft has existing insulation
-
3. What to do if loft has existing insulation
a. Be aware to check existing fibre is between the joists
b. Be aware existing fibre is not to be left over the joists, as this creates a void
c. Safely cut in existing fibre if required to lay directly on the ceiling
d. Be aware to raise electric cables above insulation wherever possible
e. Safely identify high ampage cables (cooker and shower)
f. If unable to raise cables an air space must be created to prevent overheating
g. Be aware requirements state a minimum of 3" away from the cables
h. Be aware high ampage rule also applies to clusters of low amp cables
i. Safely identify position of downlighters and transformers
j. Safely identify position of flues and metal chimneys
k. Be aware requirements state a minimum of 3" clear space all round to prevent overheating -
Existing Boards
-
Existing boards
a. Safely lay insulation across boards only if they are screwed down and not be easily moved
b. Safely raise the boards using a claw hammer or crow bar only if loose or sparingly nailed
c. Safely ensure walkways are kept clear to allow for access to pipes and tanks
d. Be aware if client doesn't allow for the lifting of existing boards or for insulation to cover them the job is to be cancelled, unless completely self funded
e. Cross laying of different thicknesses fibres can only take place when existing material is within 1" of the top of the joist, and is specified on the survey -
Sign to acknolowlege you fully understand and comply to Company Standards
-
Completion Date
-
Trainee Signature
-
Trainer Signature
-
Comments
-
Pipework
-
1. General
a. Always safely insulate using the correct wall width lagging throughout the entire length of the pipe
b. Safely ensure pipe wrap is used on clusters of pipes
c. Safely and carefully remove existing lagging unless it meets required standards
d. If required standards are met, safely secure existing with tape where required
e. Safely and carefully handle all pipework to avoid likelihood of causing a leak
f. Safely remove old insulation with care
g. Identify any solar panel pipe, plastic pipe and microbore pipe. They must all be insulated correctly
h. Identify any overflow gas and unused pipes. They are NOT to be insulated
i. Safely and correctly tape pipe lagging using the tape supplied by the company securely in the following manner:
- Where 2 pieces of pipe butt together
- Any joints
- Any bends
- And at a distance no no more than 1m apart on straight runs of pipework
j. For 90˚ joints or bends, the lagging can be either mitred or butted safely using a stanley knife or junior hacksaw
k. For slighter bends bend the lagging around the pipe ensuring that there are no gaps and it is taped correctly
l. For pipes joined at 90˚ the lagging must either be "Butt" or "V" jointed and in both cases must be securely taped
m. Be aware of the 2 options available to you when pipework is attached to joists and impossible to get lagging around
- Either cover the pipes with pipe segments and then staple to the joists
- Cut lagging longitudinally so that it covers the pipe and sits on the joist then securley tape and staple to the joist
n. If there are too many pipes situated closely together and are impossible to conventially lag, safely wind in pipe wrap and tape securely -
2. Pipes laying on top of existing fibre or joists
a. Safely lay new insulation quilt directly over the top of them, providing the air gap formed between the layers of the quilt is only the depth of the pipe (to a maximum of 28mm)
b. Be aware if the pipe is held by a raised clip and the space is over 28mm you must use pre formed pipe insulation
c. Safely insulate all valves up to the handle ensuring the handle remains accessible for easy operation
d. Open vent pipes should be lagged through the tank lid insulation. This is to ensure any water from the open vent pipe goes into the tank, and not over the ceiling -
Fitting a jacket on a cold water tank
-
a. Safely follow the following procedure:
- Removal of all old tank lagging material
- If applicable ensure existing tank lid fits correctly
- Safely fit insulation skirt around the body of the tank ensuring that correctly secured ribbons (tightly tied) are supplied and situated approx. 3-4" from both the top and bottom of the tank
- Safely ensure that any cuts in the skirt for pipework outlet and inlet pipes are securley taped, to prevent loss of insulation material and further tearing
- Safely locate tank lid insulation in situ prior to securing for the purpose of correctly sighted holes being cut into the insulation (with the rim of all holes being taped to prevent further tearing or loss of insulation
- Safely ensure that the tank lid insulation is supported to prevent it falling into the tank either by:
i. Utilising an existing tank lid securely fitted to the top of the tank or:
ii. Safely pulling tight the insulation lid and tape to the skirt at 2 diagonal corners with 3 - 4" pieces of adhesive tape
- Once you can safely confirm either of these processes have been followed you can:
i. Tuck the 2 end leaves of the lid insulation between the tank and side skirt insulation
ii. Making sure it is safely secured by the existing correctly tied ribbons -
Upon completion
-
a. Safely check and confirm all ribbons and tapes are secure
b. Safely check all pipework is correctly insulated around the tank
c. Confirm that there is no insulation material in contact with or in the vicinity of the tank -
Post-installation checks
-
a. Safely ensure all ventilation requirements are met
b. Check all survey details are carried out correctly
c. Safely ensure that the loft is tidy
d. Safely collect and remove all installation debris for disposal at the depot
e. Confirm all paperwork is present and completed as required and stapled into the rafters of the joists
f. Draught proof all loft hatches using company recommended practice -
Sign to acknolowlege you fully understand and comply to Company Standards
-
Completion Date
-
Trainee Signature
-
Trainer Signature
-
Comments