Information
-
Shift Hand-Off / Assessment Title (i.e. Fluid Bed # 473/ Nifedipine ER/ 10/01/16)
-
Fluid Bed #:
-
Product Name:
-
Lot #:
-
NDC # (Last Four(4) Digits):
-
Clean Type:
-
Conducted on
-
Prepared by
Shift Handoff
Department Shift Hand-Off

This Department Shift Handoff was developed to help improve the collaboration between shfts of the Fluid Bed Teams
-
Cleaning sheets are up to date? <br>If there is a no response... give explanation of why.j
FL-60 Process Steps
-
-
FL 60 Water Soluble Clean - Water First Type Clean
-
FL 60 Water Soluble Clean - Water First Type Clean
-
FL 60 ER Clean - Water First Type Clean
-
FL 60 ER Clean - BH First Type Clean
-
Step 1. Log out books and room. Complete TBC tag and insert in door<br>
-
Step 2. Remove all trash and evidence of previous batch<br>
-
Step 3. Obtain all applicable cleaning sheets from supervisor. Determine type of clean (A or B).<br>
-
Step 4. Retrieve skid and chamber lift for chamber lowering<br>
-
Step 5. Deflate bag seal <br>
-
Step 6. Remove fluid bed insert and set off to the side in production room<br>
-
Step 7. Put chamber lift in place in order to lower chamber lift<br>
-
Step 8. Use ladder from back room or mobile ladder within room and loosen the expansion chamber bolts<br>
-
Step 9. Lower the expansion chamber with chamber lift and place on skid covered with polyliners<br>
-
Step 10. Lower bags or D-screens<br>
-
Step 11. "If filter bags were being utilized, remove d-ring and then unclip from bag carriage and place in poly-liner. Fill out TBC tag with fluid bed type and product information. and put in poly-liner with filter bags. Also place the completed filter bag log inside outer poly-liner. Set off to the side of production room. Ensure that bag sock clips remain on bag carriage.<br>NOTE: Remember to also place gral sock in poly-liner with bags if applicable"<br>
-
Step 12. "Remove insert, chamber, and any additional equipment to be cleaned in washroom. <br>NOTE: Electrical equipment such as table top scales, mixers and pumps to remain in room at this time. "<br>
-
Step 13. Take filter bags to NEX 420B. Return chamber lift and retrieve treestand.<br>
-
Step 14. Contact supervisor to have maintenance check exhaust valves, remove chopper/impeller blades (if applicable) and disassemble insert (rotor/wurster) in washroom <br>
-
Step 15. Place treestand under upper chamber of fluid bed<br>
-
Step 16. Remove upper chamber gasket and bag seals<br>
-
Step 17. Vacuum excess powder in upper chamber, track of bag seal, and plenum. Also sweep excess powder from under and around the bottom of the fluid bed. <br>
-
Step 18. "Disassemble inlet valve, inlet temp. probe, drain plug on plenum, and the solution pump. <br>NOTE: Clean and bag elements when applicable."<br>
-
Step 19. Disassemble gral sight glasses, caps, and gral sock holder from top of gral.<br>
-
Step 20. "Swing open plunger valve while gral is raised<br>Extend plunger using compressed air."<br>
-
Step 21. Disassemble plunger assembly<br>
-
Step 22. Remove any and all plugs and caps from gral bowl. Also remove the seal from the top lip of gral bowl<br>
-
Step 23. Disassemble Nilfisk vacuum and place waste in poly-liner<br>
-
Step 24. Sign up Cleaning Checklist<br>
-
Step 25. "Lock out fluid bed (contact coordinator if not qualified to perform this task). <br>NOTE: Affected operators to place their own locks on group lock box"<br>
-
Step 26. "Retrieve cleaning cage, boots, and pump sprayer if applicable.<br>NOTE: While retrieving cleaning cage and boots, dispose of vacuum waste."<br>
-
Step 27. Clean small electrical equipment (table top scales, mixers, vacuum head and pumps) with alcohol and purified water. Bag/tag and place equipment with book on skid outside the room. <br>
-
Step 28. Wipe down outlet covers, scale displays, control panels, and computer terminal with alcohol and purified water in preparation for tape.<br>
-
Step 29. Wipe down tools from shadow board with alcohol and purified water, put in poly-liner, and place in back closet. Remove shadow board from wall, wipe down with alcohol and purified water, and place in back closet.<br>
-
Step 30. Prepare coverings and mask off outlets, scale displays, control panels, and computer terminal with prepared coverings. <br>
-
Step 31. "TYPE A CLEAN: Apply 100% Bh to all contact parts, to the out fluid bed and gral, as well as the entire production room (walls, ceiling, and floor).<br> <br> NOTE: Soaking is required for 30 - 60 minutes. Do not allow Bh to dry on surfaces.<br><br>TYPE B CLEAN: Complete initial rinse of the room.
-
Step 32. TYPE A CLEAN: Rinse Bh from all soaking parts, equipment, walls, floor, and ceiling. <br>
-
Step 33. Both Types - Apply 100% BH-38 with pump sprayer to ceiling of production room using pump sprayer. Rinse.<br>
-
Step 34. "Apply 100% BH with pump sprayer and scrub inside and outside of entire fluid bed (upper chamber, plenum, leg structures, pump and inlet area) as well as the rear wall behind fluid bed. <br>Areas of focus: Underneath plenum, inlet duct work, bag seal track, exhaust valve areas, bag cylinders, pulleys, cables, and outer lip of upper chamber"<br>
-
Step 35. Rinse entire fluid bed and the rear wall behind fluid bed.<br><br>NOTE: When cleaning production room walls ensure that any d-screens, seals, bag carriages, and gaskets hanging on the walls are also cleaned. Also computer cabinet should be cleaned along with the most convenient wall. <br><br><br>
-
Step 36. Apply 100% BH with pump sprayer and scrub left wall of production room. Rinse.<br>
-
Step 37. Apply 100% BH with pump sprayer and scrub right wall of production room. Rinse.<br>
-
Step 38. Apply 100% BH with pump sprayer and scrub front wall of production room. Rinse.<br>
-
Step 39. Clean small parts: Inlet seal assembly, plenum parts, bag seals, upper chamber gasket(s), gral parts, chairs, and tables. <br>
-
Step 40. Apply 100% BH to floor scales and scrub. Utilize scrapper for solution build up around scales if necessary. <br>
-
Step 41. Perform final rinse of production room (ceiling, walls, and floor)<br>
-
Step 42. Raise scale and hose out scale pit<br>
-
Step 43. Purify water rinse all contact parts. Log the purified water info in the log books and on cleaning sheet. <br>
-
Step 44. Perform the santization of the floor drain. Record this in the production room log book <br>
-
Step 45. Contact supervisor and perform pre-dry check<br>
-
Step 46. Retrieve heater fan and call AQL<br>
-
Step 47. "Dry production room:<br>Pull tape and coverings from outlets, displays, control panels, and computer terminals<br>NOTE: Hand dry using teri-towels. Special attention to flat surfaces, ledges, channels, and small parts. "<br>
-
Step 48. Mop floor and scale pit<br>
-
Step 49. Clean windows and door jam<br>


Supervisor Assessment
Supervisor Assessment
-
-
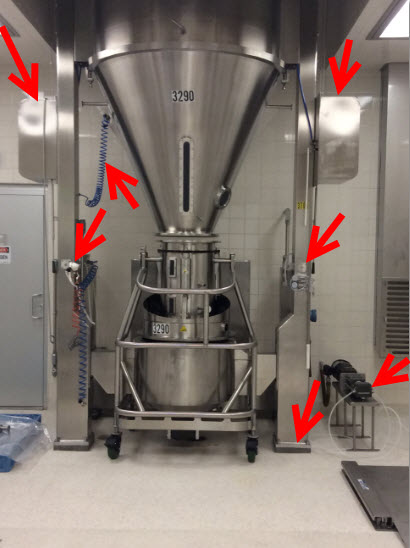
1. Check lights, ceiling, walls, floor, doors and windows for powder or residue.
-
2. Check support beam and bag Pistons
-
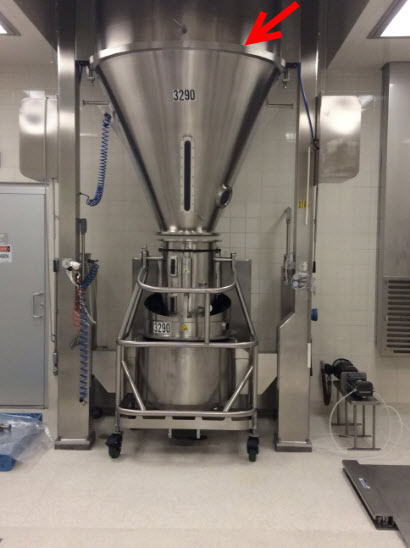
3. Check Plenum and Expansion Chamber - Inlet Valve
-
Step 3
-
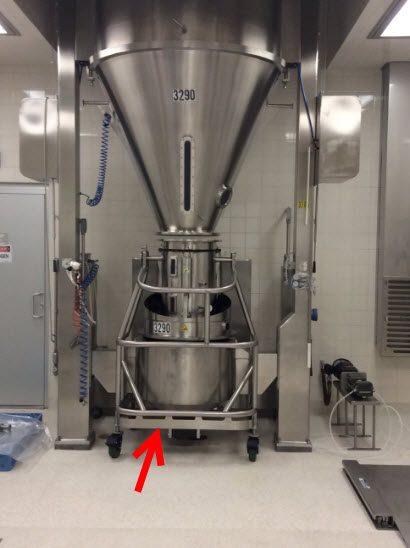
4. Check under plenum.
-
Step 4 -
-
5. Check Bed Framing and Attachments
-
Step 5 -
-
6. Check Gral Bowl and Assembly.
-
Step 6
-
7. Check for moisture in inner closet
-
8. Room is completely dry and ready for Quality Check.
-
9. Room is ready for Quality Check. IF FAIL, what rework is necessary?

Assessment Results
Quality Results
-
-
Did the Quality Check pass? If NO Response, Make notation of what rework was necessary.
-
Add signature