")


TASK EXECUTION │ PROCEDURE / PROCESS
-
The purpose of this SWI is to provide sufficient procedure and information for performing planned online functionality test for the VeriGap Ultrasonic level. This procedure applies to the Underground pump stations. 40013922LSH2030 40013922LSH2010 40013922LSH3010
40013922LSL2030 40013922LSL2010 40013922LSL3010
40013922LSH2050 40013922LSH2020 40013922LT6772
40013922LSL2050 40013922LSL2020 40013922LSH3020
40013922LSH2060 40013922LT6752
40013922LSL2060 40013922LSH3000
Approximately 2 Hours. Document number: 10000399287 Effective date: 09/01/2024 Document owner: UG AM Superintendent Site name: Kennecott Underground Department: Asset Management
Please see attached SWI for Underground 12 WK Tank Level detectors TEST -
Please read above attached the SWI for Underground 12WK Tank Level detectors TEST.
Conducted
-
Conducted on
-
Inspected by
-
Work Order number
-
Location
-
Qualification: Electricians - Trained, competent and authorized for the task.
HEALTH, SAFETY & ENVIRONMENTAL CONSIDERATIONS
Contact with Electricity
-
Contact with Electricity
Please follow below CRM controls
• Flame & Arc Flash-resistant clothing with CAT 2 Rating.
• Identify and control the hazards to complete Critical Control Checklists.
• Avoid contact with live equipment.
• Follow Electrical Safety Procedure.

Slip, trip, and falls
-
• A high standard of housekeeping shall be always maintained to prevent trip hazards.
• Be wary while walking around the pumps, motors, and other live equipment as the area might be slippery. -
Use appropriate PPE
Visibility and lightings
-
Use a headlamp or flashlight when working at the pump station
Force
-
• Regular rest
• Use appropriate tools.
• Avoid using brute force.
• Work in a team and ask for help from others -
Maintain good communication
Work instructions
1. PRE-START PREPARATIONS & ISOLATION (MUST FOLLOW C1 ISOLATION PROCESS)
-
1.1 Identify and control the hazards using the TRACK
-
1.2 Prepare material and tools:<br>Ensure that you have the necessary equipment/tools available at the site:<br>- Required Materials<br>- Required PPE<br>- Maintain good housekeeping<br>Proper Inspection of all tools and equipment
-
“HOLD POINT”
Leader and team members (Subject Matter Expert - SME) must verify the critical control(s) where a critical risk exists -
1.3 Inform the DG supervisor or team lead of the scope of work and that work about to start.

2. VERIGAP ULTRASONIC LEVEL DETECTOR: VISUAL INSPECTION
-
2.1 Step Instruction
-
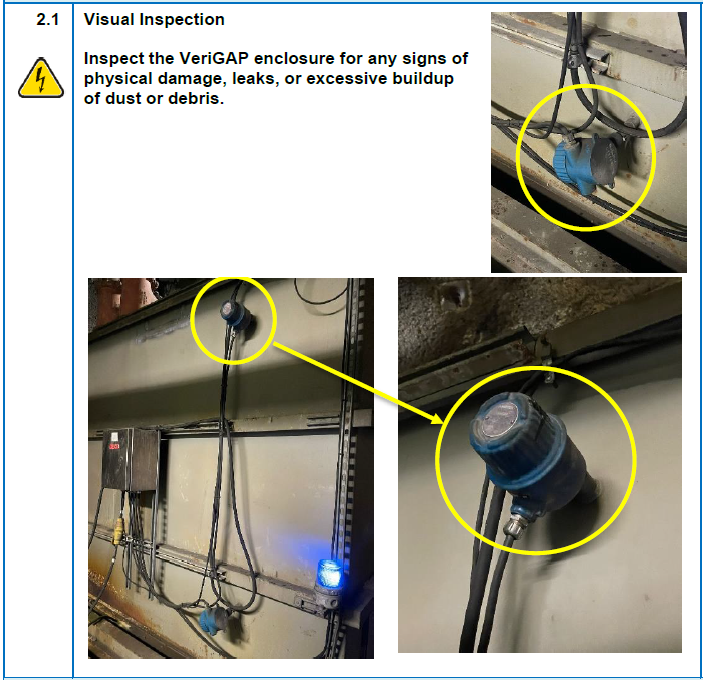
2.1 Visual Inspection<br>Inspect the VeriGAP enclosure for any signs of physical damage, leaks, or excessive buildup of dust or debris.
3. Removal Procedure
-
3.1 Step Instruction
-
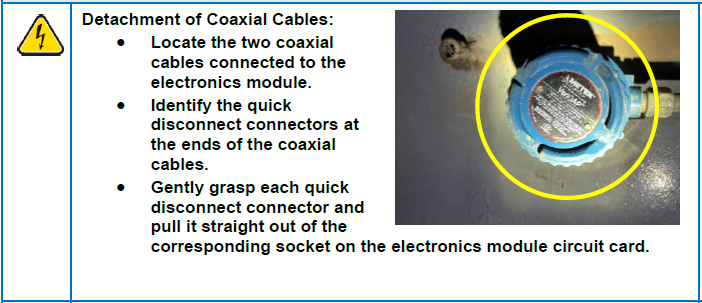
3.1 Detachment of Coaxial Cables:<br>• Locate the two coaxial cables connected to the electronics module.<br>• Identify the quick disconnect connectors at the ends of the coaxial cables.<br>• Gently grasp each quick disconnect connector and pull it straight out of the corresponding socket on the electronics module circuit card.
-
3.2 Step Instruction
-
3.2 Sensor Assembly Removal:<br>• Locate the blue cast housing of the VeriGAP.<br>• Identify the set screw on the blue cast housing.<br>• Using a screwdriver of the appropriate size, loosen the set screw by turning it counter-clockwise until it is completely loose.<br>• Once loosened, carefully unscrew the sensor assembly from the blue cast housing by turning it counter-clockwise.

4. FUNCTIONAL VERIFICATION - DIP TEST
-
4.1 • Prepare a small container filled with clean liquid (e.g., water) deep enough to fully submerge the sensor assembly of the VeriGAP.<br>• Slowly and carefully dip the sensor assembly of the VeriGAP into the container, ensuring complete submersion. <br>• Listen attentively for an audible click from the relay approximately two seconds after submersion. This click indicates successful detection of the liquid by the sensor.<br>ATTENTION:<br>If no audible click is heard after a reasonable wait time, proceed to step 4 for further troubleshooting.
5. OPTIONAL VERIFICATION - RELAY CONTACT TESTING (USING OHMMETER)
-
5.1 • This step is optional but can provide additional confirmation of relay functionality.<br>• Using an ohmmeter, measure the resistance across the relay contacts in both the open and closed states.<br>• Compare the measured values to the manufacturer's specifications for the relay contacts Significant deviations from specifications may indicate a faulty relay.
6. CLEANING
-
6.1 • If the dip test revealed no click or the visual inspection identified buildup on the sensor assembly, Carefully clean the sensor using a soft cloth dampened with a non-abrasive cleaning solution.<br>Important:<br>Avoid using harsh chemicals or abrasive cleaning methods, as they can damage the sensor.<br>• After cleaning, allow the sensor assembly to dry completely before proceeding.
7. REPEAT DIP TEST
-
7.1 • Once cleaning is complete, repeat the dip test as described in step 3.<br>• If an audible click is still not heard after cleaning, the VeriGAP has likely failed and requires further investigation or replacement.
8. DOCUMENTATION
-
• Record the date of this verification procedure and the results of the dip test (success or failure) in a designated maintenance log.<br>• If any abnormalities were observed during the verification process, document them in detail and report them for further action.
9. TASK COMPLETION
-
9.1 Clean work area of old or used parts.
-
9.2 Return all unused parts to the warehouse.
-
9.3 Clean and return all equipment and supplies to their proper location.
-
9.4 Clean any used specialty tools and return them to their specified location.
-
9.5 Is the task fully completed? Notify the DG supervisor that the Pump Stations’ tank level detectors inspection is complete, and it is back in operation.
-
9.6 Report any defects to the supervisors and the planning team.<br>Any repair done must also be recorded.
-
ADDITIONAL COMMENTS:
-
Signature
")
")
")
")
")
")
")
")
")
")