Title Page
-
Aircraft Identifier (Callsign - e.g. QFES UAV8100)
-
This inspection triggered by:
-
Total time in service (total air time): Format ??h ??m ??s
-
Landings/Cycles (flights logs on record)
-
Conducted on
-
Conducted by
Checking the Battery System
-
Check the intelligent flight batteries for damage and deformaties. If there are any signs of damager to an intelligent flight battery, stop using it and discharge fully for disposal.
-
Check the intelligent flight battery pins and rub them with a clean eraser if any residue is observed to help ensure a reliable connection.
-
On the intelligent flight charging hub, check the metal pins on the charging ports. Remove any corrosion or residue to ensure reliable connection.
-
Check the power supply and leads for damage (Charging hub)
-
Check plastic shell for damage and correct function
-
Run the DJI Pilot app to confirm each intelligent flight battery's cell are at a similar level and remain at the same level when fully charged. If all cells remain above 3.7 volts but any cell has deferential voltage of 0.2 volts higher or lower than others, the battery is not to be used.
-
Check the plastic compartments of the battery compartment to make sure they are in good order and all screws are secure.
-
Insert each intelligent flight battery into the battery well, check they mount securely with the battery release button raised. Press the battery release button and make sure the battery can be released.
Checking the folding arms
-
Check the folding arm system for security and looseness. Check the legs lock securely in place.
-
Check the power cables located between the aircraft’s front arms and body for chafing and wear.
Checking the Airframe
-
Check that all aircraft screws are still adequately tightened. If screws are found to be loose, remove and apply blue Loctite and replace.
-
Check the aircraft airframe for breaks, damage cracking. Using a magnifying glass, check for hairline cracks around the folding arm connections to the main frame.
Checking the motors
-
Check each motor for looseness on the airframe arm.
-
Conduct a visual check of the motors for discolouration due to excessive heat.
-
Check for deformities by confirming that the gap between the motor and the motor base is even.
-
Detach the propellers and start the motors. Carefully examine the edge of the rotor and confirm that the shaft is cantered perfectly on the motor. Examine the edges of each rotor for runout. Check for abnormal noise and vibration.
-
With the propellers removed, start the motors carefully and examine the edges of each rotor for runout. Check for excessive or abnormal vibration.
-
Replace motor and leg combination on condition.
Checking the Propellers
-
Replace each propeller with a complete new set.
-
Inspect propeller locking mechanism and check that the propeller clicks into place when attaching to the motor.
Checking the Flight Control System
-
In the DJI Pilot app, review the IMU bias and compass interference readings. Conduct an IMU calibration in the DJI Pilot app.
-
Check the compass bias and perform a compass calibration.
-
With the aircraft powered on, listen to the flight control module fan for any vibration or abnormalities. Fan is located just behind the gimbal.
-
Inspect the area around the GPS module at the centre of the top shell of the aircraft to make sure there is nothing obstructing the GPS module such as stickers etc.
Checking the Control and Video Transmission System
-
Inspect the aircraft antennas located on the landing gear legs are not covered with stickers or tape.
-
Check remote control antennas for damage.
Checking the Gimbal and Camera
-
Inspect gimbal carefully for looseness or damage.
-
Check the camera and lens show signs of moisture ingress, use desiccant or a moisture absorbing dry box to remove moisture.
-
Check the camera lens for dirt or residue and clean the lens gently with lens cleaner.
-
Perform a camera gimbal calibration in the DJI Pilot app.
Checking the Vision System
-
Check and remove objects that might obstruct the vision sensors.
-
Detach the propellers and turn on the aircraft, controller and app. Hold the aircraft 1 to 2 metres above a surface with rich patterns under good lighting conditions. Select P-mode on the controller and check the app. If the app displays an altitude value indicates that P-OPTI mode is active, the Vision System is functioning normally.
-
If a visions system abnormality is displayed in the app, perform a vision system calibration using the DJI Assistant 2 software. Connect the aircraft to the computer and perform a calibration of the forward and downward vision systems.
Firmware
-
Check for the latest version of firmware of the aircraft, controller and intelligent flight batteries. If the latest version of firmware has proven stable, update to the latest firmware. If running the latest firmware and instability becomes an issue, roll back the firmware to the previous version as required to gain stability.
-
Check for the latest version of firmware of the Smart Controller. <br>If the latest version of firmware has proven stable, update to the latest firmware.
Conduct Test Flight
Test Flight
-
Start the remote control, aircraft and DJI Pilot app. Allow the system to perform a self-test and check for any abnormalities within the on-board systems check.
-
Perform a compass calibration.
-
Tap on the battery bar and check the status of the battery (differential not more than +/- 0.2 volts per cell). Check battery temperature.
-
Check GPS and video link reception (not less than 7 satellites).
-
Lift off and place the aircraft in a stable hover at eye level.
-
Check for runout and alignment of propellers and any vibration.
-
Check for abnormal noise coming from the craft.
-
Check the aircraft movement in all three axes by gently moving in the direction of roll, pitch and yaw.
-
Fly the aircraft for a full battery and land.
-
Record Motor Temps
-
Within two minutes of landing, use an infrared handheld thermometer and check the temperature of each motor (record readings in the Aircraft Maintenance Log). Check for a substantial differential in temperatures between motors. No motor should be hotter than 90 deg C. If any motor is substantially hotter than others, further inspection is required.
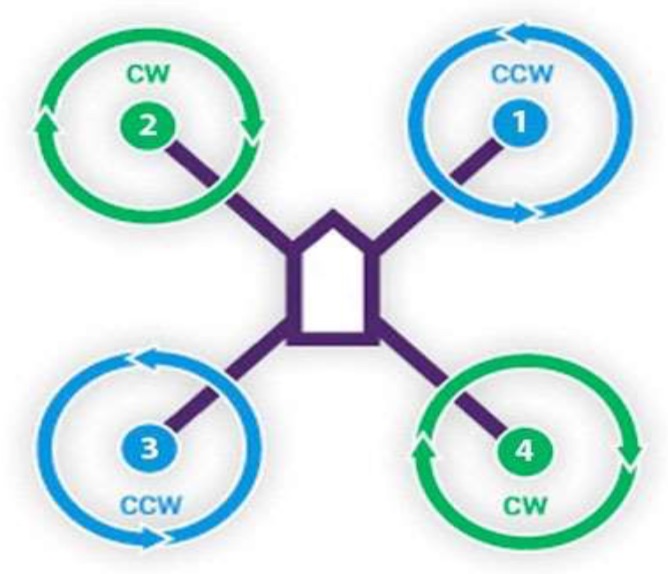
Motor 1
Motor 2
Motor 3
Motor 4
-
Place a second full battery in the aircraft and launch the aircraft. Fly the aircraft 50 meters from the take-off point. Place the aircraft in a stable hover and institute the ‘Return to Home’ mode. Check that the aircraft accurately returns to the take-off point.
-
This service has been marked as complete in Airdata
-
This service has been entered into the RPA's paper Logbook
-
Conducted by:
-
ARN
