


Title Page
-
Conducted on
-
Prepared by
-
Franchisee
-
Market
-
Location
Tire Repair OJT
Car-X Tire & Auto Tire Repair SOP
-
On-the-Job Training Checklist
All Teammates assigned a curriculum in Car-X Academy have an on-the-job training (OJT) Checklist that must be completed. Training Managers are Required to Sign & Acknowledge and Record the Status to complete within iAuditor. If this step is NOT completed, the Teammate is unable to proceed to their next assignment. -
Verify Teammate understands Tire Repair SOP
-
STANDARD OPERATING PROCEDURE
TIRE REPAIR PROCEDURES
One of the greatest liabilities for a company providing tire repair services is the potential injury caused to a customer by inappropriate adherence to company procedures.
This procedure provides specific guidance for the manner in which a tire is repaired. The technician performing the tire repair must be fully trained and familiar with the correct procedures and safety precautions.
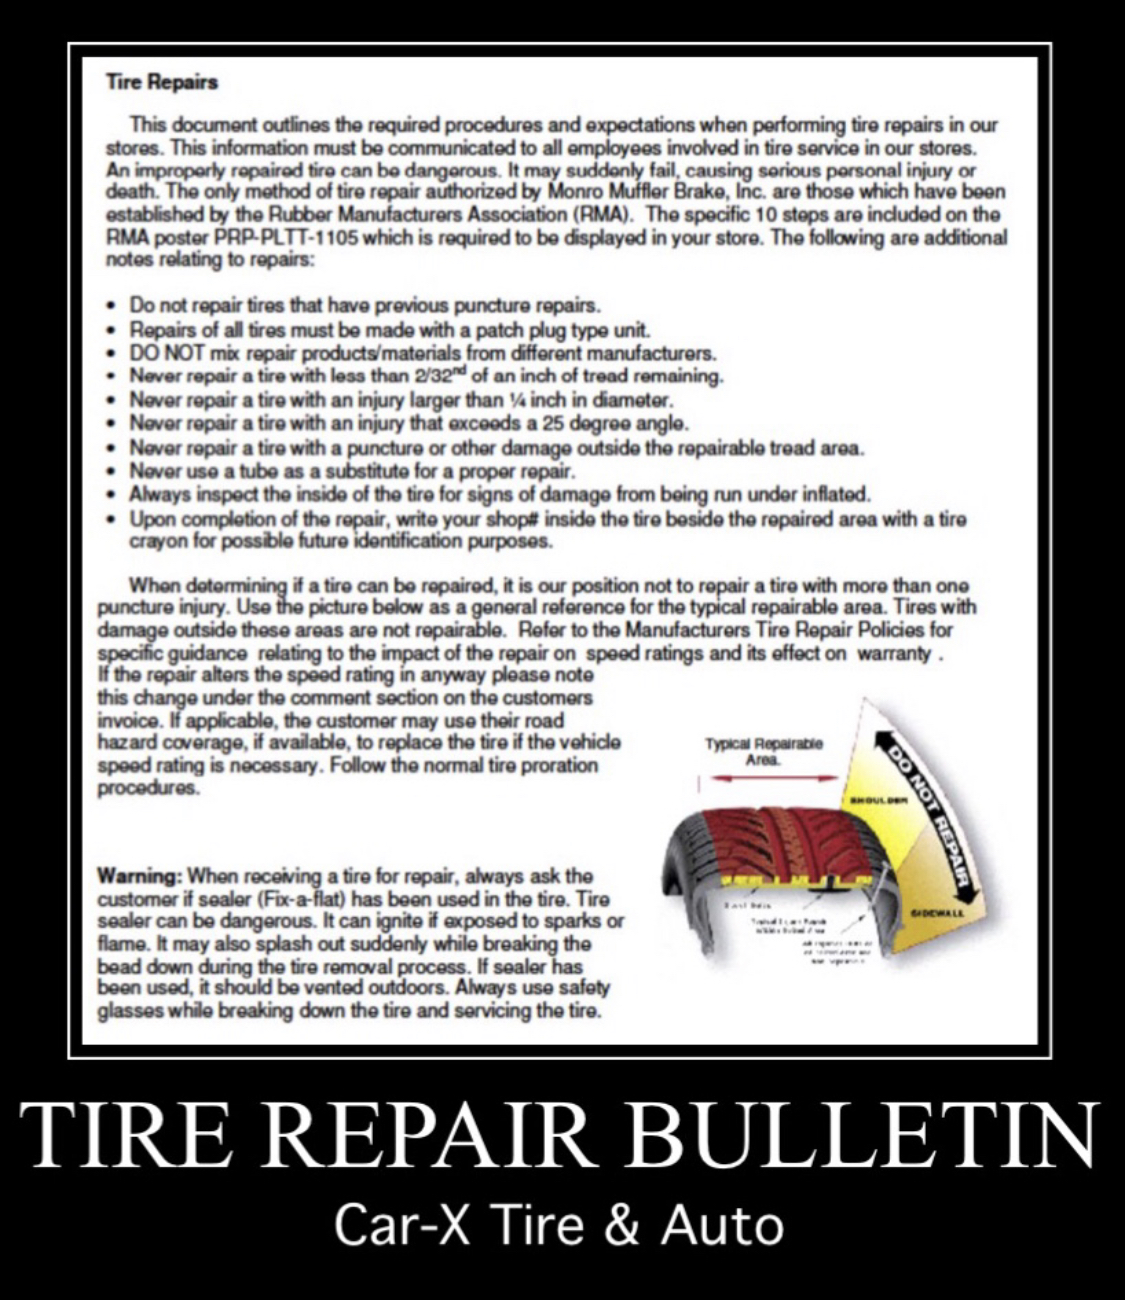
Not all tires can be repaired. Improperly repaired tires can fail while in service, such as by tread-belt separation and/or detachment, which may result in an accident causing serious injury or death. Tires will not be repaired that has a puncture in the sidewall or within one inch of the inside or outside edge of the tread surface, or if there is less than 5/32 tread depth on and part of the tread surface, or if the puncture in the tread surface is greater than 1/4" (6mm) in diameter. Car-X Tire & Auto recommends you only service tires rated Q, S, T, U, H, V. -
Tire Repair Procedures
-
1.External Inspection
-
Prior to demounting, check tire surface and the valve for the source of the leak(s) by using water or a soap solution. Mark the injured area and totally deflate the tire. Remove the tire from the wheel being careful to avoid further damage to the tire, particularly to the bead area. Place on a well-lighted spreader. (Avoid excessive spreading of the tire or tire beads). Always inspect tires internally and externally prior to installation of any repair. A hand-held inspection light can help ensure that these conditions are met both inside and outside the tire.
-
2. Internal Inspection
-
Spread the beads and mark the injury with a tire crayon. Remove the puncturing object noting the angle of penetration. Probe the injury with a blunt awl to determine the extent and direction of the injury and remove any loose foreign material. If the angle of the injury exceeds 25 degree, use a two-piece repair system. Do not repair if injury extends into the shoulder/belt edge area and never repair in the sidewall area.
• For all tires, repair units cannot overlap. Inspect for any other internal damage. Tires with damage due to under inflation, overloading, and/or tires with an existing improper (non-TIA) repair must be rejected. -
3. Prepare Inner Liner Surface
-
Clean the area around the puncture thoroughly with an appropriate pre- buff inner liner cleaner. Use a clean cloth and/or scraper. This step serves to remove dirt and mold lubricants that can reduce repair unit adhesion and contaminate buffing tools.
-
4. Prepare Injury Channel
-
All damage must be removed. Use an electric/air powered drill with an appropriate size carbide cutter or other suitable tool. Beginning from the inside, ream the puncture channel a minimum of three times and repeat from the outside. Use a probe to check for any splits in the radial plies surrounding the injury. Remove any additional damage found.
-
5. Repair Unit Selection
-
Select the appropriate size repair unit, based on repair material manufacturer’s recommendations. Center the unit over the injury and outline an area larger than the repair unit, so buffing will not remove the crayon marks.
-
6. Fill Injury (Two Piece Repair)
-
Cement the puncture channel per recommendations. Completely fill the injury from the inside of the tire with a suitable vulcanizing material or rubber stem. Without stretching the stem, cut the material off just above the inside tire surface. It is necessary to completely fill the injury to provide a backup for the patch repair unit and to prevent rusting of the steel wires or deterioration of fabric.
-
7. Buffing
-
To prevent contamination and preserve the outline, buff within the marked area thoroughly and evenly with a low speed buffer with a fine wire brush or gritted rasp. Take care not to expose or damage tire casing body (ply) cords. Buff to a velvet surface. Never buff the tire inner liner too deep exposing the tire casing body (ply) cords. If this type of damage occurs during buffing, the tire must be scrapped.
• Remove all rubber dust from the buffed area by using a fine wire brush and vacuum, being careful to avoid touching and contaminating the area. DO NOT use compressed air to clean bonding surfaces; airlines contain contaminants such as oil and moisture, which reduce adhesion. -
8. Cementing
-
Apply chemical cement and allow it to dry. Do not use forced air or outside heat source to accelerate drying time. Do not mix products from different repair material manufacturers.
-
9. Repair Unit Application.
-
The tire must be in a relaxed position when the repair unit is installed. Do not spread the beads excessively. Remove and discard protective covering being careful not to touch the bonding material on the repair unit. When using a two-piece directionally marked unit, install the unit so that the alignment is correct and centered over the injury. Next, stitch down thoroughly with a stitching tool, working from the center out. When using a one-piece combination patch/stem repair unit, do not cement the stem. Instead cement the injury channel. Next, pull the stem through the injury until the unit slightly dimples, then stitch down thoroughly with a stitching tool working from the center out. Remove and discard the top protective covering. Cut the fill material flush with the outer tread surface while being careful not to stretch the stem.
• Inspect patched area! If the buffed area extends beyond the patch, look for any signs of tire casing body (ply) cords. Do not continue the repair if the buffed area exposes the tire’s casing body (ply) cords; the tire must be scrapped. -
FINAL INSPECTION
-
• IMPORTANT! A proper repair must completely fill the injury with a suitable vulcanizing material or rubber stem and a patch must be applied to the inner liner to prevent air loss. Inspect all repairs; rework if necessary. After remounting and inflating the tire/wheel assembly, inspect the assembly (tire/rim/valve) for damage or leakage. Pay particular attention to the location of the repair, beads and valve. If the tire continues to lose air, it must again be removed from the wheel for complete re-inspection.
-
Familiarize Teammate with tire machines
-
Observe Teammate properly using tire machines to dismount and mount tires
-
Familiarize Teammate with wheel balancer
-
Observe Teammate using balancer, if applicable, include road force balancing
-
Observe Teammate demonstrate ability to identify correct wheel weights, using wheel weight tool
-
Familiarize Teammate with TPMS tool
-
Observe Teammate use tool to read tire pressures and program sensors on vehicle
TECH
-
Technician:
-
Sign and Acknowledge
-
Manager
-
Store Manager:
-
Trainer
-
NOTES 📝 :
-
Once you Record the status and mark the OJT “Completed”, the Teammate’s career path in Car-X Academy must be updated to show the learning object as Completed so they can continue to their next training object


