


Title Page
-
This induction is to be conducted Face-to-Face with an authorised RPAS personnell. 2 hours of flight time will need to be gathered to be able to use the Fotokite Sigma operationally.
-
Site conducted
-
Name of RPA Pilot being inducted
-
Conducted on
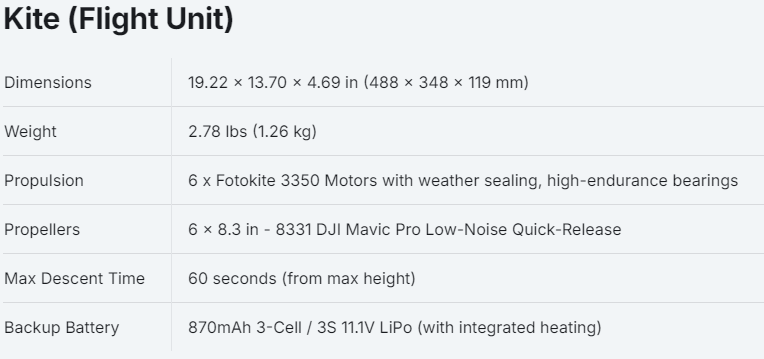
General Specifications
-
-
-
-
-
-
General Specifications


Transport Case
-
To safely open the case:
Ensure first that the handles are facing downward and the unit is located on a fixed and level surface.
- Undo the eight clips connecting the case lid.
- Pull the case lid directly upwards, making sure not to tilt or angle the case lid before clearing the unit.
- Place the case lid to the side with the foam facing upwards. If it is raining, place the case lid inside the vehicle or a protected storage area.
- Always keep the case lid aligned with the bottom half and propellers folded towards the center when opening or closing the unit.
Closing the case:
- Fold all propellers towards the center of the case.
- Align the case lid, making sure not to tilt or angle the case lid.
- Apply pressure to compress the dampening foam while reattaching the case clips to the lid.
- The case lid is reversible and can be attached in either direction.
- Plug the AC Outlet and stow with handles facing downward.
It is not recommended to store the Transport Case outside for extended intervals. Always store the system either indoors or inside of a vehicle / enclosure.
Never transport the Transport Case without first fully closing the case lid and locking it in place. Always keep the Transport Case level when opened. -
Transport Case

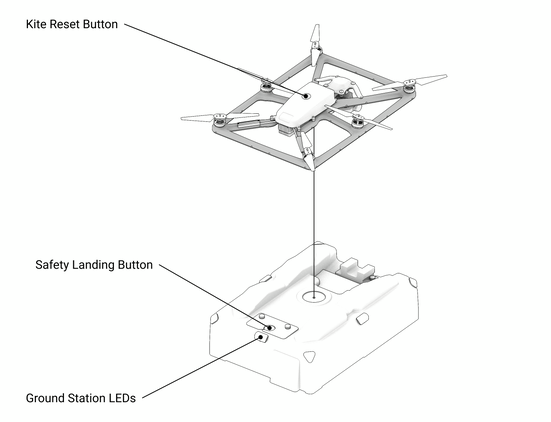
Ground Station
-
The Ground Station provides uninterrupted power and secure communication over a tether with the Kite. Featuring a motorized spooling solution designed to expand/retract the tether, the Ground Station adjusts the height of the Kite while supplying constant tension and a stable and accurate position.
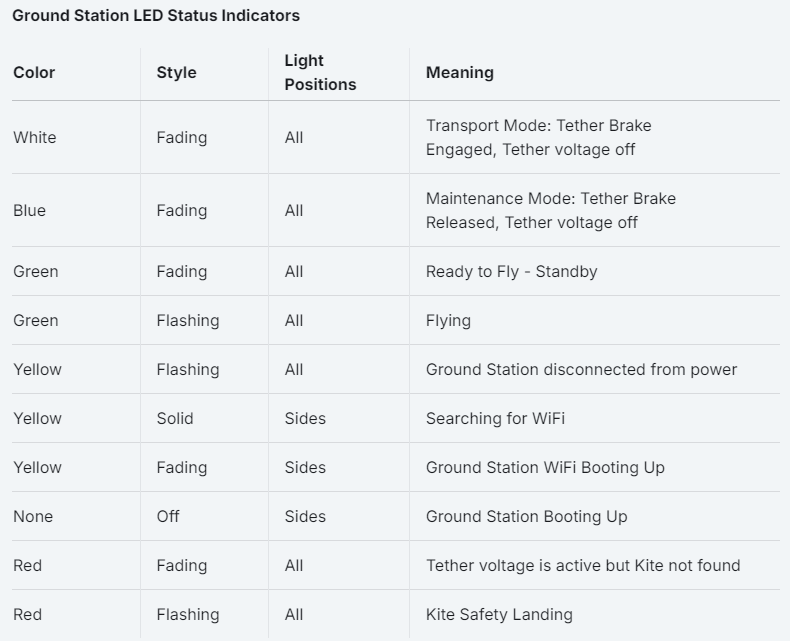
- The Ground Station is fitted with LED Status Indicators that alert the user of the flight status and readiness during operation (check the table below).
- The Ground Station is fitted with a Safety Land Button that allows the user to override existing commands and force-land the system. The Safety Land Button also has multiple uses that are described more in-depth in the Operational Guidelines section.
- The Ground Station is equipped with a backup battery that provides the system with emergency power in the case of unexpected power supply failure.
- The Ground Station is able to be supplied via an AC or DC power supply, depending on your specific configuration.
- The System is designed for static use only: do not move the Ground Station while the Kite is flying.
- Fold all propellers towards the center of the case.
- Align the case lid, making sure not to tilt or angle the case lid.
- Apply pressure to compress the dampening foam while reattaching the case clips to the lid.
- The case lid is reversible and can be attached in either direction.
- Plug the AC Outlet and stow with handles facing downward.
It is not recommended to store the Transport Case outside for extended intervals. Always store the system either indoors or inside of a vehicle / enclosure.
Never transport the Transport Case without first fully closing the case lid and locking it in place. Always keep the Transport Case level when opened. -
-
Ground Station
Tether
-
The Tether is the interface between the Ground Station and Kite and provides a continuous power source as well as secure communication to the Kite and Camera Modules.
- The Tether can be extended to reach a maximum flight height of 150 ft (45 m) from the Ground Station.
- The Tether is user-replaceable and features a quick-release system from the flight unit.
- The Tether is designed to sway and respond to environmental wind conditions within a cylindrical boundary of 8 ft (2.5 m) from the Ground Station.
In the event of the tether being cut or separated from the Kite, a Safety Landing will commence.
The tether carries power while the Kite is on. When performing any type of maintenance involving exposed wiring or reconnecting the Kite to the Tether, always power off the Kite and Ground Station by disconnecting the system from its power source. -
Tether
Kite
-
The Kite is an actively tethered RPAS with a six motor configuration designed to reliably operate in a multitude of environmental and weather parameters.
- The Kite can reach a maximum flight height of 150 ft (45 m) from the Ground Station.
- If the Kite cannot acquire a GPS lock, then the maximum altitude is limited to 25m (80 feet).
- The Kite may adjust its height automatically, if high wind conditions arise and its relative position to the Ground-Station exits the safety zone.
- The Kite is designed to sustain stable flight in the event of a single-motor failure and automatically enters a controlled descent. 5 Motors Landing in Failure Modes.
- The Kite is equipped with an internal backup battery that allows it to safely perform a Safety Landing during an unexpected power loss on the ground or critical tether failure.
- Located on the top of the flight unit is the Kite Reset Button. This button provides the user the ability to turn off the system if running on the backup battery after a Safety Landing.
- During flight, navigation lights are emitted from the bottom and top of the Kite to help with orientation and visibility.
Port - Red LED
Starboard - Green LED
Above an altitude of 10 ft (3 m), a strobe begins to emit from the top of the Kite for increased visibility by passing air traffic. -
-
Kite


Camera
-
Camera 2nd Generation features the following three camera sensors mounted on a three-axis gimbal:
- Radiometric IR Thermal Camera
- Wide Angle CMOS Color Camera
- Narrow Angle CMOS Color Camera
The data from these camera sensors are combined to make the following three video streams simultaneously available to the user at all times:
- Thermal Video Feed
- Zoom Color Video Feed
- Overview Color Video Feed
The video feeds can be viewed live and in real-time during flight. Backtracking additionally allows the video feeds for the last 30 minutes to be viewed in real-time.
Video Recording allows the Thermal and Zoom Color Video Feeds to be recorded continuously. Likewise, Livestream allows these feeds to be viewed by remote viewers over the Internet.
The radiometric feature of the IR Thermal Camera allows temperatures to be measured using the Thermal Picker.
The dual Color Camera configuration enables the Zoom Color Video Feed to provide 0.5x - 16x hybrid optical and digital zoom. Optical zoom ranges: 0.5x-1x and 2.3x-4.6x, digital zoom ranges: 1x-2.3x and 4.6x-16x. -
-
Camera


Pre-Flight Checklist
-
Watch below video
-
The following section contains information about standard setup and operating procedures. The Fotokite is designed for autonomous takeoff, flight, and landing. Without the need to pilot the system, your team can access aerial situational awareness without taking away resources from mission-critical tasks. https://youtu.be/8ig_VqdBQPs (07:54 minutes)
-
Preflight Checklist
-
1. Verify power is provided to the Fotokite system: Remove the top of the case cover and plug-in AC power cable. Unfold all propellers. Ensure you are deploying in a level and stable area. Ground Station LEDs will begin to flash a faded Green, indicating the Kite is powered on and in standby. You will hear an audible startup noise whenever the system is powered on.
-
2. Check your Airspace: Ensure you are deploying within a Class G airspace or pre-approved restricted airspace.
-
3. Open Fotokite Live Application on the tablet: Check the connection status in the Fotokite Live Status Bar at the top of the screen. The name of the connected system should be visible. Also check the status of Handoff Control. An eye icon (with orange warning icon) means that you do not have control over the system yet. Open the dialog and take control. If your system is not connected, please follow the instructions described in Connecting to a Fotokite system.
-
If you have an Android or iOS tablet, you can find the corresponding download links of Fotokite Live in Download Fotokite Live.
-
We recommend changing the Wi-Fi password of your Fotokite system to keep it secure. Visit Change Wi-Fi Password for more details.
-
Pre-Flight Checklist
Launch & Flight
-
1. Press Start Button below the Altitude Slider.
- Ground Station LEDs will flash Green, and it will start to emit an audible takeoff sound, indicating the Kite is entering Flight Mode.
- The Kite will begin to perform automatic preflight checks and its LEDs will start to flash.
- After approximately ten seconds, the motors will begin to spin and the Kite will take off to a predetermined altitude and position - the takeoff parameters are configured during installation based on your vehicle specifications
2. Carefully Observe the System during Takeoff.
- During takeoff, the Kite should remain steady with its heading aligned with the heading of the Ground Station.
- Once the Kite reaches its takeoff altitude, the Kite should maintain this position and not deviate until further commands are sent. Take 15 seconds to make sure it is not shifting significantly from this position. Check to see if the Kite begins to rotate or is pitching in any direction more than 10 degrees.
- If you are at all uncomfortable with the way the Kite is behaving, immediately land the system and contact your Fotokite Representative to provide further guidance.
Set the desired altitude using the Altitude Slider on the Main Screen. It is recommended to first set your altitude to approximately 30 ft (9 m). Maintain this altitude for around 30 seconds and again check to see if any behavior is outside of the Operating Parameters. Once you have confirmed that everything is working you can raise to a higher altitude.
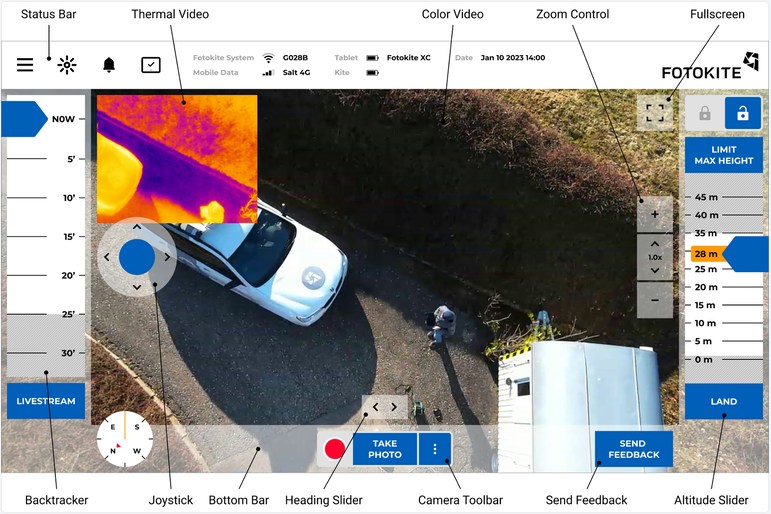
Pan and Tilt the Camera. Double-tap on the screen to center the image on the selected point or use the Joystick on the left hand side of the screen. Swap between the Thermal- and Color-Video by tapping the Picture-in-Picture (PIP) window. You can also zoom the Color-Video by pinching with two fingers or use the Zoom Control Interface on the right-hand side of the screen.
Always have a Visual Observer. It is recommended that at least one operator is assigned to perform a quick visual inspection of the System during flight. The tablet should never be left without an assigned user nearby to land the system.
- The Tether is designed to sway and respond to environmental wind conditions within a cylindrical boundary of 8 ft (2.5 m) from the Ground Station. -
Launch & Flight
Recording Video
-
1. Record video by pressing the Red Record Button. Both Thermal- and Color-Video will be recorded simultaneously.
- Video is recorded onto a solid state drive in the Ground Station. To access recorded video you can use the Video Library in the Main Menu.
2. By pressing the Take Photo Button, you will take a screenshot of both the Thermal- and Color-Video with a time-stamped overlay.
- Screenshots are stored in the screenshot folder on the desktop of the tablet.
3. Backtrack your stream. By adjusting the time slider on the left portion of the application, you can instantly scan video footage mid-flight. Simply return the time slider to the original position to return to the current video feed. -
Recording Video
Landing
-
Press Land Button on the Main Screen. The Kite will begin descent automatically. Once it reaches a lower altitude, the Kite will begin to realign itself with the Ground Station. The Kite will land directly onto the pad and power off its motors. The System will remain powered on and ready to launch for any additional flights. Always keep bystanders at least 10 ft (3 m) away from the Ground Station during a landing.
If at any time the Kite begins to behave outside of these parameters it is important to initiate a Safety Landing, either using the Ground Station button or via the Fotokite Live Application. Familiarize yourself with the Operational Guidelines section of this manual. More information on Emergency Protocols can be found in the Safety Landing section.
If your tablet begins to experience video stuttering issues or the Application notifies you of System communication issues, it could mean that you are outside of the WiFi range. The Kite will continue to operate normally and record footage / maintain height. -
Landing
Tablet Walkthrough
-
Below is an overview of the Fotokite Live Application used to operate the Fotokite system:
If you are having issues with Fotokite Live, try closing the application and restarting. If Fotokite Live does not open automatically or is closed during operation, your Kite will remain at the last input altitude and heading. Double-tap the Fotokite shortcut on the desktop to re-open the app.
Connect to a Fotokite System in System Connect.
- Get information and data about the system and components in System Info.
- Update the system in System Update.
- Access recorded video footage in the Video Library.
- Access online and offline versions of the User Manual.
- Configure color mode and units in Fotokite Live Settings.
- Provide comprehensive flight information and warning logs in Maintenance.
IMPORTANT: Never make any modification to parameters or sensor calibrations without pre-authorization from a Fotokite Representative. -
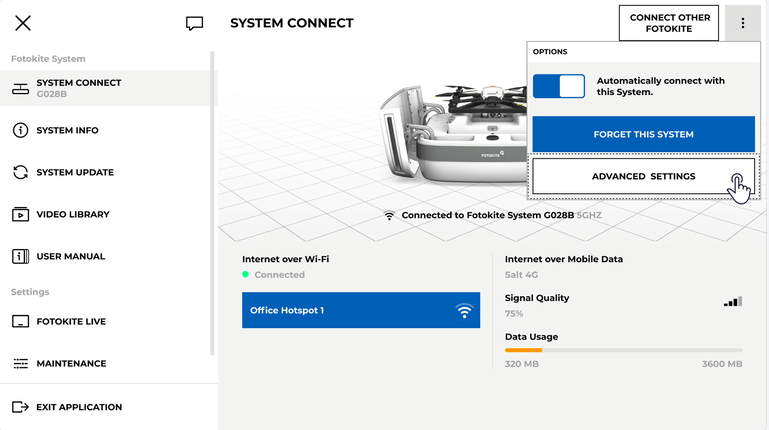
Usually, your Fotokite system should connect to the tablet automatically. If this is not possible, or if you want to connect the tablet to another Fotokite system, use System Connect.
Open System Connect by tapping the Connect Fotokite Button (or System Menu > System Connect). -
Available Fotokite systems are displayed. You can find Fotokite Systems on the top. If you connect to a Fotokite system for the first time, you need to select the system (fkGXXXB_5) from the list of Other Networks. In this case, also make sure to change your Wi-Fi password to keep your system secure.
-
If a connection is successful, the System Connect Screen is shown. Here you can check and manage your connection status, including Internet over Wi-Fi and Internet over Mobile Data
-
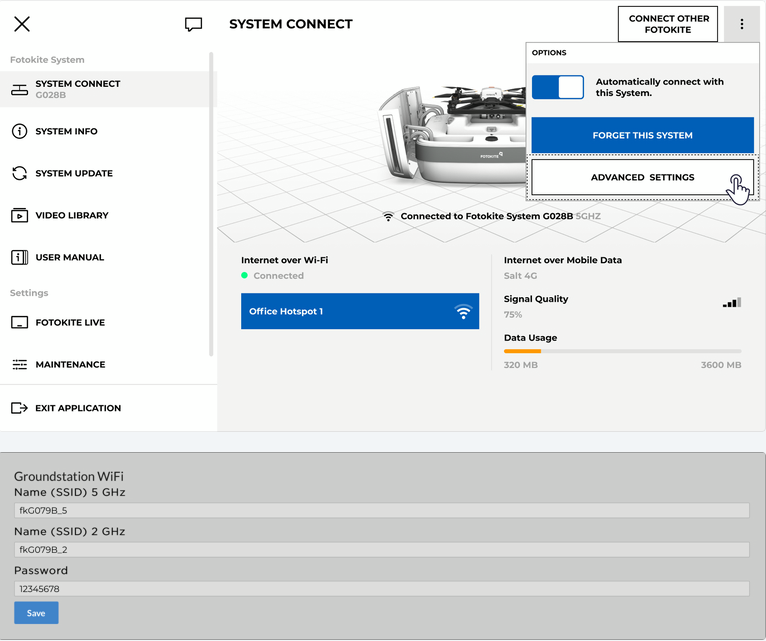
Change Wi-Fi Password
To change the Wi-Fi password of your Fotokite System, open the Advanced Settings in System Connect. -
Under Groundstation Wi-Fi, both the Wi-Fi names (5GHz and 2GHz) and the password can be changed and saved. After changing the password, please tap on Forget this System (System Connect > Options) and reconnect.
-
Change Wi-Fi Regulatory Domain
It is important that the country set in Wi-Fi Regulatory Domain corresponds to the actual location of the Fotokite system in order to comply with local telecommunication regulations.
If this setting is incorrect, the Fotokite system might bring up its Wi-Fi access point in frequency bands or transmission powers which are not legal to use in your country.
To change the Wi-Fi Regulatory Domain of your Fotokite System, open the Advanced Settings in System Connect and find the Wi-Fi Regulatory Domain section. Select the location of the system in the dropdown and tap the save button. -
-
Tablet Walkthrough


Fotokite Live App
-
Fotokite Live iOS/Android
In addition to the rugged Windows tablet that is optionally provided with the Sigma system, the Fotokite Live control software is compatible with iOS and Android. The software can be downloaded from the respective app store. Recommended tablets and accessories are listed below. -
Download Fotokite Live - APPLE
- Requires iPad
- Requires iPadOS 14 and up -
Download Fotokite Live - ANDROID
- Requires Android Tablet with min. resolution of 1920 px x 1080 px
- Requires Android 12 and up -
https://manual.fotokite.com/fotokite-live-walkthrough/fotokite-live-ios-android
-
Fotokite Live App
Release Notes (DMC Section)
-
Refer to Manufacturers website to check for the latest Firmware updates. Before updating firmware ensure the latest firmware is approved by the Chief Maintenance Controller on the MS Teams page 'Firmware updates'. https://release-notes.fotokite.com/
-
Release Notes (DMC Section)
Data Management
-
Data Upload
-
undefined
-
Comments:
-
Induction conducted by
-
Do you have any suggestions to improve this template?
-
Please add your comments on how to improve this Form.


