


Title Page
-
Organization:
-
Location:
-
Phone #:
-
Assessment Type:
-
Date of Assessment:
-
Prepared by:
-
Document #:
Parking Lot
PARKING LOT AND ROADWAY ACCESS POINTS:
-
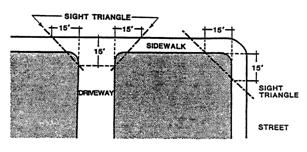
Keep access point clear from obstructed views to allow vehicles and pedestrians to enter and leave safely.
Is the Exit/Entrance free from visual obstruction?
-
Condition?
-
Level of importance?
-
Example Text:
-
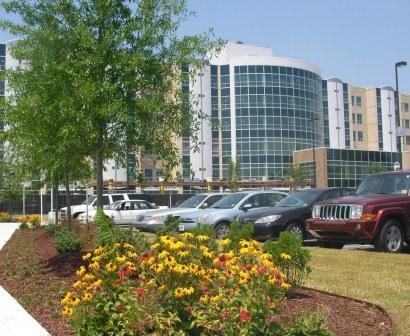
You should have a clear ‘sight triangle’ that extends 15 feet back from the right of way and is 70 feet to the left or right of the driveway line where the driveway meets the road. Within these triangles, no landscaping, signage or other visual obstruction should be between the heights of 30 inches and 10 feet. For example, shrubbery should be less than 30 inches high and the lowest limbs on trees should not be any lower than 10 feet.
-
Example Photo:
-
LIGHTING:
-
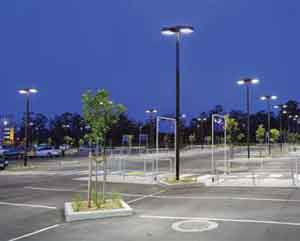
Access points to the building and the parking lot should remain well lit during times of low light.
What is the condition of the parking lot lighting?
-
Condition?
-
Level of importance?
-
Example Text:
-
Ensure that lights are in working order and glass or plastic light covers are not dirty, turning yellow, or damaged, which can reduce the visibility of the light.
This is both a deterrence and a safety issue for people going to their vehicles. It also provides a safe environment while driving in the parking lot enabling the driver to identify hazards. -
Example Photo:
-
MARKINGS & PAINT:
-
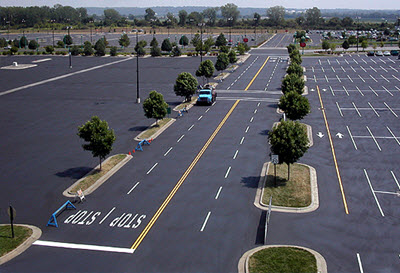
When parking lots are well-marked, drivers and pedestrians know how to move efficiently and safely through the parking lot.
Are the parking lot markings clear, visible, and easy to understand?
-
Condition?
-
Level of importance?
-
Example Text:
-
Clearly showing traffic direction and authorized parking areas helps your customers/members/employees to move comfortably and safely through your parking lot.
NOTICE- Slip and fall accidents on painted surfaces within parking lots are very often avoidable. Slipping is a common hazard on slick painted surfaces. This can be mitigated by adding silica sand or other gritty material to the paint, to create a safe, textured walking surface in the painted areas. When done properly, this simple step eliminates or greatly reduces the safety hazard from the painted areas by providing enough texture to allow a safe interface between the walking surface and the pedestrian's shoe. -
Example Photo:
-
SIGNAGE:
-
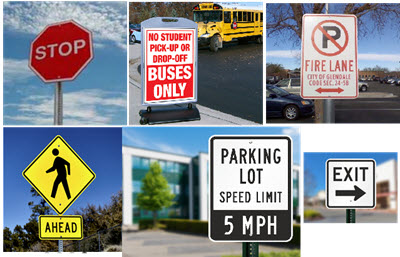
Signs help define areas in drop-off and pick-up zones and explain their proper use. Signs should be standard, highly visible, properly installed and well-maintained.
Is signage clearly visible and easy to understand?
-
Condition?
-
Level of importance?
-
Example Text:
-
Some signs can be confusing if improperly placed or poorly worded. Signs with fewer words and universal symbols are easier to read and understand. Standard signs should be used on property and in the surrounding area for regulating and guiding traffic. A local traffic engineer can recommend appropriate signs and their placement.
-
Example Photo:
-
VISUAL OBSTRUCTION:
-
Proper landscaping allows for safety between traveling motorist and pedestrians. It also removes potential hiding spots for perpetrators hiding or lying in wait.
Are the trees and shrubbery maintained to allow clear view of parking lot? Is the landscape maintained to minimize potential hidden hazards and threats?
-
Condition?
-
Level of importance?
-
Example Text:
-
Careful design or maintenance can provide ample line of sight for effective surveillance and deterrence.
Hedges should be kept low enough to expose places where people could otherwise hide or hide suspicious packages.
North Carolina recommends that shrubs and hedges bordering walkways not exceed 18 inches in height and that tree branches and leaves be kept clear to a minimum height of 8 feet off of the ground. -
Example Photo:
-
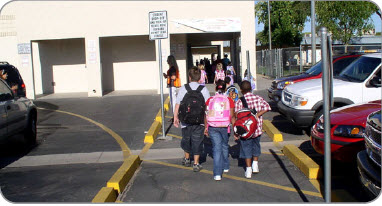
DROP-OFF & PICK-UP AREA:
-
Student drop-off and pick-up zones should be clearly designated and separated from bus traffic and established pedestrian pathways.
Are the parent pick-up and drop-off zones separated from buses and pedestrian walkways?
-
Condition?
-
Level of importance?
-
Example Text:
-
Separating or eliminating conflicts between students arriving on foot or bicycle from those arriving by bus and motor vehicle is highly recommended. Adequate physical space should be provided for each mode by which students arrive at school. Also, the route provided for each mode should be separate from other modes. Provision of sidewalks and bike ways that are separate from lanes dedicated to buses and lanes dedicated to motor vehicles will reduce a student’s exposure to traffic. Students walking or riding to school should not have to cross busy driveways or roadways to access the campus. If they do, an adult school crossing guard or older student should be placed at the crossing to assist students safely across.
Student Drop-off and Pick-up: It may be appropriate to provide a separate travel lane for buses, a separate lane for private motor vehicles and specific routes for pedestrians and bicyclists. Separate bus zones can be established either on the school site, or on the adjacent street, wherever sufficient room exists. Preferably, the bus zone is not immediately adjacent to the private motor vehicle area to ensure that there is no spillover from the motor vehicles into the bus area. -
Example Photo:
-
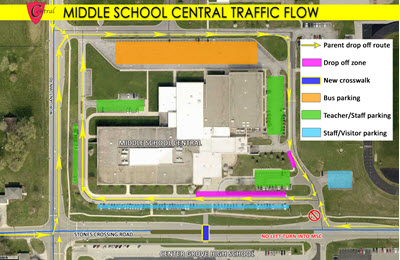
BUS LOAD & UNLOADING AREA:
-
Bus loading and unloading zones are clearly designated and separated from student pick-up and drop-off zones and established pedestrian pathways.
Are bus drop-off and pick-up areas clearly identified, separated from student walkways, and managed with sufficient staffing?
-
Condition?
-
Level of importance?
-
Example Text:
-
Separating or eliminating conflicts between students arriving on foot or bicycle from those arriving by bus and motor vehicle is highly recommended. Adequate physical space should be provided for each mode by which students arrive at school. Also, the route provided for each mode should be separate from other modes. Provision of sidewalks and bikeways that are separate from lanes dedicated to buses and lanes dedicated to motor vehicles will reduce a student’s exposure to traffic. Students walking or riding to school should not have to cross busy driveways or roadways to access the campus. If they do, an adult school crossing guard or older student should be placed at the crossing to assist students safely across.
Student Drop-off and Pick-up: It may be appropriate to provide a separate travel lane for buses, a separate lane for private motor vehicles and specific routes for pedestrians and bicyclists. Separate bus zones can be established either on the school site, or on the adjacent street, wherever sufficient room exists. Preferably, the bus zone is not immediately adjacent to the private motor vehicle area to ensure that there is no spillover from the motor vehicles into the bus area. -
Example Photo:
-
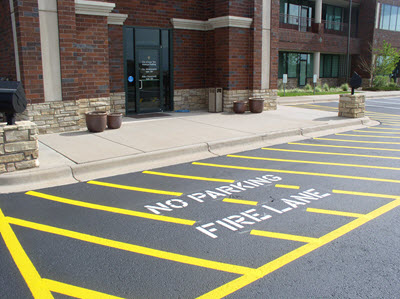
FIRST RESPONDER ACCESS:
-
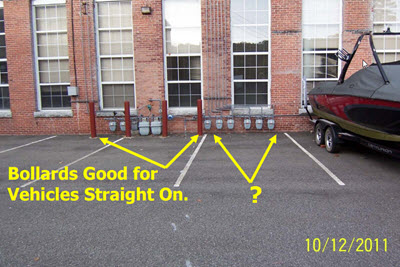
It is important to have clear signage and painted areas to keep free standing vehicles from restricting emergency access. It is also recommended that there is a consistent reminder to those that violate these rules, educating them of the importance of keeping the emergency access points clear.
Do first responders have easy parking lot access, allowing for the most efficient response needed during an emergency?
-
Condition?
-
Level of importance?
-
Example Text:
-
If emergency vehicle access lanes are required by local codes, they should be constructed as a wide sidewalk or grassed, harden surfaces. Vehicular access should be over the curb, rather than via curb cuts, which could encourage unauthorized use. Emergency lanes need to be clearly identified.
-
Example Photo:
-
ADDITIONAL INFORMATION:
-
Are there additional areas of concern?
-
Identified areas:
-
Condition?
-
Level of Importance?
Landscaping
Crime Prevention Through Environmental Design (CPTED)
-
Crime prevention through environmental design (CPTED) is a multi-disciplinary approach to deterring criminal behavior through environmental design. CPTED strategies rely upon the ability to influence offender decisions that precede criminal acts. Generally speaking, most implementations of CPTED occur solely within the urbanized, built environment. Specifically altering the physical design of the communities in which humans reside and congregate in order to deter criminal activity is the main goal of CPTED. CPTED principles of design affect elements of the built environment ranging from the small-scale (such as the strategic use of shrubbery and other vegetation) to the overarching, including building form of an entire urban neighborhood and the amount of opportunity for "eyes on the street".
CPTED strategies rely upon the ability to influence offender decisions that precede criminal acts. Research into criminal behavior shows that the decision to offend or not to offend is more influenced by cues to the perceived risk of being caught than by cues to reward or ease of entry. Certainty of being caught is the main deterrence for criminals not the severity of the punishment so by raising the certainty of being captured, criminal actions will decrease. Consistent with this research, CPTED based strategies emphasize enhancing the perceived risk of detection and apprehension. -
CPTED Instructional Video
-
TREES NEAR BUILDING:
-
Keep trees maintained so that perpetrators can not hide under, in or about trees or use them as means to access roofs.
Are trees around the immediate building maintained properly?
-
Condition?
-
Level of importance?
-
Example Text:
-
Trees need to be located far enough away from buildings or trimmed appropriately to avoid providing roof, window, or second story access. California recommends a minimum distance of 10 feet between buildings and trees.
-
Example Photo:
-
![CropperCapture[3].jpg](/media/dd609c30-032c-11e7-929f-f94da0c70d1c)
LANDSCAPING AROUND BUILDING:
-
Landscaping reinforces access control, natural surveillance, and natural deterrence by Crime Prevention Through Environmental Design (CPTED).
Is the landscaping near the building maintained in a way to restrict access into the building or eliminate possible places to hide?
-
Condition?
-
Level of importance?
-
Example Text:
-
Careful design and maintenance can provide ample line of sight for effective surveillance and deterrence.
Hedges should be kept low enough to expose places where people could otherwise hide or hide suspicious packages.
North Carolina recommends that shrubs and hedges bordering walkways not exceed 18 inches in height and that tree branches and leaves be kept clear to a minimum height of 8 feet off of the ground.
An example of implementing CPTED concepts would be utilizing rose bushes under windows to deter perpetrators from attempting to access the windows. -
Example Photo:
-

FOLIAGE NEAR ACCESS POINTS AND HIGH TRAFFIC AREAS:
-
Careful design and maintenance of landscaping can provide ample line of sight for effective surveillance and deterrence.
Is the landscaping near access points and high traffic areas maintained in such a way to provide line-of-sight?
-
Condition?
-
Level of importance?
-
Example Text:
-
Understanding that high traffic areas and main throughfares could be targets for perpetrators hiding or the placing of suspicious packages. Careful design and maintenance can provide ample line of sight for effective surveillance and deterrence.
Hedges should be kept low enough to expose places where people could otherwise hide or hide suspicious packages. North Carolina recommends that shrubs and hedges bordering walkways not exceed 18 inches in height and that tree branches and leaves be kept clear to a minimum height of 8 feet off of the ground. -
Example Photo:
-
ADDITIONAL INFORMATION:
-
Are there additional areas of concern?
-
Identified areas:
-
Condition?
-
Level of importance?
Exterior
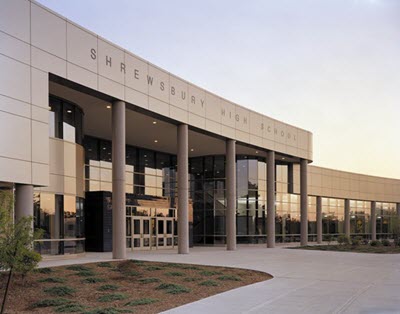
SINGLE ACCESS POINT TO INTERIOR:
-
By limiting singular access points into your facility you are better able to control and monitor who enters.
Does the building have a singular or limited access points?
-
Condition?
-
Level of importance?
-
Example Text:
-
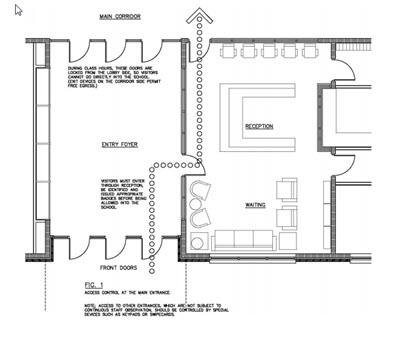
Access to the building during high traffic times should be confined to one access point. This single access point should be monitored by staff. The best practice if your company has vulnerable persons or infrastructure is to have controlled access where guests have to identify themselves prior to entering your controlled ares.
-
Example Photo:
-
EXTERIOR LIGHTING:
-
Sufficient lighting is necessary for people to see and be seen. From a security point of view, lighting that is strategically placed can have a substantial impact on reducing crime. A basic level of lighting should allow the identification of a face from a distance of about 30 feet for a person with normal vision.
Is there sufficient amount of lighting on the exterior of the building?
-
Condition?
-
Level of importance?
-
Example Text:
-
1. MINIMUM STANDARDS
If the area is intended for night time use, lighting should provide adequate visibility. Pedestrian walkways, back lanes and access routes open to public spaces should be lit so that a person with normal vision is able to identify a face from a distance of about 30 feet. Inset spaces, signs, entrances and exits should be adequately lit. Lighting of different wattage, color temperature, and rendition may also be used to make certain public areas “less hospitable” to gathering for long periods.
2. PATHS NOT INTENDED FOR NIGHT TIME USE
Lighting is not desirable in an isolated area or for a path leading to some obscure places. Lighting such areas may provide a false sense of confidence for people during low light hours.
3. CONSISTENCY OF LIGHTING
Lighting should be uniformly spread to reduce contrast between shadows and illuminated areas. More fixtures with lower wattage rather than fewer fixtures with higher wattage help reduce deep shadows and avoid excessive glare.
4. DESIGNING FOR NIGHT TIME USE
Design proposals should take into account the night time use of the outdoor spaces and specify the type, placement and intensity of lighting.
5. PROTECTION OF LIGHTING
Light fixtures should be protected against casual vandalism by means of vandal resistant materials and design.
6. PLACEMENT OF LIGHTING
Lighting should also be directed on roadside pavement and possible entrapment spaces other than on roads. Lighting should take into account vegetation, such as mature trees, and other obstructions that would cause light to be blocked off.
7. BUILDING MATERIALS
Light color finishes on walls and ceilings should be used for places such as car parks and isolated routes leading to it. This may be preferred to using lights of higher intensity that consume more energy and are costlier to maintain.
8. MAINTENANCE
Lighting requires maintenance to preserve visibility. Bushes and trees that block off light should be trimmed. Lighting fixtures should be located at suitable heights for easy maintenance and replacement. Light fixtures should be maintained in a clean condition and promptly replaced if burnt or broken. Posting information indicating who to call in case of burnout or vandalized lights is desirable. -
Example Photo:
-
ADDRESS AND SCHOOL/BUSINESS NAME CLEARLY VISIBLE:
-
A clear identifiable street address and a clearly printed business name aids first responders to easily locate your facility to assist you during an emergency when seconds and minutes are critical.
Are the building numbers clearly visible? Is the business name easily seen when approaching?
-
Condition?
-
Level of importance?
-
Example Text:
-
Approved numbers or addresses should be placed on all new and existing building in such a position as to be plainly visible and legible from the street or road fronting the property. Numbers should contrast with their background and should not be less than 4" in height. Numbers and company name should not be obstructed by vegetation. Any building located more than 50 feet from the street should have its address posted at the driveway entrance and should be visible from both directions of travel along the road.
-
Example Photo:
-

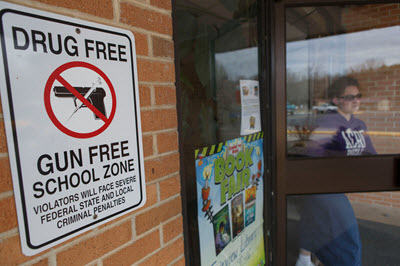
WARNING AND DIRECTIONAL SIGNAGE:
-
Strong and clear signage helps with crime prevention, aids prosecution, and provides guests clear directions.
Does the facility have appropriate signage for the business?
-
Condition?
-
Level of importance?
-
Example Text:
-
It is recommended that the appropriate signage is placed at the main entry and exit points. This aids in both crime prevention, prosecution, and mitigates litigation.
-
Example Photo:
-
ROOM NUMBERS ON WINDOWS:
-
By adding room numbers to windows it aids first responders to know where rooms are located from the exterior of the building.
Are there room numbers in the exterior windows, are they in the proper location and are the numbers clearly visible?
-
Condition?
-
Level of importance?
-
Example Text:
-
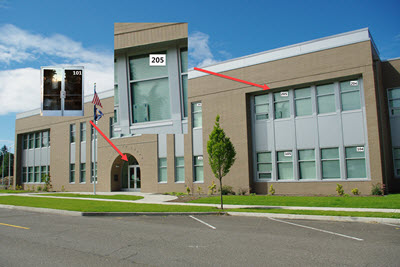
It is recommended that each room with an exterior window have room numbers displayed in the window. Numbers or letters should be placed in the upper right-hand corner when looking at the window from the outside. The font size should be 4-inches high and the style should be legible.
Choose contrasting colors, such as black and white or reflective, for best visibility.
Note: In most cases, white numbers work well on clear glass. While a bulk purchase of one color may be more economical, it may be less useful on some surfaces or require a dark back panel. -
Example Photo:
-

EXTERIOR DOOR NUMBERS:
-
When emergencies occur, the rapid response of emergency workers to the incident can be critical. Many schools have dozens of doors providing entrance and egress to their buildings. During an emergency, it may be necessary for responders to gain access through specific doors to expedite rescue.
Are doors numbers clearly visible from outside and inside?
-
Condition?
-
Level of importance?
-
Example Text:
-
Exterior doors should be numbered from right to left. The exceptions are doors within 8 feet of each other that enters into the same room or lobby. Law enforcement considers buildings to have only 4 sides (1-side, 2-side, 3-side, 4-side). The main entrance is the main side, (1-side), of the building and the doors should be represented as 100 (101, 102, 103, etc). Continue around the building in a clockwise fashion with the next side, (2-side), of the building being represented as 200 (201,202,203, etc). Continue until the last side is represented as 400 (401,402,403, etc). Numbers or letters should be placed in the upper right-hand corner when looking at the Door from the outside and upper left-hand corner on the inside. The font size should be 4-inches high and the style should be legible, with contrasting colors, such as black and white, for best visibility.
Doors that enters into rooms should be indicated with similar contrasting "rm. #'s". Numbers or letters should be placed in the center of the door on both the exterior and interior side of the door, approximately 60" from the floor. The font size should be less than 2-inches high and the style should be legible.
Non-Access Doors:
Doors which do not allow access to the building should not be numbered. Examples of these may be storage rooms, trash rooms, fire/sprinkler riser rooms. They may/should be labeled “storage only”, “No Access”, etc…
Choose contrasting colors, such as black and white, for best visibility.
Note: In most cases, white numbers work well on clear glass. While a bulk purchase of one color may be more economical, it may be less useful on some surfaces or require a dark back panel. -
Example Photo:
-
ROOF ACCESSIBILITY:
-
Structures, trees, and roof access ladders need to be secured or maintained to not allow access to the roof.
Are the roof access points secure?
-
Condition?
-
Level of importance?
-
Example Text:
-
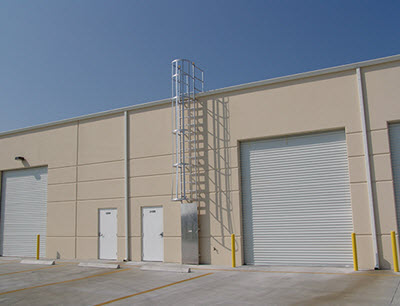
Storage sheds, vehicles, downspouts, fencing, and walls need to be configured in a way to not allow access to the roof.
If external access exists, make roof ladders removable, retractable, or lockable. Do not position screen walls around equipment or service yards to allow easy access to the roof or upper windows. -
Example Photo:
-
UTILITIES PROTECTED:
-
Access to site utilities, such as electrical transformers, generators, and gas meters, is limited and secure, and the exposed portions are protected against vandalism and vehicular damage.
Are site utilities adequately protected?
-
Condition?
-
Level of importance?
-
Example Text:
-
Avoid ground cover over 4 inches tall, which could conceal weapons or bombs. Screens at utilities, such as transformers or trash dumpsters, should be designed to minimize concealment opportunities for people and weapons.
-
Example Photo:
-
FENCING:
-
Quality fencing helps with campus security. Fencing also needs to provide line-of-sight for security purposes. Fencing must possess secure gates; However, these gates should allow for people to easily escape through during an emergency.
Does the perimeter fencing provide for good security.
-
Condition?
-
Level of importance?
-
Example:
-
SELECTING PERIMETER FENCING:
Traditionally, the fencing at a school’s property line provides the school’s first line of defense against violence or intrusion. A perimeter fence also establishes ownership of the property.
When constructed with the needs of an individual school in mind, and with the appropriate materials, perimeter fencing can create a safer school environment by augmenting the CPTED strategies of natural surveillance and access control. Accordingly, schools should reflect on the contribution of perimeter fencing to these strategies when choosing among various options.
Fencing material should not be easy to vandalize, cut, or climb; ornamental fences, such as wrought iron, are considered to be the best in these cases.
**Perimeter fencing should include at least two points of entry, in case one is blocked during a crisis.
Fencing should try to create a balance between aesthetics and security, as allowed by the budget.
Fences may also create safety hazards for students. Tall, continual fencing can block student pathways, forcing students “to take a longer route where they are more exposed to traffic, crime, or environmental hazards." Gates can help mitigate the difficulty of student navigation. Lockable gates can reduce the number of access points to a school while allowing access at certain times. However, school officials should also take into account students’ ability to use gates in the fence line in case of an emergency, as unusable gates may prevent escape from internal threats.
SCHOOL SURVEILLANCE:
As noted in various documents, perimeter fencing should not be made of a material that hinders surveillance conducted by school staff. Schools should place entrances and exits so that they can be easily surveyed by school staff. Minnesota’s Division of Homeland Security and Emergency Management suggests that schools consider surveillance elements when determining school safety and emergency preparedness plans. Surveillance elements schools should ensure when planning entrances in perimeter fencing include:
- Designated points of entry are monitored to control building access.
- School staff monitors all entrances and exits during arrival and departure of students.
- The main entrance is observable from the main office.
- All school staff should know how to open the gates in an emergency and have in their possession a key or know the combination to open the locking device. -
Example:
-
School Fencing: Benefits and Disadvantages
http://www.wssca.org/Resources/Documents/School%20Fencing-%20Benefits%20and%20Disadvantages.pdf
DUMPSTER, ALCOVES, AND HIDING SPOTS:
-
Hidden areas are dangerous and can provide concealment for perpetrators or provide places for students to hide.
Are there hidden areas around the building that need to be secured or reconfigured?
-
Condition?
-
Level of importance?
-
Example:
-
Place trash receptacles as far from the building as possible – min 30 ft. Secure all access to crawl spaces, utility tunnels, etc. Secure manholes or tunnels where site utilities enter the school site.
ADDITIONAL INFORMATION:
-
Are there additional areas of concern?
-
Identified areas:
-
Condition?
-
Level of Importance?
Interior
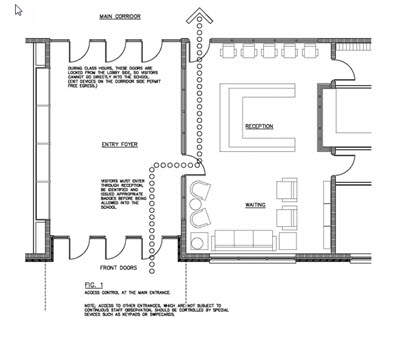
SECURE LOBBY:
-
Access to the building during high traffic times should be confined to one access point. This single access point should be monitored.
Is the lobby monitored and secured?
-
Condition?
-
Level of importance?
-
Example Text:
-
The best practice if your company has vulnerable persons or infrastructure is to have controlled access where guests have to identify themselves with a photo ID prior to entering your controlled areas.
-
Example Photo:
-
ALARM SYSTEM:
-
A basic security alarm system should be installed throughout hallways, administrative offices, exit doors, and rooms containing high-value property such as computers, shop equipment, laboratory supplies, and musical instruments.
Is a basic alarm system is installed?
-
Condition?
-
Level of importance?
-
Example Text:
-
Video and Audio monitoring is a crucial addition to protecting your facility from vandalism and employees from harm, in addition to avoiding data breaches.
INTERCOM SYSTEM:
-
School Paging and intercom systems provide educators and companies with comprehensive communications and safety in the classrooms and offices.
Does intercom systems provide the ability to alert all rooms and exterior grounds?
-
Condition?
-
Level of importance?
-
Example Text:
-
Classroom intercom systems should offer emergency features such as single button access to reach individual classrooms, the ability to page all rooms at once, and the ability to page multiple buildings. A paging system should be capable of providing important communications and for safety reasons; Such as built-In Emergency Evacuations which includes pre-recorded event messages for Severe Weather Warnings, Fire Evacuation Instructions, Intruder Lock Downs, and Medical Emergencies.
LOCK DOWN ALERT SYSTEM AND FIRE SUPPRESSION DOORS:
-
Alert systems expedite the process of initiating a lock-down via a school’s P.A. system, can initiate door lock mechanisms, and send notifications to Emergency Responders and school staff.
Does this facility have an alert style system that is capable of broadcasting a lock-down? Do doors close and lock when activated?
-
Condition?
-
Level of importance?
-
Example Text:
-
The use of alert systems in conjunction of fire doors can help compartmentalize a building, prevent the spread of smoke and flames, and protect egress routes to allow for safe escape. However, they must be properly specified, installed, and maintained to provide the necessary protection.
Doors also must be kept locked at all times. -
Example Photo:
-
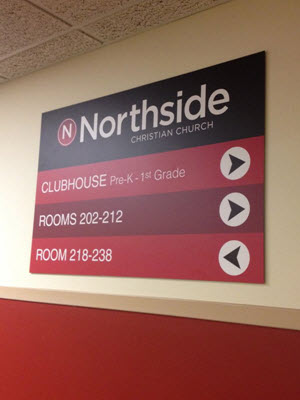
SIGNAGE FOR HALLWAYS:
-
Signs should be located in the main entrance/lobby area and main hallways.
Are there signs in main areas of the building to help provide direction to rooms and buildings?
-
Condition?
-
Level of importance?
-
Example Text:
-
From a lobby area or main access points into the building, there should be appropriate signage giving direction to other areas of the building and/or campus.
Intersecting hallways should also include directional signage.
Signs need be unobstructed and designate what rooms are down which hallway. Numbering/Lettering font size should be large enough to be seen while standing in or approaching a hallway. -
Example Photo:
-
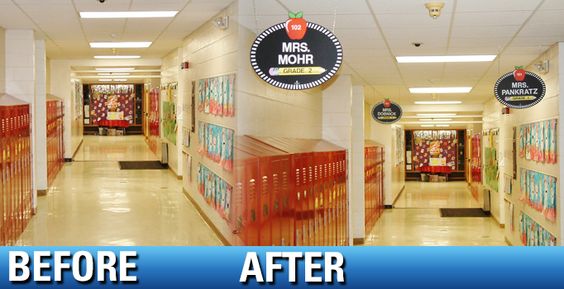
SIGNAGE FOR CLASSROOMS:
-
Signs should be located immediately outside the room door. Room numbers should be able to be seen standing at the end of a hallway.
Are the rooms numbered? Can the room number be easily seen in the hallway?
-
Condition?
-
Level of importance?
-
Example Text:
-
It is recommended to install room numbers that extend from the wall or when not applicable hang from the ceiling so many room numbers can be seen from one position looking down the hallway.
Consider retro-reflective numbers/letters on all locations to help in low light situations.
The numbers should:
- Match the number on the outside of the door
- Contrast with their background
- Be retro-reflective for low light or smoky conditions -
Example Photo:
-
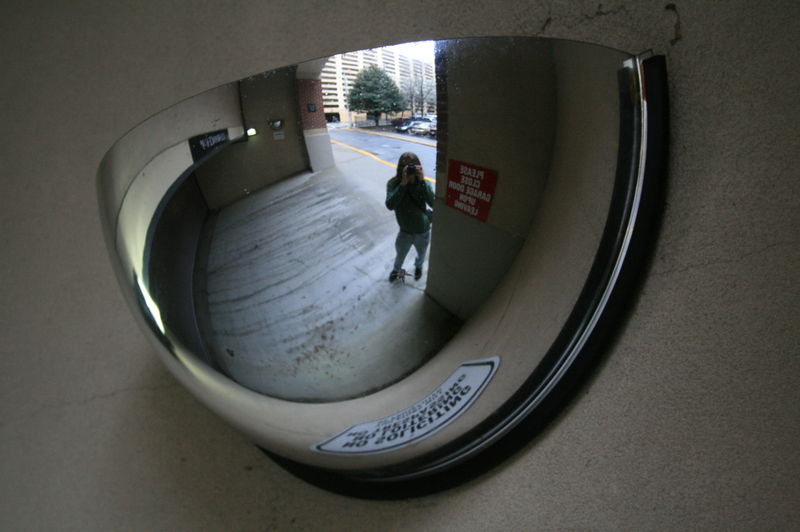
FISH-EYE MIRRORS:
-
Fish-eye mirrors are usually mounted on a wall or ceiling where hallways intersect each other or where they make sharp turns and in stairwells. They are useful for people accessing the hallways, especially at locations having blind spots or where visibility may be limited.
Does the company have fish-eye mirrors installed in proper locations?
-
Condition?
-
Level of importance?
-
Example:
-
Fish-eye mirrors should be placed in hallway intersections and stairways.
-
Example Photo:
-
INTERIOR LOCKABLE DOOR KNOBS:
-
Room doors should have "hotel" style door knobs or door knobs that can be locked by pushing a button from inside the room.
Are doors equipped with quick locking door knobs?
-
Condition?
-
Level of importance?
-
Example Text:
-
Door knobs should be installed that can either be locked quickly or that are always locked when closed.
Note: During stressful situations, fine motor skills such as attempting to locate a singular key, placing the key into the locking mechanism and ensuring the door is locked prior to closing, becomes very difficult during an unexpected chaotic event. -
Example Photo:
-

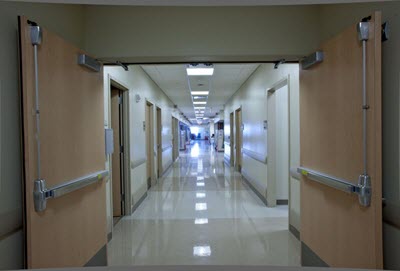
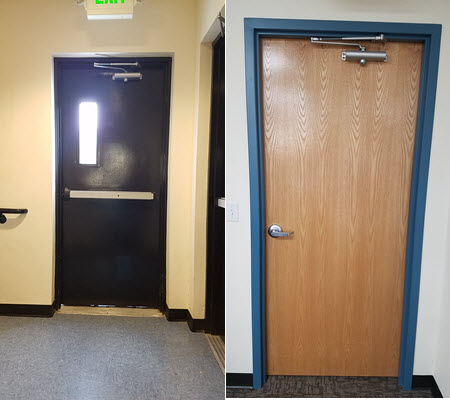
EXTERIOR DOORS CLOSE AND LATCH FREELY:
-
Exterior doors should automatically close and lock easily.
Are exterior doors properly equipped to close and lock completely?
-
Condition?
-
Level of importance?
-
Example Text:
-
Hydraulic hinges or door closers should be installed to allow for the door to close on its own without aid.
Doors need to be equipped with "hotel" style locks or crash bars that reain locked from the outside. -
Example Photo:
-
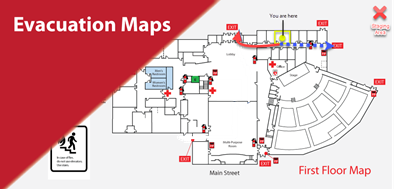
EMERGENCY EXIT ROUTES & FLOOR PLANS AT ACCESS POINTS:
-
All rooms should have clearly marked floor plans showing a primary and secondary exit route in case of emergency.
Do all rooms have affixed a clearly designated emergency evacuation route map?
-
Condition?
-
Level of importance?
-
Example Text:
-
There should be a clearly designed map showing the campus floor plan. Only that individual room should be highlighted in yellow. A red line and arrow will denote the primary evacuation route. A blue line and arrow will denote the secondary evacuation route. If possible staging areas should be noted on the campus map as well.
-
Example Photo:
-
ROOF ACCESS SECURE:
-
Roof hatches should be secured from the inside and not capable of being opened from the roof.
Are the roof hatches secured and locked?
-
Condition?
-
Level of importance?
-
Example Text:
-
Roof hatches need to be secure in the interior with a lock or simple fix like a carabiner.
Safety Note: Most roof access points utilize a ladder system to access the roof hatch, it is recommended that a locking device is used to secure the hatch that can easily be inserted or removed with using only one hand.
DELIVERY ACCESS POINTS AND POLICY:
-
Delivery access points can be a vulnerable point in the security of your facility if not properly managed.
Is there a policy in place for deliveries that are not escorted through the controlled areas? Can the subject be easily identified prior to opening the door?
-
Condition?
-
Level of importance?
-
Example Text:
-
1. It is recommended that a large style peephole minimum 2" diameter be placed so staff can clear identify visitors or equipped with a camera system capable of identifying the visitor.
2. A buzzer or other similar notification system capable of notifying staff of visitor should be installed.
3. Establish a policy on when staff is allowed to open doors to expected and unexpected visitors.
CAMERA SYSTEM:
-
Safeguarding the well-being of all guests and personnel is a primary concern for businesses and schools today. A properly installed security camera system is an important tool for ensuring safety. Today's businesses and schools face many challenges. Security cameras can be an indispensable aid to identifying and resolving issues as they arise.
Are the camera systems installed and positioned correctly?
-
Condition?
-
Level of importance?
-
Example:
-
Cameras mounted near main entrances and in administrative offices can help you record each visitor as they enter and exit your workplace. Cameras near exits can also help monitor uncontrolled areas.
Fixed cameras can be strategically placed in order to protect valuables like computers, sound equipment, servers, and other critical infrastructure.
Outdoor surveillance cameras in parking lots can help protect students and staff when leaving school late or arriving early. These cameras can also discourage break-ins and vandalism.
It is strongly encouraged that you are able to monitor camera systems remotely.
ADDITIONAL INFORMATION:
-
Are there additional areas of concern?
-
Identified areas:
-
Condition?
-
Level of Importance?
Administration
VISTOR CHECK IN/OUT VERIFICATION PLAN:
-
Visitor and personnel check in/out verification procedures allow for knowing and identifying all persons in the building, helping both administrative staff and emergency responders to know who is in the building during a critical incident.
Does the facility have a check in/out verification plan and procedure?
-
Condition?
-
Level of importance?
-
Example Text:
-
All visitors and late personnel must report to the main office, identify themselves with a photo ID, and sign-in. Individuals that are required to sign in must return and sign out.
Automated verification systems enhance your building and facility security through a process of tracking, screening and badging your visitor traffic. -
Example Link:
-
Example Policy and Procedure: https://www.hebisd.edu/uploaded/Departments/Safety_Crisis_Management/Safety_Documents/2014-2015_HEB_ISD_Visitor_Check-in_Policies_and_Procedures.pdf
https://www.hebisd.edu/uploaded/Departments/Safety_Crisis_Management/Safety_Documents/2014-2015_HEB_ISD_Visitor_Check-in_Policies_and_Procedures.pdf -
Example Photo:
-

EMPLOYEE IDENTIFICATION AND VISITOR PASSES:
-
If all staff members display an ID badge and all visitors are wearing a visitor pass it becomes much easier to spot an intruder.
Does the organization have an employee/visitor policy? Is the policy followed?
-
Condition?
-
Level of importance?
-
Example Text:
-
All staff to wear and display ID Badges:
If all permanent staff members do not wear ID badges, it makes it difficult to differentiate between an intruder and a member of staff. If all staff members do display an ID badge and all visitors are wearing a visitor pass it becomes much easier to spot an intruder.
Allocate a single point of entry and exit for visitors:
One of the key security considerations is that all visitors enter and leave via the same door, this allows reception to monitor all visitors and ensures that when a visitor leaves the premises they sign out and hand back the visitors pass.
Visitors should supply valid ID such as Driving Licence or a State ID:
This is an issue that we see time and again, it does not matter how good the visitor sign in process is if the identity of the visitor is not confirmed. It is highly recommended that all visitors provide proof of identification upon arrival. As an added layer of protection it may be worth the reception retaining (and securely storing) the identification document until the visitor signs out and hands back the visitor badge, obviously this is dependent on local laws and might not be applicable or practical to your site.
Visitors only to be issued with badge once signed in:
While this is common sense, a number of organizations hand over the visitors badge prior to being signed in.
Visitor badges are not to leave the premises:
Denying visitors from removing badges from the premises limits the chances of them being lost, stolen, or reused by an attacker.
Education of employees:
Education of employees that security is their responsibility, and that it is not impolite to challenge anyone who does not display a valid badge. It is also important that the employees are notified of what action should be taken should an intruder be identified be it notify reception or detain until identify confirmed etc.
KEY DISTRIBUTION ACCOUNTABILITY:
-
It is extremely important that a key accountability policy and procedure is in place to monitor keys and duplicates.
Is there a key accountabilty procedure and policy in place?
-
Condition?
-
Level of importance?
-
Example Text:
-
Card access systems greatly simplify access control and eliminate problems associated with lost keys and massive re-keying.
STAFF RADIOS (COMMUNICATION PLAN):
-
A sufficient number of hand-held two-way radios or cellular phones are available to staff.
Does the organization have adequate radio/communication devices?
-
Condition?
-
Level of importance?
-
Example Text:
-
The principal, vice principal, front office staff, playground supervisors, bus drivers, custodians, lunch duty staff, security guards, crossing guards, and school resource officers should have these devices.
The facility has the necessary transmitter, receivers, and repeaters to ensure radio communication by personnel everywhere in the building.
EMERGENCY OPERATIONS PLAN:
-
An Emergency Operations Plan provides general guidance for emergency management activities and an overview of the companies methods of prevention, mitigation, preparedness, response and recovery.
Is there an up to date Emergency Operations Plan? Is all critical/essential personal familiar with the plans?
-
Condition?
-
Level of importance?
-
Example Emergency Operation Plans:
-
Emergency Operations Plan (EOP) describe how a facility will respond to and recover from all hazards. It is inclusive of the six critical elements within the Joint Commission’s Emergency Management Standards:
-Communications
-Resources and assets
-Safety and security
-Staff responsibilities
-Utilities
-Support activities
The “all hazards” approach allows the ability to respond to a range of emergencies varying in scale, duration, and cause. The EOP addresses response procedures, capabilities, and procedures when the facility can not be supported by the community, recovery strategies, initiating and terminating response and recovery phases, activating authority and identifies alternate sites for operations, services, and reintegration.
The Emergency Operations Plan (EOP) provides the structure and processes that the organization utilizes to respond to and initially recover from an event. The EOP is therefore the response and recovery component of the EMP.
The Joint Commission Emergency Management Standards are very specific to the requirements of the hospital EOP, however, it should be noted that some of these requirements cross over to mitigation and preparedness activities. -
Churches:
-
Church Emergency Operations Plan: https://adacounty.id.gov/Portals/Accem/Doc/PDF/FaithBasedEmergencyPlanTemplate22410.pdf
https://adacounty.id.gov/Portals/Accem/Doc/PDF/FaithBasedEmergencyPlanTemplate22410.pdf -
Hospitals:
-
Hospital Emergency Operations Plan: http://www.calhospitalprepare.org/emergency-operations-plan
http://www.calhospitalprepare.org/emergency-operations-plan -
Hospital Emergency Assessment Tool: http://www.calhospitalprepare.org/sites/main/files/file-attachments/hospital_disaster_preparedness_self-assessment_tool.doc
http://www.calhospitalprepare.org/sites/main/files/file-attachments/hospital_disaster_preparedness_self-assessment_tool.doc -
Schools:
-
School Emergency Operations Plan: https://cdpsdocs.state.co.us/safeschools/Resources/FEMA%20Federal%20Emergency%20Management%20Agency/FEMA%20Sample%20School%20Emergency%20Plan.pdf
https://cdpsdocs.state.co.us/safeschools/Resources/FEMA%20Federal%20Emergency%20Management%20Agency/FEMA%20Sample%20School%20Emergency%20Plan.pdf
EMERGENCY DRILLS AND STAFF TRAINING:
-
It is extremely important to provide training to staff, run drills and exercises with both staff and students. During unexpected chaotic events individuals and teams resort back to their training.
Is the staff trained properly? Does the organization run drills on a regular basis?
-
Condition?
-
Level of importance?
-
Example:
-
1. Training and refresher training sessions should be conducted for all personnel.
2. Drills (fire drills, lock-downs, exterior intruders, bomb threats, and natural and man-made disasters) should be performed on a regular basis.
3. Training and drills need to be taken serious and viewed as important, especially by organizational leadership.
4. After action reports and debriefings should be utilized to help identify strengths and weaknesses.
In the event, you have a critical incident on your campus the more you have thought about responding to the incident the better off you will be, thus likely resulting in reducing both physical and emotional trauma. Training staff on how to effectively evacuate or lockdown is critical to success. Responding to any critical incident is about options. What options does a staff member have to help protect themselves and those around them? Hide, Move and Fight are the most obvious options to consider. -
First Aid Training:
-
-
Active Shooter Training:
-
-
School Active Shooter Training:
-
FIRST AID KITS/AUTOMATED EXTERNAL DEFIBRILLATOR (AED):
-
It is important to have both first aid kits and AED's at your workplace. Ensure that all staff and volunteers are familiar with where the emergency supplies are located. It is strongly recommended that all personnel are trained annually on first aid, CPR, and AEDs.
Are there first aid kits and AEDs located in the building and is the personnel properly trained?
-
Condition?
-
Level of Importance?
ADDITIONAL INFORMATION:
-
Are there additional areas of concern?
-
Identified areas:
-
Condition?
-
Level of importance?
Summary
OVERVIEW:
ADDITIONAL INFORMATION:
-
CHURCHES:
-
Churches and schools are considered to be “soft targets”. A soft target is a facility or campus that has little to no means of defending itself and is easily accessible by an intruder. Although a campus such as yours is going to be a soft target there are things that can be done to give it the appearance of being prepared and there by hardening the target.
Some of the things that campuses are utilizing are “safety teams”. The teams consist of Greeters, Ushers, security and medical personnel. These are volunteer positions and members of the teams are assigned based on experience they bring to the team. Members of the security teams are posted in the parking lot, back areas and where problems might more commonly occur. The medical team may have a pager and are able to respond to any medical need that arises. Greeters and Ushers are made aware of any potential problem and going to more situationally aware than congregation.
Having a well-equipped safety team in that is clearly visible from a distance and placed in strategic areas is a great start. Alternating doors at access points, good lighting, reducing hiding places are other easy things that can help with a visual deterrence.
It is believed that many intruders can often be deterred by the simplest counter measure. We call this “knocking them off their path”. A door that is now locked that wasn’t before, a safety team member making contact giving the appearance of a deterrent, signs indicating there may be armed individuals on the grounds can knock the intruder off their intended path and therefore the attack is not carried out.
Some issues that have come up at churches that teams have met and dealt with are suicide in the parking lot, domestic issues, custodial interference, and lost/found children.
First aid kits are placed in key places about campus and a “training” team was assigned to give as much training as possible. -
SCHOOLS:
-
Emergency situations can occur at any time and for many reasons. Having a plan in place in which multiple scenarios have been thought about is a critical step to mitigating the damage done during such events.
I believe that you are taking steps in the right direction that will set you up for dealing with a crisis in the best possible way.
Churches and schools are considered to be “soft targets”. A soft target is a facility or campus that has little to no means of defending itself and is easily accessible by an intruder. Although a campus such as yours is going to be a soft target there are things that can be done to give it the appearance of being prepared and there by hardening the target.
Having a well-equipped safety plan in place that is easily understood and clearly visible from a distance is a great start. Alternating doors at access points, good lighting, reducing hiding places are other easy things that can help with a visual deterrence. Continued staff training, drills and cooperation with you local first responders will greatly prepare your school in the event of a critical incident.
It is believed that many intruders can often be deterred by the simplest counter measure. We call this “knocking them off their path”. A door that is now locked that wasn’t before, a staff member making contact giving the appearance of a deterrent, proper signage on the grounds can knock the intruder off their intended path and therefore the attack is not carried out.
In the event you have a critical incident on your campus the more you have thought about responding to the incident the better off you will be, thus likely resulting in reducing both physical and emotional trauma. Training staff on how to effectively evacuate or lockdown is critical to success. Responding to any critical incident is about options. What options does a staff member have to help protect themselves and those around them. Avoid, Deny, Defend are the most obvious options to consider. Response options will vary depending on the situation each person is facing. Avoid the threat, Deny the threat to your location, if you are facing a direct threat be prepared to Defend yourself and your students with what ever means necessary. -
HOSPITALS:
COMMENTS:
-
OFFICER CONDUCTING ASSESSMENT:
- Yes
- No
- N/A

