")


Title Page
STARTERS
The Basics
-
Employee
- Nicolás
- Ed
- Abi
- Bruce
- Monty
- Marcus
- Janai
- Hadyn
-
Date
-
Time Started
Setup
-
Open LOUVRE WINDOWS in corner for DRAINING. Remove FRONT COVER-GLASS and place in sink for washing
Observations
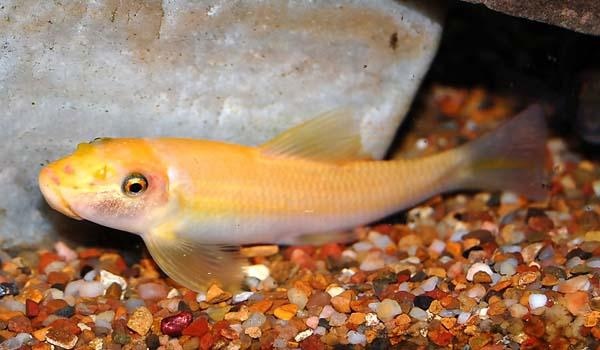
FISH
-
Photos Before. 1-2 OVERALL. 2-3 CLOSEUPS on PLANTS
-
Ramirezis & Tetras
- Great; vibrant, eager for food
- some individuals not right.
- sulky, sluggish, isolated from group
- dead fish, cloudy stinky water
-
Take photos of individuals and check for CAUSES. Questions: 1. Is it just an individual or are many affected? 2. Check for uneaten food, levels of ammonia or nitrite. 3. Filter or heater stopped or malfunctioning?
-
Anything on BODY? <br>WHITE SPOTS?<br>FUNGUS?<br>WOUNDS?
-
Take PHOTO of cases and NOTE down details.
-
Plan for LARGE WATER CHANGE (75-90%) with thorough GRAVEL VAC. Use STRESS COAT and BLUE SALTS to guard against chlorine and infection.
-
CONTACT BRUCE IMMEDIATELY
-
Take PHOTO where possible and NOTE down details.
-
Looking good? Place a pinch of TETRABITS in and observe how they eat.
The Workers: SUCKING CATS & FLYING FOXES
-
Sucking cats
-
SUCKING CAT/s sighted? (1-2)
-
Siamese Flying Fox
-
SIAMESE FLYING FOX/es sighted? (2-3)
-
How's the algae levels on GLASS & PLANTS?
- Lots of soft brown/green dust everywhere
- Very clear. A few spots on glass and old leaves
- Furry black algae growing on old leaves, pump, glass
- heavy with dark green spots on glass
- dark green algae all over rocks
-
This is an indication that there are no or low numbers of SIAMESE FLYING FOX. Mention in notes.
-
Remove as much as possible, prune old affected leaves off plants. Vacuum up loose pieces from after cleaning glass
-
This is an indication that there are no SUCKING CATS. Mention in notes.
-
Check light TIMER and nitrate levels.
-
Plan for an "Adrian Special"; BEFORE draining, turn OFF pumps, scrape all of every glass surface and carefully brush clean all rocks Then drain 80% water.

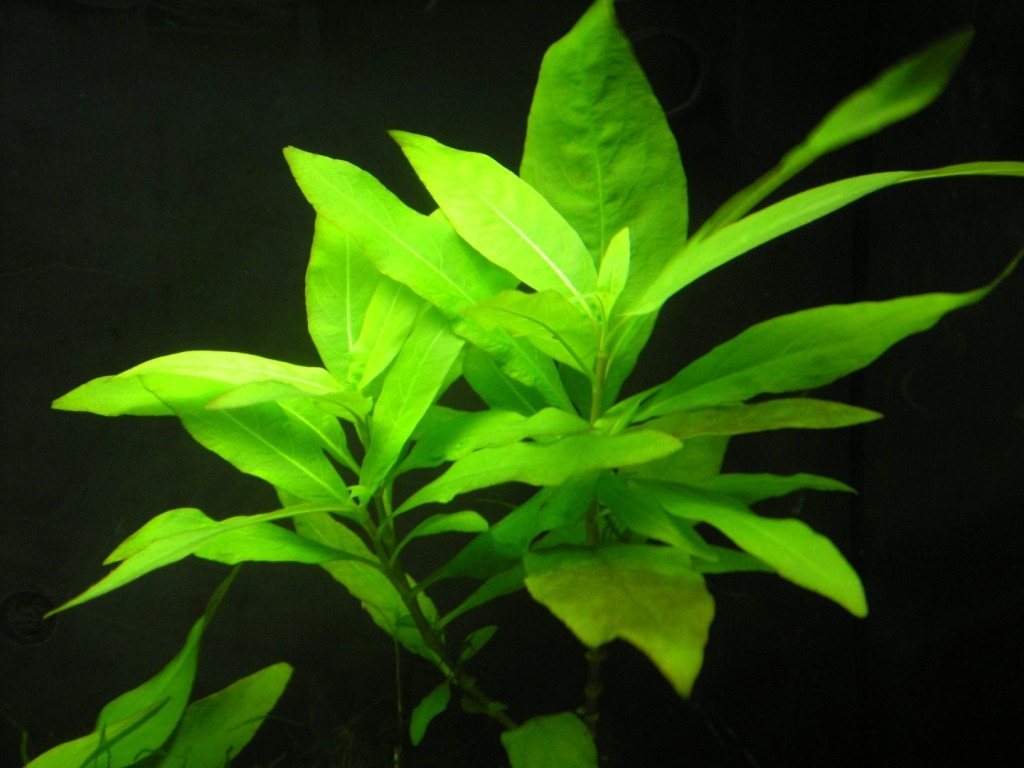
PLANTS
-
BLUE STRICTA
-
How are they looking?
- Healthy light green new growth, good size
- stems getting close to surface
- new growth pale, yellowish, maturing prematurely, smaller than old growth
- lots of old discoloured leaves, holes in them
- curled new growth
-
Remove all old and ageing leaves.
-
Great. Remove any old, ageing leaves from stem. CAREFUL that you don't snap the stem!
-
Possibly low in NITRATE and/or POTASSIUM (K) CHECK levels. (Section 4). 10ppm or more with still poor growth possibly means therefore not enough K and thus they are being starved. Contact Bruce for further instructions.
-
CUT approx in half and, If healthy, reduce HEADLESS STALK by a further 50% and replant heads on front to hide the stalk.
-
CURLED & DEFORMED new leaves? May have to review K dosage levels. Possibly too much. Check NITRATE and PHOS and GH and check with BRUCE by SMS.
-
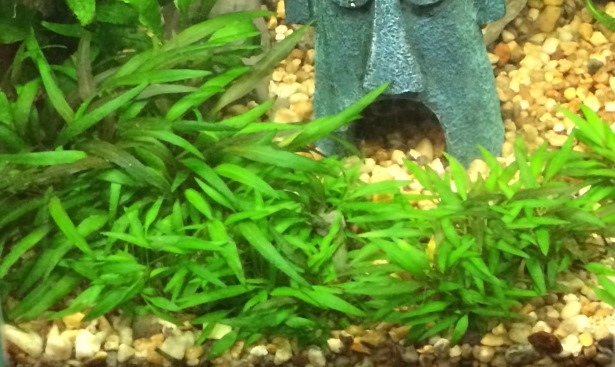
CRYPTS
-
How are they looking?
- great. shiny vibrant leaves
- discolouration, prematurely old and yellowing leaves
- curled deformed leaves, lots of dark spotted algae on leaves
-
PEEL AWAY any old and ageing leaves from base
-
POGOSTOMON STELLATA & ROTALA
-
How are they looking?
- great, health light feathery green new growth, pink in the growth head
- stems getting close to surface
- stunted or malformed small new growth, old leaves look eaten
-
CUT approx in half and, If healthy, reduce HEADLESS STALK by a further 50% and replant heads on front to hide the stalk.
-
Possibly low in NITRATE and/or POTASSIUM (K) CHECK levels. (Section 4). 10ppm or more with still poor growth possibly means therefore not enough K and thus they are being starved. Contact Bruce for further instructions.
-
Great. Be sure to SHORTEN DOWN any that are getting too close to the surface.
Tests part 1
Tests part 1
-
TEMPERATURE test (ideal 24-26 C)
-
A bit too cool. Is heater functioning/plugged in?
-
Replaced?
-
Depending on how long before replacement is likely to be installed then leave post-water change temp approx 26 degrees.
-
Increase THERMOSTAT (clockwise) and make note of how much.
-
Increased THERMOSTAT by:
-
Is THERMOSTAT functioning?
-
Decrease THERMOSTAT (anticlockwise) and note by how much.
-
Decreased THERMOSTAT by:
-
HEATER Replaced?
-
Check with BRUCE, but if the THERMOSTAT doesn't respond to being turned down then better to have a cool tank than risking cooking the fish, so UNPLUG and remove faulty unit.
-
Good. Refill with HEATER or KETTLES OF BOILED WATER in COLD months.
-
Rinse 4 TEST VIALS in tank water: pH (square vial) and GH (large round vial) NITRATE & PHOS (small glass) MEASURE 5ml in each and SET ASIDE for later. Tip: use SQUARE VIAL or a SYRINGE to measure an accurate 5ml for the GH.
The Drain
The Drain (50%)
-
Unplug PUMPS & HEATER from power.
GRAVEL VACUUM
-
Be sure the TWO SUCTION CUPS on the HOSE are secure to FRONT of GLASS. (HINT: WETTING improves their suction)
-
Fit VACUUM HEAD to DRAIN HOSE. HOSE END out the WINDOW
-
How dirty was it?
FAST DRAIN
-
Cover tank-end of HOSE with BASKET STRAINER
-
Remove VACUUM HEAD & place HOSE inside front glass at the DESIRED HEIGHT of water change. (standard for this tank is 50%)
The Refill
The Refill
-
Orientate tank-end HOSE to be HORIZONTAL and Remove BASKET STRAINER and replace in kit.
-
If not FAST DRAINED, then first remove VACUUM HEAD and position hose outlet HORIZONTALLY.
-
Bring end out of window to LAB TAP
-
Turn on LAB TAP to FLUSH out old water and set the suitable RATE of flow. After 5 seconds fit hose to TAP OUTLET.
-
SOUP HEATER in COLD months. (alternatively 2-3 kettles of boiled water) REMEMBER: always plug into WALL OUTLET. Try to find OPEN SPACE, away from plants.
Things To Do During Refill
-
CLEAN GLASS; easiest at LOW WATER LEVELS. SOFT ALGAE lightly with sponge. DARK GREEN spots: best with SCRAPER.
-
PUMP SERVICE?
-
Tap here for instructions
-
INSTRUCTIONS:
Slide PUMP upwards out of its WALL MOUNT. Can rest on TOP GLASS.
TURN bottom half to be 90 DEGREES to top half to UNLOCK AND PULL APART.
Remove and clean IMPELLER, the MAGNET BODY is the priority.
If TOOTHBRUSH too large to get around IMPELLER SHAFT, use small amount of paper towel.
REMOVE RUBBER INTAKE SHEATH.
CLEAN INTAKE BASKET STRAINER with TOOTHBRUSH.
RE-ASSEMBLE.
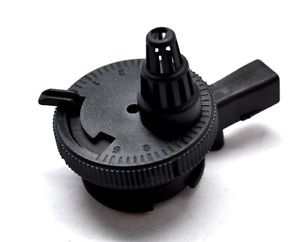
Make sure FLOW CONTROL is set to MAX.
OUTAKE should be angled approx 45 degrees from base so as to move water from the BACK to the FRONT as well as from LEFT to RIGHT.
Unit should SLIDE EASILY into the WALL MOUNT.
INTAKE is offset to adjust distance from WALL to RISER STEM PIPE; be sure the pipe is straight when viewed from the SIDE. -
FLOW CONTROL
-
INTAKE SHEATH
-
WALL MOUNT
-
Water level high enough? Turn FILTER PUMP and HEATER ON.


Tests (continued)
-
pH Test? 3 drops in 5ml. (ideal range 7-7.1)
-
ADD approx 🍏 tsp CORAL SAND.
-
ADD approx 🍎🍎 tsp CORAL SAND
-
ADD approx 🍎🍎🍎 tsp CORAL SAND
-
Is this expected? Been a recent large dose of coral sand last time?
-
Rinse test tube thoroughly and retest. (Any traces of ammonia or GH tester solution will give a false alkaline reading)
-
WOAH! Unlikely! Rinse test tube thoroughly and retest. (Any traces of AMMONIA TEST or GH TEST solutions will give a false alkaline reading) If still high then we must assume that there has been an excess amount of coral sand and all we can do is water change. It will eventually come down as the coral sand dissolves.
-
GH TEST. number of drops to turn from ORANGE to GREEN
-
SIZE of water change:
-
ADD 🍐 TSP SALTS
-
ADD 🍐🍐 TSP SALTS
-
SIZE of water change:
-
ADD up to 🍐TSP SALTS
-
ADD up to 🍐🍐 TSP SALTS
-
ADD up to 🍐🍐🍐 TSP SALTS
-
Depending on SIZE of WATER CHANGE, add NO SALTS and let WC reduce the GH.
-
NITRATE TEST
-
Depending on state of plants, this is POSSIBLY grounds for increase in BASIC-GRO dose. Contact Bruce for further instructions.
-
GENERALLY this is the OPTIMUM RANGE. HOWEVER if there is POOR PLANT GROWTH observed then possibly means therefore not enough K and thus they are being starved. Contact Bruce for further instructions.
-
Almost certainly and LACK of POTASSIUM. Are both DOSING PUMPS working properly?
-
Look at INCREASING DAILY-GRO (it contains potassium also) dose by increasing the FREQUENCY (eg: from 1ml every 3 days to 1ml every 2days) This is a finer adjustment than changing the VOLUME. (Confusingly, if we need to increase the dose rate even further then the next step would be to reduce the FREQUENCY and then increase the VOLUME, eg: 2ml every 3 days) or less confusing perhaps is to look at it in a series of fractions: 1/3 < 1/2 < 2/3
-
CONTACT Bruce.
-
PHOSPHATE TEST
-
GENERALLY this is the OPTIMUM RANGE. Some say 1/10th of the nitrate level. HOWEVER if there is POOR PLANT GROWTH observed then possibly means therefore not enough K and thus they are being starved. Contact Bruce for further instructions.
-
The only source for PHOS in this tank is from the Tetrabits. Generally if its nots causing too much algae don't worry. Water change will dilute. Otherwise consider increasing DAILY-GRO.
Additives
-
Salts added? (Low GH)
-
How many teaspoons?
-
NOTE: NO SALTS DIRECTLY ON PLANTS!! - The methylene blue in this salt stains. Either MIX in by hand, or premix in cup of HOT WATER.
-
Coral sand added? (Low pH)
-
How many teaspoons?
-
BASIC-GRO dose (3 caps/ 15ml usual)
-
How much?
DOSING PUMPS
DAILY-GRO 2ml/3days "02 3d"
-
Any AIRLOCKS to bleed out?
-
Where and how big is the airlock in the DAILY-GRO line?
- short and in the middle, here and there
- short and just at end, rest of line full
- long ( > 4cm) and just at end, rest of line full
- long sections throughout
PRIME/BLEED THE LINE
-
Use GH test vial to catch the liquid while priming the line.
-
Press "M" button for to manually operate pump
-
Liquid moving through the line?
-
Is the SUCTION LINE immersed in the liquid?
-
Is it an OBSTRUCTION in the line caused by oxidised minerals from the liquid (typically from DAILY-GRO)?
-
Remove guilty line and wash in HOT WATER, massage out the blockage and RE-ATTACH to PUMP. Ensure connection is secure.
-
IMPORTANT: The SUCTION LINE must be NOT sitting on the bottom of the supply bottle. Confirm by hanging the line OUTSIDE AND NEXT TO the bottle. Shorten if necessary.
-
WASH OUT the supply bottle. If there is a reasonable amount of liquid still in it then gently DECANTER the clear liquid into a second temporary container. As soon as it is no longer clear STOP (in the case of DAILY-GRO it goes from tea coloured to thick brown). WASH OUT SLUDGE and return the clear liquid to the bottle.
-
Contact Bruce
-
Refill supply (RINSE OUT if haven't in a while to wash out residue at bottom) and REPRIME the line ("M")
-
Is it an OBSTRUCTION in the PUMP SILCON LINE caused by oxidised minerals from the liquid (typically from DAILY-GRO)?
-
You'll have to UNSCREW THE BASE of the pump and REMOVE THE PUMP HEAD. Remove guilty line and wash in HOT WATER, massage OR blow out the blockage and RE-ASSEMBLE the PUMP.
-
IMPORTANT: The SUCTION LINE must be NOT sitting on the bottom of the supply bottle. Confirm by hanging the line OUTSIDE AND NEXT TO the bottle. Shorten if necessary.
-
WASH OUT the supply bottle. If there is a reasonable amount of liquid still in it then gently DECANTER the clear liquid into a second temporary container. As soon as it is no longer clear STOP (in the case of DAILY-GRO it goes from tea coloured to thick brown). WASH OUT SLUDGE and return the clear liquid to the bottle.
-
Contact Bruce
-
FLOWING WELL? Then CHECK that the CONNECTIONS between PUMP and FEEDER lines are well secure. If necessary, REMOVE feeder line, snip of tip with scissors and SOAK new tip in hot water to soften and REFIT.
-
Test CHECKVALVE. Blow air thru both ends. Should only let you in one direction. If it flows in both directions (or indeed none!) a paper clip wire or similar lightly poked into the rubber valve from both ends can fix this. Otherwise make note to replace valve.
PRIME/BLEED THE LINE
-
TEST LINES; "M" button for manual operation. Use GH test vial to catch the liquid while priming the line.
-
Liquid moving through the line?
-
Is the SUCTION LINE immersed in the liquid?
-
Is it an OBSTRUCTION in the line caused by oxidised minerals from the liquid (typically from DAILY-GRO)?
-
Remove guilty line and wash in HOT WATER, massage out the blockage and RE-ATTACH to PUMP. Ensure connection is secure.
-
IMPORTANT: The SUCTION LINE must be NOT sitting on the bottom of the supply bottle. Confirm by hanging the line OUTSIDE AND NEXT TO the bottle. Shorten if necessary.
-
WASH OUT the supply bottle. If there is a reasonable amount of liquid still in it then gently DECANTER the clear liquid into a second temporary container. As soon as it is no longer clear STOP (in the case of DAILY-GRO it goes from tea coloured to thick brown). WASH OUT SLUDGE and return the clear liquid to the bottle.
-
Contact Bruce
-
Refill supply (RINSE OUT if haven't in a while to wash out residue at bottom) and REPRIME the line ("M")
-
Is it an OBSTRUCTION in the PUMP SILCON LINE caused by oxidised minerals from the liquid (typically from DAILY-GRO)?
-
You'll have to UNSCREW THE BASE of the pump and REMOVE THE PUMP HEAD. Remove guilty line and wash in HOT WATER, massage OR blow out the blockage and RE-ASSEMBLE the PUMP.
-
IMPORTANT: The SUCTION LINE must be NOT sitting on the bottom of the supply bottle. Confirm by hanging the line OUTSIDE AND NEXT TO the bottle. Shorten if necessary.
-
WASH OUT the supply bottle. If there is a reasonable amount of liquid still in it then gently DECANTER the clear liquid into a second temporary container. As soon as it is no longer clear STOP (in the case of DAILY-GRO it goes from tea coloured to thick brown). WASH OUT SLUDGE and return the clear liquid to the bottle.
-
Contact Bruce
POTASSIUM 1ml/day "01 1d"
-
Any AIRLOCKS to bleed out?
-
Where and how big is the airlock in the POTASSIUM line?
- short and in the middle, here and there
- short and just at end, rest of line full
- long ( > 4cm) and just at end, rest of line full
- long sections throughout
PRIME/BLEED THE LINE
-
Use GH test vial to catch the liquid while priming the line.
-
Press "M" button for to manually operate pump
-
Liquid moving through the line?
-
Is the SUCTION LINE immersed in the liquid?
-
Is it an OBSTRUCTION in the line caused by oxidised minerals from the liquid (typically from DAILY-GRO)?
-
Remove guilty line and wash in HOT WATER, massage out the blockage and RE-ATTACH to PUMP. Ensure connection is secure.
-
IMPORTANT: The SUCTION LINE must be NOT sitting on the bottom of the supply bottle. Confirm by hanging the line OUTSIDE AND NEXT TO the bottle. Shorten if necessary.
-
WASH OUT the supply bottle. If there is a reasonable amount of liquid still in it then gently DECANTER the clear liquid into a second temporary container. As soon as it is no longer clear STOP (in the case of DAILY-GRO it goes from tea coloured to thick brown). WASH OUT SLUDGE and return the clear liquid to the bottle.
-
Contact Bruce
-
Refill supply (RINSE OUT if haven't in a while to wash out residue at bottom) and REPRIME the line ("M")
-
Is it an OBSTRUCTION in the PUMP SILCON LINE caused by oxidised minerals from the liquid (typically from DAILY-GRO)?
-
You'll have to UNSCREW THE BASE of the pump and REMOVE THE PUMP HEAD. Remove guilty line and wash in HOT WATER, massage OR blow out the blockage and RE-ASSEMBLE the PUMP.
-
IMPORTANT: The SUCTION LINE must be NOT sitting on the bottom of the supply bottle. Confirm by hanging the line OUTSIDE AND NEXT TO the bottle. Shorten if necessary.
-
WASH OUT the supply bottle. If there is a reasonable amount of liquid still in it then gently DECANTER the clear liquid into a second temporary container. As soon as it is no longer clear STOP (in the case of DAILY-GRO it goes from tea coloured to thick brown). WASH OUT SLUDGE and return the clear liquid to the bottle.
-
Contact Bruce
-
FLOWING WELL? Then CHECK that the CONNECTIONS between PUMP and FEEDER lines are well secure. If necessary, REMOVE feeder line, snip of tip with scissors and SOAK new tip in hot water to soften and REFIT.
-
Test CHECKVALVE. Blow air thru both ends. Should only let you in one direction. If it flows in both directions (or indeed none!) a paper clip wire or similar lightly poked into the rubber valve from both ends can fix this. Otherwise make note to replace valve.
PRIME/BLEED THE LINE
-
TEST LINES; "M" button for manual operation. Use GH test vial to catch the liquid while priming the line.
-
Liquid moving through the line?
-
Is the SUCTION LINE immersed in the liquid?
-
Is it an OBSTRUCTION in the line caused by oxidised minerals from the liquid (typically from DAILY-GRO)?
-
Remove guilty line and wash in HOT WATER, massage out the blockage and RE-ATTACH to PUMP. Ensure connection is secure.
-
IMPORTANT: The SUCTION LINE must be NOT sitting on the bottom of the supply bottle. Confirm by hanging the line OUTSIDE AND NEXT TO the bottle. Shorten if necessary.
-
WASH OUT the supply bottle. If there is a reasonable amount of liquid still in it then gently DECANTER the clear liquid into a second temporary container. As soon as it is no longer clear STOP (in the case of DAILY-GRO it goes from tea coloured to thick brown). WASH OUT SLUDGE and return the clear liquid to the bottle.
-
Contact Bruce
-
Refill supply (RINSE OUT if haven't in a while to wash out residue at bottom) and REPRIME the line ("M")
-
Is it an OBSTRUCTION in the PUMP SILCON LINE caused by oxidised minerals from the liquid (typically from DAILY-GRO)?
-
You'll have to UNSCREW THE BASE of the pump and REMOVE THE PUMP HEAD. Remove guilty line and wash in HOT WATER, massage OR blow out the blockage and RE-ASSEMBLE the PUMP.
-
IMPORTANT: The SUCTION LINE must be NOT sitting on the bottom of the supply bottle. Confirm by hanging the line OUTSIDE AND NEXT TO the bottle. Shorten if necessary.
-
WASH OUT the supply bottle. If there is a reasonable amount of liquid still in it then gently DECANTER the clear liquid into a second temporary container. As soon as it is no longer clear STOP (in the case of DAILY-GRO it goes from tea coloured to thick brown). WASH OUT SLUDGE and return the clear liquid to the bottle.
-
Contact Bruce
Packing up
SUPPLIES ; ANY REFILLING IN SINK OR OUTSIDE!
-
SALTS refill?
-
FOOD REPLACE/ REFILL?
-
WHICH KIND?
- TETRABITS
- SPIRULINA FLAKES
- SPIRULINA TABLETS
- DISCUS PELLETS
- None
-
Will any need replacing next month?
- TETRABITS
- SPIRULINA FLAKES
- SPIRULINA TABLETS
- DISCUS PELLETS
- None
-
BASIC-GRO refill? <br>NOTE: only WE use this.
-
HOW MUCH IS LEFT?
-
DAILY-GRO refill? (If wishing to replace but still a small amount remains in CURRENT BOTTLE, swap over and leave OLD BOTTLE behind and can pour in rest into the new bottle at a later date)
-
HOW MUCH IS LEFT?
-
POTASSIUM supply refill? <br> (If wishing to replace but still a small amount remains in CURRENT BOTTLE, swap over and leave OLD BOTTLE behind and can pour in rest into the new bottle at a later date)<br>
-
HOW MUCH IS LEFT?
-
Can put in a small pinch of TETRABITS as departing treat :)
Equipment Check
-
Timer on the correct time?
-
Replacement Installed?
-
IMPORTANT! Remove and notify the lab staff. They will have to MANUALLY turn on and off until a new one is sourced. Leave a note in LAB PREP ROOM saying so. Leave old timer there so they can match the settings if they have to get one themselves
-
Make sure if you have over-ridden timer to have work light (Lights turn off around 5.30) that you return it to its correct phase of the program.
-
LIGHTS: Both tubes working?
-
Details
-
Return LIGHT slightly FORWARD of centre.
-
Notes
FINAL CHECKS
-
HEATER and FILTER PUMPS ON and functioning?
-
OUTSIDE GLASS, CABINETRY etc CLEAN & DRY?
-
Got your: BASKET STRAINER? TOOTH BRUSH? TEASPOON?
-
Photos After. 1 x OVERALL. CLOSEUPS of any REARRANGED PLANT.
-
Time Finished


