")


Title Page
-
Site conducted
-
Program
-
Conducted on
-
Prepared by
Incoming Inspection Audit
-
Program
-
Supplier Name
- Norplas
- TG America
- TE Connectivity
- DLH Bowles
- Magna Electronics
- Other
-
Select Part
- 68370210 - Camera Washer Nozzle
- 68370825 - Camera Washer Nozzle Connector
- Other
-
Picture of rack/box label with serial number
-
Verify container labels and part labels match
-
Inspect for surface damage
-
Take the part to the Quality Engineer responsible for the program
-
Contact the Quality Engineer responsible for the program and ask them to add the part number to the inspection schedule
-
Select Part
-
Picture of rack/box label with serial number
-
Verify container labels and part labels match
-
Inspect for damage including bent pins in the connector
-
Take the part to the Quality Engineer responsible for the program
-
Contact the Quality Engineer responsible for the program and ask them to add the part number to the inspection schedule
-
Select Part
- 6DF49TRM - JL RH Grille Texture
- 6DF50TRM - JL Center Grille Texture
- 6DF51RXF - JL LH Grille Texture
- 6BY75TRM (6BY75DX8) - JL Sport Grille
- 6BY79TRM (6BY79DX8) - JL Sahara Grille
- 6BY78TRM (6BY78DX8) - JL RH Trim Piece
- 6BY77TRM (6BY77DX8) - JL LH Trim Piece
- 6BY76TRM - JL Center Trim Piece
- 6CH02TRM - JL Grille Ring Outer RH
- 6CH03TRM - JL Grille Ring Outer LH
- 6CH08TRM (6CH08S1) - JL Grille Ring Center
- 6KM35TRM - JT Grille - Base
- 6MH43TRM - JT Grille - Premium
- 68342087 - JT Carrier Panel - Upper Closeout
- 6MD48TRM - JT Grille Ring Outer RH
- 6MD49TRM - JT Grille Ring Outer LH
- 6MD47TRM - JT Grille Ring Center
- 6KN47RXF - JT Base RH Texture
- 6KN34TRM - JT Base Center Texture
- 6KN48RXF - JT Base LH Texture
- 6QN21RXF - JT Premium RH Texture
- 6QN22RXF - JT Premium Center Texture
- 6QN23RXF - JT Premium LH Texture
- 6QN24RXF - JT Premium Center Texture w/ Camera
- 68396526 - Camera Retainer Bracket
- 68342087AA - JT Closeout
- 6TN80RXF - Base Aero Closeout RH
- 6TN81RXF - Base Aero Closeout LH
- W-Clip
- Other
-
Picture of rack/box label with serial number
-
Verify container labels and part labels match
-
Inspect for surface damage or irregularity. Defects include parting lines, flash, sink, knit/flow lines, craters, pits/porosity, scratches, gouges, mottle, proper coverage of e-coat or paint, and foreign material in the paint or excessive coat build up. Also inspect for any known past quality defects for the specific part. This inspection will typically be conducted at an arms length distance at a standing height of 2 meters.
-
Take the part to the Quality Engineer responsible for the program
-
Contact the Quality Engineer responsible for the program and ask them to add the part number to the inspection schedule
-
Photo of box label
-
Verify the clip is the correct size
-
Select Part
-
Picture of rack/box label with serial number
-
Verify container labels and part labels match
-
Inspect the plug for any bent pins
-
Take the part to the Quality Engineer responsible for the program
-
Contact the Quality Engineer responsible for the program and ask them to add the part number to the inspection schedule
-
Select Part
- 68295588 - Hood Seal - Push Pins to hood seal
- Other
-
Picture of rack/box label with serial number
-
Verify container labels and part labels match
-
Inspect for surface damage
-
Take the part to the Quality Engineer responsible for the program
-
Contact the Quality Engineer responsible for the program and ask them to add the part number to the inspection schedule
-
Supplier Name
- Automotive Lighting
- Akwell
- Brose
- Cardan
- Contitech
- DLH Bowles
- Novo Mas
- Schaller Corporation
- Stoneridge
- Thermo Disc
- TI Auto
- US Farathane
- Valeo
- Vari-Form
- Viking
- Yazaki - FEM
-
Select Part
- 55112872- Headlamp Rt Halogen NAFTA
- 55112873 - Headlamp Lt Halogen NAFTA
- 55112874- Headlamp Rt Halogen ECE LHD
- 55112875 - Headlamp Lt Halogen ECE LHD
- 55112876 - Headlamp Rt Halogen ECE RHD
- 55112877 - Headlamp Lt Halogen ECE RHD
- 55112878 - Headlamp Rt - LED NAFTA
- 55112879 - Headlamp Lt - LED NAFTA
- 55112880 - Headlamp Rt - LED ECE LHD
- 55112881 - Headlamp Lt - LED ECE LHD
- 55112882 - Headlamp Rt - LED ECE RHD
- 55112883 - Headlamp Lt - LED ECE RHD
- Other
-
Picture of rack/box label with serial number
-
Verify container labels and part labels match
-
Ensure the correct headlamps match the label
-
Verify there are no broken tabs
-
Verify there is no glue visible on the A-surface
-
Inspect for surface damage including scratches on the lens
-
Take the part to the Quality Engineer responsible for the program
-
Contact the Quality Engineer responsible for the program and ask them to add the part number to the inspection schedule
-
Select Part
- 68280799 - Hose - LTR Outlet Return (2.0L ATX BSG / 2.0L ATX)
- 68282205 - Hose - BSG Coolant Return (3.6L ATX BSG / 2.0L ATX BSG)
- 68310710 - Hose - Radiator Outlet (3.6L ATX BSG / 3.6L ATX / 3.6L MTX)
- 68312497 - Hose - LTR Jumper (2.0L ATX BSG)
- 68283409 - Hose Assy - Radiator Inlet
- Other
-
Picture of rack/box label with serial number
-
Verify container labels and part labels match
-
Inspect for surface damage
-
Take the part to the Quality Engineer responsible for the program
-
Contact the Quality Engineer responsible for the program and ask them to add the part number to the inspection schedule
-
Select Part
- 68283404 - Hose - CAC Inlet (3.0L Diesel Only)
- 68283407 - Hose - CAC Outlet (3.0L Diesel Only)
- Other
-
Picture of rack/box label with serial number
-
Verify container labels and part labels match
-
Inspect for surface damage
-
Take the part to the Quality Engineer responsible for the program
-
Contact the Quality Engineer responsible for the program and ask them to add the part number to the inspection schedule
-
Select Part
-
Picture of rack/box label with serial number
-
Verify container labels and part labels match
-
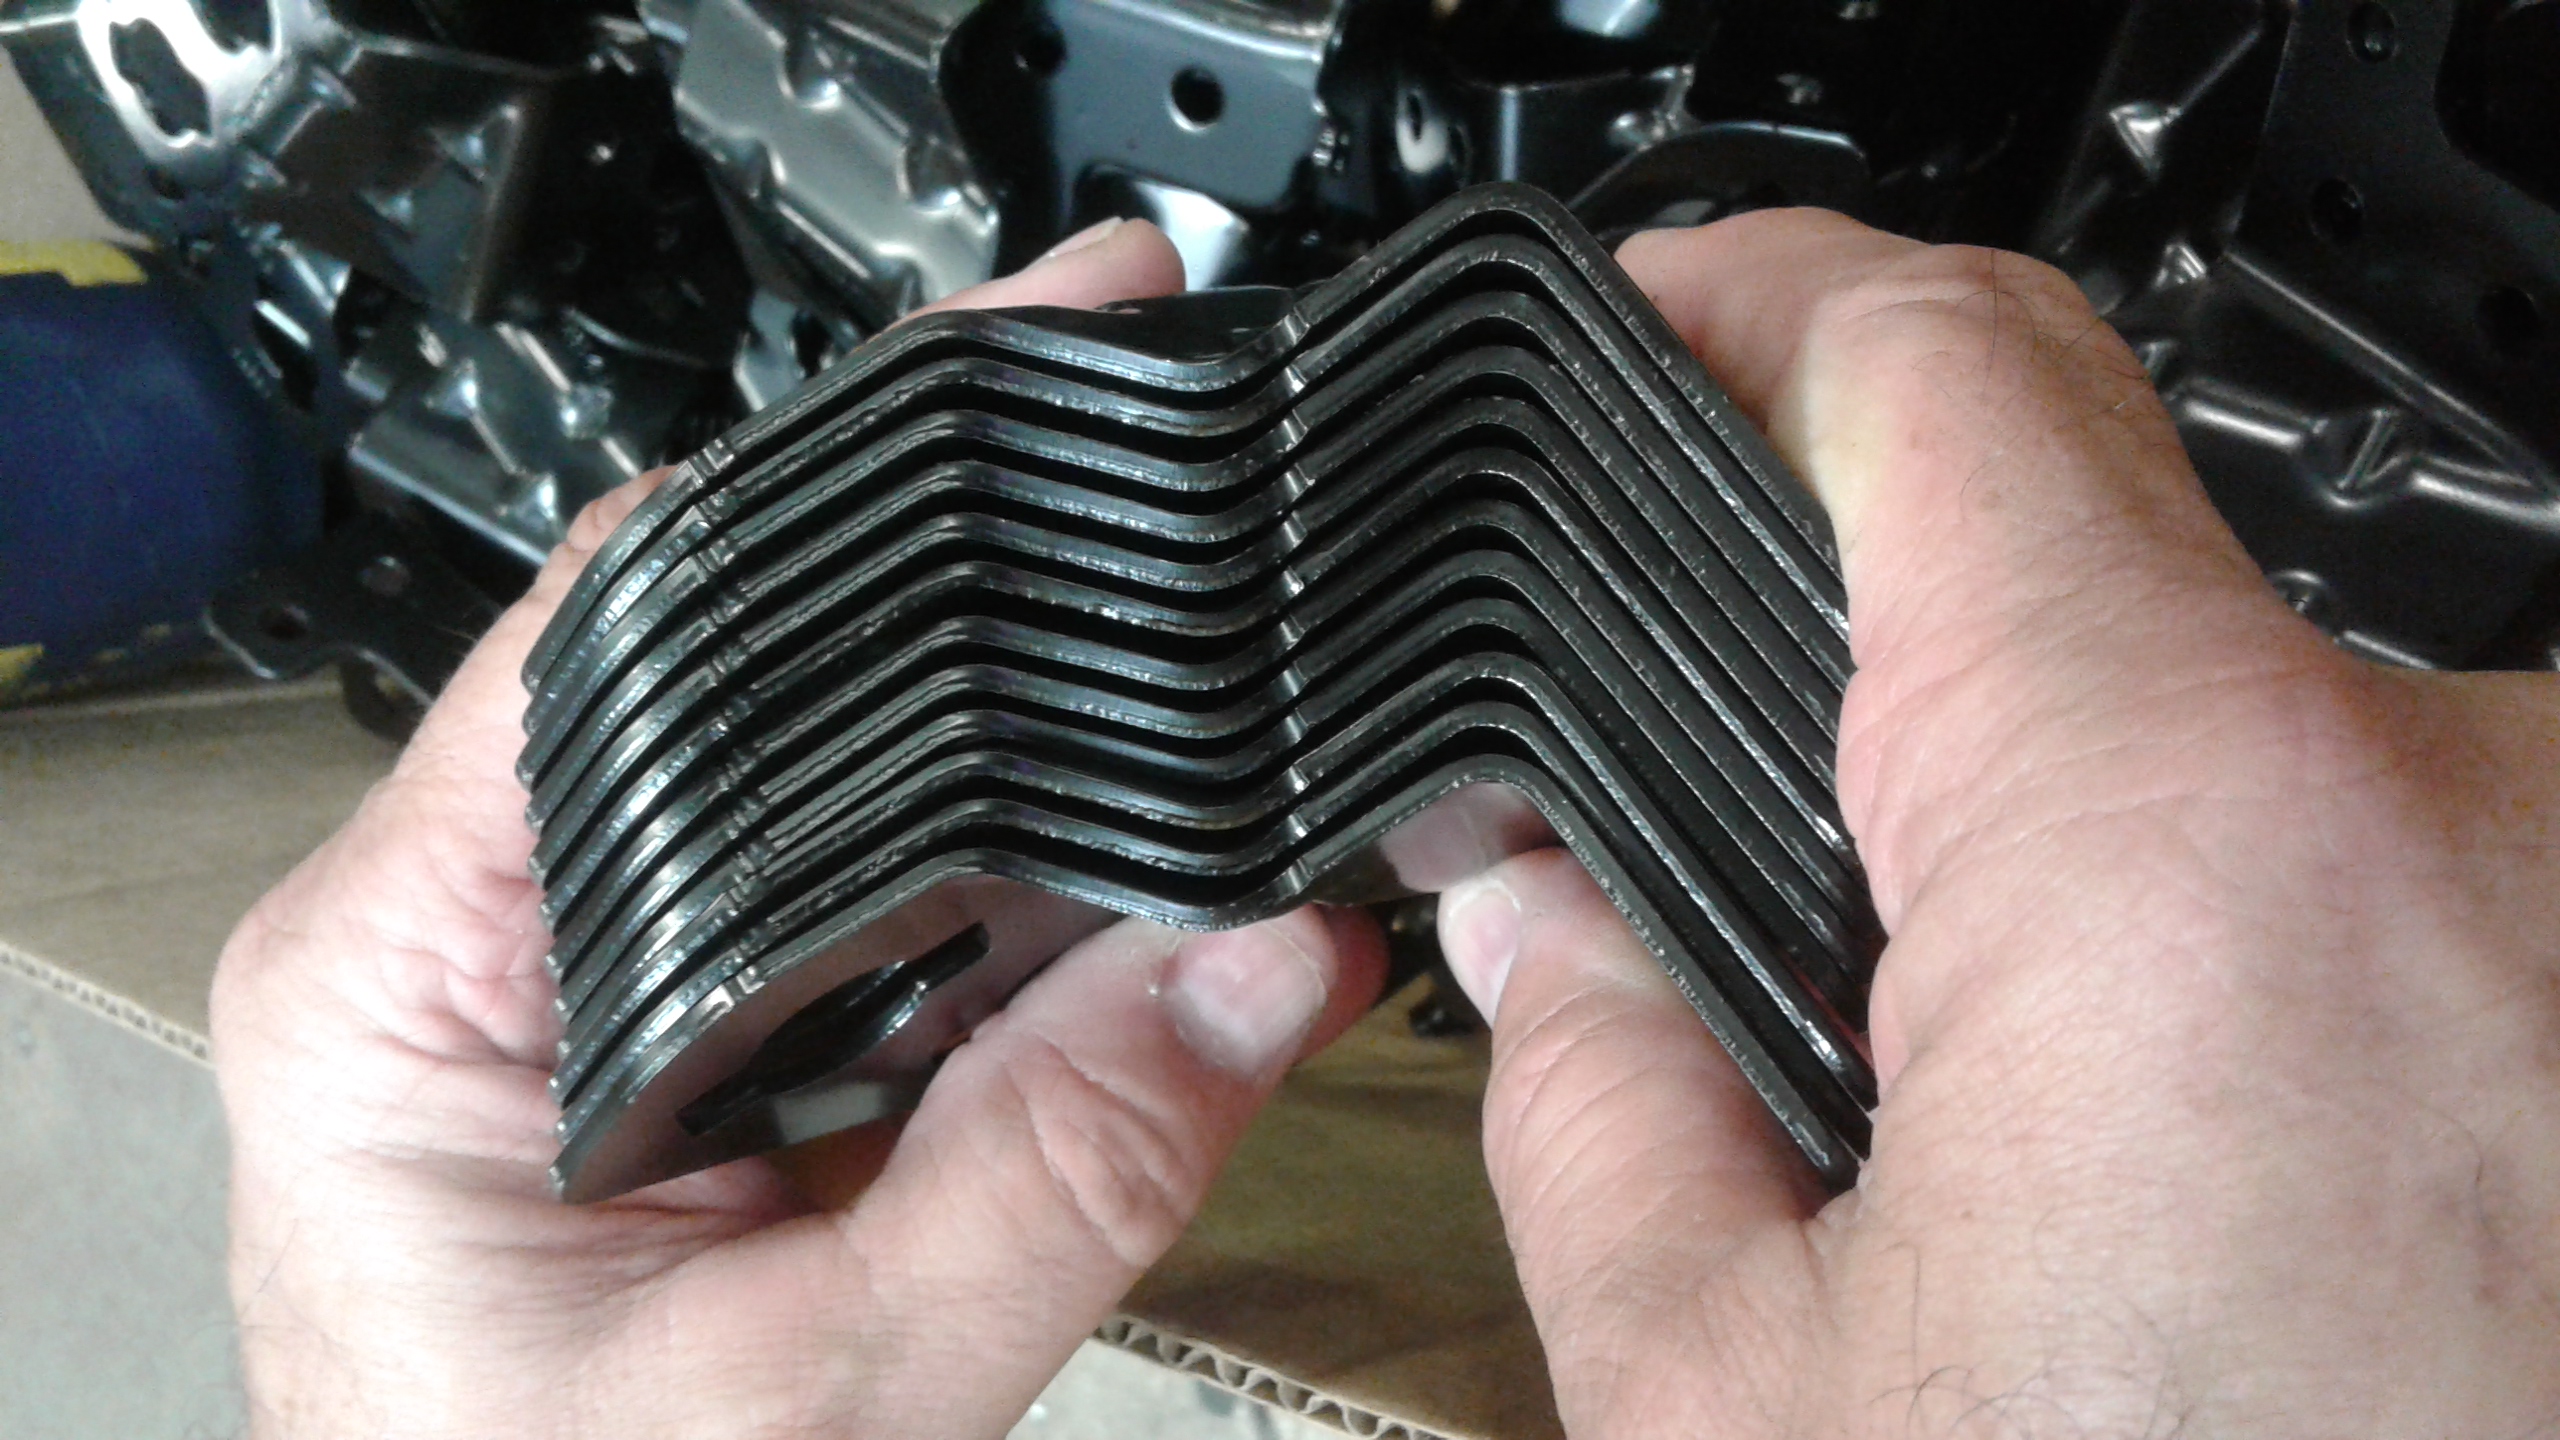
Stack the brackets as shown to ensure they are not bent (they should be relatively flush to each other)
-
Inspect for surface damage
-
Take the part to the Quality Engineer responsible for the program
-
Contact the Quality Engineer responsible for the program and ask them to add the part number to the inspection schedule
-
Select Part
-
Picture of rack/box label with serial number
-
Verify container labels and part labels match
-
Inspect for surface damage
-
Take the part to the Quality Engineer responsible for the program
-
Contact the Quality Engineer responsible for the program and ask them to add the part number to the inspection schedule
-
Select Part
- 68282496 - Hose - Radiator Inlet (2.2L Diesel Eng)
- 68333912 - Hose - LTR Outlet Jumper (2.2L Diesel)
- Other
-
Picture of rack/box label with serial number
-
Verify container labels and part labels match
-
Inspect for surface damage
-
Take the part to the Quality Engineer responsible for the program
-
Contact the Quality Engineer responsible for the program and ask them to add the part number to the inspection schedule
-
Select Part
- 68292728 - Side Air Guide RH - 3.6L/2.0L/2.2L
- 68292732 - Side Air Guide RH - 3.0L Diesel
- 68292733 - Side Air Guide LH - 3.0L Diesel
- Other
-
Picture of rack/box label with serial number
-
Verify container labels and part labels match
-
Inspect for surface damage
-
Take the part to the Quality Engineer responsible for the program
-
Contact the Quality Engineer responsible for the program and ask them to add the part number to the inspection schedule
-
Select Part
- 5MK61TRM - FPA SENSOR FRT BUX - (VALEO FC00AAQ78789)
- 68272748 - Cooling Module - 3.6L ATX BSG
- 68272749 - Cooling Module - 3.6L MTX
- 68272750 - Cooling Module - 3.6L ATX
- 68272753 - Cooling Module - 2.0L ATX
- 68282405 - Cooling Module - 2.0L ATX BSG
- 68283398 - Cooling Module - 3.0L Diesel
- 6BD56RXF - REAR PARK SENSOR
- Other
-
Picture of rack/box label with serial number
-
Verify container labels and part labels match
-
Inspect the ATOC, Condenser, PPU, WCAC, CAC Fins and Flowline for any Damage. Part Specific per Valeo ECM Complexity Matrix.
-
Inspect the ECM Fins and Flowline for any Damage. Ensure the ECM Mounting Feet are installed to the Bracket.
-
Ensure plastic port(nipple) on backside top of ECM is intact and not damaged
-
Inspect for surface damage
-
Take the part to the Quality Engineer responsible for the program
-
Contact the Quality Engineer responsible for the program and ask them to add the part number to the inspection schedule
-
Select Part
- T530001 - Upper Crossmember Assembly
- T530002 - Lower Crossmember Assembly
- Other
-
Picture of rack/box label with serial number
-
Verify container labels and part labels match
-
Check that the cross member are facing the correct orientation in the rack.
-
Inspect for presence of two (2) Outboard Locating Pins and ensure they are not bent
-
Inspect for Two (2) Compression Limiters on the Outboard ends of the Upper Cross Member
-
Verify there are no pins not sticking out of the rack
-
Inspect for surface damage and paint coverage
-
Take the part to the Quality Engineer responsible for the program
-
Picture of rack/box label with serial number, verify parts match rack label
-
Verify parts matched the PN called out on the rack label
-
Inspect for presence of Compression Limiters - three on each side
-
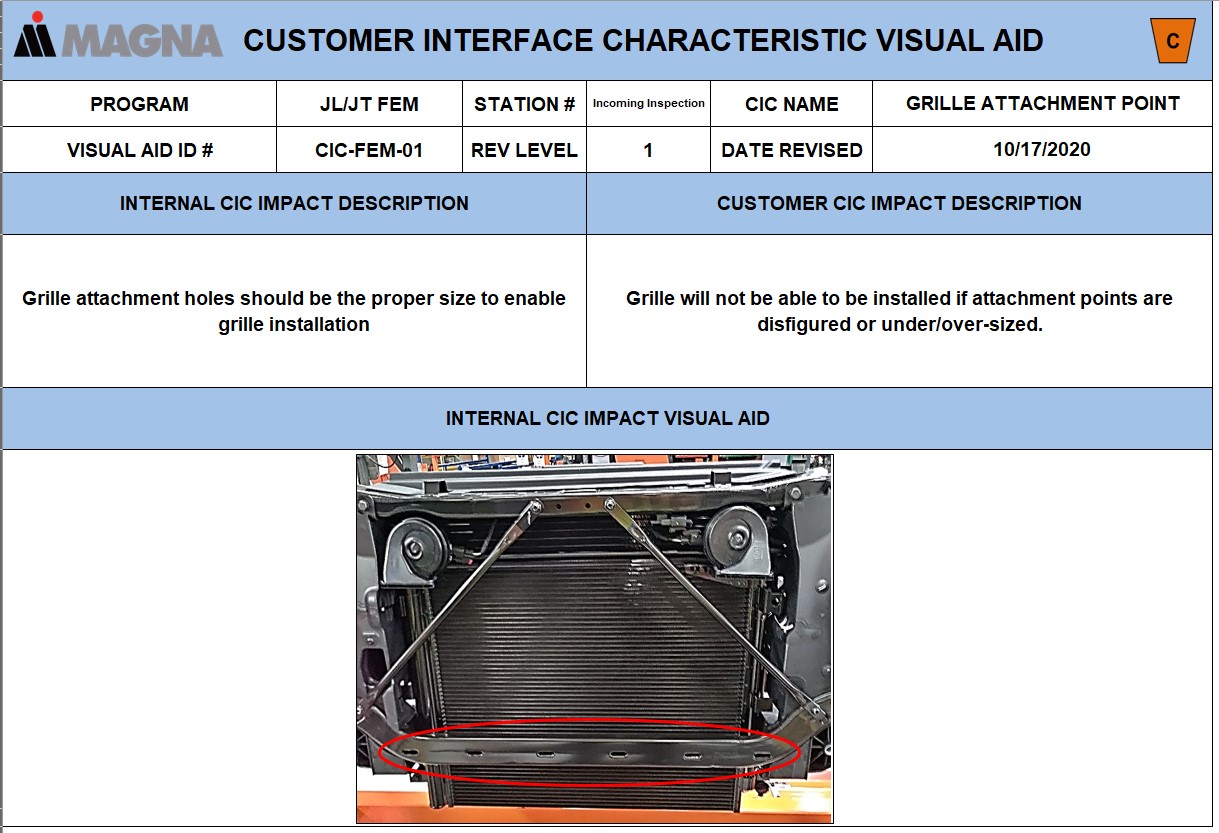
Note: next step includes verification of a Customer Interface Characteristic
-
-
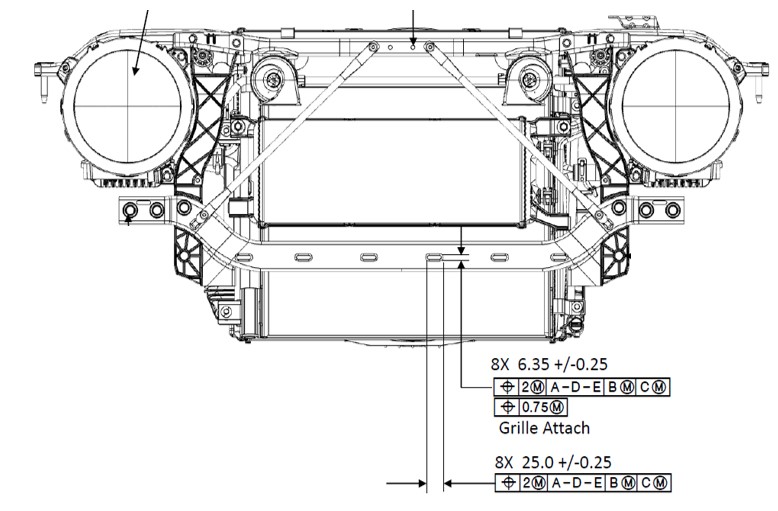
CIC - Verify the hole size for grille attachment points matches the drawing below using a caliper or go/no-go gauge
-
-
Inspect for surface damage
-
Take the part to the Quality Engineer responsible for the program
-
Contact the Quality Engineer responsible for the program and ask them to add the part number to the inspection schedule
-
Select Part
- 68340530 - "M8 STUD PLATE ASM - FASCIA INNER TO STEEL BEAM (6102587AA M8 WELD STUD)
- T530010 - Pencil Brace
- Other
-
Picture of rack/box label with serial number
-
Verify container labels and part labels match
-
Inspect for surface damage
-
Take the part to the Quality Engineer responsible for the program
-
Contact the Quality Engineer responsible for the program and ask them to add the part number to the inspection schedule
-
Select Part
- 68282740
- 68414406 Jumper
- 68414408 Jumper
- 68414409 Jumper
- 68416883 Jumper
- 68416884 Jumper
- Other
-
Picture of rack/box label with serial number
-
Verify container labels and part labels match
-
Ensure there are no bent pins in the plug.
-
Inspect push pin for presence
-
Inspect Red Tab that it is in the correct position. With the push pin to the left red tab should be to the top of the slot.
-
Inspect for surface damage
-
Take the part to the Quality Engineer responsible for the program
-
Contact the Quality Engineer responsible for the program and ask them to add the part number to the inspection schedule
-
Select Part
-
Verify container labels and part labels match
-
Inspect Fan Shroud Fins damage
-
Verify there are two U nuts are present on the top of the shroud.
-
Inspect Wire Harness Connection for Broken or Damage and the ECM Mounting Tabs
-
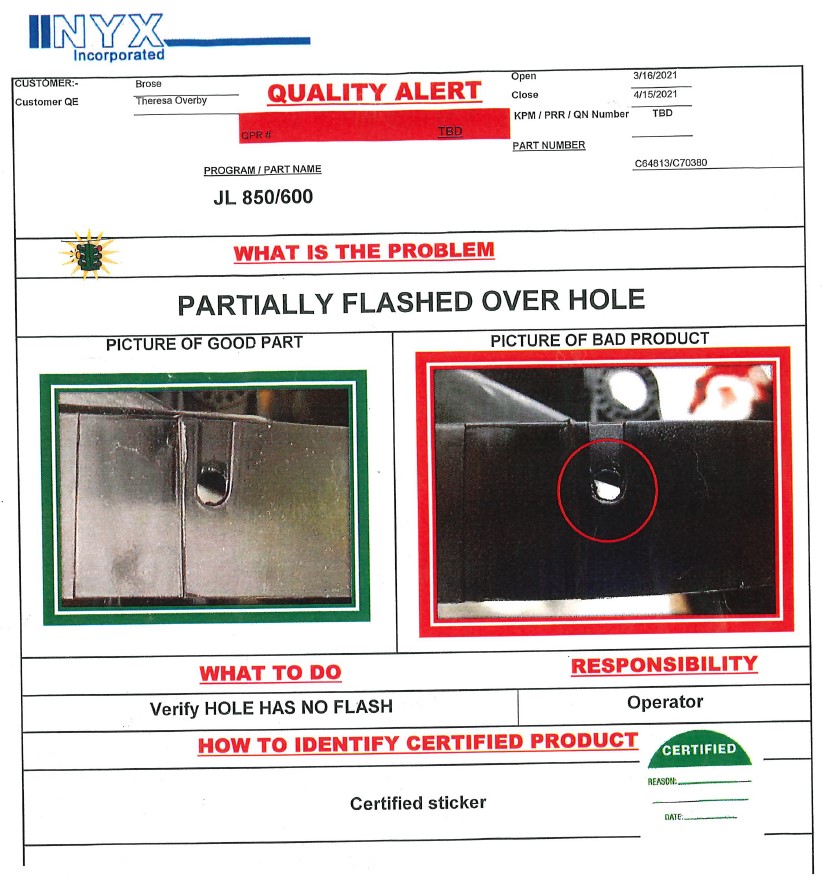
Inspect push pin hole for flash on upper air guide per QA listed below (799 & 755 only) per supplier issue on 03/15/21
-
-
Select Part
-
Picture of rack/box label with serial number
-
Verify container labels and part labels match
-
Verify presence of metal locking mechanism
-
Inspect for surface damage
-
Take the part to the Quality Engineer responsible for the program
-
Contact the Quality Engineer responsible for the program and ask them to add the part number to the inspection schedule
-
Select Part
-
Picture of rack/box label with serial number
-
Verify container labels and part labels match
-
Inspect for surface damage
-
Take the part to the Quality Engineer responsible for the program
-
Verify part does not have excess material that would prevent it from being seated on the machine
-
Contact the Quality Engineer responsible for the program and ask them to add the part number to the inspection schedule
-
Supplier Name
- ABC
- AG Simpson
- Alpha
- Centracore
- Goodwill
- Mantaline
- Myotek
- Norplas
- Shape
- TSM
- Valeo
- Viking
- Yazaki
-
Select Part
- 6BU41TRM/6BU41RXF - BLOW MOLD FRONT BUMPER
- Other
-
Picture of rack/box label with serial number
-
Verify container labels and part labels match
-
Inspect for surface damage
-
Take the part to the Quality Engineer responsible for the program
-
Contact the Quality Engineer responsible for the program and ask them to add the part number to the inspection schedule
-
Select Part
- 6FN38RXFAF
- 6SX03RXFAD
- 6FN37RXFAF
- 6UB20RXFAB
- 6YZ80RXFAA
- Other
-
Picture of rack/box label with serial number
-
Verify container labels and part labels match
-
Inspect for surface damage
-
Take the part to the Quality Engineer responsible for the program
-
Contact the Quality Engineer responsible for the program and ask them to add the part number to the inspection schedule
-
Select Part
- 68295608(T66003) - M12 Stud Plate ASM - Galvanized
- Other
-
Picture of rack/box label with serial number
-
Verify container labels and part labels match
-
Inspect for surface damage including paint defects
-
Take the part to the Quality Engineer responsible for the program
-
Contact the Quality Engineer responsible for the program and ask them to add the part number to the inspection schedule
-
Select Part
-
Picture of rack/box label with serial number
-
Verify container labels and part labels match
-
Inspect for surface damage
-
Take the part to the Quality Engineer responsible for the program
-
Contact the Quality Engineer responsible for the program and ask them to add the part number to the inspection schedule
-
Select Part
- 68295599AB - China L/P Bracket Kit
- Other
-
Picture of rack/box label with serial number
-
Verify container labels and part labels match
-
Inspect for surface damage
-
Take the part to the Quality Engineer responsible for the program
-
Contact the Quality Engineer responsible for the program and ask them to add the part number to the inspection schedule
-
Select Part
- 68353662 - SEAL - UPPER CLOSEOUt
- Other
-
Picture of rack/box label with serial number
-
Verify container labels and part labels match
-
Ensure the pins on the seal are the correct distance apart by comparing the seal to a known good part to enable proper install by the operator
-
Inspect for surface damage
-
Take the part to the Quality Engineer responsible for the program
-
Contact the Quality Engineer responsible for the program and ask them to add the part number to the inspection schedule
-
Select Part
- 68081399 - INCANDESCENT FOG LAMPS
- 68307273 - LED FOG LAMPS
- 68318608 - INJ BUX REAR LICENSE LAMP
- 68307201 - FASCIA RR LICENSE PLATE LAMP BKT
- OTHER
-
Picture of rack/box label with serial number
-
Verify container labels and part labels match
-
Inspect for surface damage including scratches on the lens
-
Take the part to the Quality Engineer responsible for the program
-
Contact the Quality Engineer responsible for the program and ask them to add the part number to the inspection schedule
-
Select Part
- 68299008 - FASCIA FOG LAMP BEZEL RT - BUX PAINTED
- 68299009 - FASCIA FOG LAMP BEZEL LT - BUX PAINTED
- 6BU58TRM - FASCIA FRT RT APPLIQUE
- 6BU59TRM - FASCIA FRT LT APPLIQUE
-
Picture of rack/box label with serial number
-
Verify container labels and part labels match
-
Verify 10 appliques for part labels
-
Inspect for surface damage including paint defects
-
Take the part to the Quality Engineer responsible for the program
-
Select Part
- 68293716 - FRONT BEAM ASSY NAFTA
- 68295606 - FRONT BEAM ASSY BUX
- 68352789 - FRONT BEAM ASSY NAFTA
- Other
-
Picture of rack/box label with serial number
-
Verify container labels and part labels match
-
Inspect for adequate paint coverage
-
Verify the presence of 8 weld nuts
-
Inspect for weld slag
-
Inspect for surface damage
-
Take the part to the Quality Engineer responsible for the program
-
Contact the Quality Engineer responsible for the program and ask them to add the part number to the inspection schedule
-
Select Part
-
Picture of rack/box label with serial number
-
Verify container labels and part labels match
-
Inspect for surface damage including paint defects
-
Take the part to the Quality Engineer responsible for the program
-
Contact the Quality Engineer responsible for the program and ask them to add the part number to the inspection schedule
-
Select Part
- 5MK61TRM - FPA SENSOR FRT BUX - (VALEO FC00AAQ78789)
- 68272748 - Cooling Module - 3.6L ATX BSG
- 68272749 - Cooling Module - 3.6L MTX
- 68272750 - Cooling Module - 3.6L ATX
- 68272753 - Cooling Module - 2.0L ATX
- 68282405 - Cooling Module - 2.0L ATX BSG
- 68283398 - Cooling Module - 3.0L Diesel
- 6BD56RXF - REAR PARK SENSOR
- Other
-
Picture of rack/box label with serial number
-
Verify container labels and part labels match
-
Inspect the ATOC, Condenser, PPU, WCAC, CAC Fins and Flowline for any Damage. Part Specific per Valeo ECM Complexity Matrix.
-
Inspect the ECM Fins and Flowline for any Damage. Ensure the ECM Mounting Feet are installed to the Bracket.
-
Inspect for surface damage
-
Take the part to the Quality Engineer responsible for the program
-
Contact the Quality Engineer responsible for the program and ask them to add the part number to the inspection schedule
-
Picture of rack/box label with serial number, verify parts match the rack label
-
Verify that there are no bent pins in the wire harness plug
-
Select Part
- 68340530 (T660003) - M8 Stud Plate ASM
- Other
-
Picture of rack/box label with serial number
-
Verify container labels and part labels match
-
Inspect for surface damage including paint defects
-
Take the part to the Quality Engineer responsible for the program
-
Contact the Quality Engineer responsible for the program and ask them to add the part number to the inspection schedule
-
Select Part
- 68282740 - Wire Harness - w Hood Security
- 68414889 - WIRE HARNESS ASSY - RPA - BUX
- 68319652 - WIRE HARNESS W/ LED FOG + FPA (Ped Pro)
- 68336461 - WIRE HARNESS W/ INC FOG
- 68336462A - WIRE HARNESS W/ INC FOG (NAFTA
- 68414893 - WIRE HARNESS ASSY - NAFTA / RUBICON L/P Lamp
- 68414894 - WIRE HARNESS ASSY - RPA / LP Lamp- NAFTA / RUBICON
- 68356681 - WIRE HARNESS W/ INC FOG (BUX)
- 68356682 - WIRE HARNESS W/ FOG (Non Ped Pro)
- 68356683 - WIRE HARNESS W/ LED FOG (Ped Pro)
- 68414892- WIRE HARNESS NAFTA/RUBICON RE
- Other
-
Picture of rack/box label with serial number
-
Verify container labels and part labels match
-
Ensure there are no bent pins in the plug.
-
Inspect for surface damage
-
Take the part to the Quality Engineer responsible for the program
-
Picture of rack/box label with serial number
-
Verify presence of push pins
-
Verify that the red tab is in the correct position (with the push pin to the left red tab should be to the top of the slot)
-
Inspect for surface damage
-
Take the part to the Quality Engineer responsible for the program
-
Contact the Quality Engineer responsible for the program and ask them to add the part number to the inspection schedule
-
Supplier Name
- AG Simpson
- Autosystems
- Bayloff
- Carrdan
- Decofinmex
- ITW Deltar
- L&B
- Myotek
- Valeo
- Yazaki
-
Select Part
- 6FN38RXFAF
- 6SX03RXFAD
- 6FN37RXFAF
- 6UB20RXFAB
- 6YZ80RXFAA
- Other
-
Picture of rack/box label with serial number
-
Verify container labels and part labels match
-
Inspect for surface damage
-
Take the part to the Quality Engineer responsible for the program
-
Contact the Quality Engineer responsible for the program and ask them to add the part number to the inspection schedule
-
Select Part
- 68281936 - REAR REFLEX RT - NAFTA/RUBICON
- 68281937 - REAR REFLEX LT - NAFTA/RUBICON
- 68310837 - REAR LICENSE LAMP LT - NAFTA/RUBICON
- 68281932 - REAR FOG LAMP RT BUX
- Other
-
Picture of rack/box label with serial number
-
Verify container labels and part labels match
-
Inspect LP lamp pins for damage
-
Inspect for surface damage including scratches on the lens
-
Take the part to the Quality Engineer responsible for the program
-
Contact the Quality Engineer responsible for the program and ask them to add the part number to the inspection schedule
-
Select Part
- 68335617 (T670017aa) - Reinforcement Bumper Bracket
- Other
-
Picture of rack/box label with serial number
-
Verify container labels and part labels match
-
Inspect for adequate paint coverage
-
Verify the presence of 4 studs due to customer quality issue on 4.8.21
-
Inspect for weld slag
-
Inspect for surface damage
-
Take the part to the Quality Engineer responsible for the program
-
Contact the Quality Engineer responsible for the program and ask them to add the part number to the inspection schedule
-
Select Part
- 6102244 (T670002) - M5 PALNUT - LICENSE LAMP - (RR NAFTA / RUBICON KIT
- Other
-
Picture of rack/box label with serial number
-
Verify container labels and part labels match
-
Inspect for surface damage
-
Take the part to the Quality Engineer responsible for the program
-
Contact the Quality Engineer responsible for the program and ask them to add the part number to the inspection schedule
-
Select Part
-
Picture of rack/box label with serial number
-
Verify container labels and part labels match
-
Inspect fog lamp pins for damage
-
Inspect for surface damage
-
Take the part to the Quality Engineer responsible for the program
-
Contact the Quality Engineer responsible for the program and ask them to add the part number to the inspection schedule
-
Select Part
- 68225214 - PLAS SHOE HORN CLIP - END CAP TO FASCIA OUTER-(RR NAFTA / RUBICON KIT)
- Other
-
Picture of rack/box label with serial number
-
Verify container labels and part labels match
-
Inspect for surface damage
-
Take the part to the Quality Engineer responsible for the program
-
Contact the Quality Engineer responsible for the program and ask them to add the part number to the inspection schedule
-
Select Part
- 68349548 - BRACKET - STAMPED MODAL REINFORCEMENT RH - INJECTION
- 68349549 - BRACKET - STAMPED MODAL REINFORCEMENT LH - INJECTION
- Other
-
Picture of rack/box label with serial number
-
Verify container labels and part labels match
-
Inspect for adequate paint coverage
-
Inspect for surface damage
-
Take the part to the Quality Engineer responsible for the program
-
Contact the Quality Engineer responsible for the program and ask them to add the part number to the inspection schedule
-
Select Part
- 68081399 - INCANDESCENT FOG LAMPS
- 68307273 - LED FOG LAMPS
- 68318608 - INJ BUX REAR LICENSE LAMP
- 68307201 - FASCIA RR LICENSE PLATE LAMP BKT
- OTHER
-
Picture of rack/box label with serial number
-
Verify container labels and part labels match
-
Inspect for surface damage including scratches on the lens
-
Take the part to the Quality Engineer responsible for the program
-
Contact the Quality Engineer responsible for the program and ask them to add the part number to the inspection schedule
-
Confirm parts in rack match rack label and part label.
-
Inspect for adequate paint coverage
-
Select Part
- 5MK61TRM - FPA SENSOR FRT BUX - (VALEO FC00AAQ78789)
- 68272748 - Cooling Module - 3.6L ATX BSG
- 68272749 - Cooling Module - 3.6L MTX
- 68272750 - Cooling Module - 3.6L ATX
- 68272753 - Cooling Module - 2.0L ATX
- 68282405 - Cooling Module - 2.0L ATX BSG
- 68283398 - Cooling Module - 3.0L Diesel
- 6BD56RXF - REAR PARK SENSOR
- Other
-
Picture of rack/box label with serial number
-
Verify container labels and part labels match
-
Inspect for surface damage
-
Take the part to the Quality Engineer responsible for the program
-
Add signature
-
Contact the Quality Engineer responsible for the program and ask them to add the part number to the inspection schedule
-
Select Part
- 68282740 - Wire Harness - w Hood Security
- 68414889 - WIRE HARNESS ASSY - RPA - BUX
- 68319652 - WIRE HARNESS W/ LED FOG + FPA (Ped Pro)
- 68336461 - WIRE HARNESS W/ INC FOG
- 68336462A - WIRE HARNESS W/ INC FOG (NAFTA
- 68414893 - WIRE HARNESS ASSY - NAFTA / RUBICON L/P Lamp
- 68414894 - WIRE HARNESS ASSY - RPA / LP Lamp- NAFTA / RUBICON
- 68356681 - WIRE HARNESS W/ INC FOG (BUX)
- 68356682 - WIRE HARNESS W/ FOG (Non Ped Pro)
- 68356683 - WIRE HARNESS W/ LED FOG (Ped Pro)
- 68414892- WIRE HARNESS NAFTA/RUBICON RE
- Other
-
Picture of rack/box label with serial number
-
Verify container labels and part labels match
-
Ensure there are no bent pins in the plug.
-
Inspect for surface damage
-
Take the part to the Quality Engineer responsible for the program
-
Picture of rack/box label with serial number, verify parts match rack label
-
Verify presence of push pins
-
Verify that the red tab is in the correct position (with the push pin to the left red tab should be to the top of the slot)
-
Inspect for surface damage
-
Take the part to the Quality Engineer responsible for the program
-
Contact the Quality Engineer responsible for the program and ask them to add the part number to the inspection schedule
-
Verify skip lot inspection frequency and qty per the PPAP matrix
-
Verify the part is PPAP'd by referring to the applicable PPAP Matrix
-
Verify the drawing revision level
-
Inspect the rack for any damage, if found please take a picture and report it to the Quality Engineer
-
Ensure Logistics Inspection was completed per MQS 9
-
Verify the quantity in container matches label and/or shipping documentation
-
Visually compare the production part to the PPAP sample
-
Conduct dimensional inspection of critical characteristics, or other important, non-critical features
-
Check the Supplier Issues list for any complaints/issues related to this part that occurred within the past 6 months and determine if any additional inspections need to be conducted
- No additional inspections required
- Additional inspection required (enter action item so this can be added to the template)
-
Were any non-conformances detected in the incoming inspection & receiving good area?