")


Information
Service to 59 HOPETOUN RD Toorak 3142 House phone 98228806 Owner: Avi Housekeeper Liliana (0451 927 493) Second cleaner/cook: Debbie Maintenance man: Oren
-
Conducted on
STARTERS
The Basics
-
Employee (if more present mention in notes)
- Matthias
- Christine
- Charles
- Steven
- CK
- Cyrus
-
Date
-
Time Started
FIRST THINGS FIRST.
Setup
-
Need to override lights for working?
-
Lights over-ride:
Dial on ends of the lights are also the enter button. Depress and hold until lights come on. This brings up the preset #1 which is bright. Hold again to get preset #2 which is dimmer. -
Remove AUTO FEEDER and LIQUID DOSER and store on their backs on floor of bathroom with feeder barrel facing upwards so it doesn't dose while you are working
-
MOVE Dining Table chair at tank end to the side by the marble bench
-
Tap here to open other SETUP reminders
-
Normal STEP LADDER usually outside of laundry on back patio. Otherwise in carpark or ask Pina or Leo
-
Platform Ladder (if needed), hoses buckets and drop sheets downstairs. Normally unlocked but if needed green key in kitchen cabinet. Ask Liliana if unsure.
Observations
-
Photos Before. 1-2 OVERALL. 2-3 CLOSEUPS on PLANTS
FISH (multiple choices possible)
-
Peacock sp, , Electric Blue Cichlids, blue and red zebra cichlids, golden sucking cats
- Great; vibrant, eager for food
- some individuals not right.
- sulky, sluggish, isolated from group
- dead fish
- cloudy stinky water
- Uneaten food on bottom
-
Uneaten food on bottom or Cloudy Stinky water? Plan for: Thorough gravel vacuum Larger water change, ~70% Ammonia and nitrite water tests Contact Bruce to discuss.
-
Take photos of individuals and check for CAUSES. Questions: 1. Is it just an individual or are many affected? 2. Check for uneaten food, levels of ammonia or nitrite. 3. Filter or heater stopped or malfunctioning?
-
Anything on BODY? <br>WHITE SPOTS?<br>FUNGUS?<br>WOUNDS?
-
Take PHOTO of cases and NOTE down details.
-
Dead fish? Tap here to give more information
- Single, isolated death
- Multiple deaths
- Large fish death
- Small fish death
-
If multiple or large fish deaths then good chance the tank is polluted
-
Plan for LARGE WATER CHANGE (75-90%) with thorough GRAVEL VAC. Use STRESS COAT and BLUE SALTS to guard against chlorine and infection.
-
CONTACT BRUCE IMMEDIATELY
-
Possibly due to aggression. Check others are fine and feeding well. Perhaps a larger water change than usual necessary
-
Take photo of all carcasses on removal
-
Take PHOTO where possible and NOTE down details.
-
Looking good? Place a block of FROZEN FOOD in and observe how they eat.
The Workers: SUCKING CATS & FLYING FOXES
-
SUCKING CAT/s sighted? (2-3)
-
How's the algae levels on GLASS & ROCKS?
- Lots of soft brown/green dust everywhere
- Very clear. A few spots on glass and rocks
- Furry black algae growing on rocks and glass
- heavy with dark green spots on glass
- dark green algae all over rocks
-
FURRY BLACK ALGAE is an indication that there are no or low numbers of SIAMESE FLYING FOX. Mention in notes.
-
Remove as much as possible, prune old affected leaves off plants. Vacuum up loose pieces from after cleaning glass
-
Brown Dust and Fine Green Algae is possibly an indication that there are no SUCKING CATS. Mention in notes.
-
Confirm lights are on A for Auto. Were they on already when you arrived? Also test phos and nitrate levels.
-
Plan for an "Adrian Special"; BEFORE draining, turn OFF pumps, scrape all of every glass surface and carefully brush clean all rocks Then drain 80% water.
Tests part 1
Tests part 1
-
TEMPERATURE test (ideal 24-26 C) Serviced by INLINE HEATER on right piping of filter return.
-
less than 22 degrees is getting to cold. Is the INLINE HEATER plugged in/ functioning?<br>(Does the indicator light come on and off when you turn the thermostat setting up and down?)
-
Then plug in and confirm correct thermostat setting and check that indicator light comes on.
-
Then plug in BACKUP rod heater (from downstairs storage and set thermostat at 24 degrees and check that indicator light comes on.
-
Notify Bruce to arrange replacement of INLINE HEATER Make a follow-up ACTION entry here
-
Increase THERMOSTAT (clockwise) by the SUITABLE AMOUNT to bring it up within the range (see above) and make note of how much.
-
Increased THERMOSTAT on BACK UP UNIT by:
-
Has the morning AUTO 10% water change happened recently?
-
Depending on how recent and how cool the temp is now, this is most likely the explanation for the temp drop. Is the indicator light of the INLINE HEATER on?
-
Is INLINE heater functioning/plugged in? <br>(Does the indicator light come on and off when you turn the thermostat setting up and down?)
-
Then plug in BACKUP rod heater (from downstairs storage and set thermostat at 24 degrees and check that indicator light comes on.
-
Notify Bruce to arrange replacement of INLINE HEATER Make a follow-up entry here
-
Increase THERMOSTAT (clockwise) by the SUITABLE AMOUNT to bring it up within the range (see above) and make note of how much.
-
Increased THERMOSTAT by:
-
Then plug in and confirm correct thermostat setting and check that indicator light comes on.
-
Then all should be normal. Leave all settings as they are.
-
If not performed the AUTO W/C then this is bit too cool. Is INLINE heater functioning/plugged in? <br>(Does the indicator light come on and off when you turn the thermostat setting up and down?)
-
Then plug in BACKUP ROD HEATER (from down stairs) and confirm correct thermostat setting and check that indicator light comes on.
-
Notify Bruce to arrange replacement of INLINE HEATER Make a follow-up entry here
-
Increase THERMOSTAT (clockwise) by the SUITABLE AMOUNT to bring it up within the range (see above) and make note of how much.
-
Increased THERMOSTAT by:
-
Then plug in and confirm correct thermostat setting and check that indicator light comes on.
-
A little too warm. Is the THERMOSTAT of INLINE heater functioning? <br>(Does the indicator light come on and off when you turn the thermostat setting up and down?)
-
Decrease THERMOSTAT (anticlockwise) by the SUITABLE AMOUNT to bring it down within the range (see above)and note by how much.
-
Decreased THERMOSTAT by:
-
HEATER Replaced?
-
if the THERMOSTAT doesn't respond to being turned down then better to have a cool tank than risking cooking the fish. Unplug faulty unit and plug in the SPARE HEATER that is already installed at receptionist end INSIDE THE TANK. Notify Bruce to arrange replacement.
-
Good. Refill with SOUP HEATER or KETTLES OF BOILED WATER in COLD months.
-
Rinse 2 TEST VIALS in tank water: MEASURE 5ml in each and SET ASIDE for later.
The Drain
The Drain (50%)
-
Turn off WATER WITCH
GRAVEL VACUUM. NB: sand very fine here so be careful not to suck it out the drain!
-
Gravel vacuum planned?
-
How dirty was it?
FAST DRAIN (version 1: AT TANK)
-
Once gravel vacuum finished, remove vacuum and be sure to use BASKET STRAINER over end. Attach on inside to desired drain level with 2 functioning SUCTION CUPS. run HOSE out to back lawn. To start the syphon: make a caterpillar action on the drain hose from the tank end outwards. This pushes the water inside the hose out which in turn sucks new water from the tank and the syphon will begin.
FAST DRAIN (Version 2: DOWNSTAIRS- ideal for when Avi is at home or lots of activity in dining area)
-
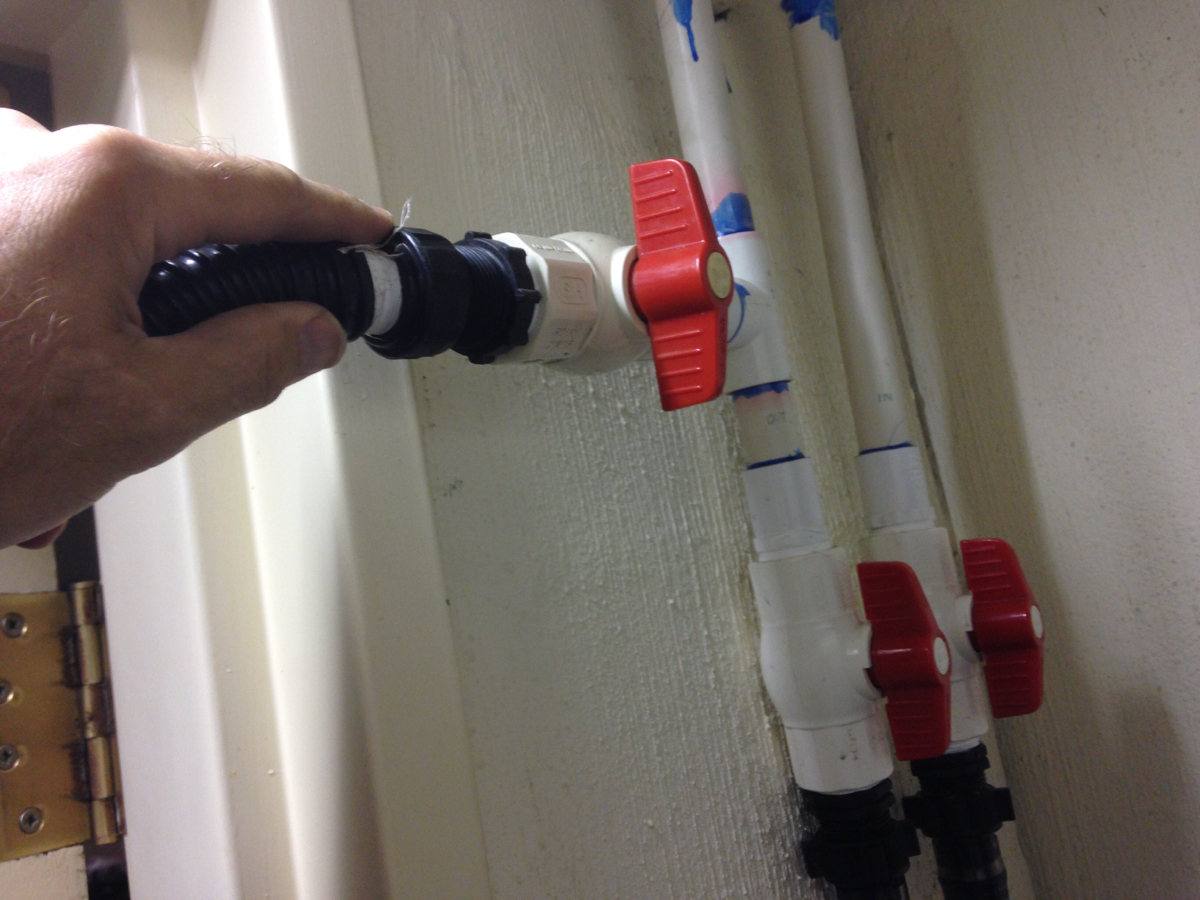
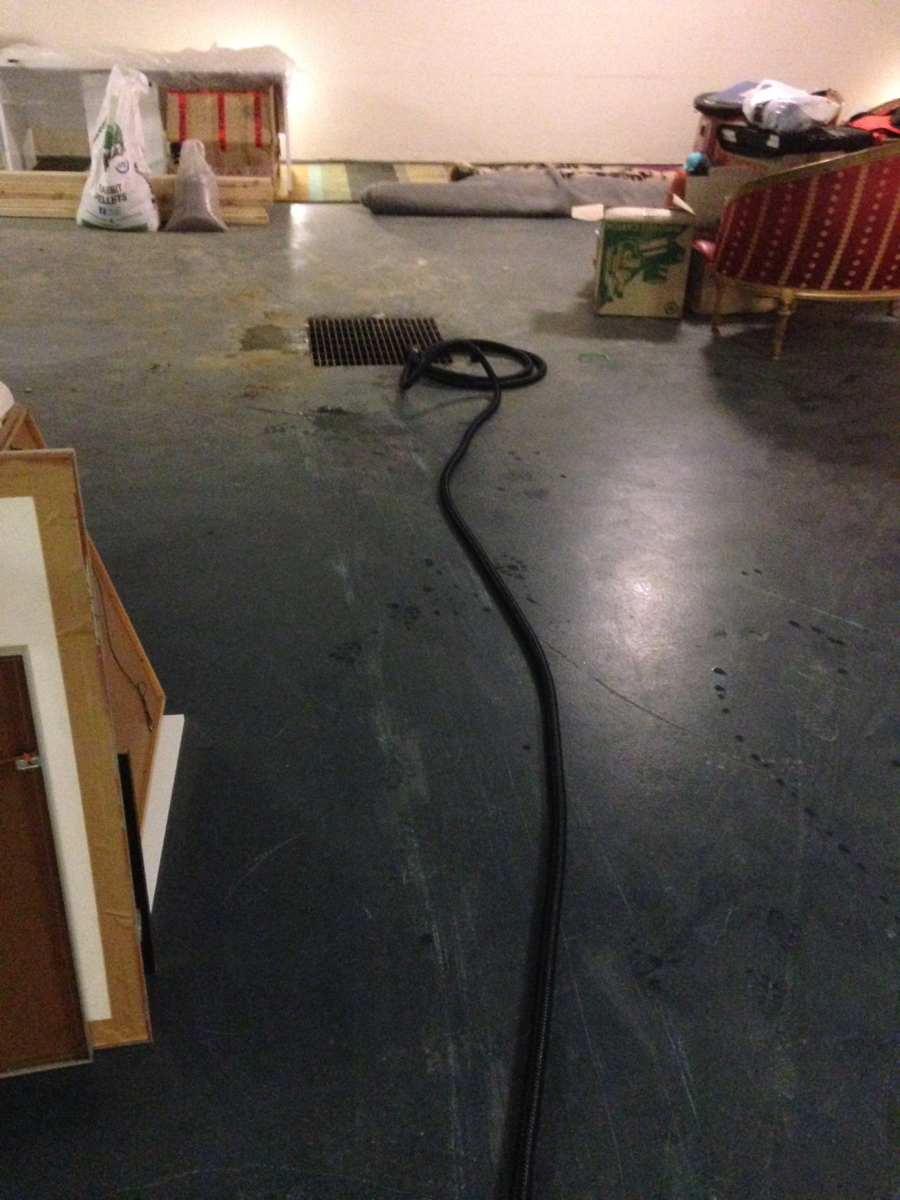
Detach short extension of drain hose and attach nut and tail fitting and attach to the BLEEDER/DRAIN line by the FILTER in plant room downstairs. TAP THIS CHECKBOX FOR ASSISTIVE PICS Run hose out flat to the DRAIN in floor of CARPARK. Remove basket strainer to allow easy flow Open up drain ballvalve. NB: don't forget to KEEP AN EYE ON WATER LEVEL!!
-
INLINE DRAIN
-
RUN HOSE TO CARPORT DRAIN
THINGS TO DO WHILE DRAINING
-
Stir up open space gravel with DISHBRUSH. <br>Expose joins in bottom lining plates of glass and release trapped gas (particularly in left join)<br>Use brush to then relandscape and smooth out sand, sloping away from front glass<br>
-
CLEAN GLASS; easiest at LOW WATER LEVELS.<br><br>SOFT ALGAE lightly with DISH BRUSH. DARK GREEN spots: best with SCRAPER.<br><br>JOINS in BACKPANELS now covered with thin black acrylic strips to hide calcification buildup. Still give a pass-over with DISHBRUSH to remove any algae thinking about growing on them<br><br>If using the Magnet Cleaner please use with caution near gravel! Be sure to squeeze off white cleaning pad and store it in a clean place with the two pieces "spooning" so the white pad is not being squashed but open to dry
Tests (continued)
-
NO TESTS LEFT ON BARE MARBLE TABLE TOPS! Take outside or into laundry sink
pH
-
pH Test? 3 drops in 5ml. (ideal range 7.1-7.6) NB. The black gravel in there is constant buffer so should be no need to use any coral sand. If you get a below 7 reading consult Bruce first. As it is white, coral sand or she'll grit should not go in directly to the tank
-
Retest to make sure. Should be too much buffering capacity from the black sand to get such a reading. Make a note for Bruce
-
Though possible this is fairly unlikely just on the gravel alone. Rinse test tube thoroughly and retest. (Any traces of AMMONIA TEST or GH TEST solutions will give a false alkaline reading) If still high then we must assume that there has been an excess amount of coral sand and all we can do is water change. It will eventually come down as the coral sand dissolves.
GH
-
GH TEST. number of drops to turn from ORANGE to GREEN. Note ANY addition of BLUE SALTS should be premixed in a CLEAR MIXING JUG of boiling water to stop it staining the rocks and sand
-
SIZE of water change:
-
ADD up to 5 teaspoons of salts. (Premix in boiling water first)
-
ADD up to 10 teaspoons of salts. (Premix in boiling water first)
-
SIZE of water change:
-
-
SIZE of water change:
-
ADD up to 10 teaspoons of salts. (Premix in boiling water first)
-
ADD up to 15 teaspoons of salts. (Premix in boiling water first)
-
SIZE of water change:
-
ADD up to 15 teaspoons of salts. (Premix in boiling water first)
-
ADD up to 20 teaspoons of salts. (Premix in boiling water first)
-
Depending on SIZE of WATER CHANGE, perhaps NO SALTS are needed and you can let WC reduce the GH to within desired range
The Refill
The Refill
-
Switch on WATER WITCH power. Water will flow in through OUTFLOW of filter system. Sensor is mounted in black poly plumbing fittings to left of weir.
-
Can open up the mains ball-valve to allow stronger flow. BEWARE: the water pressure is super strong so you won't need to open it very much to get it going. IT IS VITAL that you return it to just being cracked open for the normal evaporation top up use.
-
SOUP HEATER in COLD months or in large water changes. Place in right end of the tank. Plug into WALL OUTLET to the right by the floor. If using regular non floating heater, use extension cord to reach.
Things To Do During Refill
-
FILTER SERVICE?
-
Tap here for instructions ====>
-
INSTRUCTIONS: UNDER CONSTRUCTION.
-
CONTINUE GLASS CLEAN
OTHER TESTS
-
Nitrate and Phos tests needed?<br>(only by order or in strange cases of excessive unwanted algae)
-
NITRATE TEST
-
GENERALLY this is the OPTIMUM RANGE.
-
Perhaps daily auto water change has stopped. Check Galcon battery power. Is the Galcon unit out of battery?
-
This is the most likely cause of this reading and should drop once the daily water changes resume. Replace battery. Should be one stored down stairs
-
PHOSPHATE TEST
-
GENERALLY this is the OPTIMUM RANGE. Some say 1/10th of the nitrate level. HOWEVER if there is POOR PLANT GROWTH (premature aging leaves usually) observed then possibly means therefore not enough K and thus they are being starved. Contact Bruce for further instructions.
-
If algae issues this may be a contributing factor. Make note to Bruce
Additives
-
Conditioning SALTS added?
-
How many teaspoons?
Packing up
SUPPLIES; ANY REFILLING TO BE DONE IN SINK OR OUTSIDE!
AUTO FEEDER
-
AUTO FEEDER topped up?<br>Hold finger over opening to prevent food spilling
-
If the barrel is still pretty full then possibly there is a block or the program is not activated. Test/inspect.
-
Battery ok?
-
Replace batteries (2 x AA), NOTE DOWN PROGRAM TIMES FIRST as you'll lose all info!
-
Replace batteries (should be some on site, in draws to right, ask Leo or Pina) <br><br>reprogram for a doses of 1 rotation at 12pm, 4pm and 8pm
-
Time of day correct?
-
DOSE ARROWS showing? <br>Down-facing arrows next to program number, 1 per rotation programmed
-
AUTO FEEDER returned to position and tested?
LIQUID DOSER
-
Liquid DOSER topped up with DAILYGRO?<br>Tip: use salts mixing jug to pour into first for finer pouring accuracy.
-
If the barrel is still pretty fullthen possibly there is a block or the program is not activated. Test/inspect.
-
Battery ok?
-
Replace batteries (2 x AA), NOTE DOWN PROGRAM TIMES FIRST as you'll lose all info!
-
Replace batteries (should be some on site, in draws to right, ask Leo or Pina) <br>reprogram for a doses of 1 rotation at 14:00
-
Time of day correct?
-
DOSE ARROWS showing? <br>Down-facing arrows next to program number, 1 per rotation programmed
-
AUTO FEEDER returned to position and tested?
FOOD
-
DRYFOOD (TETRABITS) REPLACE?
-
Will any need replacing next month?
- TETRABITS
- SPIRULINA FLAKES
- SPIRULINA TABLETS
- DISCUS PELLETS
-
Still plenty of FROZEN FOOD? <br>(Top shelf in carpark freezer)
-
Approx how many packs remaining?
Equipment Check
-
TIME on Lights correct?
-
LIGHTS working ok?
-
Details
-
"Galcon" auto water changer solenoid battery need replacing?
-
Replaced Battery?<br>(Ask Leo if there are any 9 Volt ones)
-
Make sure that a replacement is ready. If none on site then make an "Action" here to buy one
-
Notes. Any extra work performed? Any additions of fish? Any questions...?
-
Refill ballvalve (on Water Witch Solenoid) returned to minimum flow? <br>
-
TEST FLOW FROM WATER WITCH<br><br>Press FEED PAUSE BUTTON on water pump volume control to stop pump. You can then see how much if any is coming through just from the water witch (of course the WW needs to be currently on "FILL" to test this. <br><br>If tank already filled to max (and WW flashing "SENSE") then use gravel vac to suck out a bucket or so.
-
Great. Turn FILTER PUMP back on (press the feed button again)
FINAL CHECKS
-
INLINE HEATER ON and functioning?
-
OUTSIDE GLASS, CABINETRY etc CLEAN & DRY?
-
WATER WITCH on? Remember, here it is constantly used to top up from evaporation. It must ALWAYS BE ON.
-
Photos After. 1 x OVERALL. Both sides, 2 half shots CLOSEUPS of any REARRANGED PLANT.
-
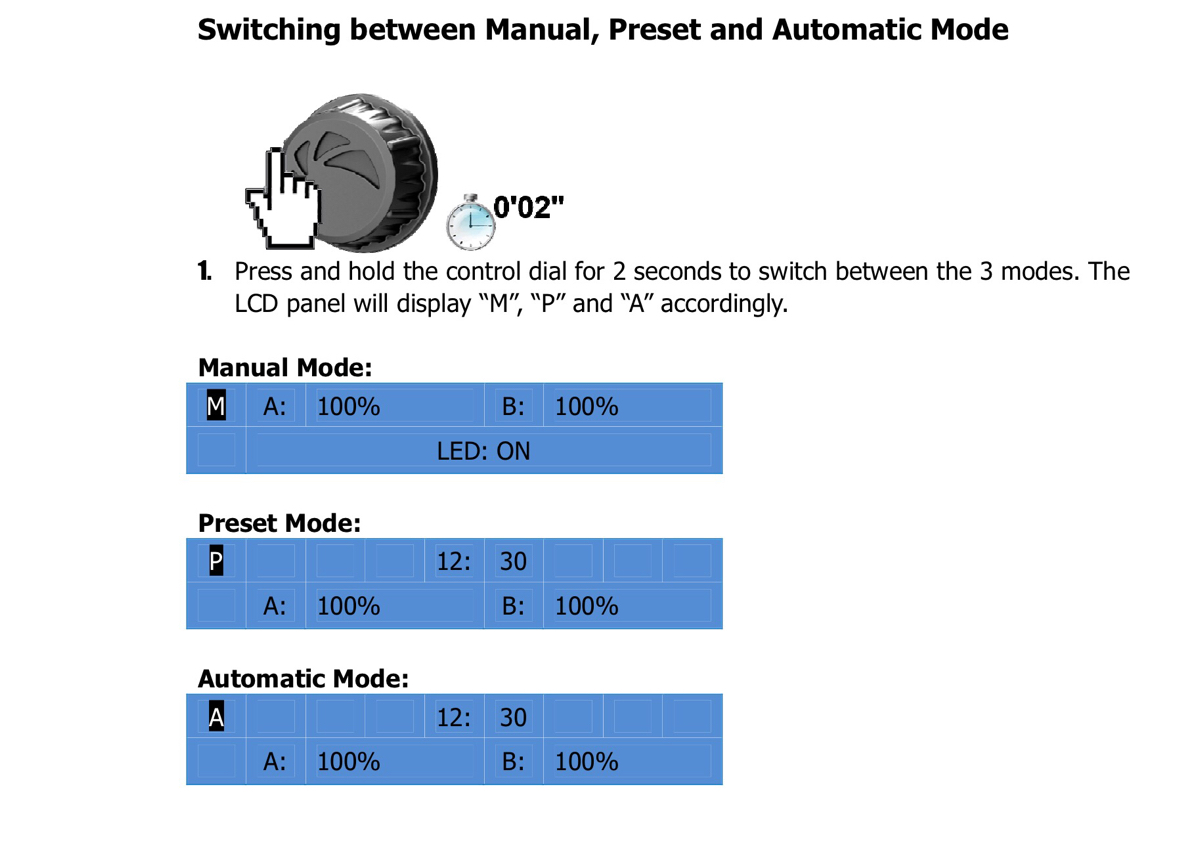
RETURN THE LIGHTS TO AUTO!! Press adjustment dials 2 seconds until it shows "A" (if you are leaving after the first programmed time then it will be probably go to a dim setting. Otherwise it will be completely dark again) Instructions again below<br><br>TIP: as sight-lines for the display are really poor and it's hard to discern from A, P or M, a confirmation of A being set is that after a few seconds it should then change the display to show what position in the 6 steps the program is currently at with 2 of the relevant steps highlighted and corresponding percentages of the channels
-
Lights over-ride:
Dial on ends of the lights are also the enter button. Depress and hold until lights come on. This brings up the preset #1 which is bright. Hold again to get preset #2 which is dimmer. -
Got your: TOOTH BRUSH? TEASPOON?
-
NOTHING LEFT ON TOP GLASS?
-
Time Finished
")
")