")


Information
Service for: SME Commercial Finance Pty Ltd 5/15-19 Claremont Street, South Yarra VIC 3141, Australia +61 1300 275 763 Boss: Michael Pratt Assistant: Avanthi Person doing feeding: David
-
Conducted on
STARTERS
The Basics
-
Employee (if second person present mention in notes)
-
Date
-
Time Started
Observations
-
AIR BUBBLES working?
-
Investigate reason. If unable to resolve, INSTALL SPARE, CALL BRUCE IMPORTANT: the air pump here is VITAL LIFE SUPPORT so must be running at all times.
-
Depending on how severe the flow is reduced, If available put on NEW PUMP to see if that resolves. If no change then likely to be the AIRSTONE blocked. Spare in cupboard.
-
FILTER working? (Water movement breaking surface)
-
DO NOT start filter without FULL SERVICE OF FILTER first. If it has been off for longer than a couple of hours then the beneficial bacteria will be dead. Check for AMMONIA and NITRITE levels. Tell Avanthi to pause feeding until further notice.
FISH
-
Photos Before. 1-2 OVERALL. 2-3 CLOSEUPS on PLANTS
-
Green Horsefaces, Angels and Kribensis
-
Take photos of individuals and check for CAUSES. Questions: 1. Is it just an individual or are many affected? 2. Check for uneaten food, levels of ammonia or nitrite. 3. Filter or heater stopped or malfunctioning?
-
Anything on BODY? <br>WHITE SPOTS?<br>FUNGUS?<br>WOUNDS?
-
Take PHOTO of cases and NOTE down details.
-
Plan for LARGE WATER CHANGE (75-90%) with thorough GRAVEL VAC. Use STRESS COAT and BLUE SALTS to guard against chlorine and infection.
-
CONTACT BRUCE IMMEDIATELY
-
Take PHOTO where possible and NOTE down details.
-
Looking good? Place a pinch of TETRABITS in and observe how they eat.
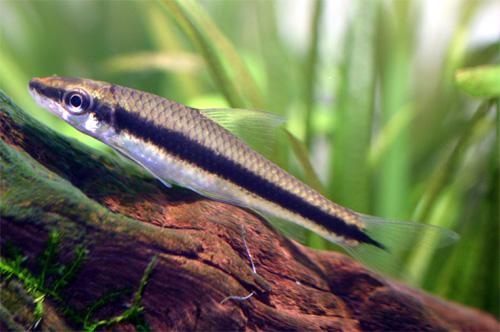
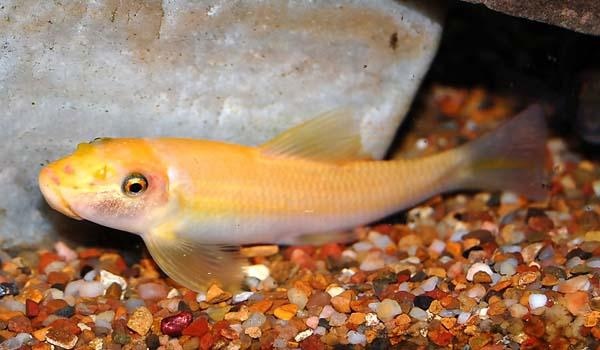
The Workers: SUCKING CATS & FLYING FOXES
-
How's the algae levels on GLASS & PLANTS?
- Lots of soft brown/green dust
- Very clear. A few spots on glass and old leaves
- Furry black algae growing on old leaves, pump, glass
- dark green spots on glass
-
This is an indication that there are no or low numbers of SIAMESE FLYING FOX. Mention in notes.
-
This is an indication that there are no SUCKING CATS. Mention in notes.
-
Check light TIMER and nitrate levels.
PLANTS
-
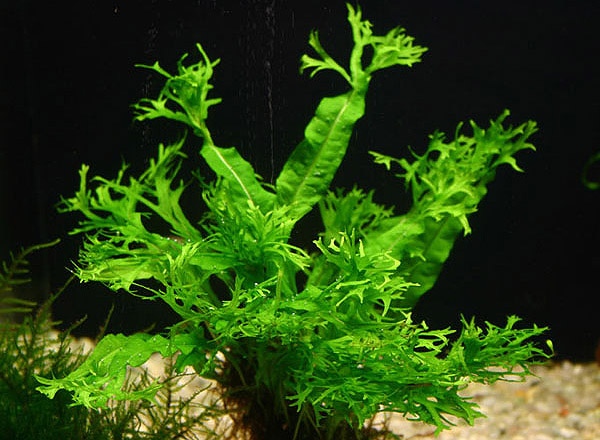
CRESTED JAVA FERN
-
How are they looking?
- Healthy light green new growth, good size
- new growth pale, yellowish, maturing prematurely, smaller than old growth
- lots of old discoloured leaves, holes in them
- curled new growth
-
Remove all old and ageing leaves.
-
Great. Remove any old, ageing leaves by peeling back away from growth direction
-
CURLED & DEFORMED new leaves? May have to review K dosage levels. Possibly too much. Check NITRATE and PHOS and GH and check with BRUCE by SMS.
-
ANUBIAS species
-
How are they looking?
- great. shiny vibrant leaves
- discolouration, prematurely old and yellowing leaves
- curled deformed leaves, lots of dark spotted algae on leaves
-
PEEL AWAY any old and ageing leaves from base
Tests part 1
Tests part 1
-
TEMPERATURE test (ideal 25-26.5 C)
-
A bit too cool. Is heater functioning/plugged in?
-
Replaced?
-
Depending on how long before replacement is likely to be installed then leave post-water change temp approx 26 degrees.
-
Increase THERMOSTAT (clockwise) and make note of how much.
-
Increased THERMOSTAT by:
-
Is THERMOSTAT functioning?
-
Decrease THERMOSTAT (anticlockwise) and note by how much.
-
Decreased THERMOSTAT by:
-
HEATER Replaced?
-
Check with BRUCE, but if the THERMOSTAT doesn't respond to being turned down then better to have a cool tank than risking cooking the fish, so UNPLUG and remove faulty unit.
-
Good. Refill with HEATER or KETTLES OF BOILED WATER in COLD months.
-
Rinse 2 TEST VIALS in tank water: pH (square vial) and GH (large round vial) OPTIONAL EXTRAS: NITRATE & PHOS (small glass) MEASURE 5ml in each and SET ASIDE for later. Tip: use SQUARE VIAL or a SYRINGE to measure an accurate 5ml for the GH.
The Drain
The Drain (50%)
-
Planning on a FILTER SERVICE?
-
Unplug FILTER & HEATER from power.
-
-
As we need to wash out filter media in tank water then good to prepare before Tap here for step by step instructions
-
Unplug FILTER POWER and close both CONNECTOR VALVES
-
Unscrew HOSE CONNECTORS and lift out entire unit to sink
-
Remove media (take note of order) and place in buckets. Empty the canister bucket water over a net to catch any heavy debris
-
Start SYPHON as per FAST DRAIN below and wash media and rinse filter bucket. Leave media aside immersed in water to be assembled later
FAST DRAIN
-
Tap for notes
-
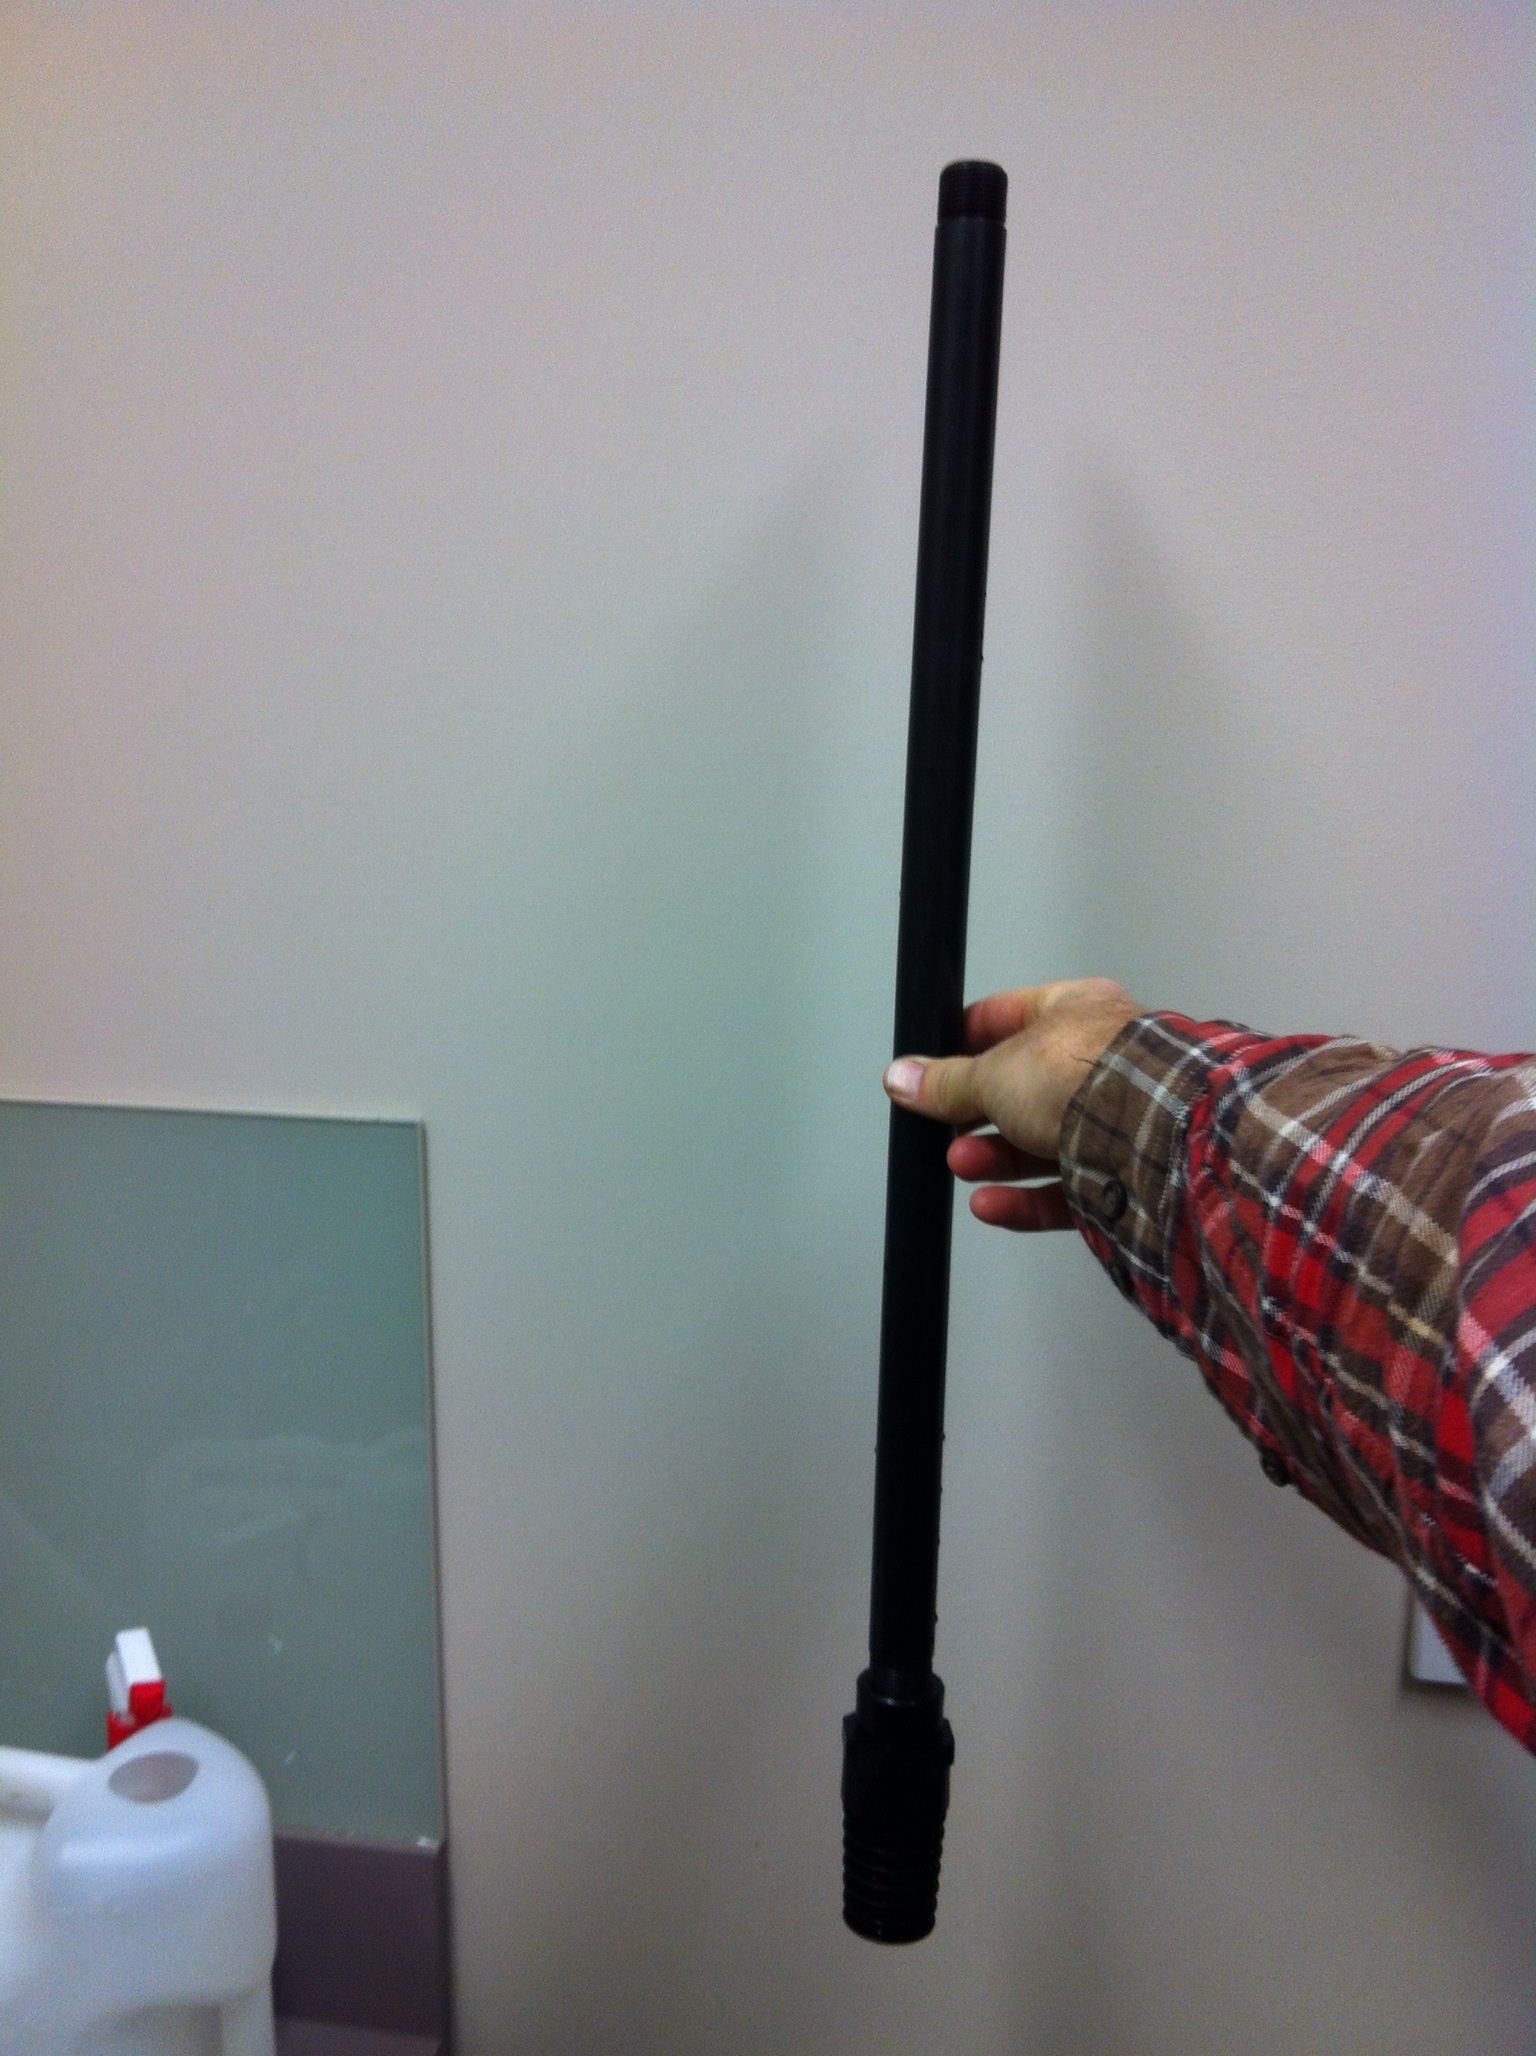
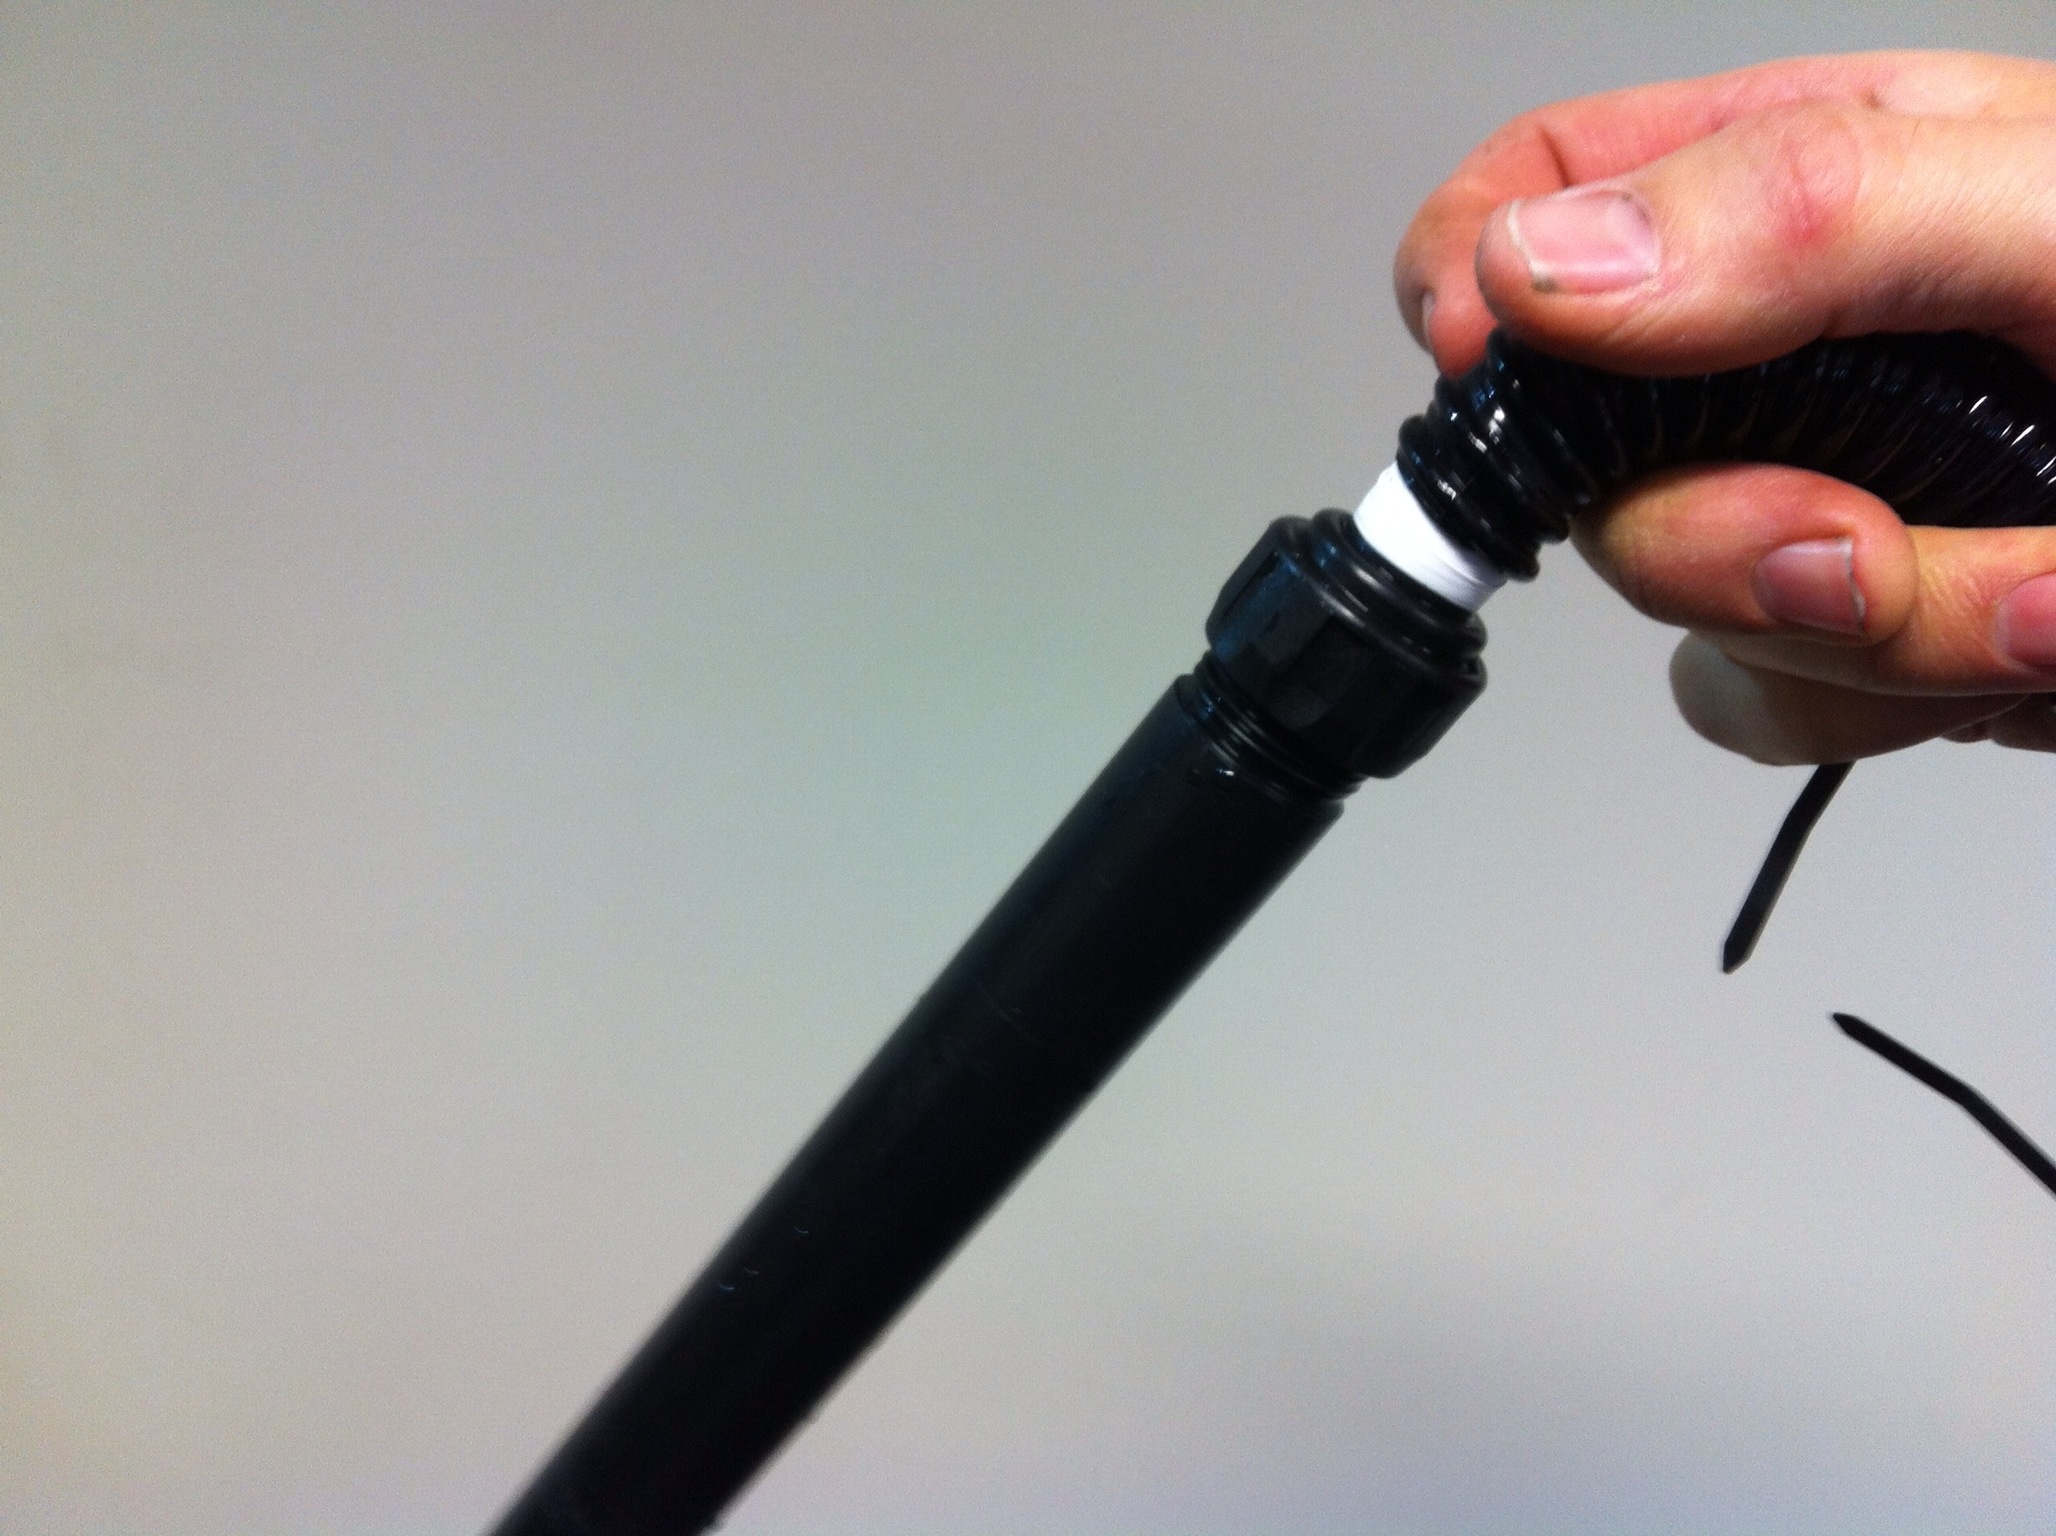
SERVICE PIPE
-
Screw SERVICE PIPE (with BASKET STRAINER) to HOSE and hang in tank.
No suction cups required at this end.
Cup thumb and forefinger on end and suck for 2 seconds to START SYPHON. -
BOTH SUCTION CUPS secure in sink?
-
NET on outlet to prevent solids going down sink?
The Refill
The Refill
-
-
In COLD months, combination of 2-3 jugs of boiled water from kitchen SOUP HEATER; If floating type can use immediately, if only regular HANG-ON variety can be used once water level is safely covering HEATING ELEMENT REMEMBER: always plug into WALL OUTLET. Try to find OPEN SPACE, away from plants.
-
Attach FILLING ADAPTOR HOSE ASSEMBLY to drain end of HOSE
-
FLUSH tap line for 4 seconds
-
Fit hose to TAP and gently open up to a SUITABLE FILL RATE (slower in colder months)
-
In COLD months, combination of 2-3 jugs of boiled water from kitchen (other end of the floor) SOUP HEATER; If floating type can use immediately, if only regular HANG-ON variety can be used once water level is safely covering HEATING ELEMENT REMEMBER: always plug into WALL OUTLET. Try to find OPEN SPACE, away from plants.
Things To Do During Refill
-
FILTER SERVICE?
-
Tap here for step-by-step instructions for reassembly
-
DID the DRAIN go BELOW the filter INTAKE (large water change)?
-
Water level high enough for FILTER? (INTAKE BASKET STRAINER MUST BE UNDER WATER) If draining dropped the WATER LEVEL below INTAKE BASKET STRAINER, then the line will need to be PRIMED FIRST==> disconnect at filter end and drain into bucket to bleed the line first before connecting to filter
-
CONNECT the now-empty OUT line pipe to the corresponding OUT connection of the filter. Should thread on easily. Leave the valve OPEN
-
CONNECT the STILL-FULL-OF-WATER IN line hose to the corresponding IN connection of the filter. IF WATER LEVEL WITHIN 300mm from top of the tank then:
-
OPEN up the valve connector of the IN hose. You should hear water moving strongly into the filter for about 10-15 seconds
-
Once the flow of water has stopped, PLUG IN and SWITCH ON power to the filter
-
SPRAY BAR should be angled slightly upwards to disturb the water surface once the tank is full
-
Remove impeller assembly, wash with toothbrush, including the impeller seat in the motor head itself.
-
Re seat the impeller and replace the impeller cover. Be sure that the locking nut has properly locked the cover in place
-
Place filter media baskets back in correct order (they are slightly different in size so only fit in one position).
-
Rinse the rubber seal and surrounding area of the motor head and check that the rim of the filter bucket is free from grit of any sort
-
Place motor head on filter bucket and pull the locks down two opposing corners at a time. Use old or make new strips of packing to bite under the locking latches to give a stronger seal
-
Bring assembled filter back to the tank, taking note of which is the IN and which is the OUT connector. BUT, before connecting:
-
If water level is still below the OUT SPRAY BAR, then, holding a bucket under the OUT pipe outlet, open up the connector valve and drain the water out of the OUT PIPE. IF water still not higher enough, pause here and come back when ready
-
DID the DRAIN go BELOW the filter INTAKE (large water change)?
-
Water level high enough for FILTER? (INTAKE BASKET STRAINER MUST BE UNDER WATER) If draining dropped the WATER LEVEL below INTAKE BASKET STRAINER, then the line will need to be PRIMED FIRST==> disconnect at filter end and drain into bucket to bleed the line first before connecting to filter
-
CONNECT the now-empty OUT line pipe to the corresponding OUT connection of the filter. Should thread on easily. Leave the valve OPEN
-
CONNECT the STILL-FULL-OF-WATER IN line hose to the corresponding IN connection of the filter. IF WATER LEVEL WITHIN 300mm from top of the tank then:
-
OPEN up the valve connector of the IN hose. You should hear water moving strongly into the filter for about 10-15 seconds
-
Once the flow of water has stopped, PLUG IN and SWITCH ON power to the filter
-
SPRAY BAR should be angled slightly upwards to disturb the water surface once the tank is full
-
CONNECT the now-empty OUT line pipe to the corresponding OUT connection of the filter. Should thread on easily. Leave the valve OPEN
-
CONNECT the STILL-FULL-OF-WATER IN line hose to the corresponding IN connection of the filter. IF WATER LEVEL WITHIN 300mm from top of the tank then:
-
OPEN up the valve connector of the IN hose. You should hear water moving strongly into the filter for about 10-15 seconds
-
Once the flow of water has stopped, PLUG IN and SWITCH ON power to the filter
-
SPRAY BAR should be angled slightly upwards to disturb the water surface once the tank is full
OTHER TASKS
-
CLEAN GLASS; magnet cleaner. INSPECT both sides first for grit!
-
Clean COVERGLASS, both REMOVABLE & underside of FIXED PIECE; sponge or blade often best on this as often a single coat of slime algae built up from bubbles wetting it.
-
Water level high enough for HEATER? (Over 50% of element under water) SWITCH ON.
Tests (continued)
-
pH Test? 3 drops in 5ml. (ideal range 7-7.1)
-
ADD approx 1 tsp CORAL SAND.
-
ADD approx 2 tsp CORAL SAND
-
Is this expected? Been a recent large dose of coral sand last time?
-
Rinse test tube thoroughly and retest. (Any traces of ammonia or GH tester solution will give a false alkaline reading)
-
WOAH! Unlikely! Rinse test tube thoroughly and retest. (Any traces of AMMONIA TEST or GH TEST solutions will give a false alkaline reading) If still high then we must assume that there has been an excess amount of coral sand and all we can do is water change. It will eventually come down as the coral sand dissolves.
-
GH TEST. number of drops to turn from ORANGE to GREEN
-
SIZE of water change:
-
ADD up to 2 TSP SALTS
-
NOTE: NO SALTS DIRECTLY ON PLANTS OR SAND!! - The methylene blue in this salt stains. PREMIX in cup of HOT WATER before pouring in. Kitchen at opposite end had BOILED WATER tap.
-
ADD up to 3 TSP SALTS
-
NOTE: NO SALTS DIRECTLY ON PLANTS OR SAND!! - The methylene blue in this salt stains. PREMIX in cup of HOT WATER before pouring in. Kitchen at opposite end had BOILED WATER tap.
-
ADD up to 4 TSP SALTS
-
NOTE: NO SALTS DIRECTLY ON PLANTS OR SAND!! - The methylene blue in this salt stains. PREMIX in cup of HOT WATER before pouring in. Kitchen at opposite end had BOILED WATER tap.
-
Depending on SIZE of WATER CHANGE, add NO SALTS and let WC reduce the GH.
-
NITRATE TEST (Optional, on request)
-
PHOSPHATE TEST (Optional, on request)
Additives
-
Salts added? (Low GH)
-
How many teaspoons?
-
Coral sand added? (Low pH)
-
How many teaspoons?
-
BASIC-GRO dose (1capful/ 5ml usual)
-
How much?
Packing up
SUPPLIES ; in OFFICE, by PRINTER. ANY REFILLING IN SINK OR OUTSIDE!
-
SALTS refill?
-
FOOD REPLACE/ REFILL?
-
WHICH KIND?
- TETRABITS
- SPIRULINA FLAKES
- SPIRULINA TABLETS
- DISCUS PELLETS
- None
-
Will any need replacing next month?
- TETRABITS
- SPIRULINA FLAKES
- SPIRULINA TABLETS
- DISCUS PELLETS
- None
-
DAILY-GRO dropper bottle topped up?
-
BASIC-GRO refill supplied? <br>NOTE: only WE use this.
-
HOW MUCH IS LEFT?
-
DAILY-GRO main supply refill supplied?
-
HOW MUCH IS LEFT?
-
Can put in a small pinch of TETRABITS as departing treat :)
Equipment Check
AUTO FEEDER
-
AUTO FEEDER topped up?
-
Make sure the opening has not shifted. Run a test feed to check its putting in not too much/too little food
-
If the barrel is still pretty full (we only come every 4 weeks) then possibly the opening is closed or not open enough. Also maybe program not activated. See below
-
BATTERIES OK?
-
Replace batteries (2 x AA, ask AVANTHI )
-
Make note in ACTION here and address to Bruce
-
Replace batteries (2 x AA, ask AVANTHI ), NOTE DOWN PROGRAM TIMES FIRST as you'll lose all info!
-
Make note in ACTION here and address to Bruce
-
TIME OF DAY CORRECT?
-
FEEDER ARROWS SHOWING?
-
Make ACTION note here for Bruce and activate a conservative setting of: 2 programs with one rotation (one downward ⬇️) per time programmed
-
AUTO FEEDER returned to position and tested?
LIGHT TIMER
-
TIMER on AUTO and correct PHASE for that time of day?<br>>Should lights be ON or OFF at this time?<br>(Scroll through the 4 options with UP key.)
-
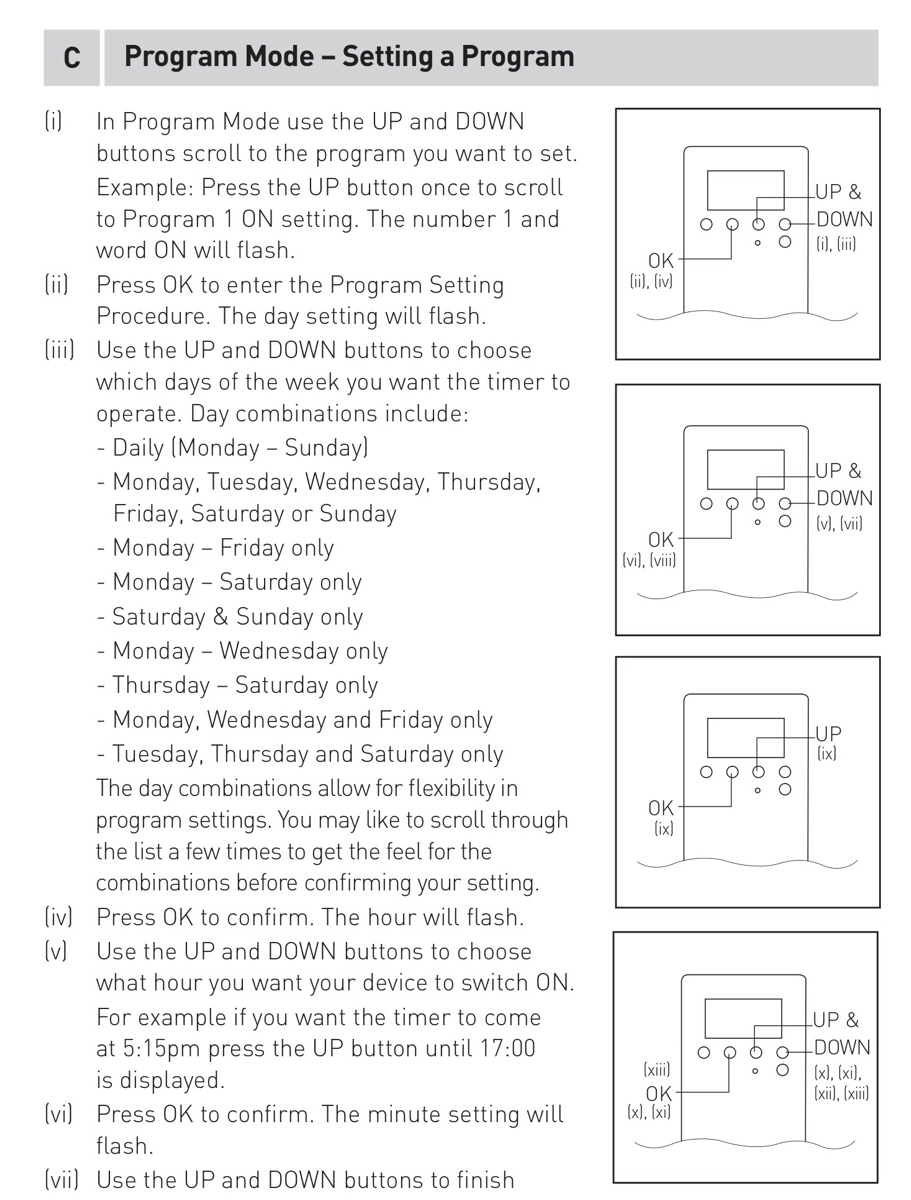
Press menu button to bring up Program Mode.
It will automatically show the ON time.
Use UP button to then show the OFF time
Press MENU twice (it will go past a countdown option that we don't use) to get back to the main clock screen -
Timer on the correct time?
-
Press the RCL button to easily advance or retard the time by 1 hour depending on what's needed.
-
Can you Account for this discrepency? Eg. Power Failure
-
Details of cause:
-
-
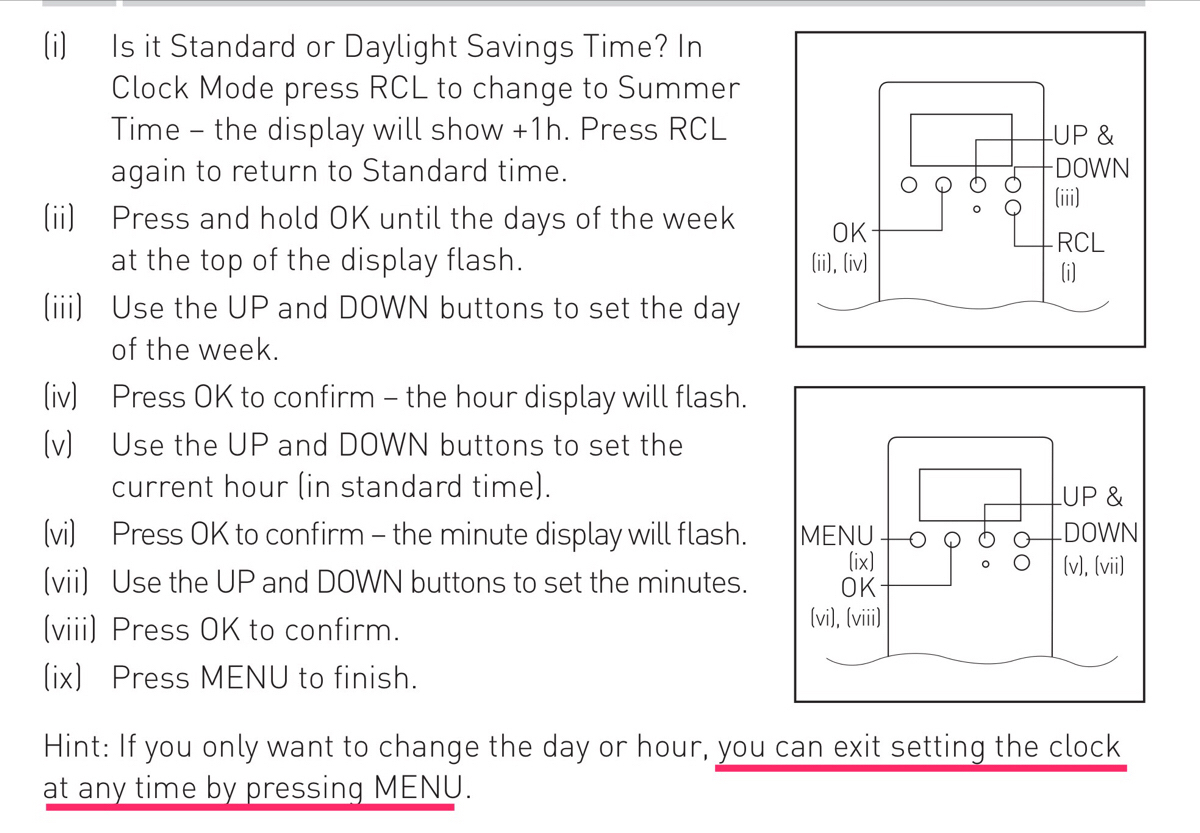
Setting the time of day
-
Is there other issues reported? Such as light failing to come on or go off? If the staff report it otherwise behaving normally (other than the lights coming on at earlier or later times that correspond with the discrepancy) then simply correct the clock to the right time.
-
Perhaps a reset?: Use paper clip or similar to depress the reset button and reset time and reprogram for ON at 9am and OFF at 4:30pm<br>TEST by setting setting it to AUTO OFF and setting the clock at 1 minute before the ON time and confirm that it turns on the light, <br>Then same with AUTO ON and with the clock set to 1 minute before the programmed OFF time and confirm that the light turns OFF
-
Setting the time of day
-
Programming page 1
-
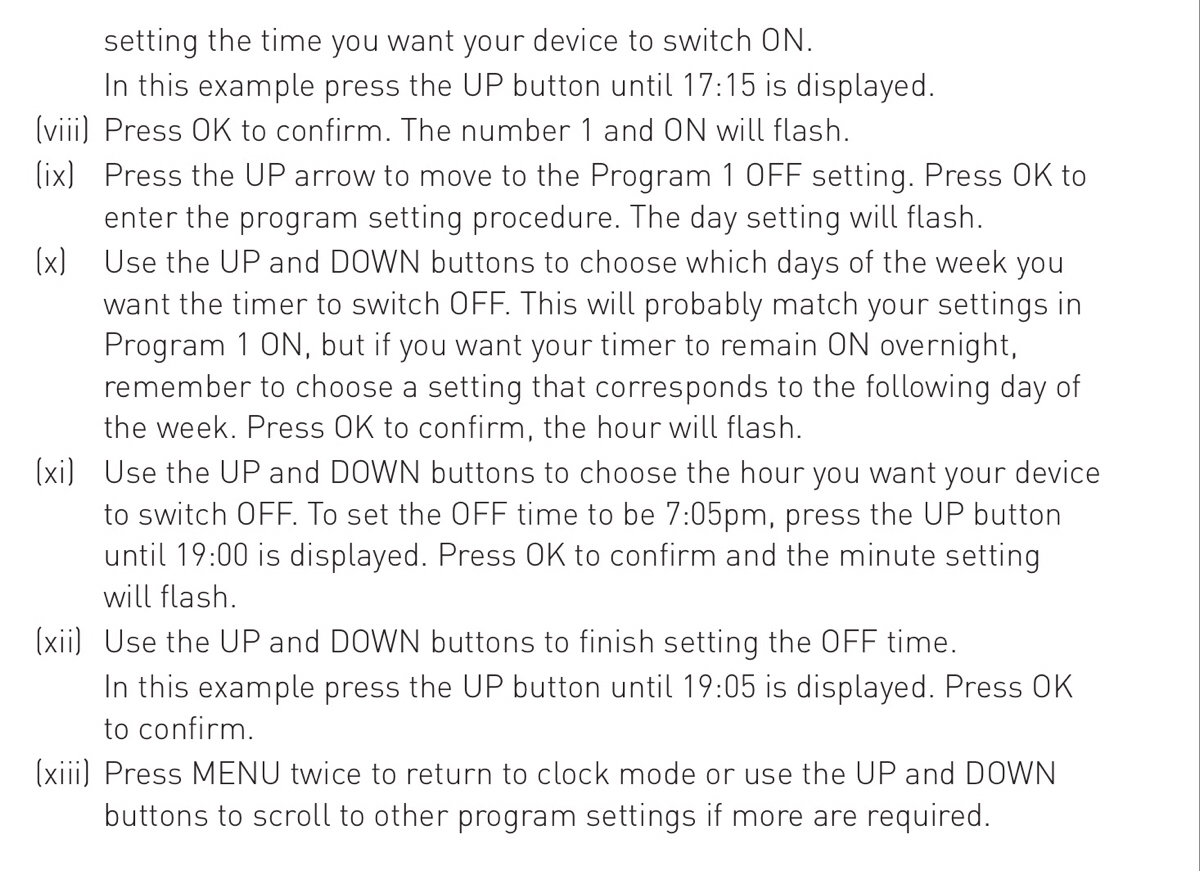
Programming page 2
-
Did this fix the problem?
-
Safest to remove this unit. Replacement Installed?
-
IMPORTANT! Remove and notify the staff. They will have to MANUALLY turn on and off until a new one is sourced. Leave old timer there so they can match the settings if they have to get one themselves. Make a follow up field here
-
-
Setting the time of day
-
LIGHT: LED working?
-
Details
-
Return LIGHT SCAFFOLDING back to centre if you've moved it
-
Return removable piece of COVERGLASS, well centered, with Maximum coverage.
-
Notes
FINAL CHECKS
-
HEATER, AIRPUMP and FILTER ON and functioning?
-
OUTSIDE GLASS, CABINETRY etc CLEAN & DRY?
-
Got your: BASKET STRAINER? TOOTH BRUSH? TEASPOON?
-
Photos After. 1 x OVERALL. CLOSEUPS of any changes
-
Time Finished
")
")