")


Information
AUDIT FOR LEWENBERG & LEWENBERG 1/340 Little Lonsdale St, Melbourne VIC 3000, Australia +61 3 9600 0888 FRONT DESK: Lisa BOSSES: Vivian and Alex Lewenberg ADMIN MANAGEMENT: Buddhi (pron. Buddy)
-
Conducted on
STARTERS
The Basics
-
Employee (any extras present list in notes)
-
Time Started
Observations
-
Photos Before. 2 each; front and back
-
All three pumps have been working?
-
Which ones not pumping?
- TOP
- MIDDLE
- BOTTOM
-
Unplugged or Something else?
-
Plan for service to that pump. If this doesn't fix it then make follow-up and bring to BRUCE's attention.
FISH
TOP Thread-fin Rainbows and Ember Tetras
-
How are the fish in the TOP tank?
-
Take photos of individuals and check for CAUSES. Questions: 1. Is it just an individual or are many affected? 2. Check for uneaten food, levels of ammonia or nitrite. 3. Filter or heater stopped or malfunctioning?
-
Anything on BODY? <br>WHITE SPOTS?<br>FUNGUS?<br>WOUNDS?
-
Take PHOTO of cases and NOTE down details.
-
Plan for LARGE WATER CHANGE (75-90%) with thorough GRAVEL VAC. Use STRESS COAT and BLUE SALTS to guard against chlorine and infection.
-
CONTACT BRUCE IMMEDIATELY
-
Looking good? Place a small pinch of SPIRULINA FLAKES (or a couple of ground-between-your-fingers grains of TETRABITS) in and observe how they eat.
MIDDLE Platies and White-finned Tetras
-
How are the fish in the MIDDLE tank?
-
Take photos of individuals and check for CAUSES. Questions: 1. Is it just an individual or are many affected? 2. Check for uneaten food, levels of ammonia or nitrite. 3. Filter or heater stopped or malfunctioning?
-
Anything on BODY? <br>WHITE SPOTS?<br>FUNGUS?<br>WOUNDS?
-
Take PHOTO of cases and NOTE down details.
-
Plan for LARGE WATER CHANGE (75-90%) with thorough GRAVEL VAC. Use STRESS COAT and BLUE SALTS to guard against chlorine and infection.
-
CONTACT BRUCE IMMEDIATELY
-
Looking good? Place a small pinch of SPIRULINA FLAKES (or a couple of ground-between-your-fingers grains of TETRABITS) in and observe how they eat.
BOTTOM Assorted Aus and New Guinean Rainbow Fish
-
How are the fish in the BOTTOM tank?
-
Take photos of individuals and check for CAUSES. Questions: 1. Is it just an individual or are many affected? 2. Check for uneaten food, levels of ammonia or nitRITE. 3. Filter or heater stopped or malfunctioning?
-
Anything on BODY? <br>WHITE SPOTS?<br>FUNGUS?<br>WOUNDS?
-
Take PHOTO of cases and NOTE down details.
-
Plan for LARGE WATER CHANGE (75-90%) with thorough GRAVEL VAC. Use STRESS COAT and BLUE SALTS to guard against chlorine and infection.
-
CONTACT BRUCE IMMEDIATELY
-
Looking good? Place a small pinch of SPIRULINA FLAKES in and observe how they eat.
The Workers: SUCKING CATS & FLYING FOXES
TOP
-
SUCKING CAT/s sighted? (1-2)
-
SIAMESE FLYING FOX/es sighted? (2-3)
-
How's the algae levels on GLASS, ROCKS & PLANTS? (Note: multiple answers possible)
- Lots of soft brown/green dust everywhere
- Very clear. Small to moderate cover of green spots on glass and old leaves
- Furry black algae growing on old leaves; pump; Rocks;glass
- heavy with stubborn green spots on glass
- dark green algae all over rocks
-
FURRY BLACK ALGAE is an indication that possibly there are no or low numbers of SIAMESE FLYING FOX. Mention in notes.
-
Remove as much as possible, prune old affected leaves off plants. Vacuum up loose pieces from after cleaning glass. If heavily on rocks then remove and pour boiling water over them. This will kill the algae (will turn soft green under light) and the fish will eat it)
-
BROWN DUST and FINE GREEN ALGAE is possibly an indication that there are no SUCKING CATS. Mention in notes.
-
This is usually not a very aggressive algae so treat it if you have time. Try scrubbing with toothbrush in situ. If this is not working then they may need to be sterilised in boiling water. This will kill the algae and it will be easily eaten by the fish over the next days
-
Check LIGHT TIMER and nitRATE levels.
-
Plan for an "Adrian Special" treatment: BEFORE draining, turn OFF pumps, scrape all of every glass surface and carefully brush clean all rocks Then drain 80% water.
PLANTS
TOP
-
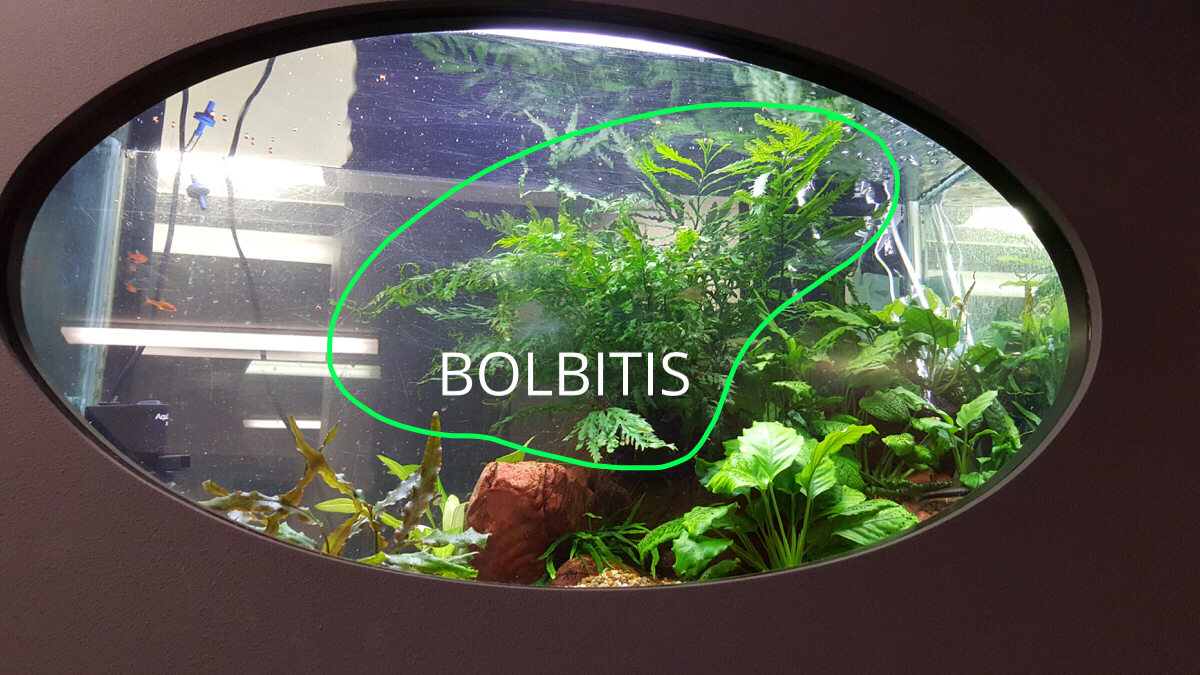
BOLBITIS FERN (tap for picture)
-
BOLBITIS
-
How is the BOLBITIS looking?
- shiny and strong deep green new leaves
- older leaves pretty good, low algae
- new leaves small, twisted, algae spots on all leaves
- some dark, old and algae-covered leaves
-
Take off any old leaves that look on the way out (PEEL with fingers away from base or SNIP with scissors as close to base as possible)
-
CURLED & DEFORMED new leaves? May have to review K dosage levels. Possibly too much. Do tests & check with BRUCE by SMS. Perhaps too much light
-
Great. Take off any old leaves that look on the way out or have dark algae spots on them (peel with fingers away from base or snip with scissors as close to base as possible)
-
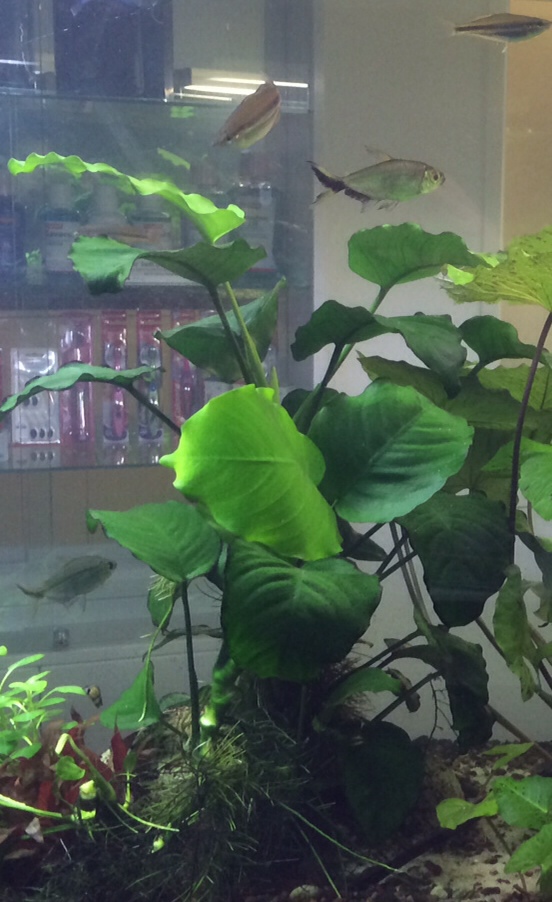
ANUBIAS (tap for picture)
-
ANUBIAS
-
How are the ANUBIAS looking?
- shiny and strong deep green new leaves
- older leaves pretty good, low algae
- new leaves small, twisted, algae spots on all leaves
- some dark, old and algae-covered leaves
-
Take off any old leaves that look on the way out (PEEL with fingers away from base or SNIPwith scissors as close to base as possible)
-
CURLED & DEFORMED new leaves? May have to review K dosage levels. Possibly too much. Do tests & check with BRUCE by SMS. Perhaps too much light
-
Great. Take off any old leaves that look on the way out or have dark algae spots on them (peel with fingers away from base or snip with scissors as close to base as possible)
-
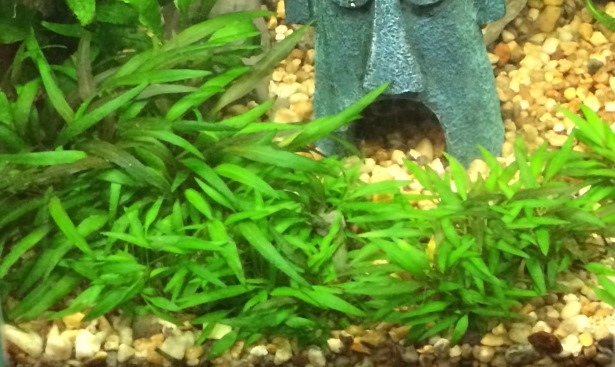
CRYPTS (tap for picture)
-
CRYPTS
-
How are the CRYPTS looking?
- shiny healthy deep green and strong new leaves,
- old leaves ageing well, minimum algae spots
- new leaves smaller than the older
- lots of algae spots on leaves
- deformed twisted leaves
- leaves weak and floppy, older leaves. spread out,
- prematurely aging, discoloured leaves
-
Possibly a deficiency in PHOS which is a mobile nutrient. If phos levels sufficient then possibly not enough K. check with BRUCE by SMS.
-
PEEL AWAY any old and ageing leaves from base
-
Possibly low in NITRATE and/or POTASSIUM (K) or CO2 not working CHECK levels. (Section 4). 10ppm or more with still poor growth possibly means therefore not enough K and thus they are being starved. Contact Bruce for further instructions.
-
CURLED & DEFORMED new leaves? May have to review K dosage levels. Possibly too much. Do tests & check with BRUCE by SMS.
-
Possibly a lack of K and/or CO2. Check nitrate and phos levels and check co2 system
-
Great. Peel away any old leaves that look on the way out
-
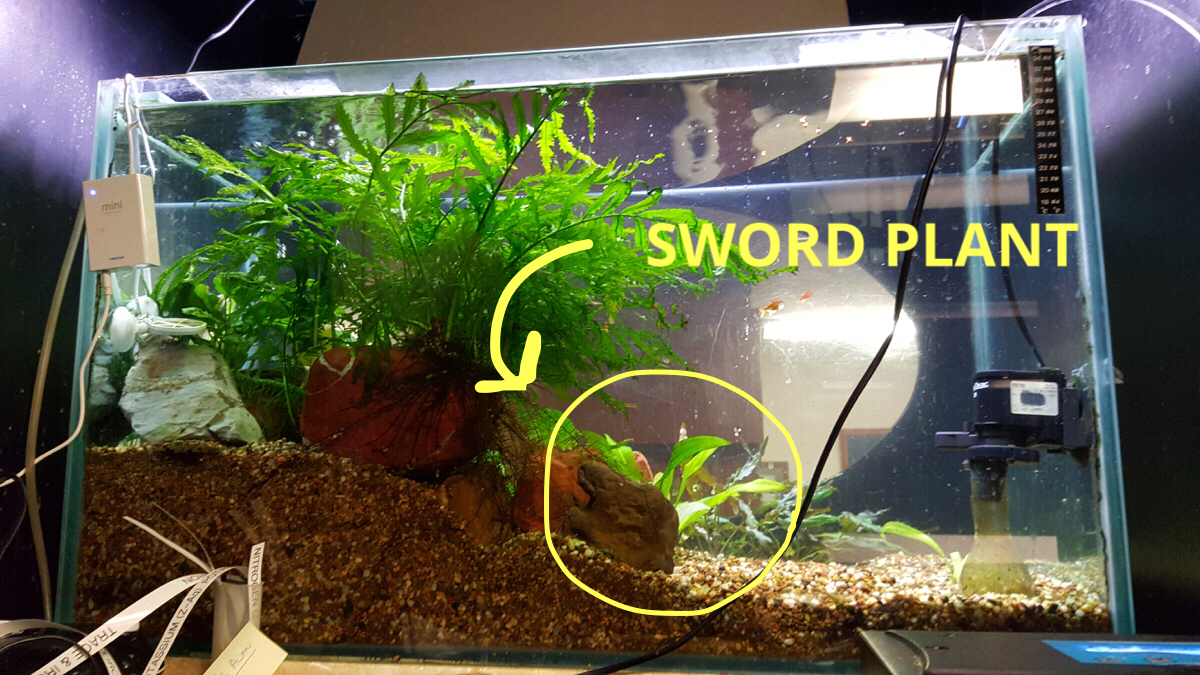
AMAZON SWORD (tap for picture)
-
SWORD PLANT
-
How is the AMAZON SWORD looking?
- shiny healthy deep green and strong new leaves,
- old leaves ageing well, minimum algae spots
- new leaves smaller than the older
- lots of algae spots on leaves
- deformed twisted leaves
- leaves weak and floppy, older leaves. spread out,
- prematurely aging, discoloured leaves
-
Possibly a deficiency in PHOS which is a mobile nutrient. If phos levels sufficient then possibly not enough K. check with BRUCE by SMS.
-
PEEL AWAY any old and ageing leaves from base
-
Possibly low in NITRATE and/or POTASSIUM (K) or CO2 not working CHECK levels. (Section 4). 10ppm or more with still poor growth possibly means therefore not enough K and thus they are being starved. Contact Bruce for further instructions.
-
CURLED & DEFORMED new leaves? May have to review K dosage levels. Possibly too much. Do tests & check with BRUCE by SMS.
-
Possibly a lack of K and/or CO2. Check nitrate and phos levels and check co2 system
-
Great. Peel away any old leaves that look on the way out
MIDDLE
-
BLYXA JAPONICA (tap for photo)
-
BLYXA
-
How is the BLYXA looking?
- great. large, light green new growth. old growth slightly darker but still intact
- OK. medium quality new growth. not spreading but each piece is well rooted and old growth hasn't prematurely fallen off
- old leaves prematurely old. (may be also eaten off)
- poor. new growth short, dark and slow. old leaves perhaps eaten away. roots week
-
Great. Manage any over-growth (pushing up to glass, swamping other smaller plants) by thinning out and replanting to any thinner areas.
-
Possibly low in NITRATE and/or POTASSIUM (K) CHECK levels. (Section 4). 10ppm or more with still poor growth possibly means therefore not enough K and thus they are being starved. Contact Bruce for further instructions.
-
Possibly a deficiency in PHOS which is a mobile nutrient. If phos levels sufficient then possibly not enough K. check with BRUCE by SMS.
-
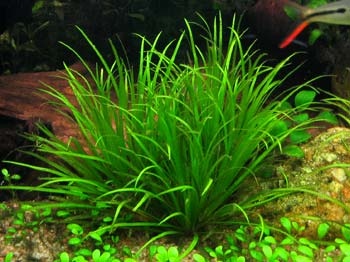
STAURAGYNE. (Tap for picture)
-
STAURAGYNE
-
How is the STAURAGYNE looking?
- good. healthy bright green star-shaped new growth
- new and old growth nibbled
- poor. old growth dark and nibbled and new growth small, slow, stunted
- curled/deformed new growth
-
New growth is the fish eating it! Clearly need to increase their green diet. Take photos and notify Bruce.
-
Possibly low in NITRATE and/or POTASSIUM (K) CHECK levels. (Section 4). 10ppm or more with still poor growth possibly means therefore not enough K and thus they are being starved. Contact Bruce for further instructions.
-
CURLED & DEFORMED new leaves? May have to review K dosage levels. Possibly too much. Do tests & check with BRUCE by SMS.
-
Great. Prune any healthy taller stems and replant to improve coverage of ground.
-
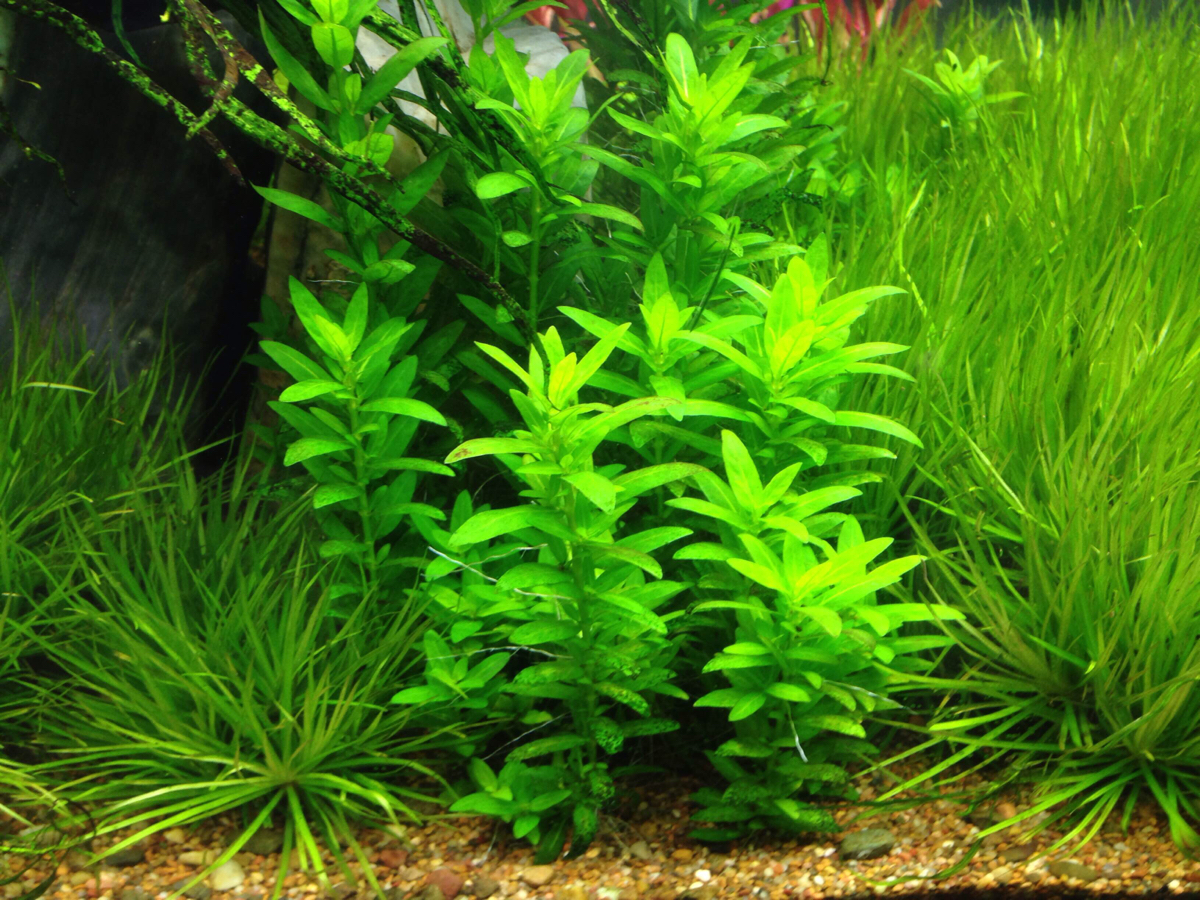
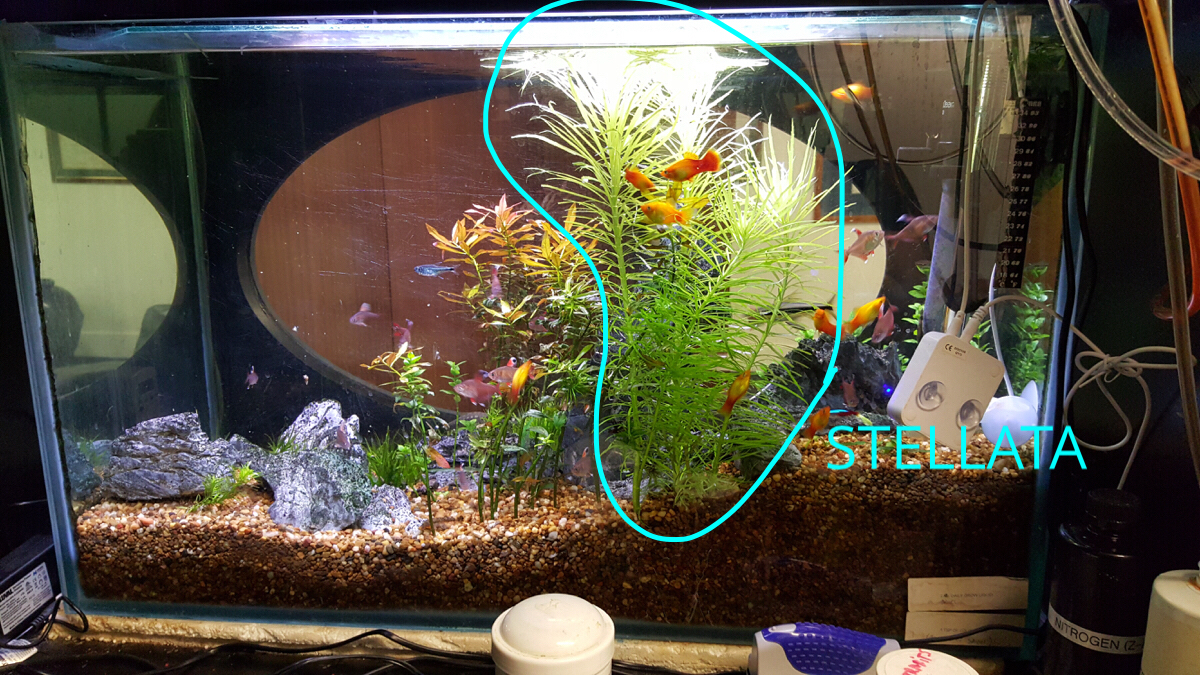
STELLATA (Tap for picture)
-
POGOSTOMON STELLATA
-
How is the STELLATA looking?
- great, health light feathery green new growth, pink in the growth head
- stems getting close to surface
- old leaves prematurely aging/falling off
- stunted or small new growth, old leaves look eaten
- twisted/malformed new growth
-
CUT approx in half and, If healthy, reduce HEADLESS STALK by a further 50% and replant heads on front to hide the stalk.
-
Possibly low in NITRATE and/or POTASSIUM (K) or CO2 not working CHECK levels. (Section 4). 10ppm or more with still poor growth possibly means therefore not enough K and thus they are being starved. Check CO2 functioning properly. Contact Bruce for further instructions.
-
Great. Be sure to SHORTEN DOWN any that are getting too close to the surface. Typically slightly lower than the wood that passes by it.
-
Premature ageing is possibly a deficiency in PHOS which is a mobile nutrient. (Here only available via the fish food) If phos levels sufficient then possibly not enough K. check with BRUCE by SMS.
-
CURLED & DEFORMED new leaves? May have to review K dosage levels. Possibly too much. Do tests & check with BRUCE by SMS.
BOTTOM
-
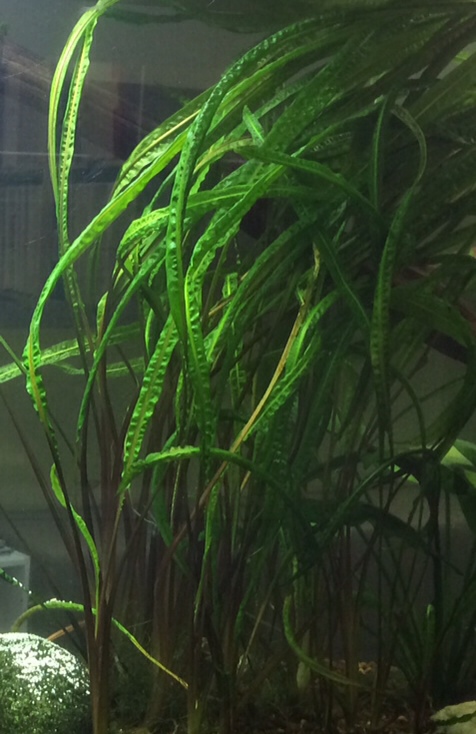
CRYPTS BALANSAE (tap for picture)
-
CRYPT BALANSAE
-
How are the CRYPTS BALANSAE looking?
- great. Healthy shiny lustre. new growth good size, slightly curved upwards
- prematurely aged older leaves (possibly with algae spots)
- pale, slightly yellow leaves
- many leaves curled downwards, not holding their own weight.
- curled or bumpy deformed leaves, possibly lots of dark spotted algae on leaves
- slow growth. new leaves remaining small, stunted.
- surface pads
-
Possibly a deficiency in PHOS which is a mobile nutrient. If phos levels sufficient then possibly not enough K. check with BRUCE by SMS.
-
PEEL AWAY any old and ageing leaves from base
-
Possibly low in NITRATE and/or POTASSIUM (K) or CO2 not working CHECK levels. (Section 4). 10ppm or more with still poor growth possibly means therefore not enough K and thus they are being starved. Contact Bruce for further instructions.
-
CURLED & DEFORMED new leaves? May have to review K dosage levels. Possibly too much. Do tests & check with BRUCE by SMS.
-
CRYPTS (tap for picture)
-
CRYPTS
-
How are the CRYPTS looking?
- shiny healthy deep green and strong new leaves,
- old leaves ageing well, minimum algae spots
- new leaves smaller than the older
- lots of algae spots on leaves
- deformed twisted leaves
- leaves weak and floppy, older leaves. spread out,
- prematurely aging, discoloured leaves
-
Possibly a deficiency in PHOS which is a mobile nutrient. If phos levels sufficient then possibly not enough K. check with BRUCE by SMS.
-
PEEL AWAY any old and ageing leaves from base
-
Possibly low in NITRATE and/or POTASSIUM (K) or CO2 not working CHECK levels. (Section 4). 10ppm or more with still poor growth possibly means therefore not enough K and thus they are being starved. Contact Bruce for further instructions.
-
CURLED & DEFORMED new leaves? May have to review K dosage levels. Possibly too much. Do tests & check with BRUCE by SMS.
-
Possibly a lack of K and/or CO2. Check nitrate and phos levels and check co2 system
-
Great. Peel away any old leaves that look on the way out
-
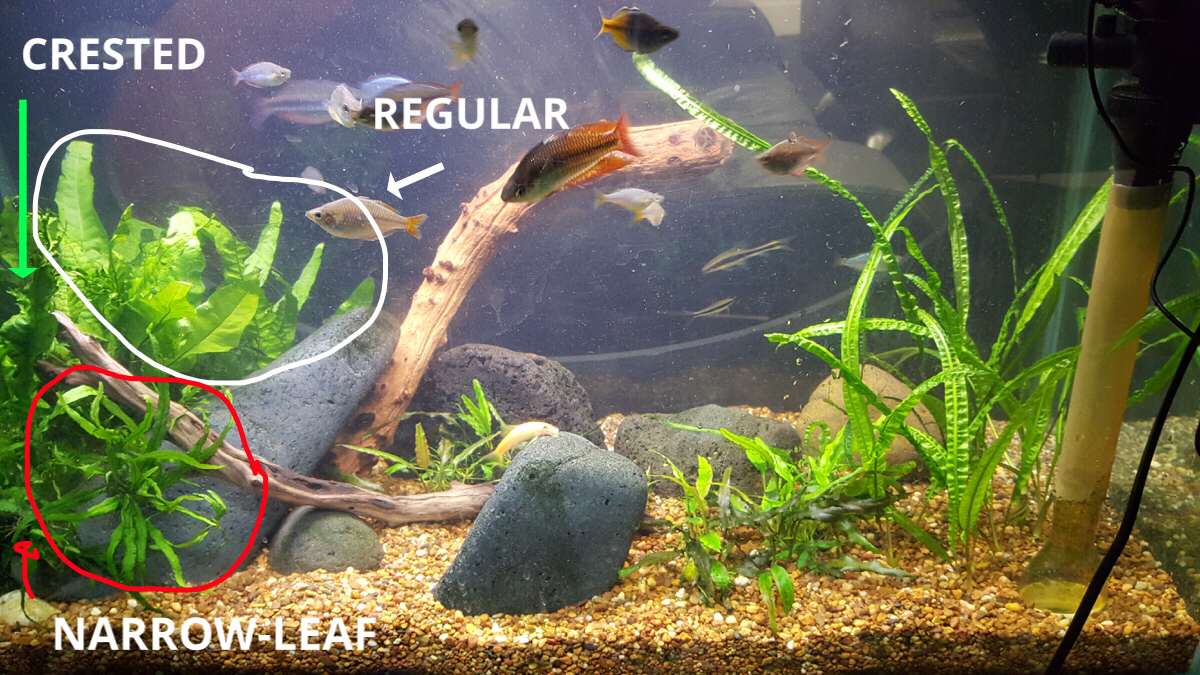
JAVA FERN, REGULAR, CRESTED & NARROW LEAF forms (tap for picture)
-
JAVA FERNS
-
How are the JAVA FERNS looking?
- BRIGHT LIGHT GREEN GROWTH
- HAS OLD PERFORATED LEAVES
- SOME PIECES UNATTACHED/FLOATING ABOUT
- BLACK DISCOLOURED LEAVES
-
Take off any old leaves that look on the way out (PEEL with fingers away from base or SNIP with scissors as close to base as possible)
-
Great. Take off any old leaves that look on the way out or have dark algae spots on them (peel with fingers away from base or snip with scissors as close to base as possible)
-
If in abundance (eg. Lots of baby shoots detached from old leaves) then remove otherwise see if you can anchor between some rocks or jam onto the wood somewhere.
Tests part 1
Setup
-
SHIFT LIGHT UNITS back a little to allow front cover glass to be removed. They can rest on top of the lights
Tests part 1 NOTE: only MIDDLE tanks has a heater, TOP & BOTTOM are heated through ambient warmth.
TOP
-
TEMPERATURE test (ideal 24-26 C)
-
Most LIKELY EXPLANATION is a RECENT WATER CHANGE has happened <br><br>OR LIGHTS have been off, thus not as much heat produced. Any of these?
-
This is most unlikely so double check reading. Perhaps lights have been on 24/7...? Is it particularly warm in the office? Make a follow-up note here
-
Good. Refill with HEATER or KETTLES OF BOILED WATER in COLD months and with water changes 50% or greater
MIDDLE
-
TEMPERATURE test (ideal 24-26 C)
-
Most LIKELY EXPLANATION is a RECENT WATER CHANGE has happened <br><br>OR LIGHTS have been off, thus not as much heat produced. Any of these?
-
This is most unlikely so double check reading. Perhaps lights have been on 24/7...? Is it particularly warm in the office? Make a follow-up note here
-
Good. Refill with HEATER or KETTLES OF BOILED WATER in COLD months and with water changes 50% or greater
BOTTOM TANK
-
TEMPERATURE test (ideal 24-26 C)
-
Most LIKELY EXPLANATION is a RECENT WATER CHANGE has happened <br><br>OR LIGHTS have been off, thus not as much heat produced. Any of these?
-
This is most unlikely so double check reading. Perhaps lights have been on 24/7...? Is it particularly warm in the office? Make a follow-up note here
-
Good. Refill with HEATER or KETTLES OF BOILED WATER in COLD months and with water changes 50% or greater
WATER SAMPLES
-
Rinse 8 TEST VIALS in corresponding tank water: (Extra plastic vials should be on shelf) TOP: 1 X pH 1 X GH MID: 1 X pH 1 X GH 1 x NITRATE 1 x PHOS BOTTOM: 1 X pH 1 X GH MEASURE 5ml in each and SET ASIDE for later. TIP: the accuracy of the 5ml for the pH is not so important. The GH however needs to be more accurate.
The Drain
The Drain (50%)
-
Switch off BOTTOM and MIDDLE pumps.
GRAVEL VACUUM
-
THE DRAIN
-
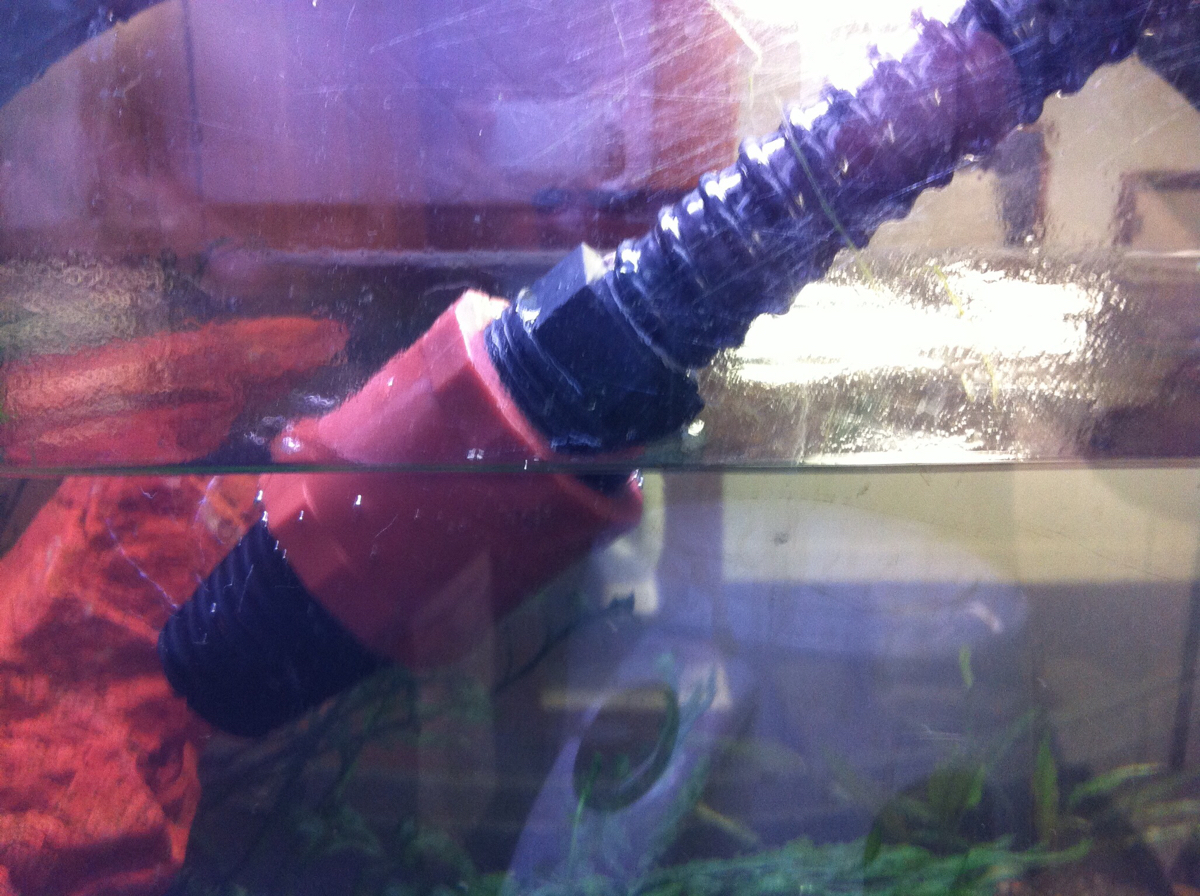
Be sure the TWO SUCTION CUPS on the HOSE are secure to FRONT of GLASS. (HINT: WETTING improves their suction)
TOP TANK
-
How dirty was it?
MIDDLE TANK
-
How dirty was it?
BOTTOM TANK
-
How dirty was it?
-
If further draining required perform FAST DRAIN. (Tap here for instructions)
FAST DRAIN
-
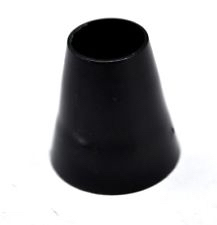
Attach THREADED BASKET STRAINER (from bucket) to end of HOSE and place HOSE inside front glass at the DESIRED HEIGHT of water change. (standard for this tank is 50%) Tap below for PICTURE
-
BASKET STRAINER PIC
-
BASKET STRAINER
-
If no vac planned perform FAST DRAIN. (Tap here for instructions)
FAST DRAIN
-
Attach THREADED BASKET STRAINER (from bucket) to end of HOSE and place HOSE inside front glass at the DESIRED HEIGHT of water change. (standard for this tank is 50%) Tap below for PICTURE
-
BASKET STRAINER PIC
-
BASKET STRAINER
The Refill
The Refill
-
Detach hose from inside of tank. Remove THREADED BASKET STRAINER and return to bucket. Attach HOSE to FILLING ASSEMBLY on door. CHECK that the NUT & TAIL assembly has its rubber seal in place
-
Fix all 3 FILLING HOSES to sit HORIZONTALLY on back glass and open all 3 valves.
-
Turn on TOILET BASIN TAP to FLUSH out old water and set the suitable RATE of flow. After 2 seconds fit hose to TAP OUTLET.
-
SOUP HEATER in COLD months. (alternatively 2-3 kettles of boiled water - use cups to pour into lower tanks with poor head room) REMEMBER: always plug into WALL OUTLET. Try to find OPEN SPACE, away from plants.
Things To Do During Refill
-
CLEAN GLASS; easiest at LOW WATER LEVELS. SOFT ALGAE lightly with sponge. DARK GREEN spots: best with SCRAPER. MAGNET CLEANER in cupboard handy for missed spots after tank full
-
PUMP SERVICE?
-
Which ones?
- TOP
- MIDDLE
- BOTTOM
-
Tap here for instructions
-
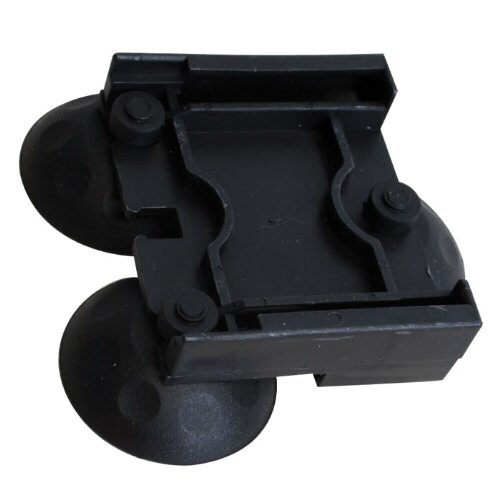
INTAKE SHEATH
-
WALL MOUNT
-
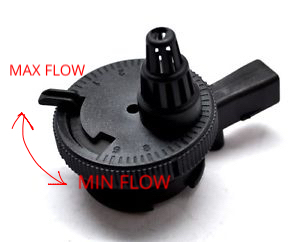
FLOW CONTROL
-
INSTRUCTIONS:
Slide PUMP upwards out of its WALL MOUNT. Can rest on shelf.
TURN bottom half to be 90 DEGREES to top half to UNLOCK AND PULL APART.
Remove and clean IMPELLER, the MAGNET BODY is the priority.
If TOOTHBRUSH too large to get around IMPELLER SHAFT, use small amount of paper towel.
REMOVE RUBBER INTAKE SHEATH.
CLEAN INTAKE BASKET STRAINER with TOOTHBRUSH.
RE-ASSEMBLE.
Make sure FLOW CONTROL is set to MAX.
OUTAKE should be angled approx 45 degrees from base so as to move water from the BACK to the FRONT as well as from LEFT to RIGHT.
Unit should SLIDE EASILY into the WALL MOUNT.
INTAKE is offset to adjust distance from WALL to RISER STEM PIPE; be sure the pipe is straight when viewed from the SIDE. -
Repairs to Service Equipment needed?<br>Hose suction cups replacing?<br>Leak in hose repaired?
-
Details
-
Work on PLANTS.
-
CLEAN COVER GLASS (particularly the bottom one will get algae growth due to the bubbles splashing on to it)
-
Water level high enough? Turn FILTER PUMPS ON.
Tests (continued)
TOP TANK
-
pH Test? 3 drops in 5ml. (ideal range 7-7.1)
-
ADD approx 1 tsp CORAL SAND.
-
ADD approx 2 tsp CORAL SAND
-
Is this expected? Been a recent large dose of coral sand last time?
-
Rinse test tube thoroughly and retest. (Any traces of ammonia or GH tester solution will give a false alkaline reading)
-
WOAH! Unlikely! Rinse test tube thoroughly and retest. (Any traces of AMMONIA TEST or GH TEST solutions will give a false alkaline reading) If still high then we must assume that there has been an excess amount of coral sand and all we can do is water change. It will eventually come down as the coral sand dissolves.
-
GH TEST. number of drops to turn from ORANGE to GREEN
-
SIZE of water change:
-
ADD 1 Measure spoon GH POWDER
-
ADD 2 Measure spoon GH POWDER
-
SIZE of water change:
-
ADD up to 1 Measure spoon GH POWDER
-
ADD up to 2 Measure spoons GH POWDER
-
ADD up to 3 Measure spoons GH POWDER
-
Depending on SIZE of WATER CHANGE, add NO SALTS and let WC reduce the GH to within desired range
MIDDLE TANK
-
pH Test? 3 drops in 5ml. (ideal range 6.8-7)
-
ADD approx 1 tsp CORAL SAND.
-
ADD approx 2 tsp CORAL SAND
-
Is this expected? Been a recent large dose of coral sand last time?
-
Rinse test tube thoroughly and retest. (Any traces of ammonia or GH tester solution will give a false alkaline reading)
-
WOAH! Unlikely! Rinse test tube thoroughly and retest. (Any traces of AMMONIA TEST or GH TEST solutions will give a false alkaline reading) If still high then we must assume that there has been an excess amount of coral sand and all we can do is water change. It will eventually come down as the coral sand dissolves.
-
GH TEST. number of drops to turn from ORANGE to GREEN
-
SIZE of water change:
-
ADD 1 Measure spoon GH POWDER
-
ADD 2 Measure spoon GH POWDER
-
SIZE of water change:
-
ADD up to 1 Measure spoon GH POWDER
-
ADD up to 2 Measure spoons GH POWDER
-
ADD up to 3 Measure spoons GH POWDER
-
Depending on SIZE of WATER CHANGE, add NO SALTS and let WC reduce the GH to within desired range
-
NITRATE TEST
-
Depending on state of plants, this is POSSIBLY grounds for increase in NITROGEN dose. Contact Bruce for further instructions.
-
GENERALLY this is the OPTIMUM RANGE. HOWEVER if there is POOR PLANT GROWTH observed then possibly means therefore not enough K and thus they are being starved. Contact Bruce for further instructions.
-
Perhaps a LACK of POTASSIUM. Is DOSING PUMP for K well primed and unblocked?
-
Done a calibration of the PUMPS recently? (In the last 3 months)
-
Look at INCREASING POTASSIUM dose. Consult Bruce
-
Do a NITROGEN CALIBRATION: <br>QUESTION: did it dose MORE or LESS than the volume displayed at the end of the calibration?
-
By how much?
- 1ml
- 2ml
- 3ml
- 4ml
- 5ml
- more than 5 ml
-
Input correct volume and test with a 10ml ADJUSTMENT DOSE into test vial. This will effectively decrease the BASIC-GRO DOSE.
-
Input correct volume and test with a 10ml ADJUSTMENT DOSE into test vial.
-
By how much?
- 1ml
- 2ml
- 3ml
- 4ml
- 5ml
- more than 5 ml
-
Input correct volume and test with a 10ml ADJUSTMENT DOSE into test vial.
-
Input correct volume and test with a 10ml ADJUSTMENT DOSE into test vial. Decrease
-
Look at INCREASING DAILY-GRO (it contains potassium also) or POTASSIUM dose. Consult Bruce
-
Give details of problem
-
If after fixing the problem, you're not convinced this was sufficiently causing problems in dosing of K and/or DAILY-GRO then CONTACT Bruce to discuss.
-
PHOSPHATE TEST
-
GENERALLY this is the OPTIMUM RANGE. Some say 1/10th of the nitrate level. HOWEVER if there is POOR PLANT GROWTH observed then possibly means therefore not enough K and thus they are being starved. Contact Bruce for further instructions.
-
PHOS in this tank is supplied by the fish food. Perhaps a potassium deficiency. Consult Bruce. Make a follow-up field here
-
Is there premature aging/falling off of leaves on any of the plants?
-
PHOS in this tank is supplied by the fish food. Perhaps a need for augmenting somehow. Consult Bruce. Make a follow-up field here
-
Then don't worry about it. Enjoy algae-free aquarium maintenance!
BOTTOM TANK
-
pH Test? 3 drops in 5ml. (ideal range 7-7.1)
-
ADD approx 1 tsp CORAL SAND.
-
ADD approx 2 tsp CORAL SAND
-
Is this expected? Been a recent large dose of coral sand last time?
-
Rinse test tube thoroughly and retest. (Any traces of ammonia or GH tester solution will give a false alkaline reading)
-
WOAH! Unlikely! Rinse test tube thoroughly and retest. (Any traces of AMMONIA TEST or GH TEST solutions will give a false alkaline reading) If still high then we must assume that there has been an excess amount of coral sand and all we can do is water change. It will eventually come down as the coral sand dissolves.
-
GH TEST. number of drops to turn from ORANGE to GREEN
-
SIZE of water change:
-
ADD 1 Measure spoon GH POWDER
-
ADD 2 Measure spoon GH POWDER
-
SIZE of water change:
-
ADD up to 1 Measure spoon GH POWDER
-
ADD up to 2 Measure spoons GH POWDER
-
ADD up to 3 Measure spoons GH POWDER
-
Depending on SIZE of WATER CHANGE, add NO SALTS and let WC reduce the GH to within desired range
DOSING PUMP (NOW USING Z-AQUATICS FERTS!)
"COMPLETE" FERTILISER
"COMPLETE" TOP TANK
-
Any AIRLOCKS to bleed out?
TEST THE LINE
-
TEST LINES; "Manual Dose", scroll UP or DOWN to select pump and hold SET. Only do as much as a couple of drops.
-
Liquid moving through the line?
-
Is the SUCTION LINE immersed in the liquid?
-
Is it an OBSTRUCTION in the line caused by oxidised minerals from the liquid?
-
Remove SUCTION LINE from PUMP HEAD and WASH in hot water, massage or blow out the blockage and RE-ATTACH to PUMP HEAD.
-
IMPORTANT: the SUCTION LINE ideally shouldn't be sitting on the bottom of the SUPPLY BOTTLE. The supply bottles here are deliberately NOT DIRECTLY BELOW THEIR RESPECTIVE PUMPS in order to allow ease of refilling and accessing the control panel so the SUCTION LINES are quite long.
If unsure, SIMULATE it's position outside, next to the supply container. -
WASH OUT the supply bottle. If there is reasonable amount of liquid still in it then gently DECANTER the clear liquid into a second container. As soon as it is no longer clear STOP (in the case of DAILY-GRO it goes from tea coloured to thick brown). WASH OUT SLUDGE and return the clear liquid to the bottle.
-
Where and how big was the airlock in the COMPLETE TOP line?
-
Check that the CONNECTIONS between PUMP and FEEDER lines are well secure. If necessary, REMOVE feeder line, snip of tip with scissors and SOAK new tip in hot water to soften and REFIT.
-
Test CHECKVALVE. Blow air thru both ends. Should only let you in one direction. If it flows in both directions (or indeed none!) a paper clip wire or similar lightly poked into the rubber valve from both ends can fix this. Otherwise make note to replace valve.
PRIME/BLEED THE LINE
-
If substantial amount of liquid needs to be moved I order to release the airlock then use a CONTAINER (eg. test vial.) to catch the liquid while priming the line. We don't want to give unquantified extra doses!
-
TEST LINES; "Manual Dose", scroll UP or DOWN to select pump and hold SET.
-
Liquid moving through the line?
-
Is the SUCTION LINE immersed in the liquid?
-
Is it an OBSTRUCTION in the line caused by oxidised minerals from the liquid?
-
Remove SUCTION LINE from PUMP HEAD and WASH in hot water, massage or blow out the blockage and RE-ATTACH to PUMP HEAD.
-
IMPORTANT: the SUCTION LINE must NOT be sitting on the bottom of the SUPPLY BOTTLE. The supply bottles here are deliberately NOT DIRECTLY BELOW THEIR RESPECTIVE PUMPS in order to allow ease of refilling and accessing the control panel so the SUCTION LINES are quite long.
If unsure, SIMULATE it's position outside, next to the supply container. -
WASH OUT the supply bottle. If there is reasonable amount of liquid still in it then gently DECANTER the clear liquid into a second container. As soon as it is no longer clear STOP (in the case of DAILY-GRO it goes from tea coloured to thick brown). WASH OUT SLUDGE and return the clear liquid to the bottle.
-
Where they are mounted a over the water line: clean CHECK VALVES/ENDS OF LINES of dried/calcified buildup.
"COMPLETE" MIDDLE TANK
-
Any AIRLOCKS to bleed out?
TEST THE LINE
-
TEST LINES; "Manual Dose", scroll UP or DOWN to select pump and hold SET. Only do as much as a couple of drops.
-
Liquid moving through the line?
-
Is the SUCTION LINE immersed in the liquid?
-
Is it an OBSTRUCTION in the line caused by oxidised minerals from the liquid?
-
Remove SUCTION LINE from PUMP HEAD and WASH in hot water, massage or blow out the blockage and RE-ATTACH to PUMP HEAD.
-
IMPORTANT: the SUCTION LINE ideally shouldn't be sitting on the bottom of the SUPPLY BOTTLE. The supply bottles here are deliberately NOT DIRECTLY BELOW THEIR RESPECTIVE PUMPS in order to allow ease of refilling and accessing the control panel so the SUCTION LINES are quite long.
If unsure, SIMULATE it's position outside, next to the supply container. -
WASH OUT the supply bottle. If there is reasonable amount of liquid still in it then gently DECANTER the clear liquid into a second container. As soon as it is no longer clear STOP (in the case of DAILY-GRO it goes from tea coloured to thick brown). WASH OUT SLUDGE and return the clear liquid to the bottle.
-
Where and how big was the airlock in the COMPLETE TOP line?
-
Check that the CONNECTIONS between PUMP and FEEDER lines are well secure. If necessary, REMOVE feeder line, snip of tip with scissors and SOAK new tip in hot water to soften and REFIT.
-
Test CHECKVALVE. Blow air thru both ends. Should only let you in one direction. If it flows in both directions (or indeed none!) a paper clip wire or similar lightly poked into the rubber valve from both ends can fix this. Otherwise make note to replace valve.
PRIME/BLEED THE LINE
-
If substantial amount of liquid needs to be moved I order to release the airlock then use a CONTAINER (eg. test vial.) to catch the liquid while priming the line. We don't want to give unquantified extra doses!
-
TEST LINES; "Manual Dose", scroll UP or DOWN to select pump and hold SET.
-
Liquid moving through the line?
-
Is the SUCTION LINE immersed in the liquid?
-
Is it an OBSTRUCTION in the line caused by oxidised minerals from the liquid?
-
Remove SUCTION LINE from PUMP HEAD and WASH in hot water, massage or blow out the blockage and RE-ATTACH to PUMP HEAD.
-
IMPORTANT: the SUCTION LINE must NOT be sitting on the bottom of the SUPPLY BOTTLE. The supply bottles here are deliberately NOT DIRECTLY BELOW THEIR RESPECTIVE PUMPS in order to allow ease of refilling and accessing the control panel so the SUCTION LINES are quite long.
If unsure, SIMULATE it's position outside, next to the supply container. -
WASH OUT the supply bottle. If there is reasonable amount of liquid still in it then gently DECANTER the clear liquid into a second container. As soon as it is no longer clear STOP (in the case of DAILY-GRO it goes from tea coloured to thick brown). WASH OUT SLUDGE and return the clear liquid to the bottle.
-
Where they are mounted a over the water line: clean CHECK VALVES/ENDS OF LINES of dried/calcified buildup.
"COMPLETE" BOTTOM TANK
-
Any AIRLOCKS to bleed out?
TEST THE LINE
-
TEST LINES; "Manual Dose", scroll UP or DOWN to select pump and hold SET. Only do as much as a couple of drops.
-
Liquid moving through the line?
-
Is the SUCTION LINE immersed in the liquid?
-
Is it an OBSTRUCTION in the line caused by oxidised minerals from the liquid?
-
Remove SUCTION LINE from PUMP HEAD and WASH in hot water, massage or blow out the blockage and RE-ATTACH to PUMP HEAD.
-
IMPORTANT: the SUCTION LINE ideally shouldn't be sitting on the bottom of the SUPPLY BOTTLE. The supply bottles here are deliberately NOT DIRECTLY BELOW THEIR RESPECTIVE PUMPS in order to allow ease of refilling and accessing the control panel so the SUCTION LINES are quite long.
If unsure, SIMULATE it's position outside, next to the supply container. -
WASH OUT the supply bottle. If there is reasonable amount of liquid still in it then gently DECANTER the clear liquid into a second container. As soon as it is no longer clear STOP (in the case of DAILY-GRO it goes from tea coloured to thick brown). WASH OUT SLUDGE and return the clear liquid to the bottle.
-
Where and how big was the airlock in the COMPLETE TOP line?
-
Check that the CONNECTIONS between PUMP and FEEDER lines are well secure. If necessary, REMOVE feeder line, snip of tip with scissors and SOAK new tip in hot water to soften and REFIT.
-
Test CHECKVALVE. Blow air thru both ends. Should only let you in one direction. If it flows in both directions (or indeed none!) a paper clip wire or similar lightly poked into the rubber valve from both ends can fix this. Otherwise make note to replace valve.
PRIME/BLEED THE LINE
-
If substantial amount of liquid needs to be moved I order to release the airlock then use a CONTAINER (eg. test vial.) to catch the liquid while priming the line. We don't want to give unquantified extra doses!
-
TEST LINES; "Manual Dose", scroll UP or DOWN to select pump and hold SET.
-
Liquid moving through the line?
-
Is the SUCTION LINE immersed in the liquid?
-
Is it an OBSTRUCTION in the line caused by oxidised minerals from the liquid?
-
Remove SUCTION LINE from PUMP HEAD and WASH in hot water, massage or blow out the blockage and RE-ATTACH to PUMP HEAD.
-
IMPORTANT: the SUCTION LINE must NOT be sitting on the bottom of the SUPPLY BOTTLE. The supply bottles here are deliberately NOT DIRECTLY BELOW THEIR RESPECTIVE PUMPS in order to allow ease of refilling and accessing the control panel so the SUCTION LINES are quite long.
If unsure, SIMULATE it's position outside, next to the supply container. -
WASH OUT the supply bottle. If there is reasonable amount of liquid still in it then gently DECANTER the clear liquid into a second container. As soon as it is no longer clear STOP (in the case of DAILY-GRO it goes from tea coloured to thick brown). WASH OUT SLUDGE and return the clear liquid to the bottle.
-
Where they are mounted a over the water line: clean CHECK VALVES/ENDS OF LINES of dried/calcified buildup.
POTASSIUM
POTASSIUM TOP TANK
-
Any AIRLOCKS to bleed out?
TEST THE LINE
-
TEST LINES; "Manual Dose", scroll UP or DOWN to select pump and hold SET. Only do as much as a couple of drops.
-
Liquid moving through the line?
-
Is the SUCTION LINE immersed in the liquid?
-
Is it an OBSTRUCTION in the line caused by oxidised minerals from the liquid?
-
Remove SUCTION LINE from PUMP HEAD and WASH in hot water, massage or blow out the blockage and RE-ATTACH to PUMP HEAD.
-
IMPORTANT: the SUCTION LINE ideally shouldn't be sitting on the bottom of the SUPPLY BOTTLE. The supply bottles here are deliberately NOT DIRECTLY BELOW THEIR RESPECTIVE PUMPS in order to allow ease of refilling and accessing the control panel so the SUCTION LINES are quite long.
If unsure, SIMULATE it's position outside, next to the supply container. -
WASH OUT the supply bottle. If there is reasonable amount of liquid still in it then gently DECANTER the clear liquid into a second container. As soon as it is no longer clear STOP (in the case of DAILY-GRO it goes from tea coloured to thick brown). WASH OUT SLUDGE and return the clear liquid to the bottle.
-
Where and how big was the airlock in the TOP POTASSIUM line?
-
Check that the CONNECTIONS between PUMP and FEEDER lines are well secure. If necessary, REMOVE feeder line, snip of tip with scissors and SOAK new tip in hot water to soften and REFIT.
-
Test CHECKVALVE. Blow air thru both ends. Should only let you in one direction. If it flows in both directions (or indeed none!) a paper clip wire or similar lightly poked into the rubber valve from both ends can fix this. Otherwise make note to replace valve.
PRIME/BLEED THE LINE
-
If substantial amount of liquid needs to be moved I order to release the airlock then use a CONTAINER (eg. test vial.) to catch the liquid while priming the line. We don't want to give unquantified extra doses!
-
TEST LINES; "Manual Dose", scroll UP or DOWN to select pump and hold SET.
-
Liquid moving through the line?
-
Is the SUCTION LINE immersed in the liquid?
-
Is it an OBSTRUCTION in the line caused by oxidised minerals from the liquid?
-
Remove SUCTION LINE from PUMP HEAD and WASH in hot water, massage or blow out the blockage and RE-ATTACH to PUMP HEAD.
-
IMPORTANT: the SUCTION LINE must NOT be sitting on the bottom of the SUPPLY BOTTLE. The supply bottles here are deliberately NOT DIRECTLY BELOW THEIR RESPECTIVE PUMPS in order to allow ease of refilling and accessing the control panel so the SUCTION LINES are quite long.
If unsure, SIMULATE it's position outside, next to the supply container. -
WASH OUT the supply bottle. If there is reasonable amount of liquid still in it then gently DECANTER the clear liquid into a second container. As soon as it is no longer clear STOP (in the case of DAILY-GRO it goes from tea coloured to thick brown). WASH OUT SLUDGE and return the clear liquid to the bottle.
-
Where they are mounted a over the water line: clean CHECK VALVES/ENDS OF LINES of dried/calcified buildup.
POTASSIUM MIDDLE TANK
-
Any AIRLOCKS to bleed out?
TEST THE LINE
-
TEST LINES; "Manual Dose", scroll UP or DOWN to select pump and hold SET. Only do as much as a couple of drops.
-
Liquid moving through the line?
-
Is the SUCTION LINE immersed in the liquid?
-
Is it an OBSTRUCTION in the line caused by oxidised minerals from the liquid?
-
Remove SUCTION LINE from PUMP HEAD and WASH in hot water, massage or blow out the blockage and RE-ATTACH to PUMP HEAD.
-
IMPORTANT: the SUCTION LINE ideally shouldn't be sitting on the bottom of the SUPPLY BOTTLE. The supply bottles here are deliberately NOT DIRECTLY BELOW THEIR RESPECTIVE PUMPS in order to allow ease of refilling and accessing the control panel so the SUCTION LINES are quite long.
If unsure, SIMULATE it's position outside, next to the supply container. -
WASH OUT the supply bottle. If there is reasonable amount of liquid still in it then gently DECANTER the clear liquid into a second container. As soon as it is no longer clear STOP (in the case of DAILY-GRO it goes from tea coloured to thick brown). WASH OUT SLUDGE and return the clear liquid to the bottle.
-
Where and how big was the airlock in the MIDDLE POTASSIUM line?
-
Check that the CONNECTIONS between PUMP and FEEDER lines are well secure. If necessary, REMOVE feeder line, snip of tip with scissors and SOAK new tip in hot water to soften and REFIT.
-
Test CHECKVALVE. Blow air thru both ends. Should only let you in one direction. If it flows in both directions (or indeed none!) a paper clip wire or similar lightly poked into the rubber valve from both ends can fix this. Otherwise make note to replace valve.
PRIME/BLEED THE LINE
-
If substantial amount of liquid needs to be moved I order to release the airlock then use a CONTAINER (eg. test vial.) to catch the liquid while priming the line. We don't want to give unquantified extra doses!
-
TEST LINES; "Manual Dose", scroll UP or DOWN to select pump and hold SET.
-
Liquid moving through the line?
-
Is the SUCTION LINE immersed in the liquid?
-
Is it an OBSTRUCTION in the line caused by oxidised minerals from the liquid?
-
Remove SUCTION LINE from PUMP HEAD and WASH in hot water, massage or blow out the blockage and RE-ATTACH to PUMP HEAD.
-
IMPORTANT: the SUCTION LINE must NOT be sitting on the bottom of the SUPPLY BOTTLE. The supply bottles here are deliberately NOT DIRECTLY BELOW THEIR RESPECTIVE PUMPS in order to allow ease of refilling and accessing the control panel so the SUCTION LINES are quite long.
If unsure, SIMULATE it's position outside, next to the supply container. -
WASH OUT the supply bottle. If there is reasonable amount of liquid still in it then gently DECANTER the clear liquid into a second container. As soon as it is no longer clear STOP (in the case of DAILY-GRO it goes from tea coloured to thick brown). WASH OUT SLUDGE and return the clear liquid to the bottle.
-
Where they are mounted a over the water line: clean CHECK VALVES/ENDS OF LINES of dried/calcified buildup.
POTASSIUM BOTTOM TANK
-
Any AIRLOCKS to bleed out?
TEST THE LINE
-
TEST LINES; "Manual Dose", scroll UP or DOWN to select pump and hold SET. Only do as much as a couple of drops.
-
Liquid moving through the line?
-
Is the SUCTION LINE immersed in the liquid?
-
Is it an OBSTRUCTION in the line caused by oxidised minerals from the liquid?
-
Remove SUCTION LINE from PUMP HEAD and WASH in hot water, massage or blow out the blockage and RE-ATTACH to PUMP HEAD.
-
IMPORTANT: the SUCTION LINE ideally shouldn't be sitting on the bottom of the SUPPLY BOTTLE. The supply bottles here are deliberately NOT DIRECTLY BELOW THEIR RESPECTIVE PUMPS in order to allow ease of refilling and accessing the control panel so the SUCTION LINES are quite long.
If unsure, SIMULATE it's position outside, next to the supply container. -
WASH OUT the supply bottle. If there is reasonable amount of liquid still in it then gently DECANTER the clear liquid into a second container. As soon as it is no longer clear STOP (in the case of DAILY-GRO it goes from tea coloured to thick brown). WASH OUT SLUDGE and return the clear liquid to the bottle.
-
Where and how big was the airlock in the BOTTOM POTASSIUM line?
-
Check that the CONNECTIONS between PUMP and FEEDER lines are well secure. If necessary, REMOVE feeder line, snip of tip with scissors and SOAK new tip in hot water to soften and REFIT.
-
Test CHECKVALVE. Blow air thru both ends. Should only let you in one direction. If it flows in both directions (or indeed none!) a paper clip wire or similar lightly poked into the rubber valve from both ends can fix this. Otherwise make note to replace valve.
PRIME/BLEED THE LINE
-
If substantial amount of liquid needs to be moved I order to release the airlock then use a CONTAINER (eg. test vial.) to catch the liquid while priming the line. We don't want to give unquantified extra doses!
-
TEST LINES; "Manual Dose", scroll UP or DOWN to select pump and hold SET.
-
Liquid moving through the line?
-
Is the SUCTION LINE immersed in the liquid?
-
Is it an OBSTRUCTION in the line caused by oxidised minerals from the liquid?
-
Remove SUCTION LINE from PUMP HEAD and WASH in hot water, massage or blow out the blockage and RE-ATTACH to PUMP HEAD.
-
IMPORTANT: the SUCTION LINE must NOT be sitting on the bottom of the SUPPLY BOTTLE. The supply bottles here are deliberately NOT DIRECTLY BELOW THEIR RESPECTIVE PUMPS in order to allow ease of refilling and accessing the control panel so the SUCTION LINES are quite long.
If unsure, SIMULATE it's position outside, next to the supply container. -
WASH OUT the supply bottle. If there is reasonable amount of liquid still in it then gently DECANTER the clear liquid into a second container. As soon as it is no longer clear STOP (in the case of DAILY-GRO it goes from tea coloured to thick brown). WASH OUT SLUDGE and return the clear liquid to the bottle.
-
Where they are mounted a over the water line: clean CHECK VALVES/ENDS OF LINES of dried/calcified buildup.
LIQUID CARBON (MIDDLE TANK ONLY)
LIQUID CARBON
-
Any AIRLOCKS to bleed out?
TEST THE LINE
-
TEST LINES; "Manual Dose", scroll UP or DOWN to select pump and hold SET. Only do as much as a couple of drops.
-
Liquid moving through the line?
-
Is the SUCTION LINE immersed in the liquid?
-
Is it an OBSTRUCTION in the line caused by oxidised minerals from the liquid?
-
Remove SUCTION LINE from PUMP HEAD and WASH in hot water, massage or blow out the blockage and RE-ATTACH to PUMP HEAD.
-
IMPORTANT: the SUCTION LINE ideally shouldn't be sitting on the bottom of the SUPPLY BOTTLE. The supply bottles here are deliberately NOT DIRECTLY BELOW THEIR RESPECTIVE PUMPS in order to allow ease of refilling and accessing the control panel so the SUCTION LINES are quite long.
If unsure, SIMULATE it's position outside, next to the supply container. -
WASH OUT the supply bottle. If there is reasonable amount of liquid still in it then gently DECANTER the clear liquid into a second container. As soon as it is no longer clear STOP (in the case of DAILY-GRO it goes from tea coloured to thick brown). WASH OUT SLUDGE and return the clear liquid to the bottle.
-
Where and how big was the airlock in the LIQUID CARBON line?
-
Check that the CONNECTIONS between PUMP and FEEDER lines are well secure. If necessary, REMOVE feeder line, snip of tip with scissors and SOAK new tip in hot water to soften and REFIT.
-
Test CHECKVALVE. Blow air thru both ends. Should only let you in one direction. If it flows in both directions (or indeed none!) a paper clip wire or similar lightly poked into the rubber valve from both ends can fix this. Otherwise make note to replace valve.
PRIME/BLEED THE LINE
-
If substantial amount of liquid needs to be moved I order to release the airlock then use a CONTAINER (eg. test vial.) to catch the liquid while priming the line. We don't want to give unquantified extra doses!
-
TEST LINES; "Manual Dose", scroll UP or DOWN to select pump and hold SET.
-
Liquid moving through the line?
-
Is the SUCTION LINE immersed in the liquid?
-
Is it an OBSTRUCTION in the line caused by oxidised minerals from the liquid?
-
Remove SUCTION LINE from PUMP HEAD and WASH in hot water, massage or blow out the blockage and RE-ATTACH to PUMP HEAD.
-
IMPORTANT: the SUCTION LINE must NOT be sitting on the bottom of the SUPPLY BOTTLE. The supply bottles here are deliberately NOT DIRECTLY BELOW THEIR RESPECTIVE PUMPS in order to allow ease of refilling and accessing the control panel so the SUCTION LINES are quite long.
If unsure, SIMULATE it's position outside, next to the supply container. -
WASH OUT the supply bottle. If there is reasonable amount of liquid still in it then gently DECANTER the clear liquid into a second container. As soon as it is no longer clear STOP (in the case of DAILY-GRO it goes from tea coloured to thick brown). WASH OUT SLUDGE and return the clear liquid to the bottle.
-
Where they are mounted a over the water line: clean CHECK VALVES/ENDS OF LINES of dried/calcified buildup.
ADDITIVES
TOP TANK
-
GH UP POWDER ADDED? (NB: currently not using and hardener so IGNORE dose instructions for now)
-
Amount dosed
-
Coral sand added? (Low pH)
-
Amount dosed
MIDDLE TANK
-
GH UP POWDER ADDED? (NB: currently not using and hardener so IGNORE dose instructions for now)
-
Amount dosed
-
Coral sand added? (Low pH)
-
Amount dosed
BOTTOM TANK
-
GH UP POWDER ADDED? (NB: currently not using and hardener so IGNORE dose instructions for now)
-
Amount dosed
-
Coral sand added? (Low pH)
-
Amount dosed
Packing up
SUPPLIES; ANY REFILLING TO BE DONE IN SINK OR OUTSIDE!
-
GH UP REPLACE?
-
FOOD REPLACE/ REFILL?
-
WHICH KIND?
- TETRABITS
- SPIRULINA FLAKES
- SPIRULINA TABLETS
-
Will any need replacing next month?
- TETRABITS
- SPIRULINA FLAKES
- SPIRULINA TABLETS
FERTILISER REFILLS
-
COMPLETE refill? <br>(If wishing to replace but still a small amount remains in CURRENT BOTTLE, swap over and leave OLD BOTTLE behind and can pour in rest into the new bottle at a later date)
-
HOW MUCH IS LEFT?
-
None in stock? Make an ACTION here and address to Bruce and yourself for follow up
-
How much?
-
POTASSIUM supply refill? <br> (If wishing to replace but still a small amount remains in CURRENT BOTTLE, swap over and leave OLD BOTTLE behind and can pour in rest into the new bottle at a later date)<br>
-
How much?
-
HOW MUCH IS LEFT?
-
THIS IS PROBABLY NOT ENOUGH TO LAST. The tanks will use approx 60ml of K before the next service None in stock? Make an ACTION here and address to Bruce and yourself for follow up. Refill within the week.
-
LIQUID CARBON refill?
-
How much?
-
HOW MUCH IS LEFT?
-
THIS POSSIBLY WON'T BE ENOUGH TO LAST. None in stock? Make an ACTION here and address to Bruce and yourself for follow up. Refill within the week.
-
If you have some with you then swap over the bottles. Otherwise bring some next time as almost definitely will need some.
Equipment Check
-
LIGHT Timer on the correct time?
-
if no plausible explanation TRY RESET BUTTON and reprogram
-
What mode should the lights be on now?
-
LIGHTS: all LEDs working?
-
Details
-
Return coverglasses and lights to centre/slightly fwd position
-
DOSING PUMPS returned to operation display? (Press ESC until it stops beeping when you press it)
-
DOSING PUMP TUBING
-
Notes. Any extra work performed? Any additions of fish? Any questions...?
FINAL CHECKS
-
FILTER and AIR PUMPS ON and functioning?
-
OUTSIDE GLASS, CABINETRY etc CLEAN & DRY?
-
Got your: BASKET STRAINER? TOOTH BRUSH? TEASPOON?
-
Photos After. 1 x OVERALL. Both sides, 2 half shots CLOSEUPS of any REARRANGED PLANT.
-
Time Finished
")
")