")


Information
Audit for WYNDHAM DENTAL Reception: KATE, (sometime Tracy) Admin: BEV Head dentists: CARMINE, TARCILLIO
-
Conducted on
STARTERS
The Basics
-
Employee (if more personnel present add in notes)
-
Date
-
Time Started
Observations
FISH
-
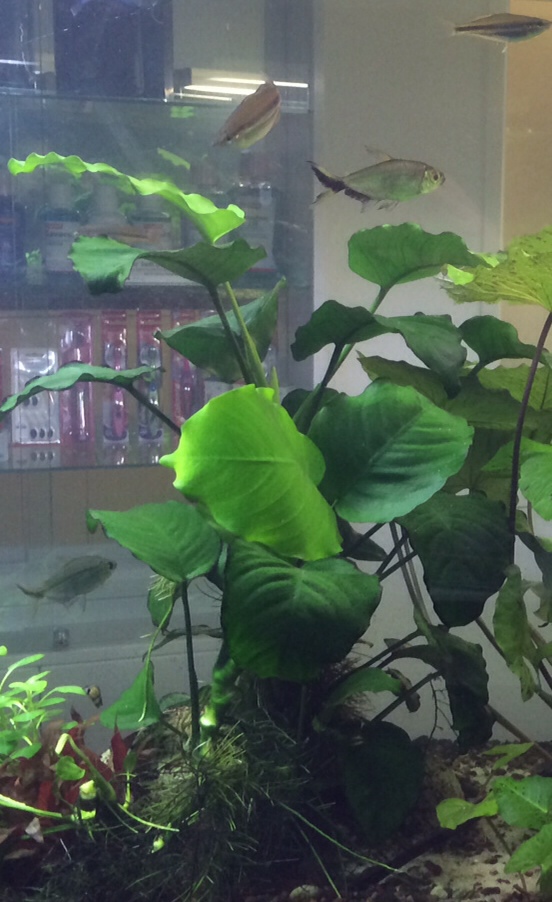
Photos Before. 1-2 OVERALL. 2-3 CLOSEUPS on PLANTS
-
Rainbow Fishes and miscellaneous
- Great; vibrant, eager for food
- some individuals not right.
- sulky, sluggish, isolated from group
- dead fish, cloudy stinky water
-
Take photos of individuals and check for CAUSES. Questions: 1. Is it just an individual or are many affected? 2. Check for uneaten food, levels of ammonia or nitrite. 3. Filter or heater stopped or malfunctioning?
-
Anything on BODY? <br>WHITE SPOTS?<br>FUNGUS?<br>WOUNDS?
-
Take PHOTO of cases and NOTE down details.
-
Plan for LARGE WATER CHANGE (75-90%) with thorough GRAVEL VAC. Use STRESS COAT and BLUE SALTS to guard against chlorine and infection.
-
CONTACT BRUCE IMMEDIATELY
-
Take PHOTO where possible and NOTE down details.
-
Looking good? Place a pinch of SPIRULINA FLAKES or FROZEN FOOD (freezer in kitchen) in and observe how they eat.
The Workers: SUCKING CATS & FLYING FOXES
-
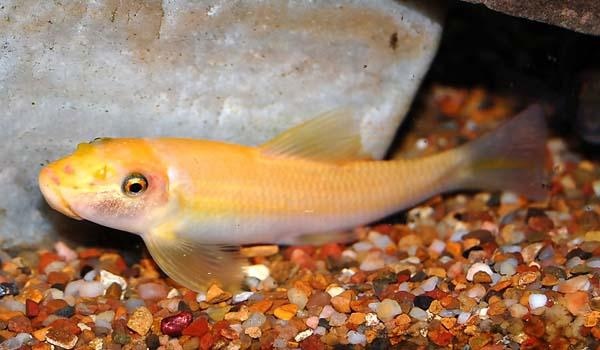
SUCKING CAT/s sighted? (1-2)
-
Show SUCKING CAT photo ====>
-
Sucking cats
-
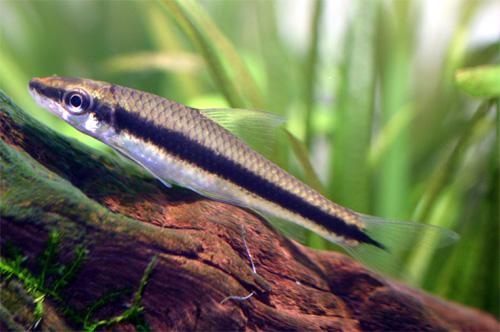
SIAMESE FLYING FOX/es sighted? (2-3)
-
Siamese Flying Fox (tap for picture)
-
Siamese Flying Fox
-
How's the algae levels on GLASS & PLANTS?
- Lots of soft brown/green dust everywhere
- Very clear. A few spots on glass and old leaves
- Furry black algae growing on old leaves, pump, glass
- heavy with dark green spots on glass
- dark green algae all over rocks
-
This is an indication that there are no or low numbers of SIAMESE FLYING FOX. Mention in notes.
-
Remove as much as possible, prune old affected leaves off plants. Vacuum up loose pieces from after cleaning glass
-
This is possibly an indication that there are no SUCKING CATS. Mention in notes.
-
Check light TIMER and nitrate levels.
-
Plan for an "Adrian Special"; BEFORE draining, turn OFF pumps, scrape all of every glass surface and carefully brush clean all rocks Then drain 80% water.
PLANTS
-
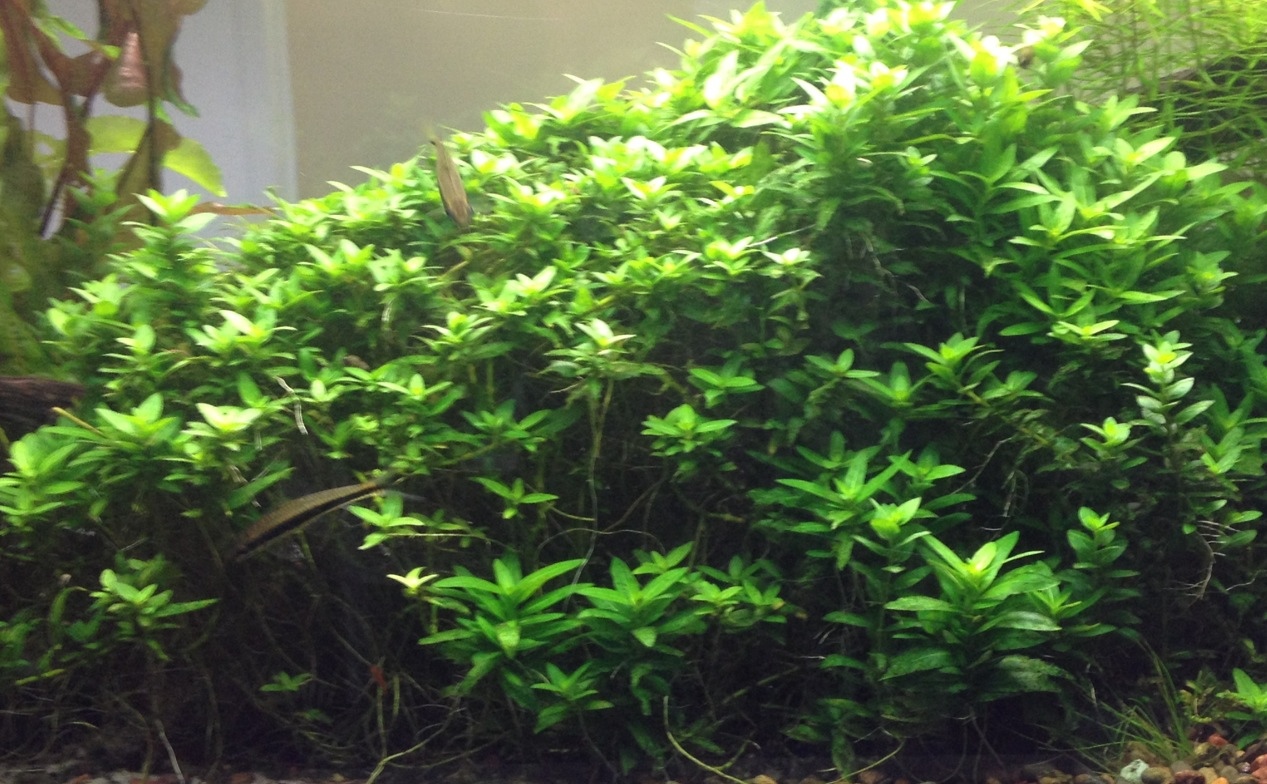
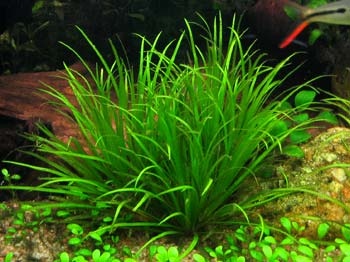
STAURAGYNE. (Tap for picture)
-
STAURAGYNE
-
How is the STAURAGYNE looking?
- good. healthy bright green star-shaped new growth
- new and old growth nibbled
- poor. old growth dark and nibbled and new growth small, slow, stunted
- curled/deformed new growth
-
New growth is the fish eating it! Clearly need to increase their green diet. Take photos and notify Bruce.
-
Possibly low in NITRATE and/or POTASSIUM (K) CHECK levels. (Section 4). 10ppm or more with still poor growth possibly means therefore not enough K and thus they are being starved. Contact Bruce for further instructions.
-
CURLED & DEFORMED new leaves? May have to review K dosage levels. Possibly too much. Do tests & check with BRUCE by SMS.
-
Great. Prune any healthy taller stems and replant to improve coverage of ground.
-
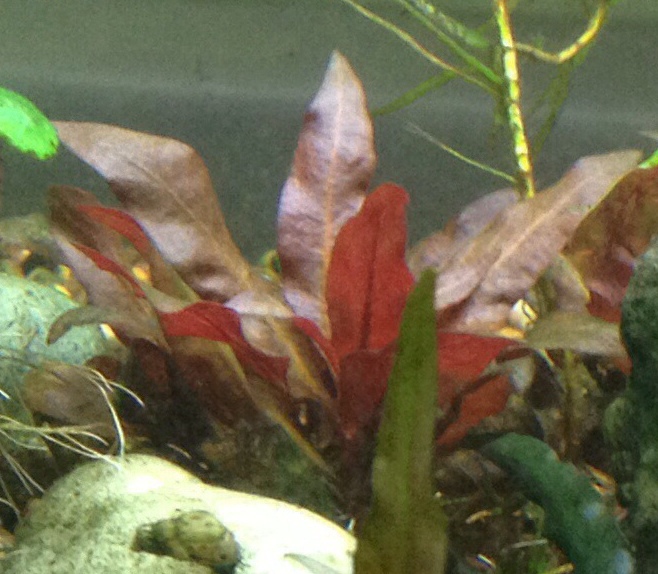
ALTERANTHERA. (Tap for picture)
-
ALTERANTHERA
-
How is the ALTERANTHERA looking?
- good. healthy bright green star-shaped new growth
- new and old growth nibbled
- poor. old growth dark and nibbled and new growth small, slow, stunted
- curled/deformed new growth
-
New growth is the fish eating it! Clearly need to increase their green diet. Take photos and notify Bruce.
-
Possibly low in NITRATE and/or POTASSIUM (K) CHECK levels. (Section 4). 10ppm or more with still poor growth possibly means therefore not enough K and thus they are being starved. Contact Bruce for further instructions.
-
CURLED & DEFORMED new leaves? May have to review K dosage levels. Possibly too much. Do tests & check with BRUCE by SMS.
-
Great. Prune any healthy taller stems and replant to improve coverage of ground.
-
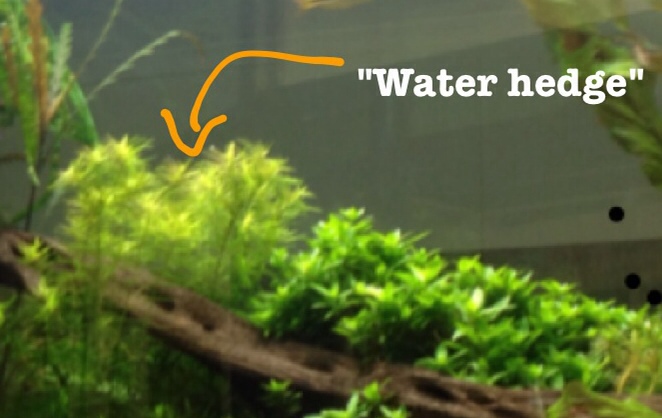
Water Hedge (Tap for picture)
-
Water Hedge (didiplus diandra)
-
How is the WATER HEDGE looking?
- great, health light feathery green new growth, pink in the growth head
- stems getting close to surface
- old leaves prematurely aging/falling off
- stunted or small new growth, old leaves look eaten
- twisted/malformed new growth
-
CUT approx in half and, If healthy, reduce HEADLESS STALK by a further 50% and replant heads on front to hide the stalk.
-
Possibly low in NITRATE and/or POTASSIUM (K) or CO2 not working CHECK levels. (Section 4). 10ppm or more with still poor growth possibly means therefore not enough K and thus they are being starved. Check CO2 functioning properly. Contact Bruce for further instructions.
-
Great. Be sure to SHORTEN DOWN any that are getting too close to the surface. Typically slightly lower than the wood that passes by it.
-
Premature ageing is possibly a deficiency in PHOS which is a mobile nutrient. (Here only available via the fish food) If phos levels sufficient then possibly not enough K. check with BRUCE by SMS.
-
CURLED & DEFORMED new leaves? May have to review K dosage levels. Possibly too much. Do tests & check with BRUCE by SMS.
-
LOBELIA (Tap for picture)
-
LOBELIA
-
How is the LOBELIA looking?
- new growth, large and healthy green
- new leaves smaller than previous.
- old growth remaining healthy, ageing slowly
- old leaves prematurely ageing, falling off, leaving bare base stalk
- algae spots on old leaves
- leaves deformed and twisted
- stems getting a little high
-
CUT approx in half and, If healthy, reduce HEADLESS STALK by a further 50% and replant heads on front to hide the stalk.
-
Possibly low in NITRATE and/or POTASSIUM (K) or CO2 not working CHECK levels. (Section 4). 10ppm or more with still poor growth possibly means therefore not enough K and thus they are being starved. Check CO2 functioning properly. Contact Bruce for further instructions.
-
Great. Be sure to SHORTEN DOWN any that are getting too close to the tall
-
Premature ageing is possibly a deficiency in PHOS which is a mobile nutrient. If phos levels sufficient then possibly not enough K. check with BRUCE by SMS.
-
CURLED & DEFORMED new leaves? May have to review K dosage levels. Possibly too much. Do tests & check with BRUCE by SMS.
-
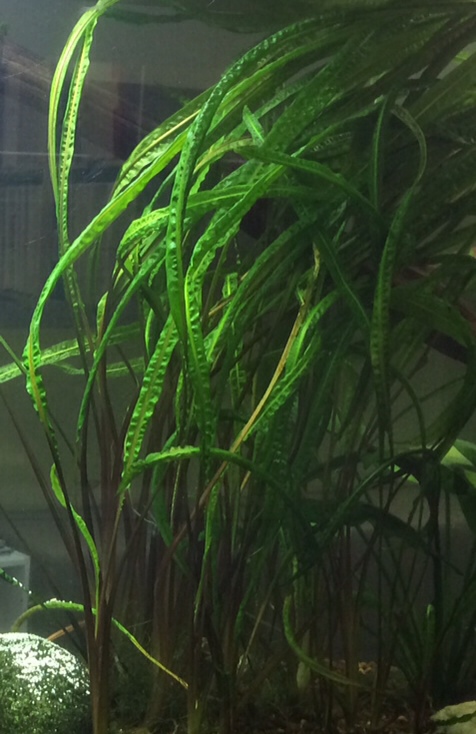
CRYPTS BALANSAE (tap for picture)
-
CRYPT BALANSAE
-
How are the CRYPTS BALANSAE looking?
- great. Healthy shiny lustre. new growth good size, slightly curved upwards
- prematurely aged older leaves (possibly with algae spots)
- pale, slightly yellow leaves
- many leaves curled downwards, not holding their own weight.
- curled or bumpy deformed leaves, possibly lots of dark spotted algae on leaves
- slow growth. new leaves remaining small, stunted.
- surface pads
-
Possibly a deficiency in PHOS which is a mobile nutrient. If phos levels sufficient then possibly not enough K. check with BRUCE by SMS.
-
PEEL AWAY any old and ageing leaves from base
-
Possibly low in NITRATE and/or POTASSIUM (K) or CO2 not working CHECK levels. (Section 4). 10ppm or more with still poor growth possibly means therefore not enough K and thus they are being starved. Contact Bruce for further instructions.
-
CURLED & DEFORMED new leaves? May have to review K dosage levels. Possibly too much. Do tests & check with BRUCE by SMS.
-
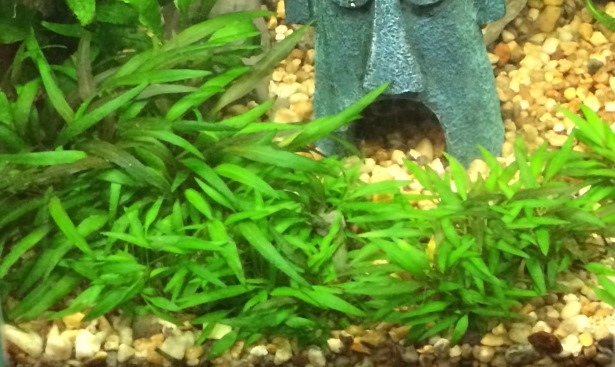
CRYPTS (tap for picture)
-
CRYPTS
-
How are they looking?
- shiny healthy deep green and strong new leaves,
- old leaves ageing well, minimum algae spots
- new leaves smaller than the older
- lots of algae spots on leaves
- deformed twisted leaves
- leaves weak and floppy, older leaves. spread out,
- prematurely aging, discoloured leaves
-
Possibly a deficiency in PHOS which is a mobile nutrient. If phos levels sufficient then possibly not enough K. check with BRUCE by SMS.
-
PEEL AWAY any old and ageing leaves from base
-
Possibly low in NITRATE and/or POTASSIUM (K) or CO2 not working CHECK levels. (Section 4). 10ppm or more with still poor growth possibly means therefore not enough K and thus they are being starved. Contact Bruce for further instructions.
-
CURLED & DEFORMED new leaves? May have to review K dosage levels. Possibly too much. Do tests & check with BRUCE by SMS.
-
Possibly a lack of K and/or CO2. Check nitrate and phos levels and check co2 system
-
Great. Peel away any old leaves that look on the way out
-
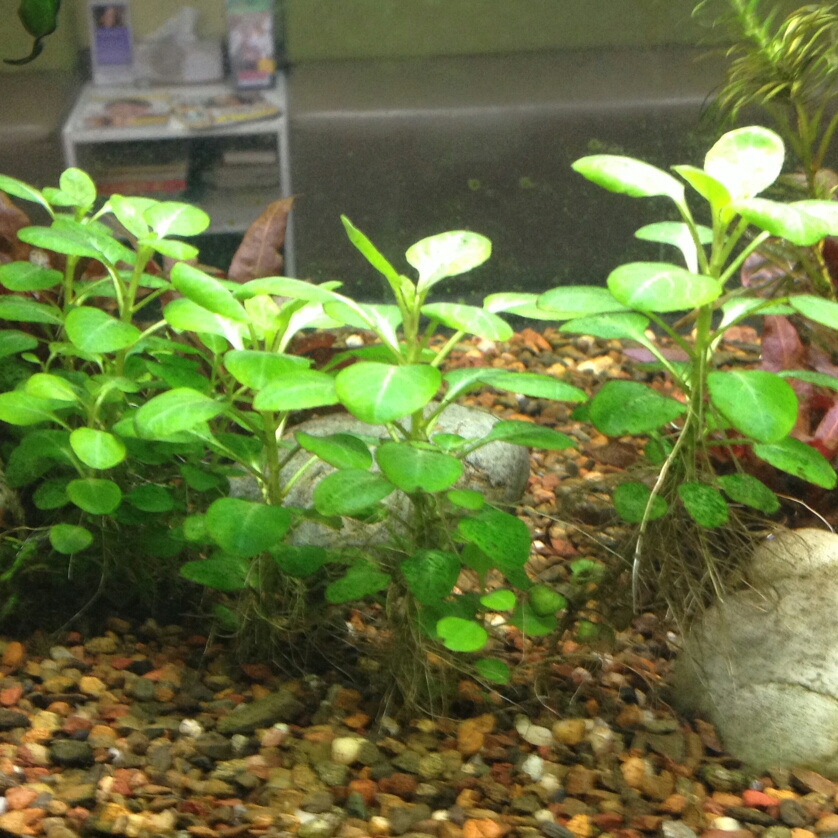
ANUBIAS (tap for picture)
-
ANUBIAS
-
How are they looking?
- shiny and strong deep green new leaves
- older leaves pretty good, low algae
- new leaves small, twisted, algae spots on all leaves
- some dark, old and algae-covered leaves
-
PEEL AWAY any old and ageing leaves from base
-
CURLED & DEFORMED new leaves? May have to review K dosage levels. Possibly too much. Do tests & check with BRUCE by SMS. Perhaps too much light
-
Great. Peel away any old leaves that look on the way out
-
BLYXA- 1 or 2 pieces at reception side at base of stauragyne hedge (tap for photo)
-
BLYXA
-
How is the BLYXA looking?
- great. large, light green new growth. old growth slightly darker but still intact
- OK. medium quality new growth. not spreading but each piece is well rooted and old growth hasn't prematurely fallen off
- old leaves prematurely old. (may be also eaten off)
- poor. new growth short, dark and slow. old leaves perhaps eaten away. roots week
-
Great. Manage any over-growth (pushing up to glass, swamping other smaller plants) by thinning out and replanting to any thinner areas.
-
Possibly low in NITRATE and/or POTASSIUM (K) CHECK levels. (Section 4). 10ppm or more with still poor growth possibly means therefore not enough K and thus they are being starved. Contact Bruce for further instructions.
-
Possibly a deficiency in PHOS which is a mobile nutrient. If phos levels sufficient then possibly not enough K. check with BRUCE by SMS.
-
Green Tiger Lotus
-
Green Tiger Lotus
-
How is the green tiger lotus looking?
- great. Healthy shiny lustre. new growth good size, slightly curved upwards
- prematurely aged older leaves (possibly with algae spots)
- pale, slightly yellow leaves
- many leaves curled downwards, not holding their own weight.
- curled or bumpy deformed leaves, possibly lots of dark spotted algae on leaves
- slow growth. new leaves remaining small, stunted.
- surface pads
-
Deformed new growth? May have to review K dosage levels. Check NITRATE and PHOS and check with BRUCE by SMS.
-
CUT all surface pads out from BASE. NB. Check for NEW SHOOTS. they are guaranteed to be also surface so be ruthless!
-
Great. Remove any old, ageing leaves from base. CAREFUL that you have the right one!
-
Possibly low in NITRATE and/or POTASSIUM (K) CHECK nitrate levels. (Section 4). 10ppm of nitrate or more with still poor growth possibly means therefore not enough K and thus they are being starved. Contact Bruce for further instructions.
-
Possibly a deficiency in PHOS which is a mobile nutrient. If phos levels sufficient then possibly not enough K. check with BRUCE by SMS.
-
Possibly low in IRON and/or NITRATES. Maybe cause for increase in fertilisers or ROOT TABLETS. Consult Bruce by SMS if no previous instructions.
-
BARCLAYA
-
BARCLAYA
-
How is the barclaya looking? (2 pieces; 1 by the surgery end filter outlet and the 2nd by the Stauragyne hedge and the NUPHAR
- great. Healthy shiny lustre. new growth good size, slightly curved upwards
- prematurely aged older leaves (possibly with algae spots)
- pale, slightly yellow leaves
- many leaves curled downwards, not holding their own weight.
- curled or bumpy deformed leaves, possibly lots of dark spotted algae on leaves
- slow growth. new leaves remaining small, stunted.
- surface pads
-
Deformed new growth? May have to review K dosage levels. Check NITRATE and PHOS and check with BRUCE by SMS.
-
CUT all surface pads out from BASE. NB. Check for NEW SHOOTS. they are guaranteed to be also surface so be ruthless!
-
Great. Remove any old, ageing leaves from base. CAREFUL that you have the right one!
-
Possibly low in NITRATE and/or POTASSIUM (K) CHECK nitrate levels. (Section 4). 10ppm of nitrate or more with still poor growth possibly means therefore not enough K and thus they are being starved. Contact Bruce for further instructions.
-
Possibly a deficiency in PHOS which is a mobile nutrient. If phos levels sufficient then possibly not enough K. check with BRUCE by SMS.
-
Possibly low in IRON and/or NITRATES. Maybe cause for increase in fertilisers or ROOT TABLETS. Consult Bruce by SMS if no previous instructions.
CO2 SYSTEM
-
What does CO₂ TIMER DISPLAY?
-
WORKING PRESSURE
This is the right hand gauge on the regulator assembly.
This helps stability bubble rate and its adjustment
Ideal around 3-5 PSI
Adjustment with Alan Key (on floor of cupboard) in centre of regulator -
WORKING PRESSURE LEVELS OK? <br>This is the right hand gauge on the regulator assembly.<br>This helps stability bubble rate and its adjustment<br>Ideal around 2-3 bar<br>Adjustment with Alan Key (on floor of cupboard) in centre of regulator
-
If the WORKING PRESSURE is not high enough then opening up the the fine adjustment valve may not work to increase the bubble rate: use Alan Key to turn adjustment bolt clockwise.
-
If the WORKING PRESSURE is TOO HIGH then the fine adjustment valve may be too touchy to refine the bubble rate (either too fast or nothing at all). In this case use Alan Key to turn adjustment bolt anti-clockwise to reduce the working pressure
-
BUBBLE RATE good? (About 1-2 bubbles per second)
-
Bottle empty? Timer or solenoid off for some reason. Some other issue?
-
CLOSE THE BOTTLE VALVE
REMOVE empty bottle immediately from system (place pressure gauge assembly carefully on DRAIN portal
Take to Laboratory freezer. There should be one already waiting. Remove and fill from filler bottle according to REFILL procedure (see Dropbox link)
https://www.dropbox.com/s/qdes9fp2oot2qhu/Refilling%20CO2.pdf?dl=0 -
DECREASE by turning the FINE ADJUSTMENT
-
INCREASE by turning the FINE ADJUSTMENT
-
Tap here for picture of FINE ADJUSTMENT VALVE
-
FINE ADJUSTMENT now directly on pressure gauge, below gold bubble counter
-
If opening up the the fine adjustment valve doesn't work to INCREASE IT then it maybe the bottle is low so replace
-
FINE gas bubbles coming out of DIFFUSER STONE DISC? (by OUT of surgery-end filter)
-
Large bubbles also means possible crack or locking nuts not tight enough. Contact BRUCE
-
Plan for a Service to REPLACE DIFFUSER STONE. Instructions in service page
Tests part 1
Setup
-
Remove LIGHT SPILL COVERS and lean on wall.
-
Lift LIGHT UNITS up for extra working space if needed If doing large work (plant removals and other potentially messy things) lay down canvas drop sheet (folded in half, length ways) along the front of the tank)
Tests part 1
-
TEMPERATURE test (ideal 24-26 C)
-
A bit too cool. Is INLINE HEATER functioning/plugged in? (In "hidden" cupboard by reception)
-
Unplug faulty unit and install and plug in the SPARE HEATER that is in cupboard. Notify Bruce to arrange replacement.
-
Increase THERMOSTAT (clockwise) by the SUITABLE AMOUNT to bring it up within the range (see above) and make note of how much.
-
Increased THERMOSTAT by:
-
A little too warm. Is THERMOSTAT functioning? <br>(Does the indicator light come on and off when you turn the thermostat setting up and down?)
-
Decrease THERMOSTAT (anticlockwise) by the SUITABLE AMOUNT to bring it down within the range (see above)and note by how much.
-
Decreased THERMOSTAT by:
-
HEATER Replaced?
-
if the THERMOSTAT doesn't respond to being turned down then better to have a cool tank than risking cooking the fish. Unplug faulty unit and plug in the SPARE HEATER that is already installed at receptionist end INSIDE THE TANK. Notify Bruce to arrange replacement.
-
Good. Refill with HEATER or KETTLES OF BOILED WATER in COLD months and with water changes 50% or greater
-
Rinse 4 TEST VIALS in tank water: pH (square vial) and GH (large round vial) NITRATE & PHOS (small glass) MEASURE 5ml in each and SET ASIDE for later. Tip: use SQUARE VIAL or a SYRINGE to measure an accurate 5ml for the GH.
The Drain
The Drain (75%)
GRAVEL VACUUM (only as needed, either with hose or with bucket if just small amounts.) NB: if plants are doing well, and algae levels are ok, then leave. It's good food for them!
-
How dirty was it?
FAST DRAIN
-
Open DRAIN VALVE (marked "B" in PVC Filter service instructions) NB It drains fast and you have no way to set the height so be sure to keep an eye on i! If concerned set timer for a minute
The Refill
The Refill
-
Install WATER WITCH FLOAT SWITCH ASSEMBLY in middle section, be sure that it SITS AS LOW AS POSSIBLE. Fix on the glass with suction cup.
-
Affix the FILLING HOSE to the inside wall in the right end section, position it horizontally, facing toward the opposite end
-
Switch on WATER WITCH power and open up MAINS WATER TAP. Water Witch will automatically turn off water when it reaches the support strip of glass.
-
SOUP HEATER in COLD months or in large water changes. Use SHORT EXTENSION CORD hanging over water tap that is already plugged in. Mount on a slight angle over the FLOAT SWITCH ASSEMBLY so the heating element hangs in the middle OPEN SPACE, away from glass and plants.
Things To Do During Refill
-
CLEAN GLASS; easiest at LOW WATER LEVELS. SOFT ALGAE lightly with sponge. DARK GREEN spots: best with SCRAPER. MAGNET CLEANER in cupboard but please: NO FAST MOVEMENTS, ESPECIALLY CLOSE TO BOTTOM. Always check before use for grains of sand caught in the scrub pad.
-
Work on PLANTS
-
FILTER SERVICE?
-
Which one?
- Reception Desk Canister
- Surgery End PVC
-
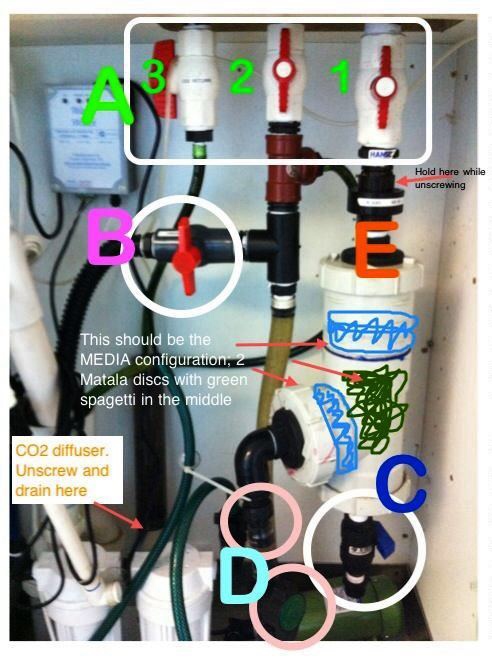
CUSTOM PVC FILTER. Tap here to start service instructions ====>
-
SURGERY END PVC FILTER
-
Turn OFF power to PUMP and CO2
-
CLOSE ballvalves A 1,2 & 3. IMPORTANT! USE BOTH HANDS! These valves are stiff and we don't want to apply unnecessary torque on the bottom glass
-
OPEN DRAIN VALVE B; small amount of water will drain out
-
Check that DRAIN HOSE is connected to DRAIN VALVE C and other end is in bottom floor drain.
-
OPEN DRAIN VALVE C; most of the water will now drain.
-
When empty, CLOSE DRAIN VALVE C
-
If you plan to do a service to the CO2 REACTOR then do so now. Tap YES to get instructions
-
Unscrew BOTTOM CAP and let water fall into plastic container below.
-
CLOSE GREEN VALVE D : NOTE, these valves are the reverse of the white ones. Therefore TURN ANTI-clockwise to close.
-
UNSCREW NUT AND TAIL CONNECTOR above green valve D
-
UNSCREW BARREL UNION E. (Use second hand to keep the other end from turning in its thread)
-
UNSCREW NUT & TAIL connector at C to release the DRAIN HOSE and GENTLY LIFT FILTER OUT. Take outside for cleaning
-
OPEN FILTER from bottom or top and REMOVE FILTER MEDIA, taking note of the order.
-
MATALA pieces can be washed out in tap water (tap around side of building) while SPAGHETTI MEDIA is best rinsed in a bucket of TANK WATER, particularly if both filters serviced in one day. RINSE filter housing under tap.
-
Use TOOTHBRUSH to ensure both THREAD and O-RING of FILTER LID are thoroughly clean before reattaching.
-
REFIT filter housing to BARREL UNION E. Check first that the O-RING of the MALE END is still in place
-
Reattach NUT AND TAIL union at VALVE D. NB. Be careful to align the two parts straight; Thread must start easily! If not, then like it has a false thread and is on an angle.
-
OPEN VALVE D
-
CUSTOM PVC FILTER; PRIMING THE SYSTEM. tap here to start instructions.
-
FIRST, now is a good time to CLEAN (either in situ or remove) and return the INTAKE BASKET STRAINERS.
-
With Ball Valve B still open, OPEN BALL VALVE A1, the "IN" VALVE. Water will rush in fast and eventually come out through B
-
When B has FULL FLOW coming through then CLOSE BALL VALVE B.
-
OPEN A2 and A3 and CHECK FOR LEAKS at all connection points just used.
-
TURN ON PUMP and re plug in CO2
-
ADJUST FLOW THROUGH CO2 REACTOR. CLOSE A2 fully, forcing all flow through the CO2 reactor (A3), confirm that impeller is turning. Then gently open A2 to approximately half open (red handle is 45 degrees to the right). Basically you want as much current as possible through the main outlet A2 WHILE MAINTAINING healthy flow through the CO2. If reactor impeller is not turning strongly then it is too slow.
-
RECEPTION DESK CANISTER FILTER
-
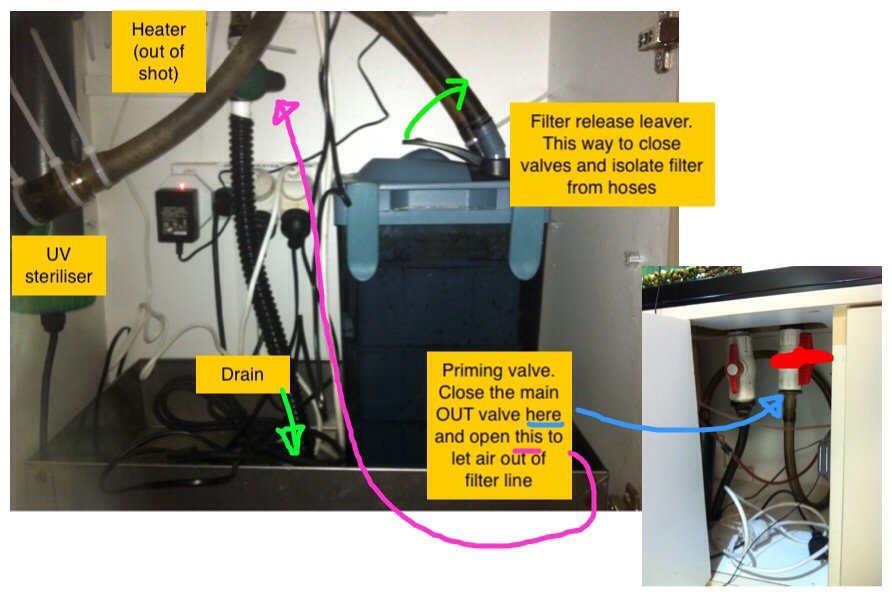
RECEPTION DESK CANISTER FILTER. Tap here to start instructions
-
UNPLUG POWER TO FILTER
-
Gently lift up IN/OUT HOSE ASSEMBLY release lever to its highest point. Grab hold of the hose assembly and gently pull up to detach it from the main body LIFT OUT FILTER out of cupboard. USE BOTH HANDS, and PROTECT YOUR BACK!
-
WASH filter media in buckets of TANK WATER as per usual and REASSEMBLE. IMPORTANT: the INNER LID can only go one way. It has written THIS SIDE UP on the relevant side that should be, well... facing UP!
-
Clean INTAKE BASKET STRAINER of debris and clear away build up of gravel
-
RECEPTION DESK CANISTER FILTER; PRIMING THE FILTER LINE INSTRUCTIONS
-
Close the OUT BALL VALVE under the tank (access through the "hidden door" by the staff timer machine. Open by using a key or screwdriver under the door). Refer to photo
-
REPOSITION the filter in the cupboard. Sit the HOSE ASSEMBLY in position and gently close the valve lever. a NOTE: if it is hard to close the lever then it probably isn't sitting in position properly.
-
Open GREEN BLEEDING LINE DRAIN HOSE TAP to let air out (clockwise to open). Refer to photo. Once the all the air is out of the line, CLOSE the tap (anticlockwise)
-
REOPEN the OUT BALLVALVE and turn ON filter. Check for flow.
-
CO₂ diffuser stone need replacing?
-
Tap here for instructions
-
Under construction. Contact Bruce for now
Tests (continued)
-
pH Test? 3 drops in 5ml. (ideal range 7-7.1)
-
ADD approx 2 tsp CORAL SAND.
-
ADD approx 3 tsp CORAL SAND
-
ADD approx 4 tsp CORAL SAND
-
Is this expected? Been a recent large dose of coral sand last time?
-
Rinse test tube thoroughly and retest. (Any traces of ammonia or GH tester solution will give a false alkaline reading)
-
WOAH! Unlikely! Rinse test tube thoroughly and retest. (Any traces of AMMONIA TEST or GH TEST solutions will give a false alkaline reading) If still high then we must assume that there has been an excess amount of coral sand and all we can do is water change. It will eventually come down as the coral sand dissolves.
-
GH TEST. number of drops to turn from ORANGE to GREEN
-
SIZE of water change:
-
ADD 1 Measure spoon GH POWDER
-
ADD 2 Measure spoon GH POWDER
-
SIZE of water change:
-
ADD up to 1 Measure spoon GH POWDER
-
ADD up to 2 Measure spoons GH POWDER
-
ADD up to 3 Measure spoons GH POWDER
-
Depending on SIZE of WATER CHANGE, add NO SALTS and let WC reduce the GH to within desired range
-
NITRATE TEST
-
Depending on state of plants, this is POSSIBLY grounds for increase in NITROGEN dose. Contact Bruce for further instructions.
-
GENERALLY this is the OPTIMUM RANGE. HOWEVER if there is POOR PLANT GROWTH observed then possibly means therefore not enough K and thus they are being starved. Contact Bruce for further instructions.
-
Has the NITROGEN PUMP dosed already today? (Monday, Wednesday, Friday at 9am)
-
Perhaps a LACK of POTASSIUM. Is DOSING PUMP for K well primed and unblocked?
-
Done a calibration of the PUMPS recently? (In the last 3 months)
-
Look at INCREASING POTASSIUM dose. Consult Bruce
-
Do a NITROGEN CALIBRATION: <br>QUESTION: did it dose MORE or LESS than the volume displayed at the end of the calibration?
-
By how much?
- 1ml
- 2ml
- 3ml
- 4ml
- 5ml
- more than 5 ml
-
Input correct volume and test with a 10ml ADJUSTMENT DOSE into test vial. This will effectively decrease the BASIC-GRO DOSE.
-
Input correct volume and test with a 10ml ADJUSTMENT DOSE into test vial.
-
By how much?
- 1ml
- 2ml
- 3ml
- 4ml
- 5ml
- more than 5 ml
-
Input correct volume and test with a 10ml ADJUSTMENT DOSE into test vial.
-
Input correct volume and test with a 10ml ADJUSTMENT DOSE into test vial. Decrease
-
Look at INCREASING DAILY-GRO (it contains potassium also) or POTASSIUM dose. Consult Bruce
-
Give details of problem
-
If after fixing the problem, you're not convinced this was sufficiently causing problems in dosing of K and/or DAILY-GRO then CONTACT Bruce to discuss.
-
PHOSPHATE TEST
-
GENERALLY this is the OPTIMUM RANGE. Some say 1/10th of the nitrate level. HOWEVER if there is POOR PLANT GROWTH observed then possibly means therefore not enough K and thus they are being starved. Contact Bruce for further instructions.
-
PHOS in this tank is supplied by the fish food. Perhaps a potassium deficiency. Consult Bruce. Make a follow-up field here
-
Is there premature aging/falling off of leaves on any of the plants?
-
PHOS in this tank is supplied by the fish food. Perhaps a need for augmenting somehow. Consult Bruce. Make a follow-up field here
-
Then don't worry about it. Enjoy algae-free aquarium maintenance!
Additives
-
GH UP POWDER ADDED?
-
How many measured spoons?
-
Coral sand added? (Low pH)
-
How many teaspoons?
DOSING PUMP (NOW USING Z-AQUATICS FERTS!)
TRACE & IRON
-
Any AIRLOCKS to bleed out?
TEST THE LINE
-
Be sure to use a CONTAINER (GH test vial eg.) to catch the liquid while priming the line.
-
TEST LINES; "Manual Dose", scroll UP or DOWN to select pump and hold SET. Only do as much as a couple of drops. IMPORTANT: DAILYGRO must be tested with a container to catch test fluid as it is too concentrated. PHOS, BASIC-GRO and K are ok in small amounts.
-
Liquid moving through the line?
-
Is the SUCTION LINE immersed in the liquid?
-
Is it an OBSTRUCTION in the line caused by oxidised minerals from the liquid (typically TRACE ELEMENTS)?
-
Remove SUCTION LINE from PUMP HEAD and WASH in hot water, massage or blow out the blockage and RE-ATTACH to PUMP HEAD.
-
IMPORTANT: the SUCTION LINE must NOT be sitting on the bottom of the SUPPLY BOTTLE. The supply bottles here are deliberately NOT DIRECTLY BELOW THEIR RESPECTIVE PUMPS in order to allow ease of refilling and accessing the control panel so the SUCTION LINES are quite long.
If unsure, SIMULATE it's position outside, next to the supply container. -
WASH OUT the supply bottle. If there is reasonable amount of liquid still in it then gently DECANTER the clear liquid into a second container. As soon as it is no longer clear STOP (in the case of DAILY-GRO it goes from tea coloured to thick brown). WASH OUT SLUDGE and return the clear liquid to the bottle.
-
Where and how big was the airlock in the TRACE & IRON line?

PRIME/BLEED THE LINE
-
Be sure to use a CONTAINER (GH test vial eg.) to catch the liquid while priming the line.
-
TEST LINES; "Manual Dose", scroll UP or DOWN to select pump and hold SET. Only do as much as a couple of drops. IMPORTANT: DAILYGRO must be tested with a container to catch test fluid as it is too concentrated. PHOS, BASIC-GRO and K are ok in small amounts.
-
Liquid moving through the line?
-
Is the SUCTION LINE immersed in the liquid?
-
Is it an OBSTRUCTION in the line caused by oxidised minerals from the liquid (typically TRACE ?
-
Remove SUCTION LINE from PUMP HEAD and WASH in hot water, massage or blow out the blockage and RE-ATTACH to PUMP HEAD.
-
IMPORTANT: the SUCTION LINE must NOT be sitting on the bottom of the SUPPLY BOTTLE. The supply bottles here are deliberately NOT DIRECTLY BELOW THEIR RESPECTIVE PUMPS in order to allow ease of refilling and accessing the control panel so the SUCTION LINES are quite long.
If unsure, SIMULATE it's position outside, next to the supply container. -
WASH OUT the supply bottle. If there is reasonable amount of liquid still in it then gently DECANTER the clear liquid into a second container. As soon as it is no longer clear STOP (in the case of DAILY-GRO it goes from tea coloured to thick brown). WASH OUT SLUDGE and return the clear liquid to the bottle.
-
Check that the CONNECTIONS between PUMP and FEEDER lines are well secure. If necessary, REMOVE feeder line, snip of tip with scissors and SOAK new tip in hot water to soften and REFIT.
-
Test CHECKVALVE. Blow air thru both ends. Should only let you in one direction. If it flows in both directions (or indeed none!) a paper clip wire or similar lightly poked into the rubber valve from both ends can fix this. Otherwise make note to replace valve.
-
Clean CHECK VALVES/ENDS OF LINES of dried/calcified buildup. They should be just hanging over the SUPPORT STRIP of glass and above the water line.
NITROGEN
-
Any AIRLOCKS to bleed out?
TEST THE LINE
-
Be sure to use a CONTAINER (GH test vial eg.) to catch the liquid while priming the line.
-
TEST LINES; "Manual Dose", scroll UP or DOWN to select pump and hold SET. Only do as much as a couple of drops. IMPORTANT: DAILYGRO must be tested with a container to catch test fluid as it is too concentrated. PHOS, BASIC-GRO and K are ok in small amounts.
-
Liquid moving through the line?
-
Is the SUCTION LINE immersed in the liquid?
-
Is it an OBSTRUCTION in the line caused by oxidised minerals from the liquid?
-
Remove SUCTION LINE from PUMP HEAD and WASH in hot water, massage or blow out the blockage and RE-ATTACH to PUMP HEAD.
-
IMPORTANT: the SUCTION LINE must NOT be sitting on the bottom of the SUPPLY BOTTLE. The supply bottles here are deliberately NOT DIRECTLY BELOW THEIR RESPECTIVE PUMPS in order to allow ease of refilling and accessing the control panel so the SUCTION LINES are quite long.
If unsure, SIMULATE it's position outside, next to the supply container. -
WASH OUT the supply bottle. If there is reasonable amount of liquid still in it then gently DECANTER the clear liquid into a second container. As soon as it is no longer clear STOP (in the case of DAILY-GRO it goes from tea coloured to thick brown). WASH OUT SLUDGE and return the clear liquid to the bottle.
-
Where and how big was the airlock in the NITROGEN line?
PRIME/BLEED THE LINE
-
Be sure to use a CONTAINER (GH test vial eg.) to catch the liquid while priming the line.
-
TEST LINES; "Manual Dose", scroll UP or DOWN to select pump and hold SET. Only do as much as a couple of drops. IMPORTANT: DAILYGRO must be tested with a container to catch test fluid as it is too concentrated. PHOS, BASIC-GRO and K are ok in small amounts.
-
Liquid moving through the line?
-
Is the SUCTION LINE immersed in the liquid?
-
Is it an OBSTRUCTION in the line caused by oxidised minerals from the liquid ?
-
Remove SUCTION LINE from PUMP HEAD and WASH in hot water, massage or blow out the blockage and RE-ATTACH to PUMP HEAD.
-
IMPORTANT: the SUCTION LINE must NOT be sitting on the bottom of the SUPPLY BOTTLE. The supply bottles here are deliberately NOT DIRECTLY BELOW THEIR RESPECTIVE PUMPS in order to allow ease of refilling and accessing the control panel so the SUCTION LINES are quite long.
If unsure, SIMULATE it's position outside, next to the supply container. -
WASH OUT the supply bottle. If there is reasonable amount of liquid still in it then gently DECANTER the clear liquid into a second container. As soon as it is no longer clear STOP (in the case of DAILY-GRO it goes from tea coloured to thick brown). WASH OUT SLUDGE and return the clear liquid to the bottle.
-
Check that the CONNECTIONS between PUMP and FEEDER lines are well secure. If necessary, REMOVE feeder line, snip of tip with scissors and SOAK new tip in hot water to soften and REFIT.
-
Test CHECKVALVE. Blow air thru both ends. Should only let you in one direction. If it flows in both directions (or indeed none!) a paper clip wire or similar lightly poked into the rubber valve from both ends can fix this. Otherwise make note to replace valve.
-
Clean CHECK VALVES/ENDS OF LINES of dried/calcified buildup. They should be just hanging over the SUPPORT STRIP of glass and above the water line.
-
ADJUSTMENT DOSE: Is today a MONDAY, WEDNESDAY or FRIDAY?
-
NITROGEN will have already dosed today. Make ADJUSTMENT DOSE (under OPTIONS) at a % corresponding to size of water change. Eg. 50% water change = 1/2 of programmed dose. It will ask you to confirm. Be sure to escape out to main menu at end (press ESC till no peep sounds anymore)
-
No macros dosed today so no adjustment necessary.
POTASSIUM
-
Any AIRLOCKS to bleed out?
TEST THE LINE
-
Be sure to use a CONTAINER (GH test vial eg.) to catch the liquid while priming the line.
-
TEST LINES; "Manual Dose", scroll UP or DOWN to select pump and hold SET. Only do as much as a couple of drops. IMPORTANT: DAILYGRO must be tested with a container to catch test fluid as it is too concentrated. PHOS, BASIC-GRO and K are ok in small amounts.
-
Liquid moving through the line?
-
Is the SUCTION LINE immersed in the liquid?
-
Is it an OBSTRUCTION in the line caused by oxidised minerals from the liquid (typically DAILY-GRO)?
-
Remove SUCTION LINE from PUMP HEAD and WASH in hot water, massage or blow out the blockage and RE-ATTACH to PUMP HEAD.
-
IMPORTANT: the SUCTION LINE must NOT be sitting on the bottom of the SUPPLY BOTTLE. The supply bottles here are deliberately NOT DIRECTLY BELOW THEIR RESPECTIVE PUMPS in order to allow ease of refilling and accessing the control panel so the SUCTION LINES are quite long.
If unsure, SIMULATE it's position outside, next to the supply container. -
WASH OUT the supply bottle. If there is reasonable amount of liquid still in it then gently DECANTER the clear liquid into a second container. As soon as it is no longer clear STOP (in the case of DAILY-GRO it goes from tea coloured to thick brown). WASH OUT SLUDGE and return the clear liquid to the bottle.
-
Where and how big was the airlock in the POTASSIUM line?
PRIME/BLEED THE LINE
-
Be sure to use a CONTAINER (GH test vial eg.) to catch the liquid while priming the line.
-
TEST LINES; "Manual Dose", scroll UP or DOWN to select pump and hold SET. Only do as much as a couple of drops. IMPORTANT: DAILYGRO must be tested with a container to catch test fluid as it is too concentrated. PHOS, BASIC-GRO and K are ok in small amounts.
-
Liquid moving through the line?
-
Is the SUCTION LINE immersed in the liquid?
-
Is it an OBSTRUCTION in the line caused by oxidised minerals from the liquid (typically DAILY-GRO)?
-
Remove SUCTION LINE from PUMP HEAD and WASH in hot water, massage or blow out the blockage and RE-ATTACH to PUMP HEAD.
-
IMPORTANT: the SUCTION LINE must NOT be sitting on the bottom of the SUPPLY BOTTLE. The supply bottles here are deliberately NOT DIRECTLY BELOW THEIR RESPECTIVE PUMPS in order to allow ease of refilling and accessing the control panel so the SUCTION LINES are quite long.
If unsure, SIMULATE it's position outside, next to the supply container. -
WASH OUT the supply bottle. If there is reasonable amount of liquid still in it then gently DECANTER the clear liquid into a second container. As soon as it is no longer clear STOP (in the case of DAILY-GRO it goes from tea coloured to thick brown). WASH OUT SLUDGE and return the clear liquid to the bottle.
-
Check that the CONNECTIONS between PUMP and FEEDER lines are well secure. If necessary, REMOVE feeder line, snip of tip with scissors and SOAK new tip in hot water to soften and REFIT.
-
Test CHECKVALVE. Blow air thru both ends. Should only let you in one direction. If it flows in both directions (or indeed none!) a paper clip wire or similar lightly poked into the rubber valve from both ends can fix this. Otherwise make note to replace valve.
-
Clean CHECK VALVES/ENDS OF LINES of dried/calcified buildup. They should be just hanging over the SUPPORT STRIP of glass and above the water line.
Packing up
SUPPLIES; ANY REFILLING TO BE DONE IN SINK OR OUTSIDE!
-
GH UP REPLACE?
-
FOOD REPLACE/ REFILL? (Tetrabits, Spirulina Flakes)
-
WHICH KIND?
- TETRABITS
- SPIRULINA FLAKES
- SPIRULINA TABLETS
- DISCUS PELLETS
-
Will any need replacing next month?
- TETRABITS
- SPIRULINA FLAKES
- SPIRULINA TABLETS
- DISCUS PELLETS
-
NITROGEN refill? <br>(If wishing to replace but still a small amount remains in CURRENT BOTTLE, swap over and leave OLD BOTTLE behind and can pour in rest into the new bottle at a later date)
-
HOW MUCH IS LEFT?
-
THIS IS DEFINITELY NOT ENOUGH TO LAST! Refill within the week
-
Bring some next time as almost definitely will need some.
-
How much?
-
TRACE & IRON refill?
-
HOW MUCH IS LEFT?
-
THIS WON'T BE ENOUGH TO LAST. It uses 4 ml per week. Refill within 2 weeks
-
Bring some next time as almost definitely will need some.
-
POTASSIUM supply refill? <br> (If wishing to replace but still a small amount remains in CURRENT BOTTLE, swap over and leave OLD BOTTLE behind and can pour in rest into the new bottle at a later date)<br>
-
How much refilled?
-
HOW MUCH IS LEFT?
-
THIS ISN'T ENOUGH TO LAST. Refill within the week
-
This is a suspiciously high amount. Someone topped up in last week or so?
-
Check dosing pump program for this channel and perform calibration test using ADJUSTMENT dose (program for 20ml and hold test vial under to measure amount that it doses) Contact BRUCE if necessary.
-
ANY LEFT-OVERS in other bottles to use up?
-
Auto feeder topped up? Spirulina flakes. NB. BE SURE THAT OPENING IS AT CORRECT LEVEL!! Can use test turn as departing treat :)
-
CO2 replaced?
-
What Size?
FINAL CHECKS
Equipment Check
-
LIGHT Timer controller on the correct time?
-
IMPORTANT! If no rational explanation (eg. recent power blackouts) then contact Bruce. Ask staff if they've been noticing it turning off/ getting dimmer
-
CO2 TIMER (in cupboard with CO2) on the correct time?
-
this is unusual. Replacement on hand?
-
IMPORTANT! Remove and notify Bruce. Plan for a replacement ASAP. In meantime, try: Reset (with pin or paperclip) and reprogram for 9am till 4pm. Set it to AUTO ON and set clock to be 3:59 and see if it turns off the CO₂ at 4.
-
LIGHTS: all tubes working?
-
Details
-
Gently lower LIGHTS back down. Be careful not to break off the end stops on the cables!
-
DOSING PUMP returned to operation display? (Press ESC until it stops beeping when you press it)
-
Notes. Any extra work performed? Any additions of fish? Any questions...?
-
HEATER and FILTER PUMPS ON and functioning?
-
OUTSIDE GLASS, CABINETRY etc CLEAN & DRY?
-
WATER WITCH turned off? MAINS WATER TAP closed?
-
Got your: BASKET STRAINER? TOOTH BRUSH? TEASPOON?
-
Photos After. 1 x OVERALL. Both sides, 2 half shots CLOSEUPS of any REARRANGED PLANT.
-
Time Finished
")
")