")


Information
Audit for Advanced Myotherapy 71 Elgin St, Carlton VIC 3053, Australia +61 3 9347 5764 Boss/owner Matthew Cleary
-
Conducted on
STARTERS
The Basics
-
Employee
-
Date
-
Time Started
Observations
-
Photos Before. 1 OVERALL. 2-3 CLOSEUPS on PLANT and FISH
-
Filter flow good?
-
If no flow at all, do not attempt to get started again without servicing the filter! The water inside is most likely anaerobic and poisonous. Definitely inspect impeller for damage or clogging. Treat like a new tank and have feeding stop tilL further notice. Contact Bruce.
-
Plan for filter service
FISH
-
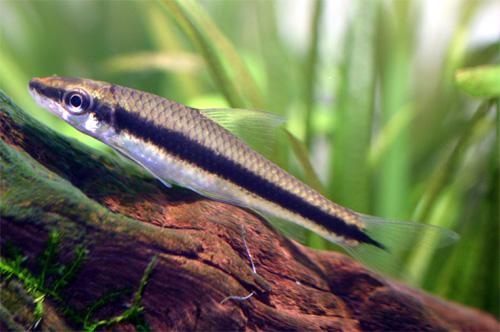
Plecostomus Catfish, Horse-face Cichlid trio & Congo Tetras
- vibrant, eager for food
- some individuals not right.
- sulky, sluggish, isolated from group
- deaths
- cloudy water
-
Looking good? Place a pinch of TETRABITS in and observe how they eat.
-
Take PHOTO where possible and NOTE down details.
-
Unwell? Take photos of individuals and check for causes. Questions: 1. Is it just an individual or many affected? 2. Check for uneaten food, levels of ammonia or nitrite. 3. Filter or heater stopped or malfunctioning?
-
Anything on BODY? <br>WHITE SPOTS?<br>FUNGUS?<br>WOUNDS?
-
Take PHOTO of cases and NOTE down details.
-
CONTACT BRUCE IMMEDIATELY
-
Remove dead body.
-
Test for AMMONIA & NITRITE
-
SERVICE FILTER and plan for large water change ~80%
Algae levels
-
How's the algae levels on GLASS & PLANTS?
- Lots of soft brown/green dust
- Very clear. A few spots on glass
- Furry black algae growing on rocks, old leaves, glass
- dark green spots on glass
- dark green algae all over rocks
-
Mention in notes. Check that light hasn't been left on for longer periods
-
Remove as much as possible, prune old affected leaves off plants. Vacuum up loose pieces from after cleaning glass
-
Remove rocks and place in bucket and pour boiling water over. This will kill the algae and it will fall off and be eaten by the fish.
-
This is possibly an indication that the we are missing the sucking cats or they are unhappy. Can you see them?
-
Check light TIMER and nitrate levels.
-
Plan for an "Adrian Special"; BEFORE draining, turn OFF pumps, scrape all of every glass surface and carefully brush clean all rocks Then drain 80% water.
PLANTS
-
How is the Java fern looking?
- great, health light green new growth
- stunted small new growth, old leaves look eaten.
Tests part 1
Tests part 1
-
TEMPERATURE test (ideal 24-26 C)
-
A bit too cool. Is heater functioning/plugged in?<br>(Does the indicator light come on and off when you turn the thermostat setting up and down?)
-
Replacement heater with you?
-
Depending on how long before replacement is likely to be installed then leave post-water change temp approx 26 degrees.
-
Set the thermostat for a conservative 25degrees, we can adjust next month if need be
-
Increase THERMOSTAT (clockwise) and make note of how much.
-
Increased THERMOSTAT by:
-
Is THERMOSTAT functioning?<br>(Does the indicator light come on and off when you turn the thermostat setting up and down?)
-
Decrease THERMOSTAT (anticlockwise) and note by how much.
-
Decreased THERMOSTAT by:
-
Do you have a replacement heater with you?
-
Check with BRUCE, but if the THERMOSTAT doesn't respond to being turned down then better to have a cool tank than risking cooking the fish, so UNPLUG and remove faulty unit. Leave temperature at approx 26 degrees
-
Remove old one and install new one during refill. Set the thermostat for a conservative 25degrees, we can adjust next month if need be
-
Good. Refill with SOUP HEATER or KETTLES OF BOILED WATER in COLD months.
-
Rinse 2 TEST VIALS in tank water: MEASURE 5ml in each and SET ASIDE for later.
The Drain
The Drain (50%)
-
Unplug HEATER from power.
-
Drain hose is two parts. First length will reach to the toilet. Attaching the second one will reach to the gutter outside for doing a filter service If draining to the TOILET then attach suction up to top rim of bowel and lower the lid over top. Weigh down with other items if handy If draining to GUTTER then join second length
GRAVEL VACUUM. (As this has fine sand, usually vacuum is not necessary. Perhaps some skimming across surface of the bottom to remove large poo from the cat fish, often gathered at base of rocks
-
GRAVEL VACUUM PLANNED?
FAST DRAIN
-
Attach BASKET STRAINER from kit to tank-end of HOSE.
-
Ensure both SUCTION CUPS are functioning. SPARES in kit.
-
Place HOSE inside front glass at the DESIRED HEIGHT of water change. Basically as low as the filter intake will allow without sucking air into the filter
-
HINTS: If GRAVEL VAC occurred then SIPHON can often be started by "SNAKING" the hose, PUSHING the water that is already in the line TO CREATE the necessary SUCTION.
If HOSE is EMPTY, then cup thumb and forefinger over end of hose and suck for max 2 seconds.
NB. The LOWER the WATER LEVEL the MORE the effort is required to start it. -
Be sure the TWO SUCTION CUPS on the HOSE are secure to FRONT of GLASS. (HINT: WETTING improves their suction)
-
Slide VACUUM inside the DRAIN HOSE. (Wet in TANK WATER to help lubricate)
-
How dirty was it?
-
Gravel vac finished but still more water to drain?
FAST DRAIN
-
Attach BASKET STRAINER from kit to tank-end of HOSE.
-
Ensure both SUCTION CUPS are functioning. SPARES in kit.
-
Place HOSE inside front glass at the DESIRED HEIGHT of water change. Basically as low as the filter intake will allow without sucking air into the filter
-
HINTS: If GRAVEL VAC occurred then SIPHON can often be started by "SNAKING" the hose, PUSHING the water that is already in the line TO CREATE the necessary SUCTION.
If HOSE is EMPTY, then cup thumb and forefinger over end of hose and suck for max 2 seconds.
NB. The LOWER the WATER LEVEL the MORE the effort is required to start it. -
FILTER SERVICE PLANNED?
-
STOP the vacuum when done but leave vacuum in place for when you have the media ready to wash as this is a gentler rate of flow for washing with.
-
NEED INSTRUCTIONS?
-
Unplug power to filter and throw plug over the wall cavity into the cupboard
-
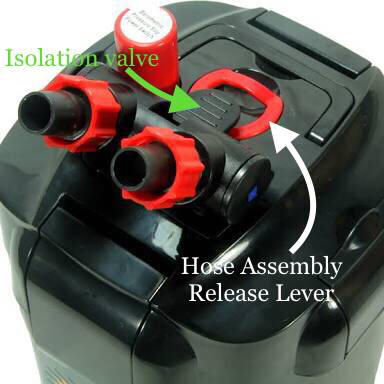
Close off isolation Valve
-
-
Lift up red HOSE ASSEMBLY RELEASE LEVER to detach hoses from the filter
-
Remove filter from cabinet and take outside to the street (with buckets)
-
Open filter and remove filter media baskets, taking note of which order they were in.
-
Start gravel vac syphon once more and start washing the media in the tank water, use the buckets to rinse them in
-
Take apart the impeller assembly in the motor head and use the toothbrush to wash impeller and its seating in the motor head.
-
Rinse the filter bucket, making sure all sand grit is free from the top part in particular
-
Reassemble the filter, making sure of the correct order (in general course on the bottom, fine at the top) and replace the motor head, making final check that its rubber seal is free from grit.
-
Return the filter to inside and leave aside for installation once the refill has begun
The Refill
The Refill
-
If not FAST DRAINED, then first place HOSE inside tank, mounted HORIZONTALLY.
-
If fast drained, orientate tank-end HOSE to be HORIZONTAL and Remove BASKET STRAINER and replace in kit.
-
Attach TAP ADAPTOR to BATHROOM TAP and slide the lock to fix it in position
-
Screw on CLICK FITTING TAP ADAPTOR length of HOSE (IN BUCKET) to drain end of HOSE.
-
Turn on Bathroom tap to FLUSH out old water
-
SOUP HEATER in COLD months and with water changes 50% or larger (alternatively 2-3 kettles of boiled water) REMEMBER: always plug into WALL OUTLET. Try to find OPEN SPACE, away from plants.
Things To Do During Refill
-
CLEAN GLASS; easiest at LOW WATER LEVELS. SOFT ALGAE lightly with sponge. DARK GREEN spots: best with SCRAPER.
-
Water level high enough? Turn HEATER ON.
-
Coverglass and top area need a clean?
-
Remove remaining back pieces and use a bucket of water and sponge using bucket as a sink. Wipe down with paper towels from toilet. Give a wipe down of BRACING on top of the tank, be sure to not let old spelled food to not fall into the tank
Tests (continued) NOTE: the following advice is based on PRE-WATER CHANGE samples
-
pH Test? 3 drops in 5ml. (ideal range 7-7.1)
-
ADD approx 1 tsp CORAL SAND.
-
ADD approx 2 tsp CORAL SAND
-
Is this expected? Been a recent large dose of coral sand last time?
-
Rinse test tube thoroughly and retest. (Any traces of ammonia or GH tester solution will give a false alkaline reading)
-
WOAH! Unlikely! Rinse test tube thoroughly and retest. (Any traces of AMMONIA TEST or GH TEST solutions will give a false alkaline reading) If still high then we must assume that there has been an excess amount of coral sand and all we can do is water change. It will eventually come down as the coral sand dissolves.
-
GH TEST. number of drops to turn from ORANGE to GREEN
-
SIZE of water change:
-
ADD 1 TSP SALTS (NB. Be sure to premix in bucket as blue salt stain white gravel)
-
ADD 2 TSP SALTS (NB. Be sure to premix in bucket as blue salt stain white gravel)
-
SIZE of water change:
-
ADD up to 1TSP SALTS (NB. Be sure to premix in bucket as blue salt stain white gravel)
-
ADD up to 2 TSP SALTS (NB. Be sure to premix in bucket as blue salt stain white gravel)
-
ADD up to 3 TSP SALTS (NB. Be sure to premix in bucket as blue salt stain white gravel)
-
SIZE of water change:
-
Add no salts and let water change reduce the GH
-
ADD 1 TSP SALTS (NB. Be sure to premix in bucket as blue salt stain white gravel)
-
ADD 2-3 TSP SALTS (NB. Be sure to premix in bucket as blue salt stain white gravel)
-
NITRATE TEST (optional on special request)
-
Depending on state of plants, this is POSSIBLY grounds for increase in COMPLETE dose. Contact Bruce for further instructions.
-
GENERALLY this is the OPTIMUM RANGE. HOWEVER if there is POOR PLANT GROWTH observed then possibly means therefore not enough K and thus they are being starved. Contact Bruce for further instructions.
-
Almost certainly and LACK of POTASSIUM. Inform Bruce after service.
-
PHOSPHATE TEST (optional on request)
Additives
-
SALTS ADDED? (Low GH)<br>NOTE: NO SALTS DIRECTLY ON PLANTS!!<br><br>- The methylene blue in this salt stains.<br><br>Either MIX in by hand, or premix in cup of HOT WATER.
-
How many spoonsful?
-
Coral sand added? (Low pH)
-
How many teaspoons?
-
COMPLETE fertiliser added? (Typically 20 ml)
-
How much?
- 5ml
- 10ml
- 15ml
- 20ml
- 25ml
- 30ml
Packing up
SUPPLIES ; in OFFICE, by PRINTER. ANY REFILLING IN SINK OR OUTSIDE!
-
SALTS refill?
-
FOOD REPLACE/ REFILL?
-
WHICH KIND?
- TETRABITS
- SPIRULINA FLAKES
- ALGAE WAFER TABLETS
-
Mark which food will be needed next
- TETRABITS
- SPIRULINA FLAKES
- ALGAE WAFER TABLETS
Equipment Check
-
Timer on the correct time?
-
Can you account for this? Was there a power failure recently?
-
Then safest is to assume it's faulty. Replacement Installed?
-
IMPORTANT! Remove and notify the staff, preferably NADER: They will have to MANUALLY turn on and off until a new one is sourced. Leave a note by food saying so. Leave old timer there so you (or they) can match the settings when new one is acquired
-
LIGHTS: All LEDs working?
-
Details
-
Return Light slightly FORWARD of centre.
-
Notes
FINAL CHECKS
-
HEATER and FILTER PUMP ON and functioning?
-
OUTSIDE GLASS, CABINETRY etc CLEAN & DRY?
-
Got your: BASKET STRAINER? TOOTH BRUSH? TEASPOON?k
-
Photos After. 1 x OVERALL. CLOSEUPS of any REARRANGED PLANT.
-
Time Finished
")
")