


Title Page
-
Customer Name
-
Postcode
-
Conducted on
-
Prepared by
-
Location
Scaffolding Health & Saftety
-
Have you visually inspected the scaff and are you happy they are no visible issues
-
Valid tag showing name and contact details
-
Are they any issues with scaffold (gate on wrong side, etc)
-
Take photos of any issues
Roof Works
Roof logic>1 roof
-
Photo's Pre-Installation of Target roof one
-
Target Roof 1 is the roof with the most panels on it
-
Direction of target roof one
- North
- North-East
- North-West
- West
- East
- South-East
- South-West
- South
-
Have you checked and confirmed that you have all the required kit for the job?
-
Photo(s) of the kit (inc everything you need - hooks, rails etc)
-
Is there felt in the loft
-
Is the felt in good condition
-
Take photo(s) of felt where in poor condition
-
Is their signs of existing water ingress in the loft
-
Photo(s) of area where existing water ingress exists
-
Is there any existing damages on the roof PRE-work commencing
-
Photo with tape measure of the width of the roof tile
-
Measured width of roof tile (mm)
-
Photo with tape measure of the EXPOSED height of the roof tile
-
Measured exposed height of roof tile (mm)
-
Are all the panels going on one roof
-
Are the panels going across 2 roofs
-
Are the panels going across 3 roofs
Additional Target roof questions
-
How many panels are going on roof 2
-
What is the direction of roof 2
-
Photo(s) of target roof two from different angles - PRE-INSTALLATION
-
Is there any EXISTING damage on target roof two - PRE work commencing
If different building
-
Is target roof 2 a different building then target roof one
-
Photo with tape measure of the width of the roof tile on target roof two
-
Measured width of roof tile (mm) on target roof two
-
Photo with tape measure of the EXPOSED height of the roof tile on target roof two
-
Measured EXPOSED height of roof tile (mm) on target roof two
-
Photo(s) of the loft of target roof 2
-
How many roofs is solar being installed on ?
Photos DURING Installation target roof one
-
Photo of Roofing Hook secured to rafters with 2 MCS standard roofing screws on multiple hooks
-
Photo(s) of target roof one - HOOKED AND RAILED (please take from multiple angles)
-
Walk around the array(s) slowly. Make 1 video for each array
-
Photo(s) showing where DC cable entry is going to be on target roof one before covering
-
Photo(s) showing how DC connectors behind the panel are neatly secured with zip-ties on rail
-
Have any tiles been notched
Photos DURING Installation target roof one
-
Photo of Roofing Hook secured to rafters with 2 MCS standard roofing screws on multiple hooks
-
Photo(s) of target roof one - HOOKED AND RAILED
-
30 second video of roof one HOOKED and RAILED
-
Walk around the array(s) slowly. Make 1 video for each array
-
Video explaining where DC cable entry is going to be on target roof one before covering
-
Photo(s) showing how DC connectors behind the panel are neatly secured with zip-ties on rail
-
Have any tiles been notched
Photos DURING Installation target roof two
-
Photo of Roofing Hook secured to rafters with 2 MCS standard roofing screws on multiple hooks
-
Photo(s) of target roof two- HOOKED AND RAILED
-
30 second video of roof two HOOKED and RAILED
-
Walk around the array(s) slowly. Make 1 video for each array
-
Video explaining where DC cable entry is going to be on target roof two before covering
-
Photo(s) showing how DC connectors behind the panel are neatly secured with zip-ties on rail
-
Have any tiles been notched
-
How many roofs have you installed solar on
Photos Post-Installation Roof One
-
Photo(s) showing distance between panel array and roof one border with tape measure (must be >400mm unless otherwise justified)
-
Photo(s) showing distance between panel array and the top of the roof one ridge with tape measure
-
Photo(s) showing distance between panel array and edge of roof one
-
Photo(s) showing rail overhang of at least 50mm and a maximum of 200mm on roof one
-
Does the job have bird netting?
-
Close up photo(s) of bird netting around solar array(s) uses adequate clips with reasonable spacing, taken from scaffold
-
Take a picture underneath EVERY panel on roof one
-
Photo(s) WITH a measuring tape from the edge of the panel to the bottom end clamp - do this for every array on roof one
-
Photo(s) WITH a measuring tape from the edge of the panel to the top end clamp - do this for every array on roof one
-
Has the panels been strung as to the original design on the job pack
-
Take a picture of the stringing configuration (Has it been strung to the OG design)
-
Is they a jumper cables between panel arrays
-
Take a picture/recording of ALL jumper cables used and prove they have been secured (with copex etc)
-
Does the system have an optimizer(s)?
-
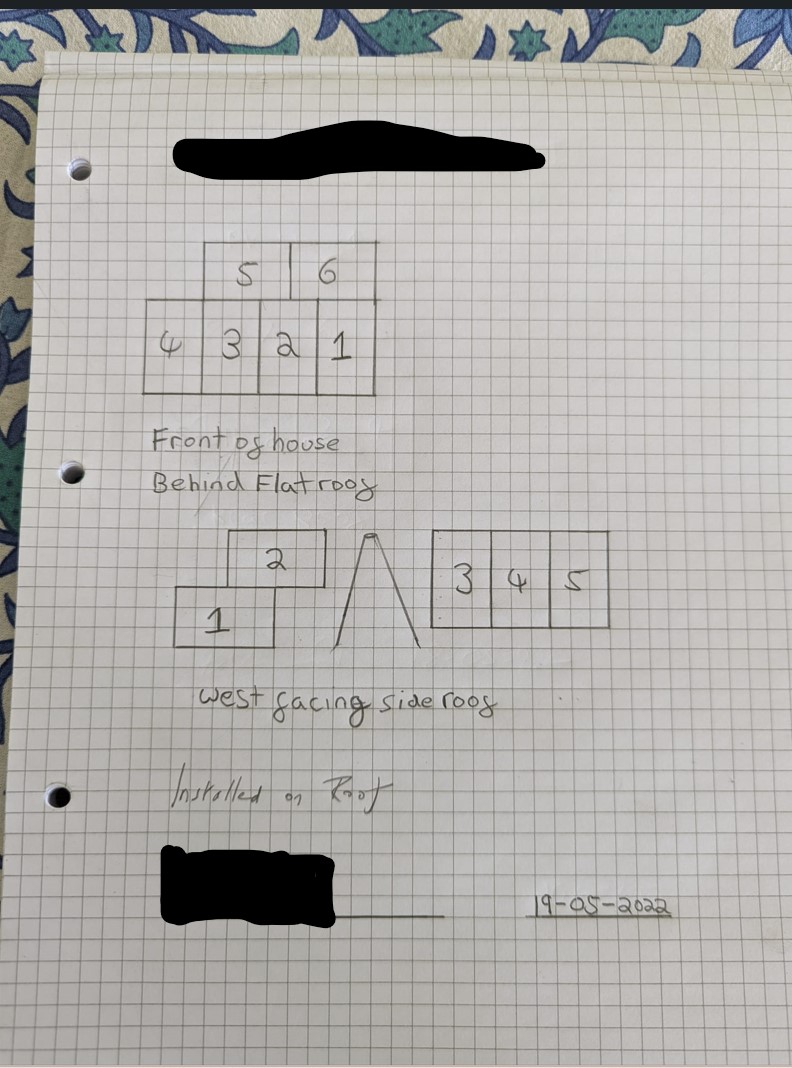
Take a picture of all Optimizer serial numbers and make a note of where they are in a array (must draw a picture)
-
Example photo of optimizer layout - (Instead of numbers I need serial numbers of the optimizer to the corresponding panel)
-
-
Any damages on the panels (scratches, bumps or scrapes)
-
Photo(s) of solar array(s) taken from ground - if visible from the ground
Photos Post-Installation Roof One
-
How many panel arrays are one roof one
-
Photo(s) showing distance between panel array and roof one border with tape measure (must be >400mm unless otherwise justified)
-
Photo(s) showing distance between panel array and the top of the roof one ridge with tape measure
-
Photo(s) showing distance between panel array and edge of roof one
-
Photo(s) showing rail overhang of at least 50mm and a maximum of 200mm on roof one
-
Does the job have bird netting?
-
Close up photo(s) of bird netting around solar array(s) uses adequate clips with reasonable spacing, taken from scaffold
-
Take a picture underneath EVERY panel on roof one
-
Photo(s) WITH a measuring tape from the edge of the panel to the bottom end clamp - do this for every array on roof one
-
Photo(s) WITH a measuring tape from the edge of the panel to the top end clamp - do this for every array on roof one
-
Take a 30 video of the panel(s) array showing every single panel on roof one. If multiple arrays - take multiple videos
-
Take a picture of the stringing configuration
-
Is they a jumper cables between panel arrays
-
Take a picture/recording of ALL jumper cables used and prove they have been secured (with lead or copex etc)
-
Does the system have an optimizer?
-
Take a picture of all Optimizer serial numbers and make a note of where they are in a array (must draw a picture)
-
Example photo of optimizer layout - (Instead of numbers I need serial numbers of the optimizer to the corresponding panel)
-
-
Any damages on the panels (scrathes, bumps or scrapes)
-
Photo(s) of solar array(s) taken from ground - if visible from the ground
Photos Post-Installation Roof Two
-
How many panel arrays are one roof two
-
Photo(s) showing distance between panel array and roof twoborder with tape measure (must be >400mm unless otherwise justified)
-
Photo(s) showing distance between panel array and the top of the roof two ridge with tape measure
-
Photo(s) showing distance between panel array and edge of roof two
-
Photo(s) showing rail overhang of at least 50mm and a maximum of 200mm on roof two
-
Does the job have bird netting?
-
Close up photo(s) of bird netting around solar array(s) uses adequate clips with reasonable spacing, taken from scaffold
-
Take a picture underneath EVERY panel on roof two
-
Photo(s) WITH a measuring tape from the edge of the panel to the bottom end clamp - do this for every array on roof two
-
Photo(s) WITH a measuring tape from the edge of the panel to the top end clamp - do this for every array on roof two
-
Take a 30 video of the panel(s) array showing every single panel on roof two. If multiple arrays - take multiple videos
-
Take a picture of the stringing configuration
-
Is they a jumper cables between panel arrays
-
Take a picture/recording of ALL jumper cables used and prove they have been secured (with lead or copex etc)
-
Does the system have an optimizer?
-
Take a picture of all Optimizer serial numbers and make a note of where they are in a array (must draw a picture)
-
Example photo of optimizer layout - (Instead of numbers I need serial numbers of the optimizer to the corresponding panel)
-
-
Any damages on the panels (scrathes, bumps or scrapes)
-
Photo(s) of solar array(s) taken from ground - if visible from the ground
Declarations and Proof
-
I confirm I have visually inspected the DC cables including exit to panels through roof tiles and confirm there are no damages? (other than minor superficial scratches) (IA)
-
I confirm I have visually inspected the roof, panels and cables for damage and mechanical/UV protection? (IA)
-
I confirm there are no cables or connectors resting on roof tiles and all are properly fixed to structures in accordance to the manufacturers?(IA)
-
I confirm any damages incurred during installation have been rectified(IA)
-
I confirm the roof is water tight and there are no leaks or potential entries for water ingress - post installation (IA)
-
I confirm all mess made during install has been cleaned and the site has bee left in a safe state (take a pic of site post installation)
-
Have you left the ladder guard on the ladder when leaving site to ensure no-one can access the scaffolding ?
Customer sign off
-
I confirm this installation has been installed within MCS guidelines and the customer is happy and content with installation
-
Customer signature - confirming their are happy with installation


")


")


