


Title Page
-
Conducted on
-
Prepared by
-
Location
-
A point of works risk assessment must be completed prior to any works starting.
-
PPE
-
All PPE:
• Must be inspected prior to use. If any defects are found the item must be taken out of service.
• Be compatible with all other PPE
• Be the correct type of PPE
• Must fit properly -
HARNESS
-
Daily pre -user checks to be completed and weekly recorded Inspections using iAuditor form
-
Always check that the lanyard length is correct for the task
-
Rope and Grab
• You must be trained and competent to use this piece of PPE -
Safety Glasses
• Ensure the glasses are clean and scratch free.
• Keep them in a case or safe place to prevent scratches and damage -
Safety Googles
• Ensure the googles are clean and scratch free.
• Keep them in a case or safe place to prevent scratches and damage -
FFP3 Filter Mask
• You must be face fit tested for the mask you are using. -
Face Visor
• Ensure the visor covers the face and is snapped in position
• Ensure the visor is clean and scratch free. -
Access Equipment
-
Working from a ladder?
-
Risk Rating prior to Controls 4x4 = 16
Risk Rating after Controls 4x1 = 4
Whos affected: Operatives
• All ladders must be inspected prior to use using the iAuditor form; Ladder Inspection RMS
• Use a ladder stay or have it footed by a second operative
• Where possible always secure the ladder
• Check the angle of the ladder and adjust if required
• Check the ladder is long enough to provide support when working from it. " -
Using a roof ladder?
-
"Risk Rating prior to Controls 4x4 = 16
Risk Rating after Controls 4x1 = 4
Whos affected: Operatives
•All roof ladders must be suitable for the task, the ridge iron must clear the ridge tile
• Ensure that the roof ladder is long enough to give you safe access
• Check that the ladder is secure and not slipping, make sure the hook is securely over the ridge.
• Make sure if you are using the roof ladder with an access ladder that you securely tie the ladders together. " -
-
Using a ladder for access only
-
Risk Rating prior to Controls 4x4 = 16
Risk Rating after Controls 4x1 = 4
Who's affected: Operatives
• All ladders must be inspected prior to use using the iAuditor form; Ladder Inspection RMS
• The supervisor will be responsible for putting up and taking down the access ladders at the start and end of each day.
• All access ladders must be footed until secured in place
• They must be securely tied/clipped. Internal ladders are to have access hatches and external ladders are to have safety gates
• The ladders must have at least 4 rungs above the platform to enable the user step from the ladder on to the platform" -
MEWP
-
Risk rating after controls: Low 1x2 =2 Risk rating before controls: High 4x4 =16
-
Overturning of Platform - Mechanical
•. Survey Roofing operatives will undertake a pre-use inspection prior to operation.
•. Mandatory LOLER thorough examinations will be undertaken as part of the company health and safety policy at intervals not exceeding 6 months
•. Maintenance will be completed in accordance with the manufacturer’s recommendations -
Exceeding the manufacturer’s safe working load
• Competent operatives trained to ‘International Powered Access Federation’ (IPAF) standards.
• A copy of the manufacturer’s machine operation manual to be kept with the machine at all times.
• Platform to have clearly identifiable decals stating the ‘Safe Working Load’ (SWL) which will not be exceeded by the operator
• All platforms fitted with automatic overload sensors / devices. -
Unsuitable Ground Conditions
• Survey Roofing operator IPAF training includes assessment for unsuitable ground conditions.
• Survey Roofing company policy is to use ground spreader pads during platform operation at all times (mandatory).
•. Where possible a competent person will predetermine ground conditions prior to deployment. -
major / minor component failure
• Survey Roofing operatives will undertake a pre-use inspection of the access platform prior to operation.
• Mandatory LOLER 1998 thorough examinations will be undertaken as part of the company health and safety policy at intervals not exceeding 6 months.
• Maintenance will be completed in accordance with the manufacturer’s recommendations.
• Operators can be lowered using either the auxiliary power systems or the emergency ground controls. -
Wind
• Survey Roofing operatives are IPAF trained which includes a section on unsafe operating weather conditions.
•. A copy of the manufacturer’s machine operation manual will be kept with the machine at all times.
•. Platform to have clearly identifiable ‘Safe Operating Wind Speed’ decals which will not be exceeded by the operative.
•. Operatives are trained in the use of, and will always carry handheld anemometers. Wind speeds will be monitored at ground level, working height and checked at regular intervals.
•. The operatives will not operate the MEWP at wind speeds in excess of 22mph -
• No works are to take place in extreme weather conditions.
• The site manager will monitor the weather forecast via the MET website and alerts issued.
• Ice, Winds over 22mph, snow, rain and extreme heat can make working on roofs unsafe. The site manager with advise from the HSQE Team is required will stand down all operatives where the weather conditions cause a risk to the health and/or the safety of the operatives. -
Thunder and lightning
• Survey Roofing operators are IPAF trained which includes a section on unsafe operating weather conditions.
•. Works will be suspended in the event of thunder and lightning until weather conditions become favourable. -
Electrocution From overhead power lines
• Survey Roofing operators are IPAF training which covers the risk of electrocution and safe operating distances from power lines.
•. Site survey to ascertain and assess risk of electrocution in an area specific to the task. -
Falls from Platform
• .A workplace restraint comprising of full body harness and adjustable fixed restraint lanyard must be worn at all times by all persons in the platform.
•. The adjustable fixed restraint lanyard will be kept anchored to the designated anchor point. -
Object falling from the platform
• .All platforms have toe boards fitted as standard.
•.Drop zone to be created using physical barriers.
•.All items must fit within the SWL of the platform, taking into consideration the weight of both persons and other materials. All objects must physically fit within the dimensions of the work platform. -
Object dislodged by platform
• .Survey Roofing operators are IPAF trained and extra vigilant when working near structures. -
Work Platform struck by another vehicle
• .Hazard beacons will be activated.
•.Provision of traffic management appropriate to the particular circumstances, including signage and barriers. -
Injury to worker
• . PPE will be provided and worn appropriate to the task. It will be inspected and maintained in accordance with PPE regulations • 99•.
•. Survey Roofing operatives have received manual handling training.
•. Where possible, manual handling will be substituted with mechanical aids.
•.Where possible, loads will be broken down. -
Loading
• Survey Roofing operatives are IPAF Load / Unload trained.
• All MEWPs (Mobile Elevated Work Platforms) will be loaded and unloaded aided by a winch where required, and always in accordance with the manufacturer’s operator manual. -
• Due to crushing/ entrapment between the work platform and an obstacle
• Survey Roofing operatives will be trained to IPAF standards which covers observation whilst manoeuvring with work platforms. -
"Stricking objects
• Extra vigilance will be taken by the operative when manoeuvring the work platform in the proximity of objects and structures." -
"Incapacitated Operative
• In the event of the operative becoming entrapped or incapacitated, they will be lowered using either auxiliary power systems or the emergency ground controls." -
"Work Platform Stranded at Height
• The work platform can be lowered using either auxiliary power systems or the emergency controls from either the platform or the ground, in accordance with the manufacturer’s machine manual." -
"• Before exiting the MEWP ensure the roof covering and substrate are capable of loads.
• Check the roof from internal where possible, especially gutters to ensure they are supported.
• Check the pitch of the roof, it should be no more than 11 degrees.
• Make sure the work area is enclosed and there are no exposed leading edges
• If there is no edge protection, then the work area must be denoted and demarcated with a physical barrier such as a chapter 8 barrier. Please note Cones and hazard tape are not acceptable.
• You are NEVER permitted to exit the MEWP bucket without a clearly defined and safe work area. " -
• Survey Roofing operatives will undertake a pre-use inspection of the access platform prior to operation.
-
-
Rescue Plan
-
"MEWP Rescue Plan
EMERGENCY SITUATION
STEP 1 Failure of upper control functions while elevated
PROPOSED ACTION
Where the normal upper control functions fail; the operator will use the upper auxiliary controls to lower the platform safely" -
EMERGENCY SITUATION
STEP 2 Failure of the operator to be able to operate the MEWP functions while elevated due to one of the following reasons:
A. Operator incapacitated
B. Both normal and auxiliary functions fail to operate from upper control station
PROPOSED ACTION
Where the operator is incapable of lowering the raised platform using the upper controls; an appointed person familiarised in the use of the ground controls will lower the platform safely using the normal ground controls -
EMERGENCY SITUATION
STEP 3 Failure of normal ground controls
PROPOSED ACTION
Where the normal ground controls fail; an appointed person familiarised in the use of the ground controls will use the ground auxiliary controls to safely lower the platform -
EMERGENCY SITUATION
STEP 4 Failure of ALL normal and auxiliary lowering functions
PROPOSED ACTION
Where all normal and auxiliary functions have failed a qualified technical engineer will need to attend. This will be arranged by the Team leader or Supervisor -
Mid Air Rescue
This can only be performed under the authorisation of the HSQE Manager or National Operations Manager and will only be attempted in extreme circumstances where there is an immediate risk to life.
The fire service will be called before this attempted as they can often assist in this type of rescue. -
Mobile Access Tower
-
Before starting
• Check that you have all of the components before you start erecting the tower and the tower will reach the intended work height. Remember you can only work from the platform.
NEVER stand on the rails
NEVER use with broken or missing parts -
Stability
• Remember, the stability of any tower is easily affected. Unless the tower has been specifically designed for such use, activities such as those listed below should never be carried out:
- sheeting or exposure to strong winds
- loading with heavy equipment; and
- using the tower to hoist materials or support rubbish chutes. -
Inspection
• Ensure scaffold is complete and signed off by a PASMA trained competent person before using.
• If there is a scaff- tag, Check theScaff-tag for comments and date prior to use.
• Ensure handrails, bracing and platforms are suitable – report any defects to site manager immediately. -
• Make sure the tower is resting on firm, level ground with the locked castors or base plates properly supported. Never use bricks or building blocks to take the weight of any part of the tower.
• Lock wheels and ensure outriggers are secure with correct arc angle.
•. Operatives to climb internal ladders only and trap doors shall be correctly aligned.
•. Tower scaffolding shall not be overloaded or store significant quantities of materials." -
•. When moving a tower:
- reduce the height to a maximum of 4 m;
- check that there are no power lines or other obstructions overhead
- check that the ground is firm, level and free from potholes; push or To prevent the use of incorrectly erected or damaged mobile access towers, they must be inspected by a competent person.
This is someone with the experience, knowledge and appropriate qualifications to enable them to identify any risks that are present and decide upon the measures required to control the risks. -
Dismantle
•. To dismantle a tower using the advance guard rail method, the operator starts from the top and reinstates the advance guard rail unit before removing the permanent guard rails and toe boards and descending to the lower level. The advance guard rail units are then relocated to the level below and the process is repeated, with collective fall prevention measures being maintained throughout. -
To dismantle a tower using the 3T method, after removing the toe boards, the operator disengages the guard rail hooks furthest from the trap. Guard rail components are then removed with the operator positioned through the trap before descending to the lower level, from where the upper platform and end frames are removed.
-
• Ensure the scaffold access ladders in segregated from the public with physical barriers
• Ladder to be removed at the end of each working day and chained so that no member of the public can easily access it
• ladder to be positioned so that you can step off it on to the scaffold platform at a 90.
Ladder to be at an angle of 1:4
• Ladder to be footed until tied in position and to be footed when taking down -
-
Design
• A tube and fitting staircase will require a design to be of construction issue prior to the works starting.
• An advanced scaffolder must be supervising at all times.
• Staircases are part of the advanced scaffolders CISRS training
• Steps to be placed evenly apart and within specified tolerances on the design.
• Risk assessment and method statement to be reviewed -
• Check the walkways and satirs are clear of debris and anyother slip, trip hazards.
• Check the condition of the stairs, especially f they are external and could be subject to degradation such as rusting. -
SCISSOR LIFT
-
Risk rating after controls: Low 1x2 =2 Risk rating before controls: High 4x4 =16
-
Overturning of Platform - Mechanical
•. Survey Roofing operatives will undertake a pre-use inspection prior to operation.
•. Mandatory LOLER thorough examinations will be undertaken as part of the company health and safety policy at intervals not exceeding 6 months
•. Maintenance will be completed in accordance with the manufacturer’s recommendations -
Exceeding the manufacturer’s safe working load
• Competent operatives trained to ‘International Powered Access Federation’ (IPAF) standards.
• A copy of the manufacturer’s machine operation manual to be kept with the machine at all times.
• Platform to have clearly identifiable decals stating the ‘Safe Working Load’ (SWL) which will not be exceeded by the operator
• All platforms fitted with automatic overload sensors / devices. -
Unsuitable Ground Conditions
• Survey Roofing operator IPAF training includes assessment for unsuitable ground conditions.
• Survey Roofing company policy is to use ground spreader pads during platform operation at all times (mandatory).
•. Where possible a competent person will predetermine ground conditions prior to deployment. -
major / minor component failure
• Survey Roofing operatives will undertake a pre-use inspection of the access platform prior to operation.
• Mandatory LOLER 1998 thorough examinations will be undertaken as part of the company health and safety policy at intervals not exceeding 6 months.
• Maintenance will be completed in accordance with the manufacturer’s recommendations.
• Operators can be lowered using either the auxiliary power systems or the emergency ground controls. -
Wind
• Survey Roofing operatives are IPAF trained which includes a section on unsafe operating weather conditions.
•. A copy of the manufacturer’s machine operation manual will be kept with the machine at all times.
•. Platform to have clearly identifiable ‘Safe Operating Wind Speed’ decals which will not be exceeded by the operative.
•. Operatives are trained in the use of, and will always carry handheld anemometers. Wind speeds will be monitored at ground level, working height and checked at regular intervals.
•. The operatives will not operate the MEWP at wind speeds in excess of 22mph -
• No works are to take place in extreme weather conditions.
• The site manager will monitor the weather forecast via the MET website and alerts issued.
• Ice, Winds over 22mph, snow, rain and extreme heat can make working on roofs unsafe. The site manager with advise from the HSQE Team is required will stand down all operatives where the weather conditions cause a risk to the health and/or the safety of the operatives. -
Thunder and lightning
• Survey Roofing operators are IPAF trained which includes a section on unsafe operating weather conditions.
•. Works will be suspended in the event of thunder and lightning until weather conditions become favourable. -
Electrocution From overhead power lines
• Survey Roofing operators are IPAF training which covers the risk of electrocution and safe operating distances from power lines.
•. Site survey to ascertain and assess risk of electrocution in an area specific to the task. -
Falls from Platform
• .A workplace restraint comprising of full body harness and adjustable fixed restraint lanyard must be worn at all times by all persons in the platform.
•. The adjustable fixed restraint lanyard will be kept anchored to the designated anchor point. -
Object falling from the platform
• .All platforms have toe boards fitted as standard.
•.Drop zone to be created using physical barriers.
•.All items must fit within the SWL of the platform, taking into consideration the weight of both persons and other materials. All objects must physically fit within the dimensions of the work platform. -
Object dislodged by platform
• .Survey Roofing operators are IPAF trained and extra vigilant when working near structures. -
Work Platform struck by another vehicle
• .Hazard beacons will be activated.
•.Provision of traffic management appropriate to the particular circumstances, including signage and barriers. -
Injury to worker
• . PPE will be provided and worn appropriate to the task. It will be inspected and maintained in accordance with PPE regulations • 99•.
•. Survey Roofing operatives have received manual handling training.
•. Where possible, manual handling will be substituted with mechanical aids.
•.Where possible, loads will be broken down. -
Loading
• Survey Roofing operatives are IPAF Load / Unload trained.
• All MEWPs (Mobile Elevated Work Platforms) will be loaded and unloaded aided by a winch where required, and always in accordance with the manufacturer’s operator manual. -
• Due to crushing/ entrapment between the work platform and an obstacle
• Survey Roofing operatives will be trained to IPAF standards which covers observation whilst manoeuvring with work platforms. -
"Stricking objects
• Extra vigilance will be taken by the operative when manoeuvring the work platform in the proximity of objects and structures." -
"Incapacitated Operative
• In the event of the operative becoming entrapped or incapacitated, they will be lowered using either auxiliary power systems or the emergency ground controls." -
"Work Platform Stranded at Height
• The work platform can be lowered using either auxiliary power systems or the emergency controls from either the platform or the ground, in accordance with the manufacturer’s machine manual." -
Permits Required
-
HOT WORKS PERMIT
Risk Rating prior to Controls 3x4 = 12
Risk Rating after Controls 3x1 = 3
Who's affected: Operatives
• Hot works permits will be completed by the site supervisor. All conditions must be met before the HWP is issued and works are allowed to proceed.
• Hot works permits are required for using grinders and fire extinguishers are required to be 1m from the point of use
• 1 or 2 hour fire watch will be completed when the hot works finish. The watcher must be able to see the work area at all times during this period. -
HOT WORKS PERMIT
Risk Rating prior to Controls 3x4 = 12
Risk Rating after Controls 3x1 = 3
Who's affected: Operatives
•. Hotworks permits will be completed by the site supervisor. All conditions must be met before the HWP is issued and works are allowed to proceed.
•. Hotworks permits are required for using grinders and fire extinguishers are required to be 1m from the point of use
• 1 or 2 hour fire watch will be completed when the hotworks finish. The watcher must be able to see the work area at all times during this period. -
ACCESS PERMIT
Risk Rating prior to Controls 3x4 = 12
Risk Rating after Controls 3x1 = 3
Who's affected: Operatives
• Access permits will be completed by the Client and issued the SRG Team. All conditions must be met before the permit is issued and works are allowed to proceed. -
Any additional Access Permit controls
-
WORKING AT HEIGHT PERMIT
Risk Rating prior to Controls 3x4 = 12
Risk Rating after Controls 3x1 = 3
Who's affected: Operatives
• Working at Height permits will be completed by the Client and issued the SRG Team. All conditions must be met before the permit is issued and works are allowed to proceed. -
ELECTRICAL PERMIT
Risk Rating prior to Controls 3x4 = 12
Risk Rating after Controls 3x1 = 3
Who's affected: Operatives
• Electrical permits will be completed by the Client and issued the SRG Team. All conditions must be met before the permit is issued and works are allowed to proceed. -
Electrical Permit Controls
-
ISOLATION PERMIT
Risk Rating prior to Controls 3x4 = 12
Risk Rating after Controls 3x1 = 3
Who's affected: Operatives
• Isolation permits will be completed by the Client and issued the SRG Team. All conditions must be met before the permit is issued and works are allowed to proceed. -
Isolation permit Controls
-
Fire and Emergency
-
• There will be a fire risk assessment for the building held by the Client. You must inform the client of where you will be working and the duration of the works.
• You must sign in and out of the building
• Complete a Hot works permit if required and ensure all conditions are met
• Find out where the muster point is located and find out the nearest call point from your work area.
• If you are using flammable substances make sure a fire extinguisher is available
•. Good housekeeping is essential in reducing the risk of fire
•. NO SMOKING ON SITE unless there is a designated smoking area. -
First Aid
-
First Aid Kit
• The correct first aid kit should be available for the type of works
• Check the contents of the first aid box on a weekly basis to ensure all items are in datee
• order replacements for any items that are used.
•. Make sure the kit is in a location that is easily accessible. This will normally be within easy reach of the works. -
Reporting First Aid Incidents
• Ensure that all first aid incidents are reported to the HSQE Manager and that a written record is completed. -
First Aid Training
• The SRG Team leader will hold an Emergency first aid at work training certificate
• Only administer first aid training that you are trained for. If there is any doubt call the emergency services. They will be able to talk you through how to administer some first aid treatment. -
Hot Works - Burns
•When carrying out hotworks ensure that there is a burns kit available on site. This must include the freeze spray and freeze patches. -
Scaffold, Edge and Fall Protection
-
NO LEADING EDGES
The work area is fully enclosed and there is no requirement for any further protection -
BASIC ACCESS SCAFFOLD - TG20 COMPLIANT
• Before setting foot on the scaffold check that there is a valid Inspection within the last 7 Days.
• Visually inspect the scaffold from the ground and look for any defects.
• When walking on a scaffold for the first time, always exercise caution. Check the boards are secure, and not trapping. Check there are no gaps bigger than 100mm. Where possible check the first lift boards from the ground, and then check the next lift boards from underneath and repeat.
• Handrails are to be at no less than 450mm gaps and a minimum of two handrails at a height of 900mm are to be in place at all accessible points.
• Access ladders shall have ladder hatches or gates fitted and SRG operatives will ensure these remain closed and are not propped open. This especially important on the roof level lift were the operatives will be working.
• Access ladders shall be fixed securely. The ladder must be set so that you can step off the ladder on to the scaffold
• If you step or work on the scaffold and it moves significantly or pulls away from the building. Immediately STOP and come off the scaffold.
Inform the supervisor or SRG manager. NEVER work on a scaffold if it does not feel secure.
• Ensure the workplace is kept tidy and walkways free from trip hazards.
•. Rubbish to bagged and stored in designated area before being removed at the end of each day
•. Employees instructed not to alter or interfere with scaffolding unless trained to do so.
•. Permanent scaffolding will be correctly designed, erected and regularly inspected by a competent person and those inspections recorded and tagged. Check Scaff-tag for comments and inspection date prior to use.
•. All boards shall be in good condition and free from splits. If notice any damaged or split boards report them immediately
•. Toe boards and handrails shall be to NASC guidelines. Debris netting and brick guards shall be fitted as per design / task.
•. Loading bay gates shall be designed so that they do not pose a fall risk
•. SRG operatives to report any faults to the SRG manager or PC -
• Individual Risk assessments to be in place for non-generic works including but not limited to Dorma windows, steep pitched roofs, adhoc stepped roof sections, porches, conservatories.
-
Falling Materials
•. Do not stack materials above the height of the toe board unless there are brick guards
•. Never bomb materials -
Any additional control measures
-
SCAFFOLD HANDRAIL
• Any scaffold handrail will have to be built to design
• Ties to be pull tested where bolted into the building.
• Where box tied, check the stability and distances between fixing points.
• If any ladders/steps/hop ups are to be used. There will need to be a third and possibly fourth hand rail. The hand rail gaps will not be more than 450mm and will be at a level above the waist height of an operative when they are stood on any required working platform
• Falls from the raised roofing sections will be protected by a hand rail that prevents a fall from the roof. This will be required on any fall over 600mm -
DOUBLE BOARDED 1st LIFT
• The lift will be fully boarded out
• Plastic sheeting will be placed over the boards so that it laps and over hangs the edges
• boards will be placed on top of the plastic and where possible clipped.
• Where is is not possible to clip the boards and there is a risk of the boards lifting tubes will be permitted to tie the boards down. -
DOUBLE BOARDED TOP LIFT
• The lift will be fully boarded out
• Plastic sheeting will be placed over the boards so that it laps and over hangs the edges
• boards will be placed on top of the plastic and where possible clipped.
• Where is is not possible to clip the boards and there is a risk of the boards lifting tubes will be permitted to tie the boards down. -
NETTING
• Visually check the netting
• Ensure it is in the correct location
• Check the handover is correct
• Read the information on certification and labelling -
-
-
Location and height of existing handrail
-
PARAPET WALL
• The wall must be 900m or higher in height
• Visually check the condition of the wall -
Information on the Mansard
-
CRASH DECK
• All crash decks to be designed to ensure they can take the loading if a person or object were to fall on to it.
• The crash deck must be as close to the fall point as possible to limit the impact loading.
• To be inspected at handover and every 7 days thereafter or when an adverse event happens that could affect the integrity of the structure. "
• Crash decks and fans to be double boarded and monoflexed
• Crash decks and fans to be provided by Scaffold contractors -
Detail where crash decks will be located
-
BIRDCAGE
• The birdcage must have a design
• All birdcages to be designed to ensure they can take the loading if a person or object were to fall on to it and is structurally sound
• The birdcage if acting as a crash deck as well must be as close to the fall point as possible to limit the impact loading.
• To be isnpected at handover and every 7 days thereatfer or when an adverse event happens that could affect the integrity of the structure
• Permanent scaffolding will be correctly designed, erected and regularly inspected by a competent person and those inspections recorded and tagged. Check Scaff-tag for comments and inspection date prior to use. -
TG20 COMPLIANT SCAFFOLD
• Must have a compliance sheet that is specific to that site and location
• Must be built within the parameters of the compliance sheet. Any deviation will require a bespoke design -
FULL DESIGN SCAFFOLD
• The design must be 'FOR CONSTRUCTION'
• The built scaffold must be checked against the design as part of the handover
• Any deviations from the design must be approved by a design engineer before the scaffold is handed over -
BRICKGUARD
• Check that are fitted correctly
• Check that they are not damaged and cover the entire area.
• They must come past the toeboard and provide a good solid barrier -
MONOFLEX
• Monoflex to be attached to the out side of the scaffold and to be attached via the eyelets.
• The monoflex is designed to break away in high winds and cannot do this if attached to the inside of the scaffold.
• Monoflex will be part of the design as it will effect the wind loading of the scaffold structure. -
DEBRIS NETTING
• Debris netting to be attached to the out side of the scaffold and to be attached via the eyelets.
• The netting is designed to break away in high winds and cannot do this if attached to the inside of the scaffold.
• Debris netting will be part of the design as it will effect the wind loading of the scaffold structure. -
SCAFFOLD A FRAME/FREE STANDING HAND RAIL
Check that the handrail is sturdy and cannot be easily moved
Only ever work in fall restraint
Check that the handrail covers the work area and that you can safely access the work areas. -
Staging Board/ Board Walk
-
• Where possible use handrail kits to both sides of the boards
Read the manufactures fitting instructions and check they are securely fitted.
• Check the boards and handrails for any signs of damage. If damaged report and do not use.
• Consider the length of the staging boards as they will have to be manually handled at some point.
• They must be of a length where they can sit comfortably over at least 3 structural points such as purlins.
• The hand rails must be put on before the board is placed in position, where this is a fragile roof guide ropes may be used to allow the board to be lowered gently. -
If using a single handrail and there is a fall risk always wear and harness 1m or 0.5 m lanyard and clip on to the frame.
-
MAN ANCHOR
• Before you use the man anchor check that all the components are present and in good order.
Make sure the man anchor is taken completely apart before moving into position and setting it up. Do not try and move once set up
•Take the man anchor system to the roof in sections and position the cross section in place.
• Always ensure that you are in a place of safety when setting up.
• As soon as the man anchor is set up, clip on.
• Check the roof condition of where the anchor is to be situated – never use on a slope of more than 15°(where over 7 ° consult the manufacturers guidance or call hire company)
• Always read SAFE USE of booklet
• Make sure you can clip on in a safe place
•. Consider the weight limits on any fragile or potentially fragile surfaces. -
• Have you considered the pendulum effect
• If you are working around the corner edges you will need two man anchors and will need to use a double rope and grab. -
SAFETY LINE
• DO NOT DO ANY WORKS ON SAFETY LINE SYSTEMS WITHOUT TRAINING
•. It is our intention to arrange for the works to be carried out in a full fall-restraint manner, whereby it will not be at all possible for our operatives to fall from their work areas.
•. Operatives are to wear full body safety harnesses with twin forked lanyard and scaffold hook attachments at all times.
•. Each operative will have harness training
•. Operatives to check that the harness fits them properly and can be fully adjusted
•. Harnesses will be inspected prior to use, and formally inspected no less than 6 months but in line with the manufacturer’s guidance.
•. Webbing and attachment points will be visually checked prior to use. Any defects must be reported to the SRG manager and the harness must not be used.
•. The lanyards are always to be a ½ metre shorter than the distance from the clipping on point to the open edges of the roofs. Therefore where the clipping on point is set 2½ metres back from the edge of the roof, 2 metre lanyards must be used.
•. NEVER TAKE A RISK
•. For roofing works fall restraint lanyards must be used as these prevent you from falling over the edge of the roof and limit the requirements of the rescue plan.
•. Clip on to the safety line system as soon as possible. The system should be designed so that you can clip on prior to stepping out on to the roof area.
•. Clip the carabiner on to the system and if a screw type, screw the catch in place. If a clip type, ensure the clip is fully engaged. Never use a faulty item
•. Operatives will be clipped on at all times when in an area with a risk of fall
•. Client to ensure the safety line ystem is inspected and safe to use.
•. In this manner, working between the man-anchor and the open edges of the roofs operatives will be able to reach with their hands all the areas requiring to be worked on, but will never be able to get their centre of gravity beyond the edge of the roof, thereby eliminating any possibility of a fall.
•. Previous experience has shown that they will still be able to reach to the corners of the roof areas to be worked on. -
ALL WORKS FROM MEWP
Remain in the basket and clipped on at all times.
Ensure the lanyard is short enough to prevent your centre of gravity being above the hand rails. DO NOT OVER REACH -
PROTECTION FANS
Check they are in the correct location and cover the areas they need to
Check that they had a slight incline in towards the building
Check they are double boarded with polythene in between -
-
Work environment hazards
-
Know the safe distances to keep from over head lines
–– low-voltage line – 1 m;
–– 11 kV and 33 kV lines – 3 m;
–– 132 kV line – 6 m;
–– 275 kV and 400 kV lines – 7 m;
Only work in the set area and do not deviate from it. This area is a designated safe zone -
Any additional controls required
-
•.All gas flues are to be identified and protected. This must be a physical protection that does not impede the working of the flue in any way. This is usually a metal cage. <br>• Where gas flues terminate in the roof, these will need to be disconnected by a GasSafe Engineer and then reinstated by a GasSafe Engineer once the works have been completed<br>• Where gas flues terminate in the roof and are going to be made redundant. A GasSafe Engineer must give the consent that they are redundant and give authority to cover. <br>• All gas flues that terminate on the roof will require a permit to work
-
Add in details of the location and any control measures required
-
Add in details of the location and any control measures required
-
Add in details of the location and any control measures required
-
Add in details of the location and any control measures required
-
Add in details of the location and any control measures required
-
Add in details of the location and any control measures required
-
Will the work involve disturbing any asbestos?
-
An asbestos plan of works must be completed along side the main RAMS
-
This work can only be completed by an HSG210 Non licensed Asbestos trained team and only after the plan of works has been signed off
-
Is the work on a Royal Mail property
-
Read the asbestos register and see if the work area has been covered in the asbestos survey.
If it has not and the works involve disturbing the fabric of the building, i.e. cutting out felt. You must STOP and inform the client. They will then arrange for a survey of the work area.
The results will depend on how the works then progress -
• You MUST have a valid asbestos awareness certificate that has been completed within the last 12 months of starting this works
-
• You MUST have a valid asbestos awareness certificate that has been completed within the last 12 months of starting this works
-
You must read the asbestos register to determine if there is any asbestos present in the work area.
If you suspect that any materials that you are likely to disturb during the works could contain asbestos - STOP and inform the Client and your line manager immediately.
DO NOT PROCEED. -
If you see items that you suspect could contain asbestos in the work area but they will not be disturbed by your works.
You can continue to work but inform the client of the location and the item. -
Equipment
-
Angle Grinder
-
Personal Protective Equipment
• One of the best safeguards against injury is wearing the proper protective equipment. This includes:
• Hearing protection
•. Eye protection (enclosed goggles)
• Gloves
. Protective boots with safety toecaps, high ankle, lace up boots with good tread
• Type FFP3 dust mask -
GENERATING HEAT
•. The blade rotates at speeds that can generate heat which and sparks which could ignite other materials.
•.Hotworks permits are required for using abrasive wheels and fire extinguishers are required to be 1m from the point of use
• 1 or 2 hour fire watch will be completed when the hotworks finish. The watcher must be able to see the work area at all times during this period. -
Prior to use
•. Ensure the correct blade is fitted for the task. Using the wrong blade puts you are serious risk of harm. Remember your training
• Check the guard is in place. NEVER operate without a guard or with a faulty guard. Never remove the guard
•. Check that the equipment has a PAT test completed within the last three months
Check the grinder and lead for damage prior to use
• Use water suppression when cutting any materials containing silica and wear an FFP3 dust mask
• Keep the equipment in a tool box and avoid damage -
Use of Grinder
• Always ensure the wheel has come to a complete stop and allow time to cool down before starting to change the blade
• ALWAYS use a cutting board and NEVER cut directly on to scaffold boards or roof coverings
• Keep the item being cut secure and ensure it cannot slip/move when being cut
•. Adopt a stable stance that gives you a good view of the off cut while keeping you clear of blade. In particular, avoid placing your leg and fingers directly under the cut.
• Always let the wheel get up to speed before starting to cut. -
GENERAL SAFETY<br>There is a serious risk of personal injury if you do not follow all instructions.<br>This equipment should only be used by an operator who has been deemed competent to do so by his/her employer.<br>This equipment should be used by an able bodied, competent adult who has read and understood these instructions. Anyone with either a temporary or permanent disability, should seek expert advice before using it.<br>Keep children, animals and bystanders away from the work area. Cordon off a NO GO area <br>Never use this equipment if you are ill, feeling,tired, or under the influence of alcohol or drugs.<br>Wear practical, protective clothing, gloves and footwear. Avoid loose garments and jewellery that could catch in moving parts, tie back long hair.<br><br>PPE<br>This equipment generates potentially harmful noise levels. To comply with Health & Safety at Work regulations, ear defenders must be worn by everyone in the vicinity.<br>Safety goggles MUST be worn by everyone in the work area while the equipment is in use.<br>Some materials when broken contain substances which, when inhaled, can be harmful to health. A<br>suitable mask must be worn when using this equipment. Never use the equipment near combustible materials or in potentially explosive atmospheres.<br><br>GENERAL SAFETY<br>Keep the electric motor's air-vents clear at all times.<br>Make sure you know how to switch this machine OFF before you switch it ON, in case you get into difficulty. Always switch off and unplug the equipment before changing steels. Never leave it switched on and unattended.<br>Always hold the power tool securely with both hands on the grips provided. Keep the grips dry, clean and free from oil and grease.<br>Take special care when breaking anything containing pipework or electrical cables. If in doubt, hire a cable avoiding tool to determine the exact position of such hazards.<br>Do not overreach. Keep proper footing and balance at all times. This enables better control of the power tool in unexpected situations.<br>If working above ground-level, always work from a suitably stable work-platform, such as an access tower. Do not work from ladders or steps.<br>The power tool must be used only in a dry environment. Do not try to repair or modify the equipment.<br><br>ELECTRICAL SAFETY<br>This power tool is designed to plug in to 110V power socket, so it must be provided with a suitable 110v generated power supply, or powered from the mains via a suitable 110v transformer.<br>When necessary use only extension cords of a type approved for the application and with conductors of adequate cross section. The power tool may otherwise lose performance and the extension cord may overheat. Check the extension cord at regular intervals. If shows any signs of damage replace immediately.<br>When the equipment needs extension cord it is recommended to use minimum 2.5 mm cross section cord with maximum length of 20m.<br>When working outdoors, use only extension cords that are approved and correspondingly marked for this application.<br>Extension leads should be fully unwound and loosely coiled, away from the equipment. Never run them through water, over sharp edges or where they could trip someone.<br>If the equipment fails, or if its flex or plug gets damaged, return it. Never attempt to repair it yourself. Keep flexes out of harm's way and clear of moving parts.<br>To reduce the risk of electric shock, use a suitable RCD (Residual Current-Operated Device) <br>Never carry or pull the tool by its flex.<br>Ensure the equipment is switched OFF before plugging it into it's power supply.<br><br>GETTING STARTED<br>Never use the power tool until you have fully read and understood this User Guide and the equipment has been properly set up using the information it contains. The power tool is an electrically-powered breaker with electro pneumatic hammering mechanism designed for heavy chiseling work. The power tool is designed for breaking, removing and demolishing concrete, masonry, stone or asphalt. Working on materials hazardous to the health (e.g. asbestos) is not permissible.<br><br>SETTING SIDE-HANDLE<br>Set the side-handle to a comfortable working position. Release the side handle clamping band by turning the knob. Relax the tension on the side handle clamping ring and slide it over the chuck and onto the cylindrical section at the front end of the power tool. Pivot the side handle into the desired position. Secure the side handle by tightening the knob.<br><br>FITTING STEEL<br>The chisel can be adjusted to 6 different positions (in 60° increments). This ensures that flat chisels and shaped chisels can always be set to the optimum working position.<br>Before inserting chisel check that the connection end is clean and lightly greased. Clean it and grease it if necessary.<br>Push the insert tool into the chuck and rotate it while applying slight pressure until it engages in the guide grooves.<br>Push the insert tool further into the chuck until it is heard to engage.<br>Check that the insert tool has engaged correctly by pulling it.<br><br>BASIC TECHNIQUES<br><br>WARNING<br>If the power tool starts without pressing the on/off switch when the supply cord is plugged back in after unplugging, the unit must be returned to HSS Hire.<br><br>SWITCHING ON<br>To switch on the power tool plug the supply cord into the power outlet and press the ON I OFF switch.<br><br>WORKING AT LOW TEMPERATURES<br>The unit must reach a minimum operating temperature before the hammering mechanism begins to operate.<br>Bring the power tool to the minimum operating temperature by switching it on and allowing it to run and warm up. Bring the tip of the chisel into contact with the work surface at regular intervals (approx. every 30 sec.) to check whether the hammering mechanism has begun to operate. Repeat the procedure if the hammering mechanism does not begin to operate.<br><br>NOTE: As starting is electronically controlled, the power tool's starting characteristics may be different in cold conditions.<br><br>ADJUSTING CHISELLING POWER<br>Chiselling power can be adjusted only when the power tool is switched on and ready for use.<br>Chiselling power can be reduced to approx. 70% by pressing the power level selector switch. The power level LED then lights indicating reduced power.<br>To reselect full chiseling power, press the chiseling power level selector switch again. Switching off and then on again also causes the power tool to return to full chiseling power.<br><br>CHISELING TIPS<br>Start chiseling by position the tip of the chisel approx. 80-100 mm from the edge of the workpiece.<br>When working on workpiece with reinforcing bars always guide the tip of the chisel toward the edge of the workpiece, not toward reinforcing bars.<br>Begin with the chisel positioned at an angle of 70° to 80° to the concrete surface, with the tip of the chisel pointing toward the edge of the workpiece.<br>To break material away increase the angle to approx. 90° as the chisel penetrates.<br><br>NOTE: The chisel should be rotated at regular intervals as even wear assists the self-sharpening process.<br><br>CAUTION<br>If inadequate pressure is applied, the chisel will jump around uncontrollably.<br>Application of excessive pressure will result in a loss of chiseling performance.<br><br>EQUIPMENT CARE<br>Never push the equipment beyond its design limits. If it will not do what you want with reasonable ease and speed, assume you have the wrong equipment for the job. <br>Handle the equipment with care. Avoid dropping it, knocking it, or otherwise exposing it to damage.<br>Never expose the equipment to dangerous and/or corrosive chemicals.<br><br>Keep the equipment clean - you will find this less of a chore if you clean it regularly, rather than wait until the end of the hire period.<br>Periodically check that the steel's base is lightly greased. If it's dry, re-grease it.<br>When not in use, store the equipment somewhere clean, dry and safe from thieves.<br><br>FINISHING OFF<br>Switch OFF both the tool and its power supply before unplugging it and neatly coiling its flex.<br>Pull back the chuck's collar and remove the steel.<br>Finally, clean the equipment with a damp cloth (never use cleaning agents).<br><br>
-
HAVS Assessment:<br>Prior to using this piece of equipment please record your start and times on the trigger. You must keep a daily record of the equipment you use that vibrates. <br>Prior to use:<br>This equipment should only be used by an operator who has been deemed competent. Read the instructions prior to use, even if you are familiar with the equipment<br>This equipment should be used by an able bodied, competent adult who has read and understood these instructions. Anyone with either a temporary or permanent disability should seek expert advice before using it.<br>Keep children, animals and bystanders away from the work area. Cordon off a NO GO area <br>Never use this equipment if you are ill, feeling, tired, or under the influence of alcohol or drugs.<br>Practical, protective clothing, gloves and footwear. Avoid loose garments and jewellery that could catch in moving parts, tie back long hair.<br><br>PPE<br>This equipment generates potentially harmful noise levels. To comply with Health & Safety at Work regulations, ear defenders must be worn by everyone in the vicinity.<br>Some materials contain substances which, when inhaled, can be harmful to health. A suitable mask must be worn when using this equipment. Safety goggles MUST be worn by everyone in the work area while the equipment is in use.<br><br>GENERAL USE:<br>Never use the equipment near combustible materials or in potentially explosive atmospheres.<br>Never use the equipment near computers or other sensitive, electronic equipment.<br>Keep the electric motor's air-vents clear at all times. Make sure you know how to switch this machine OFF before you switch it ON, in case you get into difficulty. <br>Always switch off and unplug the equipment before changing steels. Never leave it switched on and unattended.<br>Always hold the power tool securely with both hands on the grips provided. Keep the grips dry, clean and free from oil and grease.<br>Remove any adjusting key or wrench before turning the power tool on. A wrench or a key left attached to a moving part of the power tool may result in personal injury.<br>Keep cutting tools sharp and clean. Properly maintained cutting tools with sharp cutting edges are less likely to bind and are easier to control.<br>Do not try to repair or modify the equipment<br><br>ELECTRICAL SAFETY<br>Take special care when breaking anything containing pipework or electrical cables. If in doubt, hire a cable avoiding tool to determine the exact position of such hazards.<br>Do not expose power tools to rain or wet conditions. Water entering a power tool will increase the risk of electric shock. The power tool may be used only in a dry environment.<br><br>This power tool is designed to plug in to 11 OV power socket, so it must be provided with a suitable 1l0V generated power supply, or powered from the mains via a suitable 110v transformer<br>When necessary use only extension cords of a type approved for the application and with conductors of adequate cross section. The power tool may otherwise lose performance and the extension cord may overheat. Check the extension cord at regular intervals. If shows any signs of damage replace immediately.<br>When the equipment needs extension cord it is recommended to use minimum 2.5 mm' cross section cord with maximum length of 20m.<br>When working outdoors, use only extension cords that are approved and correspondingly marked for this application.<br>Extension leads should be fully unwound and loosely coiled, away from the equipment. Never run them through water, over sharp edges or where they could trip someone.<br>If the equipment fails, or if its flex or plug gets damaged, return it. Never attempt to repair it yourself. Keep flexes out of harm's way and clear of moving parts.<br>Prevent unintentional starting. Ensure the switch is in<br>The OFF position before connecting to power source,<br>Picking up or carrying the tool. Carrying power tools with your finger on the switch or energizing power tools that<br>Have the switch on invites accidents.<br>To reduce the risk of electric shock, use a suitable RCD (Residual Current-Operated Device)<br>Never carry or pull the tool by its flex.<br>Ensure the equipment is switched OFF before plugging it into its power supply.<br><br>GETTING STARTED<br>Never use the Breaker until you have fully read and understood this User Guide and the machine has been properly set up using the information it contains.<br>The Breaker is a hand-guided electric tool for chiseling on concrete, masonry and asphalt. Other applications are compacting and excavation (e.g. in soil).<br>Its typical working environment is construction sites of all kinds and it may be used for construction work, finishing, renovation, demolition and road work.<br><br>TRANSPORTATION<br>Use the transport trolley or other means of conveyance whenever possible. The power tool should always be carried by two persons if no transport trolley or means of conveyance is available for use. Be aware that the power tool plus transport trolley present a considerable weight.<br><br>CAUTION<br>DO NOT PARK THE TRANSPORT TROLLEY ON AN INCLINE. TAKE CARE TO USE ONLY SAFE TRANSPORT ROUTES. TAKE CARE TO ENSURE THAT THE TROLLEY STANDS IN A STEADY, SECURE POSITION.<br><br>Place the power tool on the locating pin provided on the transport trolley and always secure it for transport by closing the retaining bar.<br>Put the chisels in the holder provided, pushing them in as far as they will go until held securely.<br><br>BEFORE BEGINNING WORK<br>Check the working area (e.g. using a metal detector} to ensure that no concealed electric cables or gas and water pipes are present. External metal parts of the power tool may become live, for example, when an electric cable is damaged accidentally. This presents a serious risk of electric shock. If in doubt, use a cable avoiding tool available from HSS Hire.<br>Consider the work place to choose the right insert tool for your task and a length suitable for your body height.<br>Disconnect the mains plug from the power outlet. Also make sure the breaker's power switch is set to OFF position.<br>Check that the connection end of the chisel is clean and lightly greased. Clean it and grease it if necessary.<br>Check that the chuck and locking bar are clean and undamaged.<br>Check that the chisel has engaged correctly by pulling it. To remove the chisel make sure the power tool is Switched off and mains plug is disconnected from the Power outlet.<br><br>Push the chuck call<br><br>WARNING<br>DO NOT LAY A HOT INSERT TOOL DOWN ON FLAMMABLE MATERIALS. THIS COULD CAUSE THE MATERIAL TO IGNITE, RESULTING IN A FIRE.<br><br><br><br>CAUTION<br>WORKING ON THE MATERIAL MAY CAUSE ITTO SPLINTER. WEAR EYE PROTECTION AND PROTECTIVE GLOVES. SPLINTERING MATERIAL PRESENTS A RISK OF INJURY TO THE EYES AND BODY.<br>BASIC TECHNIQUES<br>Ensure that the locking bar is in the correct position and check that the insert tool is held securely (check l:y pulling the insert tool). Secure the area below the working area.<br>Take care to stand in a secure position, especially when chiseling breaches in floors, walls or ceilings. The power tool may pull you off balance if you break through suddenly.<br>Plug the mains plug of the supply cord into the power outlet.<br>Position the tip of the chisel at the point where chiseling<br>Is to begin and press the on / off switch fully.<br>The hammering mechanism works only when the power tool has reached a minimum operating temperature. Bring the chisel into contact with the base material and allow the power tool to run under no load until the minimum operating temperature is reached. If necessary, repeat this procedure until the hammering mechanism begins to operate.<br><br>ADVICE<br>IMPROVE THE BLOOD CIRCULATION JN YOUR FINGERS BY RELAXING YOUR HANDS AND EXERCISING YOUR FINGERS DURING BREAKS BETWEEN WORKING.<br><br>TROUBLESHOOTING<br>When the power tool doesn't start, simply switch the tool off and on again. If this doesn't solve the problem check the electric supply, plugging in and starting another appliance. Check the supply cord and extension cord. Replace extension cord if found damaged. If machine cord s damaged, don’t try to fix the tool, take out of service and clearly label – DO NOT USE.<br>When hammer doesn't work, the reason is usually that the power tool is too cold. Allow the tool to warm up to the minimum operating temperature. After warming up the tool and the hammer still fails to operate, take out of use.<br>When the power tool doesn’t start or cuts out during operation and the LED blinks red this usually indicates a temporary fault; overheating or overvoltage. This can be fixed l: y releasing the switch and allowing the power tool to cool down or connecting it to a different electric supply.<br>If the power tool doesn’t start or cuts out during operation and the LED lights red constantly, do not use.<br>If the power tool doesn't start or cuts out during operation check the extension cord s not too long or its gauge s inadequate. Use a, extension cord of a, approved length and/ or of adequate gauge.<br>If the fault cannot be eliminated by the measures listed above, take out of service.<br><br>EQUIPMENT CARE<br>Never operate the power tool when the ventilation slots are blocked. Clean the ventilation slots carefully using a dry brush. Do not permit foreign objects to enter the interior of the power tool. Clean the outside of the power tool at regular intervals using a slightly damp cloth.<br>Do not use a spray, steam pressure cleaning equipment or running water for cleaning. This may negatively affect the electrical safety of the power tool. Always keep the grip surfaces of the power tool free from oil and grease. Do not use cleaning agents which contain silicone.<br>Regularly, clean off dirt and dust deposits adhering to the insert tools and protect them from corrosion by wiping the insert tools from time to time with an oil soaked rag.<br>Never push the equipment beyond its design limits.<br>Handle the equipment with care. Avoid dropping it, knocking it, or otherwise exposing it to damage. Never expose the equipment to dangerous and/or corrosive chemicals. Keep the equipment clean; you will find this less of a chore if you clean it regularly<br>When not in use, store the equipment somewhere clean, dry and secure.<br><br>FINISHING OFF<br>Switch off both the tool and its power supply before unplugging it and neatly coiling its flex.<br>Let the tool cool down.<br>Remove the insert tool and place the breaker on the transport trolley.<br>When the equipment is not in use store it out of the reach of children and do not allow persons unfamiliar with<br>The power tool or these instructions to operate the power tool. Power tools are dangerous in the hands of untrained users.<br>Finally, clean the equipment with a damp cloth (never use cleaning agents)
-
-
PRE-USE<br>Keep children, animals and bystanders out of the work area.<br>Never use this equipment if you are ill, feeling tired, or under the influence of alcohol or drugs.<br>This equipment should only be used by a competent person who has read and understood these instructions<br>Check the equipment before use, if it shows signs of damage or excessive wear do not Use<br><br>PPE<br>This equipment generates potentially harmful noise levels. To comply with Health and<br>Safety at Work regulations, ear defenders must be worn by everyone in the vicinity.<br>Wear Suitable protective clothing, footwear and gloves must be worn.<br>Safety Goggles MUST is worn by everyone in the work area. Avoid loose garments and<br>Jewellery that could interfere with the work. Tie back long hair.<br><br>Never use this equipment near any combustible gases or materials.<br>Never use this equipment near computers or any sensitive electronic equipment.<br>Keep the engine's air vents clear of all obstructions<br><br>EXHAUST FUMES<br>Never operate petrol engines indoors or in a confined space.<br>The exhaust contains gases that can kill.<br><br>FUEL SAFETY<br>NEVER refuel while the engine is hot or running. NEVER smoke or allow naked lights into the area while refuelling.<br>ALWAYS mop up fuel spillages as quickly as possible.<br>Change your clothes if you spill fuel on yourself.<br>ALWAYS store fuel in an approved container, in a cool, safe place away from the work area.<br>Never mix petrol/oil in the machine's fuel tank.<br>Always switch equipment OFF before changing steels or making any adjustments to it. Never leave it switched ON and unattended.<br>If the equipment fails, or if it is damaged, return it.<br>Do not attempt to repair it yourself.<br>Take special care when breaking anything containing pipework or electrical cables. If in doubt hire a cable avoiding tool to determine the exact position of such hazards.<br><br><br>GETTING STARTED<br>Make sure you know how to switch the equipment<br>OFF before you switch it ON.<br>Carefully lay the petrol breaker down. It should not have a tool fitted.<br>Mix 2-stroke oil with unleaded petrol in a suitable container and fill the fuel tank. The tank capacity is approximately 1.3 litres. Never add petrol and oil to the tank unmixed.<br>Make sure the tank cap is securely fitted - it must not be removed when the engine is running.<br>Check the oil level in the hammer mechanism by standing the machine in an upright position. Use only SAE l 4/W40 - the oil level should be flush with the hole. Refit the plug.<br>Always check the oil level when you refuel the machine.<br>Now fit the appropriate steel for the application on which you are working. Our staff will advise you on the best steel for the job. Use the shank gauge to check that the tool has the correct dimensions. Make sure the shank is clean and in good condition.<br>Fit the steel into the chuck by moving the locking latch to the horizontal. Push the latch into the vertical position to secure the steel.<br><br>COLD STARTING...<br>Close the choke by turning the choke control upwards. Press the primer<br>5-1 O times until fuel is visible in the priming bulb.<br>Depress the throttle lever to full speed position and pull the starter cord.<br>When the engine starts, open the choke gradually<br>By turning the choke control downwards.<br>Let the engine warm up for 2-3 minutes.<br><br>RE-STARTING A WARM ENGINE...<br>Check the choke is open. Depress the throttle to the full speed position and pull the starter cord – if the engine stops after a short time this may be due to<br>Vapour lock, to rectify this: close the choke by turning the control upward, depress the throttle lever to full speed position and pull the starter cord.<br>When the engine starts allow it to run for a short time. Then open the choke gradually from full choke to the fully open position, this may take up to 30 seconds. Ensure the machine runs smoothly.<br>Never touch the exhaust pipe or the lower machine housing - they can become very hot during use.<br>Keep your hands away from the throttle until you are ready to begin work.<br>Depress the handles to activate the impact mechanism - when the handles are lifted the mechanism is disengaged. Use the throttle lever to regulate the power.<br><br>To STOP the machine pushes the red stop button below the handle.<br><br>BASIC TECHNIQUES<br>Always hold the machine with both hands. Make sure the handles are free from grease and oil.<br>Adopt a comfortable, stable stance when working<br>- One that gives a good view of whatever you are working on, it’s easier. You get better results and it’s a lot safer.<br>If the tool strikes a hidden object, stop the machine immediately; check to make sure it is safe to continue.<br>Stop the machine if you experience discomfort or numbness during use.<br>Take special care if standing anywhere other than on a firm, level footing and keep the whole of your body (especially your feet) clear at all times.<br>Use your body weight to keep the machine in contact with the work at all times. Apply just enough pressure stop it bouncing and ensure reasonable progress.<br>Where possible, concentrate on weak spots in the structure you are breaking - mortar joints, cracks and so on. Alternatively, start close to an edge and then gradually work inwards.<br>Take your time. Rushing a job tends to produce poor results and increases the risk of a serious accident.<br>Don’t overdo it - you are more likely to have an accident if you are suffering from fatigue.<br><br>EQUIPMENT CARE<br>Never push the equipment beyond its design limits. If it will not do what you want with reasonable ease, assume you have the wrong tool.<br>Handle the equipment with care. Avoid dropping it knocking it, or otherwise exposing it to damage.<br>Never expose the equipment to dangerous/<br>Corrosive chemicals.<br>Keep in cool, safe place away from the work area. Never mix petrol/oil in the machine's fuel tank.<br>Keep the equipment clean. You will find this less of a chore if you clean up regularly rather than wait until the end of the hire period.<br>When not in use, store the equipment somewhere clean, dry and safe from thieves.<br>Drain the fuel tank before transporting the machine, and when it is not to be used for long periods.<br><br>FINISHING OFF<br>Push the red stop button to switch the machine OFF. Lay the machine down and release the tools locking latch.<br>Remove the tool from the chuck and mount the machine on its trolley.<br>Finally clean off any dust and debris with a damp cloth. (Never use cleaning agents)<br>
-
Circular Saw
-
GENERATING HEAT
•. The blade rotates at speeds that can generate heat which and sparks which could ignite other materials.
•.Hotworks permits are required for using abrasive wheels and fire extinguishers are required to be 1m from the point of use
• 1 or 2 hour fire watch will be completed when the hotworks finish. The watcher must be able to see the work area at all times during this period. -
Prior to use
• Check the equipment before use and ensure it is serviced and maintained
•. Check the guard properly closes as part of the visual inspection before each use
•. Set the cutting depth approx. 5 to 10mm greater than the material to be cut.
•. Set the angle to be cut
•. Check the riving knife is set correctly as this prevents the blade from sticking
•. Ensure the correct blade is fitted for the task. Using the wrong blade puts you are serious risk of harm. Remember your training
•. Diamond Blades (dry or wet cutting) – for cutting surfacing, stone and masonry. Certain diamond blades are specialised for cutting differing types of material. Check if dry or wet cutting (wet cutting not to be used on electric grinders.
• Stone Cutting Blades – only to be used for cutting stone based materials. If prolonged usage is expected use diamond blades.
• Steel Cutting Blades – only to be used for cutting steel
• Always check the RPM stated on the disc matched the RPM stated on the circular saw
• Check the guard is in place. NEVER operate without a guard or with a faulty guard. Never remove the guard -
Personal Protective Equipment
• One of the best safeguards against injury is wearing the proper protective equipment, make sure any long hair is tied back and items that can snag are removed. This includes:
• Hearing protection
•. Eye protection (enclosed goggles)
• Gloves
. Protective boots with safety toecaps, high ankle, lace up boots with good tread
• Type FFP3 dust mask -
Preperation
• Clear away, anything that has a chance of interfering with the operation. Remove debris that could cause you to slip or lose your balance or accidentally contact the chain. Keep both hands firmly on the saw when cutting ensure any cutting is carried out on an even surface.
• Do a pre-use check of your saw - is the petrol tank full? Is the blade right and properly tensioned on the spindle? Is the saw clean and free of grit?
• Make sure you are alert and aware of your surroundings when using the equipment. This has everything to do with the keyword CONTROL
Ensure the cutting area is clear of other trades, engineers etc -
Avoid Kick backs
• Kickback occurs when the saw rotates back, or ‘kicks back’ at the operator, due to the saw contacting an object or obstruction. To prevent kickback:
• Hold the saw firmly with both hands. Grip the top handle by putting the thumb around it.
• Watch for obstructions that can snag the disc.
• Do not pinch the disc while cutting the object.
• Maintain high saw speed when entering or leaving a cut.
• Do not reach above your shoulder to cut. -
Fuel
•. Disc cutters run on an oil and petrol fuel mixture. Use the fuel mix recommended by the manufacturer
• Avoid fuelling a hot disc cutter; let it cool first
• always fuel in a clear area away from debris
• If your fuel can has no spout, use a funnel
•Wipe the disc cutter of any spilled fuel after fuelling. Never smoke while fuelling. -
Starting the Cutter
• Move away from the fuelling area.
• Place the saw in a clear, debris-free area.
• Hold the saw firmly on the ground by putting your foot through the rear handle (if possible) and by holding it down with one hand on the top handle. Pull the starter cord with the other hand. The chain should not be moving while the saw is idling.
• Never start the saw while holding it off the ground, or by "drop starting" it. -
HAVS - Medium to Low
Do not operate for more than 2hrs in an 8hr day -
GENERAL SAFETY<br><br>For advice on the safety and suitability of this equipment contact your local HSS Hire Shop.<br>Keep children, animals and bystanders away from the work area.<br><br>Never use this equipment if you are ill, feeling tired, or under the influence of alcohol or drugs.<br>This equipment should only be used by a competent person who has read and understood these instructions.<br>There is a serious risk of personal injury if you do not follow all instructions laid down in this guide.<br>Safety Goggles MUST be worn by everyone in the work area.<br>Some materials when cut contain substances which, when inhaled, can be harmful to<br>health. A suitable mask must be worn when using this equipment.<br>This equipment generates potentially harmful<br>noise levels. To comply with health and safety at work regulations, ear defenders must be worn by everyone in the vicinity.<br>Wear practical, protective clothing, gloves and footwear. Avoid loose garments and jewellery that could catch in moving parts, tie back long hair.<br>Always unplug the tool before carrying it or making adjustments to it.<br>Having switched OFF the tool, always wait for the blade to come to rest before putting it down. NEVER start the saw with the blade in contact with<br>the workpiece.<br><br>Think twice before locking the ON/OFF trigger in the ON position using any trigger lock button fitted.<br>Ensure the work area is well lit and ventilated. Do not work near flammable gases or liquids.<br>Always switch OFF and unplug the equipment when not in use. Never leave it switched ON and unattended.<br>Never carry or pull the equipment by its flex.<br>Never remove or otherwise interfere with any safety guards fitted to the saw.<br>Never use the saw to cut asbestos sheeting, nor any other material which may be hazardous to health.<br>Take care when changing or fitting blades - they are sharp.<br><br>ELECTRICAL SAFETY<br>Most HSS Reciprocating Saws plug into a standard<br>13amp power socket. However, 11 OV models (with a round yellow plug) must be provided with a suitable 11 OV generated supply, or powered from the mains via a suitable 110v transformer.<br>If the equipment fails, or if its flex or plug gets damaged, return it. Never try to repair it yourself.<br>Keep flexes out of harm's way, and clear of the work area.<br>Extension leads should be fully unwound and loosely coiled, away from the equipment. Never run them through water; over sharp edges or where they could trip someone.<br>Using electrical equipment in very damp or wet conditions can be dangerous.<br><br>To reduce the risk of electric shock, use a suitable RCD (Residual Current-Operated Device) or power 240V (not 11 OV) equipment from a power circuit with a built-in RCD.<br><br>SITING A RCD<br>When used with a transformer an RCD will only protect the user if fitted between the transformer and the tool being used.<br>An RCD fitted between the power supply and the transformer only protects up to the transformer.<br><br>Ensure the Saw and power socket are switched<br>OFF before plugging into the power supply.<br><br>GETTING STARTED<br>Fit the saw with the appropriate blade for the job. There are three basic types: one for metal, one for lopping tree branches, and an all purpose blade for wood, metal and plastic.<br><br>Where appropriate, you should now grip the work in a suitable vice, making sure that the saw blade will not be obstructed. If cutting sheet materials, ensure the sheet is adequately supported as well as held firmly in place.<br><br>All that now remains is to plug the saw into its power supply and prepare to switch ON.<br><br>To switch ON firstly push in, or move forward the safety lock button, then squeeze the ON I OFF trigger. To switch OFF simply release the trigger.<br><br>BASIC TECHNIQUES<br>Grip the tool firmly with both hands and select the appropriate speed for the job. In general, use a high speed for soft materials and a slow speed for hard ones.<br>Some models have a sliding switch speed selector which can be set to either "high" or "low". Others have a lettered selector dial on the ON/OFF trigger. Simply turn this until the chosen letter is at the top - "A" is slow, "E" is fast.<br><br>If possible, drape the tool's flex over one shoulder to keep it clear of the blade.<br><br>To start a cut away from the edge of the workpiece, simply drill a hole large enough to take the saw blade in the waste material. You can then saw out from this hole in the normal way.<br>Now, with the blade clear of the work, switch ON.<br><br>SAWING BRANCHES<br>When using the all-purpose saw to lop off tree branches, always begin by making a small cut on the underside. If you now cut down towards this, you will find the branch comes away far more cleanly than otherwise. But take care. Always work from a stable platform, and avoid over-stretching - you could lose your balance.<br><br>Now begin your cut, keeping the saw's sole plate in contact with the work at all times (take care if cutting corrugated materials). Apply just enough pressure to ensure reasonable progress.<br><br>Take special car when cutting curves and angles. Never force the saw to turn. Let it work round the corner at its own pace.<br><br>Ensure the off-cut has adequate support. It is then then less likely to jam the saw blade in the cut. When you have finished, simply withdraw the saw<br><br>EQUIPMENT CARE<br>Never push the equipment beyond its design limits. If it will not do what you want with reasonable ease, assume you have the wrong tool for the job.<br>Keep the equipment clean, (especially the motor's ventilation slots). You will find this less of a chore if you do it regularly rather than wait until the end of the hire period.<br>Avoid working the tool continuously for long periods. From time to time, run it with the blade clear of the work for a little while to let it cool.<br>If using the All Purpose Saw to cut small branches, the blade may become blunt only at the motor end. To utilise all the blades teeth, move the sole plate out so that the branches can be cut with the remaining sharp teeth. To do this, unplug the machine, loosen the 2 hex bolts, slide the sole plate out and re-tighten.<br>If cutting through timber that contains old nails, screws and so on, use an all-purpose blade. Even so, take care: the saw may behave unpredictably.<br>When not in use, store the equipment somewhere clean, dry and safe from thieves.<br><br>IN A JAM<br>If the saw blade jams in the work, release the<br>ON/OFF trigger immediately and unplug the tool.<br>In most cases you can now work the blade free quite easily. However. if a lot of force is needed, undo the blade from the saw and grip the blade with a pair of pliers rather than using the tool body as a lever.<br>Once the blade is free, give the off-cut more support it is then less likely to trap the blade in future<br><br>FINISHING OFF<br>Release the ON/OFF trigger, unplug the saw and remove the saw blade (simply reverse the fitting procedure explained in GETIING STARTED).<br>Clean the tool up as far as possible, paying special attention to the motors ventilation slots.<br>Finally, neatly coil the flex <br>
-
Use of Hand Saw
• Ensure the blade is not blunt
• Keep the saw in a sheath and do not leave it exposed
• Always ensure that any material that is being cut is secure and cannot kick out
• Always cut to the side of your body and not directly towards yourself -
GENERAL SAFETY<br>For advice on the safety and suitability of this equipment contact your local HSS Hire Shop.<br>There is a serious risk of personal injury if you do not<br>Follow all instructions laid down in this guide.<br>The hirer has a responsibility to ensure that all necessary risk assessments have been completed prior to the use of this equipment.<br>This equipment should only be used by an operator who has been deemed competent to do so by his/her employer.<br>This equipment should be used by an able bodied, competent adult who has read and understood these instructions. Anyone with either a temporary or permanent disability should seek expert advice before using it.<br>Keep children, animals and bystanders away from the work area. Cordon off a NO GO area using cones, barriers or tape.<br>Never use this equipment if you are ill, feeling tired, or under the influence of alcohol or drugs. <br><br>PPE<br>Safety goggles MUST be worn by everyone in the work area.<br>This equipment generates potentially harmful noise levels. To comply with health and safety at work regulations ear defenders must be worn by everyone in the vicinity.<br>Some materials when sanded contain substances which, when inhaled, can be harmful to health.<br>A suitable mask must be worn when using this equipment...<br>Wear practical, protective clothing, gloves and footwear. Avoid loose garments and jewellery that could catch in moving parts, tie back long hair.<br>Never carry or move this equipment by its power supply cable.<br>Always switch OFF and unplug the equipment when not in use.<br>Ensure the work area is well lit and ventilated, if in doubt ask about lighting and ventilation equipment <br>Do not work near flammable gases or liquids, petrol or paint thinner fumes for example. Keep combustible materials at a safe distance <br>Make sure you know how to switch this machine OFF before you switch it ON in case you get into difficulty Always disconnect the machine from its power supply before making adjustments to it. Check that you have removed all spanners before restarting.<br>Having switched OFF, always wait for moving parts to come to rest.<br>Make sure that everyone is warned of what you are doing. <br>Check the condition of the equipment prior to use. <br><br>ELECTRICAL SAFETY<br>110v models (with a round yellow plug) must be provided with a suitable 110v 16amp generated supply, or powered from the mains via a suitable 110v transformer.<br>If the equipment fails, or if its power supply cable or plug becomes damaged, return it. Never try to repair it yourself.<br>Keep cables out of harms way, and clear of the work area.<br>Extension leads should be fully unwound and loosely coiled, away from the equipment. Never run them through water, over sharp edges or where they could trip someone.<br>Keep the equipment dry, using electrical equipment in very damp or wet conditions can be dangerous. To reduce the risk of electric shock, always use a suitable RCD (Residual Current-Operated Device) Or power the equipment from a mains circuit with a built in RCD.<br>Ensure the machine and power socket are switched<br>OFF before plugging into the power supply.<br><br>GETTING STARTED<br>Ensure the work is free from nails, screws etc. If these cannot be removed drive them well below the surface.<br>Fit the sander with the appropriate abrasive. In general start with a medium grade, and then work through to a fine grade until the desired finish is achieved.<br>With the machine switched OFF and isolated from the power supply, turn the sander on its back, resting on the front handle.<br>Depress and hold in the spindle lock button, unscrew and remove the lock nut (using the two pin spanner supplied). Push the lock nut through the abrasive and re-tighten, making sure the abrasive disc is correctly centred.<br>Never operate the spindle lock button when the sanding disc is in motion.<br>To safe guard the user the switch can only be activated by either pressing the lock off button or pushing forward the lock off switch (see diagram) then squeezing in the trigger.<br>There is also the facility of a variable speed control, lower speeds should be used when finishing off or sanding fine materials. Higher speeds for rough or heavy sanding.<br>NOTE: If this machine is being used as a polisher it MUST be fitted with a lamb’s wool bonnet and the correct holder. The speed must be kept at the slowest setting.<br><br>BASIC TECHNIQUES<br>Always hold the sander with both hands and switch ON before bringing the sander into contact with the work <br>Never apply too much pressure. Keep the sander moving either in a straight line or in a circular motion, or it may rut the work.<br>Lift it clear before switching OFF, and wait for moving parts to stop before putting it aside.<br>Hold the sander at an angle, flattening the outer 50rnm of the backing disc against the work.<br>If using a Disc Sander with a lambs wool polisher for buffing up car paint work, set the machine speed to minimum and apply only light pressure. Too high a speed or too high a pressure may damage the paintwork.<br><br>EQUIPMENT CARE<br>Never push the equipment beyond its design limits. If it will not do what you want with reasonable ease and speed, assume you have the wrong tool for the job. <br>Keep the equipment clean - you will find this less of a chore if you clean it regularly, rather than wait until the end of the hire period.<br>Always use the correct abrasive for the job and change it as soon as it becomes clogged or damaged. Never use the sander without an abrasive fitted.<br>When not in use, store the equipment somewhere clean, dry and safe from thieves.<br><br>FINISHING OFF<br>Switch OFF and unplug the sander.<br>Remove any fitted abrasive and refit the lock nut. Neatly coil its power supply cable and give the unit a final clean
-
• Only competent and trained persons to use a drill
HAVS - HIGH RISK
DO NOT USE FOR MORE THAN 12 MINUTES IN A DAY
Consider using alternative tools
Rotate work between each other "
• Check the drill is the right size and powerful enough for the task
• Check the drill bit is the correct size and in good order. Check the nib of the bit for damage
• Disconnect battery or unplug before changing the bit or carrying out any maintenance
• Check the drill bit is securely fitted into the chuck. Only use the correct chuck key (if required)
• If using a plugin drill ensure the cable is long enough and check the cord is free from damage
• Test the drill, holding away from the body and others
• Make sure the object to be drilled is secure
• Maintain a steady, light pressure and remove drill bit from material before releasing the pressure
• Remove battery of disconnect after use and clean
• Store in a toolbox or similar dry place -
GENERAL SAFETY<br>There is a serious risk of personal injury if you do not follow all instructions.<br>This equipment should be used by an able bodied, competent adult who has read and understood these instructions. Anyone with either a temporary or permanent disability should seek expert advice before using it.<br>These tools must only be operated by adults over<br>18 years of age who have read and understood these instructions.<br>Keep children, animals and bystanders away from the work area.<br>Never use this equipment if you are ill feeling tired, or under the influence of Alcohol or drugs.<br><br>PPE<br>Safety goggles MUST be worn by everyone in the work area.<br>This equipment generates potentially harmful noise revers. To comply with health and safety at<br>Work regulations, ear defenders must be worn by everyone in the vicinity.<br>Wear practical, protective clothing, groves and footwear. Avoid loose garments and jewellery that could get in the way of the work, tie back<br>Long hair:<br><br>Always disconnect the battery when not in use or before making adjustments to it never leave it unattended.<br>Ensure the work area is well lit<br>Do not use this equipment in situations where it may be exposed to water or water spray.<br>Do not work near flammable gases or liquids, petrol or paint thinner fumes for example. Keep combustible materials at a safe distance - at least Sm.<br>Do not smoke when changing or handling gas cylinders.<br>Check the condition of the equipment before use. If it shows signs of damage or excessive wear do not use.<br>Never load the tool until you are ready to use it to make a fixing and, once loaded, never point it at anyone - including yourself.<br>Avoid using this equipment in extremely cold conditions; the safe operating range is between 0-50°c.<br>Never use the tool if anyone is close enough to be at risk from flying debris, ricochets or misfires.<br> Secure the material being fastened. Never hold it in your hand or across your legs.<br>Always switch OFF and unplug the charger when not in use.<br>Never make fixings in anything containing hidden pipes or electrical wiring. If in doubt use a metal detector to locate such hazards.<br>Store the tool (together with spare cartridges and fixings) in its case, somewhere it cannot be reached by children or unauthorised users.<br><br>ELECTRICAL SAFETY<br>The battery charger is made up of two components, a charger body and a transformer.<br>The transformer is designed to plug straight into a standard 240V 13A power socket; however, power must not be supplied from a generator.<br>To recharge, insert the battery pack into the charger body, it will only go in one way.<br>Plug the transformers read into the socket on the charger box (see illustration/ then plug the transformer into a suitable power supply and switch the power ON, recharging is fully automatic.<br>The charger will recharge the battery in approximately 1 hour.<br>Using the charger in very damp or wet conditions can be dangerous.<br>To reduce the risk of electric shock, use a suitable RCD (Residual Current-Operated Device) or power the charger from a mains circuit with a built-in RCD.<br>If the charger fails, or if power supply cable or plug gets damaged, do Not Use. Never try to repair it yourself.<br>If an extension lead is used for the charger it should be fully unwound and loosely coiled, away from the<br>Equipment. Never run leads through water; over sharp edges or where they could trip someone.<br>Never carry or puff the charger by its power supply cable.<br><br>GETTING STARTED<br>Always keep everything in the carry case until it is needed.<br><br>STRIP NAILER <br>To fit the strip nailer with the appropriate nails, slide the follower knob to the base of the cartridge body until it locks in position. Insert a strip of nails into the underside hollow of the cartridge with the point of the nails facing forward (see illustration). Press the red button in the centre of the follower knob, it will automatically spring up and hold the strip in position.<br>Take a gas cylinder and remove its top protective cover and refit the dosage valve to the cylinder. Open the cylinder compartment cover on the tool (see illustration) and make sure the colour on the dosage valve corresponds with the colour of the inlet port. Insert the cylinder, aligning the dosage valve outlet tube with the inlet port and close the compartment cover:<br>Next, insert a fully charged battery into the base of the tools handle until it is secured by the catch.<br>To operate the strip nailer, ensure the safety tip is in contact with the fixing surface and that the safety tip is furry depressed, and then simply squeeze the trigger.<br><br>BRAD NAILER...<br>To fit the brad nailer with the appropriate brad nails, slide the follower knob to the base of the cartridge body until it locks in position. Insert up to a maximum of 2 strips of brad nails into the rear hollow of the cartridge with the point of the nails<br>Facing forward (see illustration). Press the spring release fever and the follower will automatically spring up and hold the strip in position.<br>Take a gas cylinder and remove its top protective cover and refit the dosage valve to the cylinder. Open the cylinder compartment cover on the tool (see illustration) and make sure the colour on the dosage valve corresponds with the colour of the inlet port. Insert the cylinder, aligning the dosage valve outlet tube with the inlet port and close the compartment cover.<br>Next insert a fully charged battery into the base of the tools handle until it is secured by the catch.<br>To operate the brad nailer, ensure the safety tip is in contact with the fixing surface and that the safety tip is fully depressed, and then simply squeeze the trigger.<br><br> BASIC TECHNIQUES<br>The nailers are fitted with a safety tip, if this tip is not depressed by the fixing surface, the trigger is inoperable.<br>When in use, do not bump the tools nose too hard. You need apply only just enough force to depress the safety tip.
-
Nibbler
-
• Only competent and trained persons to use a nibbler. Familarise yourself with the equipment
• Before use check that the punch and die are correctly fitted and not badly worn. Use the correct punch and die.
Use cutting oil to make the cut easier and prolong the life of the punch and die
• Check that all tools used for adjustment are removed from the work area
• Test the nibbler , holding away from the body and others
• If using a plugin nibbler ensure the cable is long enough and check the cord is free from damage
• Make sure the object to be cut is secure
• Maintain a steady pressure
• Do not block the vents -
Personal Protective Equipment
• One of the best safeguards against injury is wearing the proper protective equipment. This includes:
• Hearing protection
•. Eye protection (enclosed goggles)
• Gloves
. Protective boots with safety toecaps, high ankle, lace up boots with good tread -
• Always use two hands to grip and guide the nibbler,
Noise sound pressure83 dB(A)
Noise sound power94 dB(A)
Noise K factor3 dB(A)
Input wattage 550 w
Vibration K factor1.5 m/sec²
Vibration: Cutting Sheet Metal7.5 m/sec²
DO NOT USE Ffor more than 2hrs per 8 hrs -
Monitor your time using this piece of equipment as you will need to put in additional control measures if you are likely to come close to or exceed the 2hrs per day.
-
-
-
-
-
-
-
-
-
• Ply – 2400x1220mm will be used to support under the exisitng roof – the sheets will be held in place with acro props. These will be positioned to create a safe fall protection platform. <br>• This platform is not to work from but to acts a collective fall protection measure. <br>Load bearing:<br>• Calculations should always be checked in consultation with a relevant professional, such as a structural engineer or architect. Calculations must also account for changing weight factors, such as footfall across the floor above the support. This is particularly important on construction sites where several individuals, plus heavy tools may frequently be on the floor above.<br>• Using the correct length prop for the project – making up any gap with timber is unsafe and an incorrect way to use Acrow Props.<br>• Supporting all overhead loads before anything is removed <br>Siting and installation:<br>• As Acrow props offer overhead support by standing firm below, it’s essential to check that the points of contact for the prop are fit for purpose before setting up the Acrow prop. The ground, wall masonry and roof / ceiling timbers must be:<br>• In good condition and stable: remedial work should be carried out first if necessary, before Acrow Props are installed.<br>• Fully level, so that load weight is distributed evenly.<br>• Additionally supported with sole boards for the base-plate to rest on.<br>• Checked to ensure the upper surface will not collapse or give way when the prop takes the weight.<br>• Additionally, props should be positioned carefully and installed properly to prevent them from being knocked or displaced. Acrow props should always be installed vertically (with a difference of no more than .5o off vertical line).<br>Work in progress:<br>• Once installed, props need to be checked regularly throughout use to ensure they have not become loose over the course of the work, as props can be particularly vulnerable whilst the wall is being opened up. At the very least, props should be checked by project workers before starting work and again at the end of each work session and also be inspected thoroughly by a competent professional at least once weekly.<br>• As work progresses, continue to be aware of the safe working load for the relevant size prop. This load should not be exceeded and it’s important to be aware of how this load may change as phases of work progress.<br>• At all stages, including installation and use, additional safety equipment such as hard hats and safety gloves should be used when working with Acrow Props. Electrical cables or lighting should not be added to the props.<br>
-
Scraper
-
• Wear gloves when using the scraper to avoid bruising and grazes to hands
•Check the scraper before use, check it is not warped or damaged.
•Check the scraper before use, check it is not warped or damaged.
• Clean trhough out the works and at the end of each day/use. Do not let substances harden on the blade as this will effect its use.
• Keep the edge clean and sharp to ensure ease of use -
Knives and Blades
-
Use of Knives
• Check the blade is sharp and can cut cleanly.
• Blades are replaced regularly, before they become blunt, to reduce the need for excessive force to be applied.
• Wear cut resistant gloves to a level 3 or higher
• Dispose of damaged or blunt blades immediately.
• Operatives are trained to use knives safely by cutting away from themselves.
• Only cut material that is suitable to be cut with a knife, you should not be using excesses force to get a knife to cut.
• Retractable bladed knives to be used where possible -
Security
• Operatives have been instructed not to leave knives lying around when not in use.
• Each operative is to be provided with a holster that completely encloses the blade and which allows the knife to be carried on the operative’s belt if they require to move around the work area with it.
• Check the work area when leaving for breaks and at the end of each day
• Report any missing possibly stolen knives to the SRG Manager and Police immediately -
• Only competent and trained persons to change blades
• Always wear gloves when removing or fitting the blade
• Caution should be taken as parts can become hot
•. Remove battery or unplug before changing the blade
• Check the blade is fitted properly -
-
-
-
LPG-Long and short arm Gas gun
• Only competent and trained operatives to use any kind of heat gun
• Prior to use the operatives should familiarise themselves with the manufacturer’s instructions
• Wear long sleeved tops and trousers (no shorts when using heat gun)
• Wear gloves and eye protection. Tie long hair back and makes sure your clothing is not able to become snagged or ignited
• Clear the work area of trip hazards
• Position the LPG cylinder close enough for the hose to reach without putting it under strain
• Ensure the cylinder cannot fall over. It should always be on firm and level ground
• Only ever ignite gun when facing away from yourself and others
• Only every use in open air and never use in a confined space
• Always switch off the gas gun and isolate before cleaning, making adjustments or when leaving unattended
• Carefully inspect the equipment before use
• Close the gas control and open the cylinder valve, light a taper and hold approx. 50mm from torch burner
• Always turn the gas off of when not in use
• Never leave the gas gun attended
• Once works have finished turn off the gas cylinder and wait for everything to cool down before clearing away
• Disconnect the regulator from the LPG Cylinder and replace the protective plug and cap -
•. Hoses have a 5 year life and will be date stamped
•. Check the dates prior to use. If the dates are not visible ensure the equipment is thoroughly visually checked prior to use
•. Flash back arrestors should be fitted to the regulator (This is not a general requirement but some Principal contractors may request this) -
Attaching the Cyclinder
•. The regulator has a left hand male thread which fits directly to the cylinders valve
•. To fit the regulator, firstly check that the cylinder’s valve is closed (turn clockwise) then remove the plastic plug from the cylinder valve (left hand thread, turn clockwise to release) and the plastic protective cap from the regulator
•. Check the contact surface of the regulator for scratches and general damage. The surface must be clean, dry and undamaged
•. Insert the regulator into the cylinder valve and turn anticlockwise
•. Use the spanner provided to firmly tighten the connection.
•. The cylinder is designed for use in an upright position and must not be placed on its side
•. Check fittings with a leak detection fluid -
Handling and Use
•. Wear correct PPE. Gloves and safety glasses should be worn. LPG can be very cold and cause cold burns
•. Keep LPG Cylinders away from open drains as if there is a leak the gas will sink down into the drains.
•. Always check the equipment for leaks
•. Never smoke near an LPG Cylinder and always stop others from doing so.
•. Never attempt to re-fill a cylinder
•. If you or your clothes become contaminated with LPG wash clothes immediately and was off with clean soap and water -
Storage
•. Cylinders may only be stored in a lockable gas cage and it must be signed
•. Store at least 3m from a drain
•. Store separately from corrosive, explosive, flammable materials and fuels
•. Must be stored upright with valves closed and with plastic plug fitted (propane)
•. Take care when handling cylinders and roll rather than lift where possible
•. Chain or otherwise secure loose gas cylinders.
•. Gas bottles to be checked for damage when delivered, and damaged cylinders to be returned
•. No smoking policy in area of storage -
Frosting on cylinders
•. This usually occurs when the equipment being fuelled consumes more gas then the cylinder can supply.
"•. To avoid frosting connect two or more cylinders in line with suitable connectors and tails.
A small frosting can often occur and can be due to atmospheric conditions "
•. Never apply heat to the cylinders
•. Always wear gloves when handling frosted cylinders -
Permits
•. A powder fire extinguisher should be within 1 meter of the gas bottle and another should be located near the area of gas use.
•. A Hotworks permit will be completed prior to any LPG works taking place. All conditions of the HWP must be met before the works start. -
Use of naked flame
•. Wear correct PPE, Hard hat, perfect fit gloves, Long trousers, steel toe capped boots and hi Vis vests, long sleeves & safety glasses will also be worn as a minimum when using the materials noted above.
•. Keep work areas clean and tidy clear all flammable materials to skips.
•. Use dry powder fire extinguishers for melting plant. Do not use water as material can be violently expelled.
•. Fire extinguisher to be no more than 1 m from naked flame
•. Keep LPG at least 3 meters from any naked flame.
•. Follow site hot works permit system.
•. All LPG bottles are to be disconnected from melting plant when not in use and stored in a secure cage.
•. Contain spillage of material using sand or earth. In case of LPG spillages extinguish all ignition sources immediately if indoors evacuate area and call fire brigade
•. If hot material contacts skin use copious amounts of cool water, seek medical advice
•. Report all injuries into site accident book immediately
•. Training to be carried out (Tool-Box).
•. Barriers & signage provided for segregation where required
•. Provide first aid and burns KIT -
-
Petrol Disc Cutter
-
GENERATING HEAT
•. The blade rotates at speeds that can generate heat which and sparks which could ignite other materials.
•.Hotworks permits are required for using abrasive wheels and fire extinguishers are required to be 1m from the point of use
• 1 or 2 hour fire watch will be completed when the hotworks finish. The watcher must be able to see the work area at all times during this period. -
Prior to use
• Check the equipment before use and ensure it is serviced and maintained
•. Ensure the correct blade is fitted for the task. Using the wrong blade puts you are serious risk of harm. Remember your training
•. Diamond Blades (dry or wet cutting) – for cutting surfacing, stone and masonry. Certain diamond blades are specialised for cutting differing types of material. Check if dry or wet cutting (wet cutting not to be used on electric grinders.
• Stone Cutting Blades – only to be used for cutting stone based materials. If prolonged usage is expected use diamond blades.
• Steel Cutting Blades – only to be used for cutting steel
• Always check the RPM stated on the disc matched the RPM stated on the disc cutter.
• Check the guard is in place. NEVER operate without a guard or with a faulty guard. Never remove the guard -
First use of/ new make or model
• Read the owner's manual before operating a disc cutter/grinder for the first time. Note the safety practices.
Do not use a disc cutter for longer than the HAV assessment states. Share the work if prolonged usage is anticipated. -
Personal Protective Equipment
• One of the best safeguards against injury is wearing the proper protective equipment. This includes:
• Hearing protection
•. Eye protection (enclosed goggles)
• Gloves
. Protective boots with safety toecaps, high ankle, lace up boots with good tread
• Type FFP3 dust mask -
Starting the Cutter
• Move away from the fuelling area.
• Place the saw in a clear, debris-free area.
• Hold the saw firmly on the ground by putting your foot through the rear handle (if possible) and by holding it down with one hand on the top handle. Pull the starter cord with the other hand. The chain should not be moving while the saw is idling.
• Never start the saw while holding it off the ground, or by "drop starting" it. -
Fuel and Storage
•. Disc cutters run on an oil and petrol fuel mixture. Use the fuel mix recommended by the manufacturer
• Avoid fuelling a hot disc cutter; let it cool first
• always fuel in a clear area away from debris
• If your fuel can has no spout, use a funnel
•Wipe the disc cutter of any spilled fuel after fuelling. Never smoke while fuelling.
•. When putting the saw away, clean out any accumulated debris, check the air filter (clean if required), and check the blade (replace with a new if worn). -
Lifting
-
-
-
-
-
-
Telehandler
-
User Checks
• Daily user checks must be performed before any Telehandler is used.
•Any visual signs of damage must be noted down and any faulty equipment must not be used. user checks to be carried out to ensure equipment is fully safe to operate. -
Moving and lifting
• Establish Telehandler only zones.
• Establish safe lifting zones - the area under the lift area must be physically barriered off.
• Zones to be explained at induction program. -
• Ensure that load is within Telehandler’s capacity.
• Ensur that the manual is available, these can be downloaded from most of the manufacturers websites.
• Read the details regarding the lifting capacities.
• Check that the alarm is working
• Check the operating angles
• Telehandler not to be operated across inclines. -
Contact with overhead lines
• Work areas are to be assessed to ensure that no overhead lines.
• If there are any over head lines - STOP until you have established safe clearance distances -
Electric
• Ensure fire extinguisher is placed at charge point and that power isolator is clearly marked. -
"• Telehandler is to remain in work area.
• All operatives to wear high vis
• Telehandler is to be stopped if pedestrians in vicinity."
• Telehandler must remain within the speed limits 5mph This will be discussed during the induction
• Do not use the Telehandlers for carrying or lifting people under any circumstances.
• Operator must ensure that forks are in the low travel position at all times.
• Ensure forks are dry and not slippery with rain.
• Operator to drive with load tilted and snug against mast.
• Ensure to check that load is properly packaged and that it is not overloaded.
Delivery of load
• Telehandler must be stationary when load is being raised. Load must be tilted. When at correct height, load must be positioned safely."
"Reversing
• Operator must look behind before reversing and must ensure that the forks do not foul the load."
Travelling
• Forks must be in travelling position before moving Telehandler.
Stop Telehandler if pedestrians in vicinity."
"Unauthorised Use
• Forks must be flat to the ground and key must be removed and retained by operator."
"Connect charger and check operation.
• Always connect / disconnect with the power off. If fire occurs when power is reapplied then isolate immediately. Ensure bay is clear of flammables."
"Refilling Diesel
• . Never leave the Telehandler unattended while filling up with diesel. Any spillages must be cleaned immediately but cannot be put into a normal skip- it is classed as hazardous waste. It must be discarded separately from normal waste.
•. Never smoke around/ near to a Telehandler being refilled. Ensure the area is clear of any flammables."
Never smoke around/ near to a Telehandler being refilled. Ensure the area is clear of any flammables. -
Add media
-
-
-
Roof Type
-
Add media


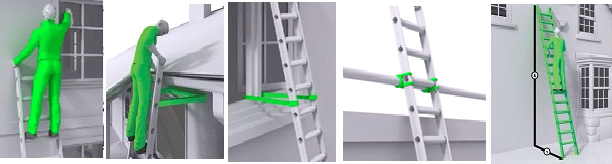


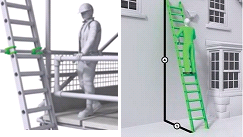

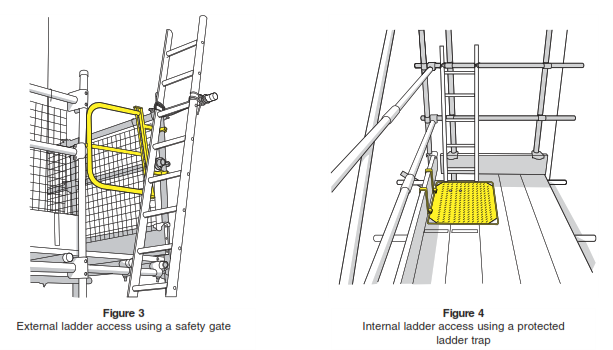

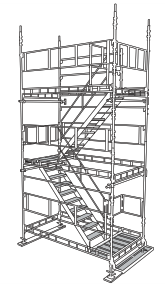


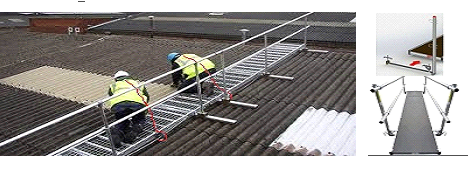
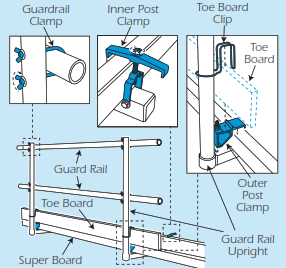
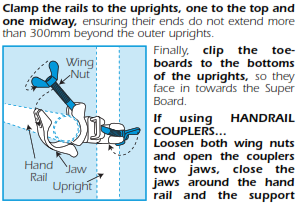
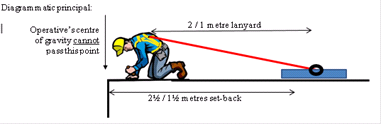
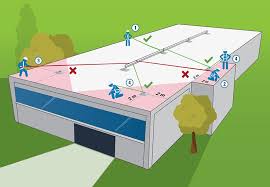


")

