Information
Service to 27 SUSSEX ST Owners FAYE and KLEO Dog is RUBY Daughter NICOLETTA Sons ANTHONY (elder) and DION
-
Conducted on
STARTERS
The Basics
-
Employee (if more personnel present add in notes)
-
Date
-
Time Started
Setup
-
Arriving before midday? First light won't start to come on till then. For some working light change the time of the light controllers (mounted on top right wall above tank). Move to 16:00 for low general. For 100% brightness change times to 18:00. Tip: though for LOOKING FOR ALGAE on the walls it's best to have LIGHTS OFF
-
Lay down drop sheets ESPECIALLY WHEN WORKING IN LOUNGE ROOM SIDE
-
Lift LIGHT UNITS up for working space. If doing large work (plant removals and other potentially messy things) lay down canvas drop sheet (folded in half, length ways) along the front of the tank)
Observations
FISH
-
Photos Before. 1-2 OVERALL. 2-3 CLOSEUPS on PLANTS
-
Peruvian Altum Angels (7) and Harlequin Rasboras (~50) Rummy-nose Tetras (30)
- Great; vibrant, eager for food
- some individuals not right.
- sulky, sluggish, isolated from group
- dead fish, cloudy stinky water
-
Take photos of individuals and check for CAUSES. Questions: 1. Is it just an individual or are many affected? 2. Check for uneaten food, levels of ammonia or nitrite. 3. Filter or heater stopped or malfunctioning?
-
Anything on BODY? <br>WHITE SPOTS?<br>FUNGUS?<br>WOUNDS?
-
Take PHOTO of cases and NOTE down details.
-
Plan for LARGE WATER CHANGE (75-90%) with thorough GRAVEL VAC. Use STRESS COAT and BLUE SALTS to guard against chlorine and infection.
-
CONTACT BRUCE IMMEDIATELY
-
Take PHOTO where possible and NOTE down details.
-
Looking good? Place a pinch of Tetrabits or a block of FROZEN FOOD in and observe how they eat.
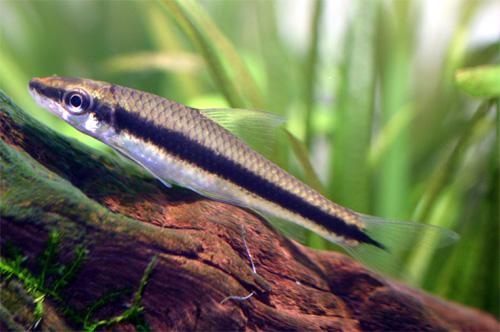
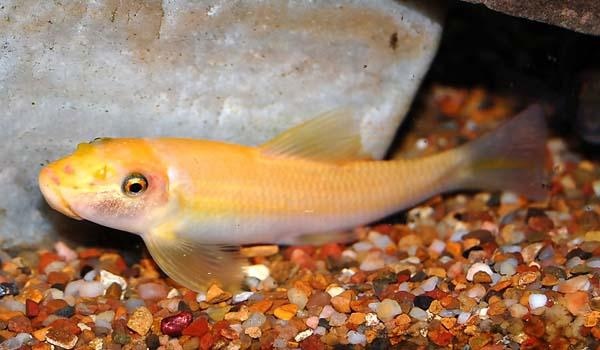
The Workers: SUCKING CATS & FLYING FOXES
-
SUCKING CAT/s sighted? (1-2)
-
SIAMESE FLYING FOX/es sighted? (2-3)
-
How's the algae levels on GLASS & PLANTS?
- Lots of soft brown/green dust everywhere
- Very clear. A few spots on glass and old leaves
- Furry black algae growing on old leaves, pump, glass
- heavy with dark green spots on glass
- dark green algae all over rocks
-
This is an indication that there are no or low numbers of SIAMESE FLYING FOX. Mention in notes.
-
Remove as much as possible, prune old affected leaves off plants. Vacuum up loose pieces from after cleaning glass
-
This is possibly an indication that there are no SUCKING CATS. Mention in notes.
-
Check nitrate and phosphate levels.
-
Plan for an "Adrian Special"; BEFORE draining, turn OFF pumps, scrape all of every glass surface and carefully brush clean all rocks Then drain 80% water.
PLANTS
-
PLANTS PHOTO GALLERY (tap to open)
-
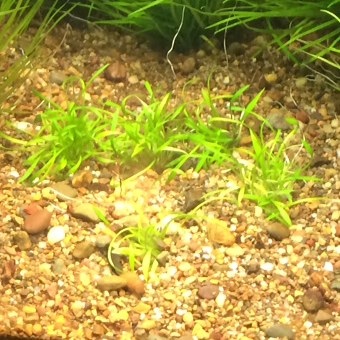
STAURAGYNE. (Tap for picture)
-
STAURAGYNE REPENS
-
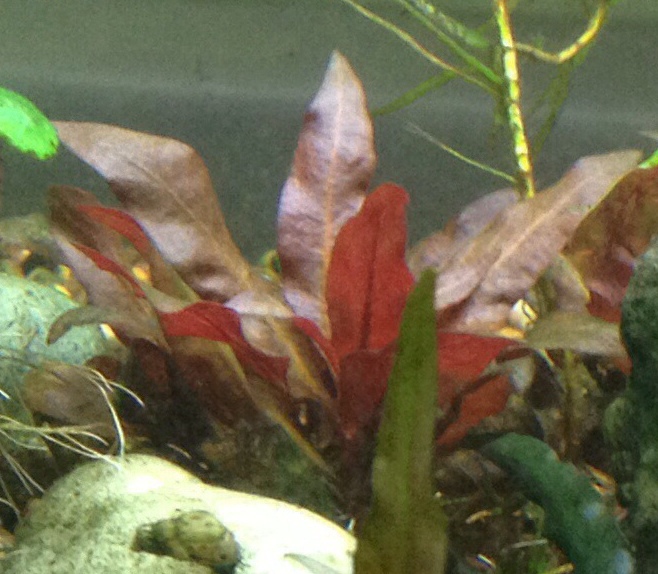
CRYPTS PARVA (tap for picture)
-
CRYPTS PARVA
-
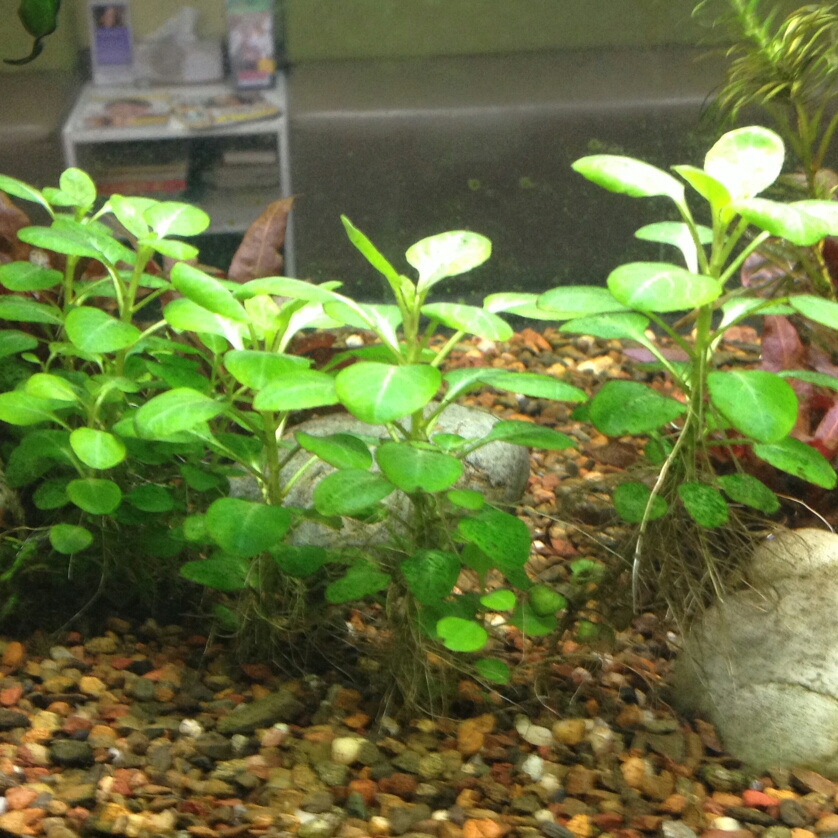
LOBELIA (Tap for picture)
-
LOBELIA
-
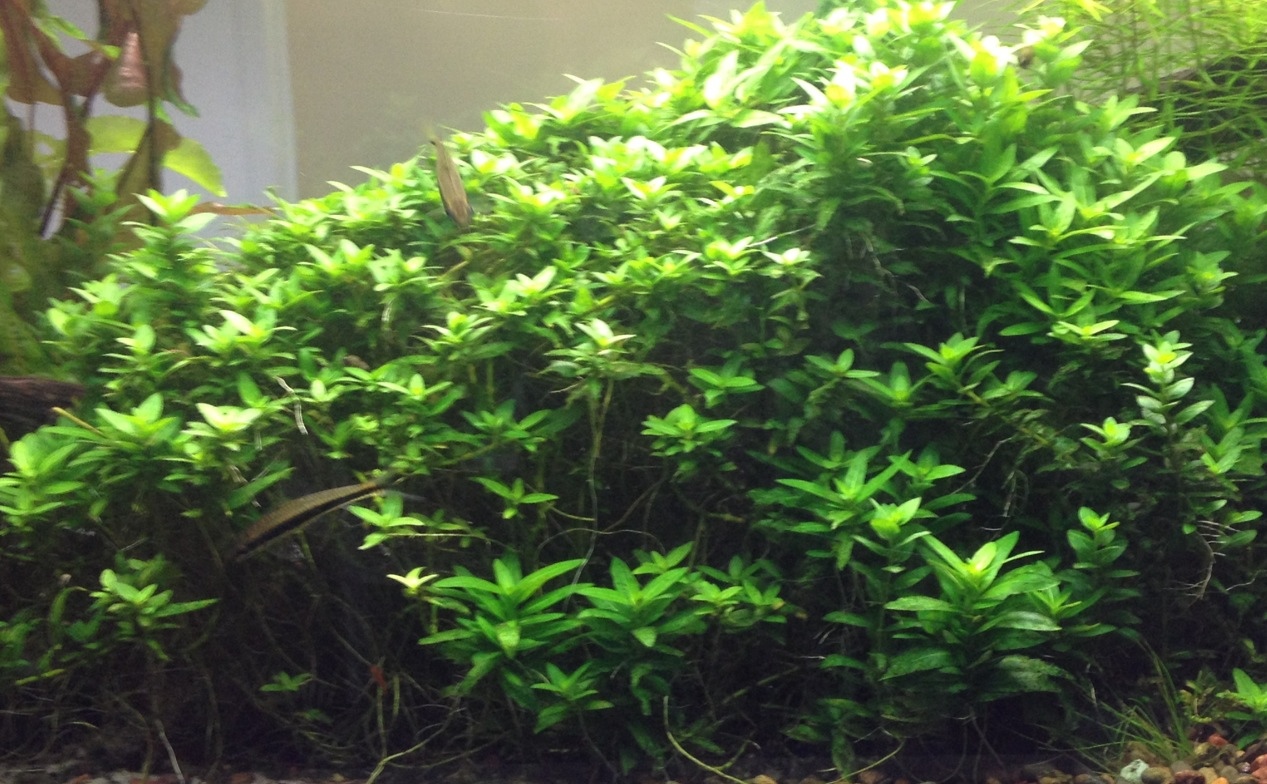
ALTERANTHERA. (Tap for picture)
-
ALTERANTHERA
-
BLYXA
-
BLYXA
-
How are the CRYPTS PARVA looking?
- shiny healthy deep green and strong new leaves,
- old leaves ageing well, minimum algae spots
- new leaves smaller than the older
- lots of algae spots on leaves
- deformed twisted leaves
- leaves weak and floppy, older leaves. spread out,
- prematurely aging, discoloured leaves
-
How is the STAURAGYNE looking?
- good. healthy bright green star-shaped new growth
- new and old growth nibbled
- poor. old growth dark and nibbled and new growth small, slow, stunted
- curled/deformed new growth
-
How is the ALTERANTHERA looking?
- good. healthy bright green star-shaped new growth
- new and old growth nibbled
- poor. old growth dark and nibbled and new growth small, slow, stunted
- curled/deformed new growth
-
Great. Prune any healthy taller stems and replant to improve coverage of ground.
-
How is LOBELIA looking?
- new growth, large and healthy green
- new leaves smaller than previous.
- old growth remaining healthy, ageing slowly
- old leaves prematurely ageing, falling off, leaving bare base stalk
- algae spots on old leaves
- leaves deformed and twisted
- stems getting a little high
-
CUT approx in half and, If healthy, reduce HEADLESS STALK by a further 50% and replant heads on front to hide the stalk.
-
Great. Be sure to SHORTEN DOWN any that are getting too close to the tall
CO2 SYSTEM. To test before 2:15 pm when it is programmed to come on, switch main POWERBOARD to MAN. This will turn the CO2. DON'T FORGET TO RETURN IT TO AUTO!!!
-
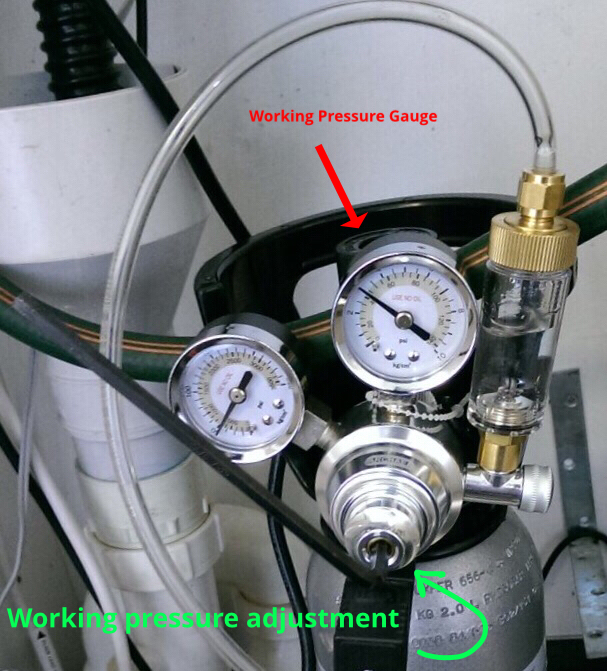
WORKING PRESSURE
This is the right hand gauge on the regulator assembly.
This helps stability bubble rate and its adjustment
Ideal around 3-5 PSI
Adjustment with Alan Key (on floor of cupboard) in centre of regulator -
WORKING PRESSURE LEVELS OK? <br>
-
If the WORKING PRESSURE is not high enough then opening up the the fine adjustment valve may not work to increase the bubble rate: use Alan Key to turn adjustment bolt clockwise. Watch to see if this increases the bubble rate and/or how much gas is diffusing through the stone inside the tank.
-
If the WORKING PRESSURE is TOO HIGH then the fine adjustment valve may be too touchy to refine the bubble rate (either too fast or nothing at all). In this case use Alan Key to turn adjustment bolt anti-clockwise to reduce the working pressure
-
With this high pressure system a BUBBLE RATE of around 1-2 bubbles per second is sufficient
-
Bottle empty? Or out of programmed time? Or some other issue?
-
Change over bottle. Should be another large one in cupboard
-
DECREASE by turning the INLINE FINE ADJUSTMENT on the WHITE PRESSURE VALVE ASSEMBLY anti-clockwise (NB this is counterintuitive and opposite to the main regulator fine adjustment valve. Can use a key to turn )
-
INCREASE by turning the INLINE FINE ADJUSTMENT on the PRESSURE VALVE ASSEMBLY clockwise (NB this is counterintuitive and opposite to the main regulator fine adjustment valve. Can use a key to turn )
-
If opening up the the fine adjustment valve doesn't work to INCREASE IT then it maybe the bottle is low so replace. Disconnect and install spare bottle in cupboard and make follow up field for Bruce to order a new bottle
-
Fine effervescence coming out in DIFFUSER STONE (at base of rocks RHS) ?
-
Plan for a Service to REPLACE DIFFUSER STONE. Instructions in service page
Tests part 1
Tests part 1
-
TEMPERATURE test (ideal 27 - 28.5 C)
-
Has the auto after change happened recently? (Check Galcon solenoid program: scroll with MODE button to see programmed days and time)
-
This definitely will have cooled the tank down and so the most likely explanation for this. If it was just done for example a temp reading of 24 would be normal, even 23 in the winter months. If even lower then consult Bruce
-
A bit too cool. Are INLINE HEATERS functioning/plugged in? (2 on right filter, 1 on left)
-
Unplug faulty unit. Notify Bruce to arrange replacement. Increase remaining units a little.
-
Increase THERMOSTAT on the heater whose thermostat is switching off at a lower temp by the SUITABLE AMOUNT to bring it up within the range (see above) and make note of how much.
-
Increased THERMOSTAT by:
-
too warm. Are THERMOSTATS on heaters functioning? <br>(Does the indicator light come on and off when you turn the thermostat setting up and down?)
-
Decrease THERMOSTAT (anticlockwise) on the highest set heater by the SUITABLE AMOUNT to bring it down within the range (see above) and note by how much.
-
Decreased THERMOSTAT by:
-
if the THERMOSTAT doesn't respond to being turned down then better to have a cool tank than risking cooking the fish. Unplug faulty unit. Notify Bruce to arrange replacement.
-
Good. Refill with HEATER or KETTLES OF BOILED WATER (boiling water tap in kitchen) in COLD months.
-
Rinse 4 TEST VIALS in tank water: pH (square vial) and GH (large round vial) NITRATE & PHOS (small glass) MEASURE 5ml in each and SET ASIDE for later. Tip: use SQUARE VIAL or a SYRINGE to measure an accurate 5ml for the GH.
The Drain
The Drain (50%)
GRAVEL VACUUM (only for special occasions.) NB: if plants are doing well, then leave.
-
Gravel vacuum?
-
How dirty was it?
FAST DRAIN
-
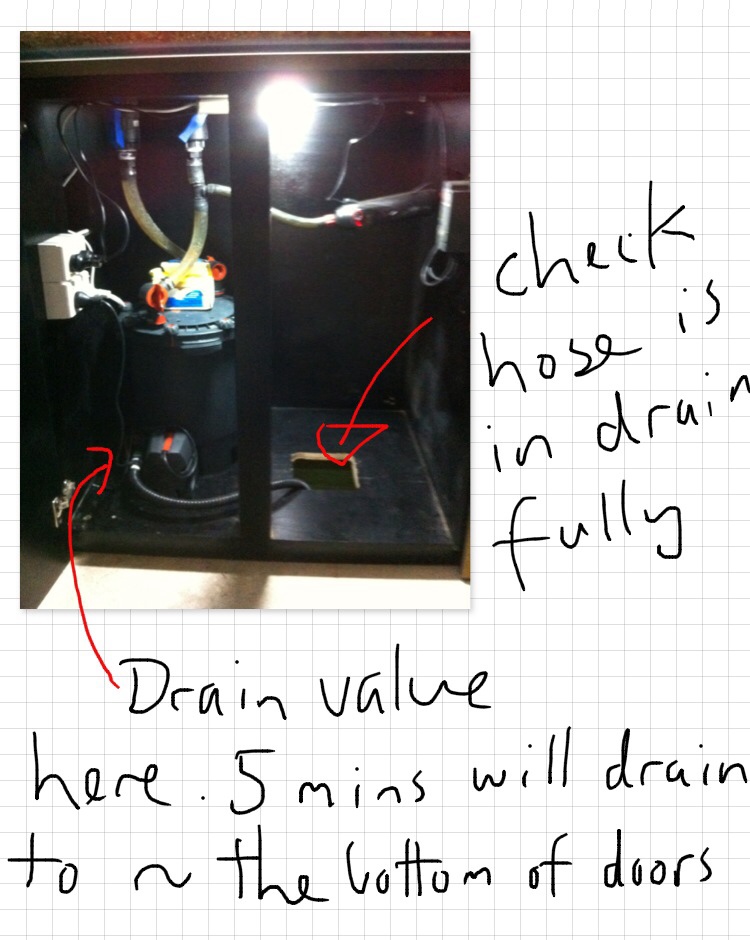
Open DRAIN VALVE (pic below) NB set timer for about 5-10 mins. Its easy to get distracted with other things and forget! MAKE SURE YOU CLOSE IT PROPERLY AT END. IF UNSURE, LIFT HISE OUT OF DRAIN TO CONFIRM IT HAS STOPPED!
-
Drain Valve diagram
-
The Refill
The Refill
-
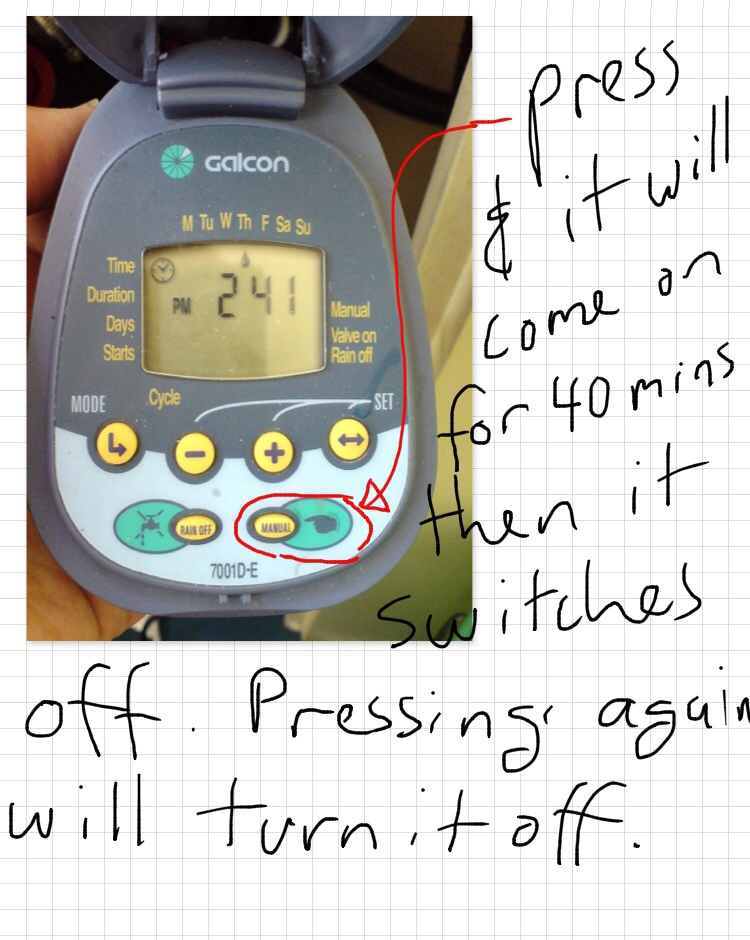
Press manual button (finger symbol) on GALCON controller. See pic below. NB check on again later. It will probably need another go as 40 mins may not be enough. TIPP: if it is only 5 -10 mins remaining on the timer then you can stop and restart to bring up another 40 mins.
-
MANUAL SETTING ON CONTROLLER diagram ==>
-
CONTROLLER MANUAL TIMED REFILL
-
SOUP HEATER in COLD months or in large water changes. REMEMBER: always plug into WALL OUTLET. Mount so the heating element hangs in the middle OPEN SPACE, away from glass and plants if possible
Things To Do During Refill
-
CLEAN GLASS; easiest at LOW WATER LEVELS. SOFT ALGAE lightly with MAGNET CLEANER (MAKE SURE BOTH SIDES ARE SUPER CLEAN FIRST!!). Even if you can't see any, best to do a light pass over the whole thing. DARK GREEN spots: best with SCRAPER.
-
Work on PLANTS
-
FILTER SERVICE?
-
Which one?
-
Tap here for instructions ====>
-
INSTRUCTIONS: UNDER CONSTRUCTION.
-
CO₂ diffuser stone need replacing?
-
Tap here for instructions
-
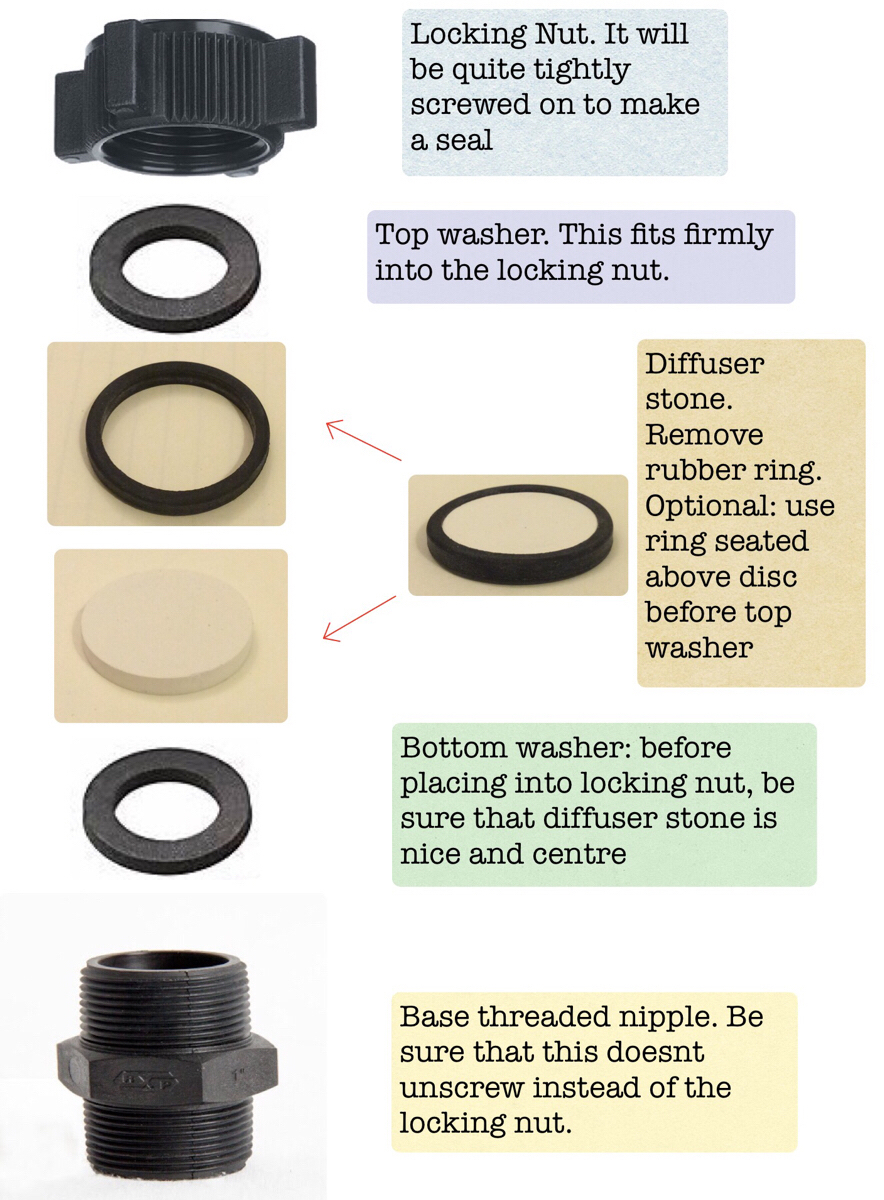
CO₂ diffuser assembly
-
Turn off CO₂
-
Unscrew Locking Nut. Note: this will be very tight. The base threaded nipple may decide to turn instead so you may need a second hand to stop it turning
-
The whole assembly down to the bottom washer should come out together. Remover the bottom washer and the old diffuser stone
-
Open new DIFFUSER STONE and remove OUTER RUBBER RING. (Pic above mentions using this as additional seal but here we will just leave the upper part of the assembly untouched)
-
Use brush or finger to clean out top washer a little under hot water but best to otherwise not disturb it.
-
Place new stone in centre of TOP WASHER and re-seat rinsed (in hot water) BOTTOM WASHER to lock the diffuser disc into position.
-
Carefully screw the WHOLE ASSEMBLY back onto the MALE THREADED BASE. For now just turn it up moderately firm. We'll probably need to tighten further but for now that will do.
-
Turn on the CO₂. Don't be surprised if there is big bubbles escaping out of the sides of the assembly. If it is excessively fast then, depending on where it's coming out of, we may need to check the stone is centre. In which case turn of CO₂ and repeat the above.
-
With CO₂ still on, tighten the locking nut in small increments, being careful not to crack the stone. Some big bubbles forming slowly on the edges of the stone is ok. As long as no gas coming from under the locking nut.
Tests (continued)
-
pH Test? 3 drops in 5ml. (ideal pre CO2 range 6.5-7)
-
ADD approx 2 tsp CORAL SAND.
-
ADD approx 3 tsp CORAL SAND
-
ADD approx 4 tsp CORAL SAND
-
Most likely this is the due to the rocks<br>Has the CO2 been on for a while?
-
CO2 will reduce the pH so if its still high then perhaps a contaminated vial. Rinse test tube thoroughly and retest. (Any traces of ammonia or GH tester solution will give a false alkaline reading)
-
WOAH! Unlikely! Rinse test tube thoroughly and retest. (Any traces of AMMONIA TEST or GH TEST solutions will give a false alkaline reading) If still high then we must assume that there has been an excess amount of coral sand and all we can do is water change. It will eventually come down as the coral sand dissolves.
-
GH TEST. number of drops to turn from ORANGE to GREEN
-
SIZE of water change:
-
ADD 1 Measure spoon GH POWDER
-
ADD 2 Measure spoon GH POWDER
-
SIZE of water change:
-
ADD up to 1 Measure spoon GH POWDER
-
ADD up to 2 Measure spoons GH POWDER
-
ADD up to 3 Measure spoons GH POWDER
-
Depending on SIZE of WATER CHANGE, add NO SALTS and let WC reduce the GH to within desired range
-
NITRATE TEST
-
Depending on state of plants, this is POSSIBLY grounds for increase in NITROGEN dose. Contact Bruce for further instructions.
-
GENERALLY this is the OPTIMUM RANGE. HOWEVER if there is POOR PLANT GROWTH observed then possibly means therefore not enough K and thus they are being starved. Contact Bruce for further instructions.
-
Has the COMPLETE dosed already today? Note, this dosing pump is programmed for every TUESDAY <br>If so then this will contribute to a higher nitrate reading
-
Almost certainly and LACK of POTASSIUM and/or OVER DOSE of NITROGEN <br>Are DOSING PUMPS for K and N well primed and unblocked?
-
Done a calibration of the PUMPS recently? (In the last 5months)
-
Look at POTASSIUM dose. Consult Bruce
-
Do a manual dose of 10ml of NITROGEN while holding a test vial underneath. <br>Did it dose the correct volume?
-
Has it been over-dosing or under-dosing?
-
OVER-DOSING by how much?
-
Perform a calibration of all three pumps
-
UNDER-DOSING by how much?
-
Perform a calibration of all three pumps
-
Look at increasing POTASSIUM dose. Consult Bruce
-
Look at increasing POTASSIUM dose. Consult Bruce
-
Give details of problem
-
If after fixing the problem, you're not convinced this was sufficiently causing problems in dosing of any ferts then CONTACT Bruce to discuss.
-
PHOSPHATE TEST
-
GENERALLY this is the OPTIMUM RANGE. Some say 1/10th of the nitrate level. HOWEVER if there is POOR PLANT GROWTH observed then possibly means therefore not enough K and thus they are being starved. Contact Bruce for further instructions.
-
Only phosphate source here is the fish food. Perhaps an increase in K dose will help. Make follow up note and discuss with Bruce later
-
Is there premature aging/falling off of leaves on any of the plants?
-
Only phosphate source here is the fish food. Perhaps a manual liquid dose or increase in feeding . Make follow up note and discuss with Bruce later
-
Then don't worry about it. Enjoy algae-free aquarium maintenance!
Additives
-
GH UP POWDER ADDED?
-
How many measured spoons?
-
Coral sand added? (Low pH)
-
How many teaspoons?
DOSING PUMPS. Only COMPLETE & POTASSIUM in operation
"COMPLETE"
-
Any AIRLOCKS to bleed out?
TEST THE LINE
-
Be sure to use a CONTAINER (GH test vial eg.) to catch the liquid while priming the line.
-
TEST LINES; Manual Dose ==> press BUTTON to the RIGHT OF EACH PUMP HEAD Only do as much as a couple of drops. Extra doses of Basic-gro is ok in small amounts.
-
Liquid moving through the line?
-
Is the SUCTION LINE immersed in the liquid?
-
Is it an OBSTRUCTION in the line caused by oxidised minerals from the liquid?
-
Remove SUCTION LINE from PUMP HEAD and WASH in hot water, massage or blow out the blockage and RE-ATTACH to PUMP HEAD.
-
WASH OUT the supply bottle. If there is reasonable amount of liquid still in it then gently DECANTER the clear liquid into a second container. As soon as it is no longer clear STOP (in the case of DAILY-GRO it goes from tea coloured to thick brown). WASH OUT SLUDGE and return the clear liquid to the bottle.
-
Where and how big was the airlock in the COMPLETE line?
PRIME/BLEED THE LINE
-
Be sure to use a CONTAINER (GH test vial eg.) to catch the liquid while priming the line.
-
TEST LINES; Manual Dose ==> press BUTTON to the RIGHT OF EACH PUMP HEAD Only do as much as a couple of drops. Extra doses of Basic-gro is ok in small amounts.
-
Liquid moving through the line?
-
Is the SUCTION LINE immersed in the liquid?
-
Is it an OBSTRUCTION in the line caused by oxidised minerals from the liquid (typically TRACE & IRON)?
-
Remove SUCTION LINE from PUMP HEAD and WASH in hot water, massage or blow out the blockage and RE-ATTACH to PUMP HEAD.
-
WASH OUT the supply bottle. If there is reasonable amount of liquid still in it then gently DECANTER the clear liquid into a second container. As soon as it is no longer clear STOP (in the case of DAILY-GRO it goes from tea coloured to thick brown). WASH OUT SLUDGE and return the clear liquid to the bottle.
-
Check that the CONNECTIONS between PUMP and FEEDER lines are well secure. If necessary, REMOVE feeder line, snip of tip with scissors and SOAK new tip in hot water to soften and REFIT.
-
Test CHECKVALVE. Blow air thru both ends. Should only let you in one direction. If it flows in both directions (or indeed none!) a paper clip wire or similar lightly poked into the rubber valve from both ends can fix this. Otherwise make note to replace valve.
-
Clean CHECK VALVES/ENDS OF LINES of dried/calcified buildup. They should be just hanging over the SUPPORT STRIP of glass and above the water line.
-
ADJUSTMENT DOSE: has the COMPLETE dosed before the water change?
-
Make ADJUSTMENT DOSE at a % corresponding to size of water change. Eg. 50% water change = 1/2 of programmed dose. It will ask you to confirm.
-
No macros dosed today so no adjustment necessary.
POTASSIUM
-
Any AIRLOCKS to bleed out?
TEST THE LINE
-
TEST LINES; Manual Dose ==> press BUTTON to the RIGHT OF EACH PUMP HEAD As long as not excessive, extra doses of K is ok
-
Liquid moving through the line?
-
Is the SUCTION LINE immersed in the liquid?
-
Is it an OBSTRUCTION in the line caused by oxidised minerals from the liquid (typically TRACE & IRON)?
-
Remove SUCTION LINE from PUMP HEAD and WASH in hot water, massage or blow out the blockage and RE-ATTACH to PUMP HEAD.
-
WASH OUT the supply bottle. If there is reasonable amount of liquid still in it then gently DECANTER the clear liquid into a second container. As soon as it is no longer clear STOP (in the case of DAILY-GRO it goes from tea coloured to thick brown). WASH OUT SLUDGE and return the clear liquid to the bottle.
-
Where and how big was the airlock in the POTASSIUM line?
PRIME/BLEED THE LINE
-
TEST LINES; Manual Dose ==> press BUTTON to the RIGHT OF EACH PUMP HEAD As long as not excessive, extra doses of K is ok
-
Liquid moving through the line?
-
Is the SUCTION LINE immersed in the liquid?
-
Is it an OBSTRUCTION in the line caused by oxidised minerals from the liquid (typically DAILY-GRO)?
-
Remove SUCTION LINE from PUMP HEAD and WASH in hot water, massage or blow out the blockage and RE-ATTACH to PUMP HEAD.
-
WASH OUT the supply bottle. If there is reasonable amount of liquid still in it then gently DECANTER the clear liquid into a second container. As soon as it is no longer clear STOP (in the case of DAILY-GRO it goes from tea coloured to thick brown). WASH OUT SLUDGE and return the clear liquid to the bottle.
-
Check that the CONNECTIONS between PUMP and FEEDER lines are well secure. If necessary, REMOVE feeder line, snip of tip with scissors and SOAK new tip in hot water to soften and REFIT.
-
Test CHECKVALVE. Blow air thru both ends. Should only let you in one direction. If it flows in both directions (or indeed none!) a paper clip wire or similar lightly poked into the rubber valve from both ends can fix this. Otherwise make note to replace valve.
-
Clean CHECK VALVES/ENDS OF LINES of dried/calcified buildup. They should be just hanging over the SUPPORT STRIP of glass and above the water line.
Packing up
SUPPLIES; ANY REFILLING TO BE DONE IN SINK OR OUTSIDE!
LIQUID FERTS (Dosing Pump) Currently only running COMPLETE and POTASSIUM
-
COMPLETE FERTILISER. HOW MUCH IS LEFT?
-
THIS IS PROBABLY NOT ENOUGH TO LAST. Change over Bottle with a new 1 litre bottle<br>Use the remainder of the old bottle to top up another time.<br>
-
HOW MANY FULL BOTTLES LEFT?
-
Great. Any empty bottles with some leftovers to top up the current bottle with?
-
POTASSIUM. HOW MUCH IS LEFT IN DOSING BOTTLE?
-
THIS IS PROBABLY NOT ENOUGH TO LAST. Replace with a new 1 litre bottle or top up from left -overs in previously opened bottle
-
HOW MUCH POTASSIUM LEFT IN SUPPLY
-
Great. Any empty bottles with some leftovers to top up the current bottle with?
-
FOOD REPLACE/ REFILL? (Tetrabits, frozen food)
-
WHICH KIND?
- TETRABITS
- DISCUS PELLETS
- FROZEN FOOD
-
Will any need replacing next month?
-
Which kind?
- TETRABITS
- DISCUS PELLETS
- FROZEN FOOD
AUTO FEEDER
-
AUTO FEEDER topped up?<br>Hold finger over opening to prevent food spilling
-
If the barrel is still pretty full then possibly the opening is closed or not open enough.
-
Make sure the opening has not shifted. Run a test feed to check its putting in not too much/too little food
-
Battery ok?
-
Replace batteries (2 x AA, ask Faye), NOTE DOWN PROGRAM TIMES FIRST as you'll lose all info! Call Bruce if Help needed
-
Make note in ACTION here and address to Bruce
-
Replace batteries (2 x AA, ask Faye)<br>Program for 2 single rotations at 15:00 and 21:00.<br>
-
Make note in ACTION here and address to Bruce
-
Feeder Time of day correct?
-
FEED ARROWS showing? <br>Sign that program is activated <br>Down-facing arrows ⬇️ next to program number, 1 per rotation programmed
-
Make ACTION note here for Bruce and activate a conservative setting of: 2 programs with one rotation (one downward ⬇️) per time programmed
-
AUTO FEEDER returned to position and tested?
Equipment Check
-
MOST IMPORTANT: were the lights OFF when you arrived?
-
HAVE YOU OVER-RIDDEN THE LIGHTS (changed the time) TO BE ABLE TO WORK? <br>Lights are programmed to come on around 12.30pm
-
Reset the TIME on CONTROLLER
-
Correct time on SYSTEM controller (mounted on wall below dosing pumps)?
-
Contact Bruce
-
LIGHTS: all LEDS working?
-
Details
-
If you have lifted the LIGHTS then gently lower them back down to the height you found them
-
Notes. Any extra work performed? Any additions of fish? Any questions...?
FINAL CHECKS
-
HEATER and FILTER PUMPS ON and functioning?
-
OUTSIDE GLASS, CABINETRY etc CLEAN & DRY?
-
Finished (or close to) refilling? Check the remaining time on the REFILL TIMER and if more than 5 mins then close off. You can leave it to overflow a little. But we don't want to chill the tank too much
-
POWER BOARD SET TO "AUTO"? This currently only runs the CO₂ and DOSING PUMP
-
MOST IMPORTANT #2: is the DRAIN PROPERLY CLOSED? Check the end of the drain hose to confirm nothing flowing out. The tap should be vertical.
-
WORKLIGHTS IN CUPBOARDS TURNED OFF?
-
Got your: BASKET STRAINER? TOOTH BRUSH? TEASPOON?
-
Photos After. 1 x OVERALL. Both sides, 2 half shots CLOSEUPS of any REARRANGED PLANT.
-
Time Finished


